Transcription
Chapter 6MATLAB GUIMATLAB GUI (G(Graphicalhi l UserUInterface)I t f) TutorialT t i l forf BeginnersB iBy J.S. ParkUniversity of Incheon
Preprocessingpg DataWhy use a GUI in MATLAB?It makes things simple for the end-users of the program.The command line interface Vs. GUI
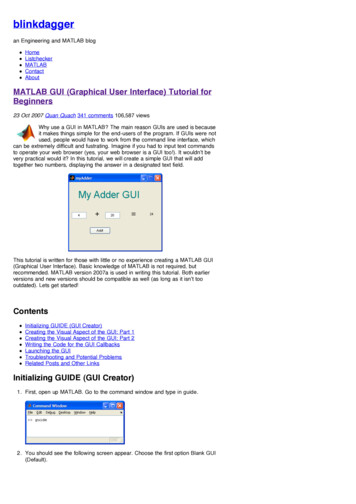
Initializing GUIDE (GUI Creator)1. Open up MATLAB. Go to the command window and type in guide2. Choose the first option Blank GUI (Default)
Initializing GUIDE (GUI Creator)3. You should now see the following screen.
Initializing GUIDE (GUI Creator)4. Before adding components blindly, it is good to have a rough idea about how youwant the graphical part of the GUI to look like.
Creating the Visual Aspect of the GUI: Part 11.For the adder GUI, we will need the following componentsTTwoEdit TextT t componentstFour Static Text componentOne Pushbutton component
Creating the Visual Aspect of the GUI: Part 12. Edit the properties of these components.pYou should see the ppropertyp y Inspector.pDouble click one of the Static Text components.
Creating the Visual Aspect of the GUI: Part 13. Do the same for the next Static Text component, but instead of changing the String parameter to , change it to , and another it to MyAdderGUI.4. For Static Text component 0, modify the Tag parameter to answer staticText.5. You should have something that looks likethe following:
Creating the Visual Aspect of the GUI: Part 21.Modify the Edit Text components. Double click on the first Edit Text component.Set the String parameter to 0Change the Tag parameter to input1 editTextinput1 editText2. The second Edit Text component, set the String parameter to 0Set the Tag parameter input2 editText.
Creating the Visual Aspect of the GUI: Part 23.Modify the pushbutton component.Change the String parameter to Add!Change the Tag parameter to add pushbutton.add pushbutton.
Creating the Visual Aspect of the GUI: Part 24. You should have something like this:You should have something like this:5. Save your GUI under any file name you please. I chose to name mine myAdder.When you save this file, MATLAB automatically generates two files:myAdder.fig and myAdder.m.The .fig file contains the graphics of your interface.The .m file contains all the code for the GUI.
Writing the Code for the GUI Callbacks1.Open up the .m file that was automatically generated when you saved your GUI.2.In the MATLAB editor, click on theicon, which will bring up a list of the functionsp.within the .m file. Select input1 editText Callback
Writing the Code for the GUI Callbacks3. The cursor should take you to the following code block:4. Add the following code to the bottom of that code block:5. Add the same block of code to input2 editText Callback.
Writing the Code for the GUI Callbacks6. Now we need to edit the add pushbutton Callback.Here is the code that we will add to this callback:
Launching the GUI7. There are two ways to launch your GUI.The first way: Press theicon on the GUIDE editor.editorThe second method : Launch the GUI from the MATLAB command prompt.Type in the name of the GUI at the command prompt.
Launching the GUI8. The GUI should start running immediately:
MATLAB GUI Tutorial - SliderIn this Matlab GUI tutorial, you will learn how to create and use the slider component.Sliders are useful controls for choosing a value in a range of values.Common uses are volume controls, seekers for movie and sound files as well as color pickers.An example of a slider is shown below.
Create the Visual Aspect of the GUI1. Open up MATLAB. Go to the command window and type in guide2. Choose the first option Blank GUI (Default)
Create the Visual Aspect of the GUI3. You should now see the following screen.
Creating the Visual Aspect of the GUI: Part 11.For the adder GUI, we will need the following componentsAdd an Edit TextT t componentt tot theth GUI figure.fiAdd a Slider component onto the GUI figure.
Creating the Visual Aspect of the GUI: Part 12. Edit the properties of these components.Double click the Edit Text component to bring up the Property Inspector.ChChangeththe StringSt i propertyt tot 0,0 anddchange the Tag property to sliderValue editText.3. Modify the properties of the Slider component.Sit the Min property to 0, andthe Max property to 100.Change the Tag property to slider1.slider1
Creating the Visual Aspect of the GUI: Part 14. The figure should look like after you add the components and modify them.
Creating the Visual Aspect of the GUI: Part 15. Add some Static Text components to specify the min and max values of the slider.Modify their text by double clicking on the component andchanging the String property.It’s not required, but I highly recommend it.6. Save your GUI wherever you please with your desired filename.
Writing the Code for the GUI Callbacks1.Open up the .m file that was automatically generated when you saved your GUI.2.In the MATLAB editor, click on thewithin the .m file.Select slider1 Callback.icon, which will bring up a list of the functions
Writing the Code for the GUI Callbacks3. Add the following code to the function:
Writing the Code for the GUI Callbacks4. Add the following code to the slider editText Callback function:
Run and Test the GUI11.From the m-filem file editor,editor you can click on the iconto save and run the GUI.GUI2.Alternatively, from the GUIDE editor, you can click on theNow, try to put in different types of inputs to test the GUI.Any input that is not a number, less than zero,or greater than 100 should default the slider to a value of zero.to launch the GUI.
Matlab GUI Tutorial - Pop-up MenuIn this Matlab GUI tutorial, you will learn how to create and use the Pop-up Menu component.Pop-upPopup menus are used as a control for choosing between a set of options.When the user clicks on the Pop-up menu, the menu expands, revealing a set of choicesthat the user can pick.A common use for Pop-up menus is a font size selector (shown below).
Create the Visual Aspect of the GUI1. Open up MATLAB. Go to the command window and type in guide2. Choose the first option Blank GUI (Default)
Create the Visual Aspect of the GUI3. You should now see the following screen.
Creating the Visual Aspect of the GUI: Part 11.For the adder GUI, we will need the following componentsAdd an Edit TextT t componentt tot theth GUI figure.fiAdd a Pop-up Menu component onto the GUI figure.
Creating the Visual Aspect of the GUI: Part 12. Double click the Static Text component to bring up the Property Inspector.g the Stringgppropertyp y to Testing!!!,g andChangechange the Tag property to testing staticText as shown in the figure below:
Creating the Visual Aspect of the GUI: Part 13. Modify the properties of the Pop-up Menu component.gppropertyp y line as shown below.Click on the icon on the String4. After clicking on the icon,you should now see the following window.Fill in the window as shown below:
Creating the Visual Aspect of the GUI: Part 15. The figure should look like after you add the components and modify them.
Creating the Visual Aspect of the GUI: Part 16. Add some Static Text components to add some description tags to the GUI.Modify their text by double clicking on the component andchanging the String property.
Writing the Code for the GUI Callbacks1.Open up the .m file that was automatically generated when you saved your GUI.2.In the MATLAB editor, click on thewithin the .m file.Select popupmenu1 Callback.icon, which will bring up a list of the functions
Writing the Code for the GUI Callbacks3. Add the following code to the function:
Run and Test the GUI11.From the m-filem file editor,editor you can click on the icon2.Alternatively, from the GUIDE editor, you can click on theGo ahead and try selecting different font sizes.to save and run the GUI.GUIto launch the GUI.
MATLAB GUI Tutorial - Plotting Data to AxesIn this Matlab GUI tutorial, you will learn how to create and use the Axes component.The Axes component allows you to display graphics, such as graphs and images on yourGUI.In this tutorial, we will create two axes on the GUI and plot some simple data onto it.In addition, we will include a reset button to clear the axes andwe will also add the standard toolbar to allow the user to zoom, pan, and query the plot.
Create the Visual Aspect of the GUI1. Open up MATLAB. Go to the command window and type in guide2. Choose the first option Blank GUI (Default)
Create the Visual Aspect of the GUI3. You should now see the following screen.
Creating the Visual Aspect of the GUI: Part 11.For the adder GUI, we will need the following components.Add two Axes components to the GUI figureAdd three Pushbutton components onto the GUI figure.
Creating the Visual Aspect of the GUI: Part 12. Double click the Axes component to bring up the Property Inspector.gppropertyp y is named axes1.The TagThe other Axes component’s Tag property is named axes2.
Creating the Visual Aspect of the GUI: Part 13. Modify the properties of the Pushbutton components.pDouble click on one of the Pushbutton components.Change the String property to Plot Axes 1, and the Tag property to plotAxes1 pushbutton4. Double click on the next pushbutton and change the String property to Plot Axes 2and change the Tag property to plotAxes2 pushbutton.Double click on the final pushbutton and change the String property to Clear Axesand change the Tag property to clearAxes pushbutton.
Creating the Visual Aspect of the GUI: Part 15. The figure should look like below after you add the components and modify them.
Writing the Code for the GUI Callbacks1.Open up the .m file that was automatically generated when you saved your GUI.2.In the MATLAB editor, click on thewithin the .m file.Select plot1 pushbutton Callback.icon, which will bring up a list of the functions
Writing the Code for the GUI Callbacks3. Add the following code to the function:
Writing the Code for the GUI Callbacks4. Put the following code into the plot2 pushbutton Callback:
Writing the Code for the GUI Callbacks5. Add some code to the clearPlots pushbutton Callback:5. Add the following line of code to axes tutorial OpeningFcn:This line of code effectively adds the standard toolbar to the GUI, allowing the user to zoom,pan, query the plot, and more.
Run and Test the GUI1.From the m-file editor, you can click on the iconto save and run the GUI.2.Alternatively,te at e y, fromo thet e GUIDEGUeditor,ed to , you canca clickc c ono thet eto launchau c thet e GUI.GU .
MATLAB GUI Tutorial - Button Types and Button GroupYou will learn how to use the different types of buttons available within Matlab GUIs.These button types are: push button, radio button, check box, and toggle buttons.In addition, you will learn how to use the button panel to control a group of buttons.
Create the Visual Aspect of the GUI1. Open up MATLAB. Go to the command window and type in guide2. Choose the first option Blank GUI (Default)
Create the Visual Aspect of the GUI3. You should now see the following screen.
Part One: The Pushbutton1.For the adder GUI, we will need the following components.add one Static Text component to the GUI figure.Add three Pushbutton components onto the GUI figure.f2. Double click the Static Text componentpto bringg upp theProperty Inspector.Change the String property so that there is nothing inside.Changeg the Taggppropertyp y to display staticText.p yDouble click on the Pushbutton component andchange the String property to Display Text! andchange the Tag property to displayText pushbutton.
Creating the Visual Aspect of the GUI: Part 13. The figure should look like below after you add the components and modify them.
Writing the Code for the GUI Callbacks1.Open up the .m file that was automatically generated when you saved your GUI.2.In the MATLAB editor, click on thewithin the .m file.Select displayText pushbutton Callback.icon, which will bring up a list of the functions
Writing the Code for the GUI Callbacks3. Add the following code to the function:
Run and Test the GUI1.From the m-file editor, you can click on the iconto save and run the GUI.2.Alternatively,te at e y, fromo thet e GUIDEGUeditor,ed to , you canca clickc c ono thet eto launchau c thet e GUI.GU .
Part Two: The Check Box1.For the adder GUI, we will need the following components.add one Check Box component to the GUI figure.2. Double click the Check Box componentpto bringg upp theProperty Inspector.Change the String property to Bold.Changeg the Taggppropertyp y to bold checkbox.
Creating the Visual Aspect of the GUI: Part 13. The figure should look like below after you add the Check Box component and modify it.
Writing the Code for the GUI Callbacks3. Add the following code to the bold checkbox Callback function:
Run and Test the GUI1.Run the GUI to make sure it works before we move on.Try checking and unchecking the Check Box component to make sure that the text“Hello World!” is being bolded and unbolded.
Part Three: Radio Buttons, Toggle Buttons, and Button Group Panel1. Closed GUIDE, reopen it again.add one Button Panel component to the GUI figure.Add three radio buttons onto the button group panel.2. Double click on the first Radio Button componentpto bringg uppthe Property Inspector.Change the String property to 8.Changeg the Taggppropertyp y to fontsize08 radiobutton.
Creating the Visual Aspect of the GUI: Part 13. Double click on the second Radio Button component, and change the String property to 12.Change the Tag property to fontsize12 radiobutton.Double click on the third Radio Button component, and change the String property to 16.Change the Tag property to fontsize16 radiobutton.Double click on the button group panel and change the Tag property to fontSelect buttongroup.Change the String property for the button group panel to Fontsize.Here’s what your figure should look like after you add the components and modify them.
Creating the Visual Aspect of the GUI: Part 13.Check the hierarchical structure of the GUI figure. Click on thethe followinging should appear:icon andMake sure that the three radio buttons are one hierarchy below the button groupicon.icon
Writing the Code for the GUI Callbacks3. Add the following line of code to the opening function.In this tutorial example, it is named button tutorial OpeningFcn function
Writing the Code for the GUI Callbacks3. Next, add the following function at the very end of the .m file.
Run and Test the GUIRun the GUI.Try clicking on all of the buttons to make sure they perform their function correctly.Specifically, make sure that the font size changes accordingly.
MATLAB GUI Tutorial -Plotting Data to Axes In this MatlabGUI tutorial, you will learn how to create and use the Axescomponent. The Axescomponent allows you to display graphics, such as graphs and images on your GUI. In this tutorial, we will create two axes on the GUI and plot some simple data onto it.