Transcription
White Tub, Laurium Manor Inn, Laurium MIDigital Negatives for Silver Gelatin PrintsAnd Alternative ProcessesV1.5February 2014Michael P. com
Digital Negatives for Silver Gelatin PrintsV1.2.1 November 2013V1.5 February 2014Michael P. Rosenbergmprosenberg@earthlink.netIntroductionThis article will describe a simple method to construct Quad Tone Rip ink profiles for printingdigital negatives on Epson inkjet printers. These digital negatives are contact-printed ontosilver gelatin paper, yielding prints that are identical to traditional darkroom prints.BackgroundVarious methods have been described for making enlarged digital negatives for contactprinting on photosensitized materials. Most of these methods were used for makingalternative process prints, such as platinum/palladium (pt/pl), palladium (pl), carbonpigment, and gum. These processes require UV light to expose photosensitive paper.Negatives made by older image setter technology depended on a high density or high contrastindex to block UV light, while negatives made by inkjet printers utilize inks with inherentlyhigher UV opacity. While it was possible to make negatives using image setter and light valvetechnologies, often several attempts were needed to make a useable negative for silvergelatin prints. Furthermore, these technologies were difficult to maintain and costly. Asimage setters and light valve technology became increasingly unavailable, improvements inprinters and inks allowed the printing of digital negatives at home. However, the ability tocontrol inks and their deposition was still an issue.About 2003 Ron Reeder approached Roy Harrington, both friends of mine, regarding the use ofQuad Tone Rip (QTR) to control the use of inks to print digital negatives for contact palladiumprints. QTR is a software package developed by Roy to make high quality black and whitedigital prints using Epson inkjet printers. Although Epson subsequently improved their driversfor making black and white prints with the ABW mode, many photographers still rely on QTRbecause of its flexibility, simplicity, calibration tools, and inexpensive price (compared tocompetitors). QTR also makes it possible to exercise a high degree of control in printingdigital negatives for a variety of photographic processes.Ink profiles are used by printer drivers to render appropriate tone and color in a print; theyare usually named for the printer paper being used, e.g. Epson Enhanced Matte (or EpenMatte). When QTR is downloaded and installed the profiles for a variety of printers andpapers are also downloaded and installed; the ink levels in these profiles have been balancedto produce neutral tone prints. Ron realized he could write custom QTR ink profiles adjustingRosenberg: Digital Negatives For Silver Gelatin PrintsPage 2
the levels of inks that are UV opaque to print digital negatives capable of properly renderingimage tonalities in palladium prints. Ron has compiled his method in a book titled DigitalNegatives for Palladium and Other Alternative Processes ( 30), and it is well worth visiting hisweb site to view his images (www.ronreeder.com). QTR can be licensed for the Mac and PCfor 50. But using Ron’s method it still was not possible to make digital negatives thatyielded good silver gelatin prints.Here I describe the generation of ink profiles, adjustment, and correction curves, for printingdigital negatives that yield silver-gelatin prints identical to traditional darkroom prints.Although Ron’s book addresses digital negatives for alternative processes, the fundamentalsfor making digital negatives are the same regardless of the final process. Rather than restateall of what Ron has put in his book, I recommend acquiring his book.There is a certain degree of plug-and-play in the method and profiles presented here. Thatis, after installing QTR, using the profiles and curves described here, along with the negativemedia and printing conditions I use, it is possible to make silver gelatin prints without adetailed understanding of how to create profiles or correction curves. Furthermore, theprofiles and curves provided can be used as a starting point if any adjustments for individualdifferences in printers, darkroom process, or printing style are needed. This method is greatfor making silver gelatin prints from digital capture images.My darkroom papers of choice are Ilford and Adox poly-contrast papers (both cold and warmtone). I have not tried other silver gelatin papers, but I believe my profiles and curves willwork for other papers; if necessary, tonalities in these papers can be adjusted by making anew correction curve. The ink profile method I describe can also be adapted for alternativeprint processes. In that case you will want to obtain Ron’s book and integrate it with themethod of creating profiles and correction curves described below. Sandy King is now usingthis method for making carbon pigment prints with great success, and found he gets less grainusing this method.The interface with QTR is different on the PC from the MAC (of course), and I use a PC. Forexample, when you download the version for the PC, a GUI (Version 2.7.2) is installed forprinting and making profiles. On the Mac, printing through QTR is accessed in Photoshop .Profiles on a Mac are created and edited as text lines in a file, which will be familiar toanyone with experience writing simple code. All screenshots shown below are from the GUI,but I also show the same profile as a text files in some of the examples. I have made everyattempt to point out the differences at the various steps, and have had friends who use QTRon a Mac double check what I have written. However, as a disclaimer, I may have missed orglossed over a Mac step. Please let me know, and I will try to find the answer or incorporateyour feedback. Likewise, contact me if anything is unclear. When you download QTR pleasealso download the manual and check the links on Roy’s web site (www.quadtonerip.com ) tohelp with QTR. Roy continually updates his software, and revises it when new Epson printerscome out.Rosenberg: Digital Negatives For Silver Gelatin PrintsPage 3
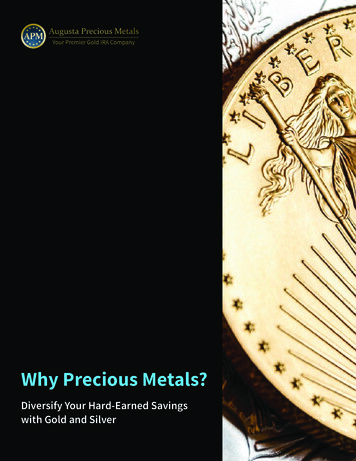
In what follows I will first lay out the problems I previously encountered in making digitalnegatives for silver gelatin prints and the solutions to those problems. I describe in detailhow to make ink profiles, Photoshop adjustment curves, gray scale correction curves (andhow they differ), negative media, printing the digital negative, contact printing of thenegative, and analog-to-digital-to-print tonal representation.I. The Problem: Why a new approach was needed.In fall of 2006 I visited Ron to learn the process for making digital negatives. We createdseveral QTR ink profiles by modifying existing profiles (see Ron’s book), and makingcorrection curves (discussed below). On returning home I continued working on makingdigital negatives for silver gelatin prints but was dissatisfied with the results. In 2011 Istarted thinking about the process again, and began some thought experiments to recognizethe problem(s) and how to solve them. Hopefully, explaining my thought process and thesolutions I came up with will help with understanding the components versatility of theprocess.The first problem I encountered was an inability to predict how changing the level (I use leveland limit interchangeably, see Figure 2) of one ink affected the final print. In a QTR profileeach ink has a setting for density and limit, or level. These two parameters describe how inkis deposited on a media to correlate with Photoshop pixel values. Other parameters(described below) affect ink usage in highlights, shadows, mid-tones, and cross-over (seeFigure 1). Plotting levels of each ink versus density (pixel values) show each ink has its owncurve, and the mid-point where the inks overlap is set by the cross-over setting. Changingone ink affects the shape and slope of the curve, as well as the cross-over point. Todetermine how a change in an ink affects print tones you have to print a digital negative of agray scale image and measure the change in print tone. An ink curve plot of a profile I usedfor my old Epson 2400 printer is shown below (Figure 1). Of course, not all inks are equal inblocking light, which also complicated the problem. It would be far better if changes in oneink would have predictable results on the print tonality, similar to how increasing ordecreasing negative development expands or contracts tonalities (respectively).Rosenberg: Digital Negatives For Silver Gelatin PrintsPage 4
Figure 1. Plot of individual inks for RR2400 profile for printing a digital negative on overheadtransparency media, for contact printing on silver gelatin paper. Y axis ink amount X axis image densityThe second problem was a lack of tone transition smoothness, which was most obvious in theshadows and highlights. Also, the placement of Zone V was shifted in the print. Ron foundthat problems in tone transitions and smoothness for alternative processes were addressed byapplying a correction curve to the profile. The correction curve is the difference in measuredreflectance values of the contact darkroom print and the original input values in a gray scaletest image. These paired values are used to make a Photoshop .acv curve, and inserted inthe profile (see Correction Curves below). But correction curves for silver gelatin prints stillhad poor transitions in low and high tones and a lack of smooth transitions in the mid-tones.The third problem was unacceptable grain. This was very evident in the higher tonalities (forexample Zones VII to IX), and gave the appearance of a print made from an overdevelopednegative, or a negative enlarged too much. Not what I would expect from starting with a 4x5negative.II. Solutions: A New Approach.1.a. Creating Ink Curves and Linearization.As can be seen in Figure 1, making alterations to density or levels of one ink wouldunpredictably change print tonality in only one portion of the image. Change in one ink mayrequire all the other inks to be rebalanced, and/or a new correction curve be generated. Ithought that to make the process predictable the inks should mimic each other in theirdistribution, i.e. ink levels should be co-linear to image density. Furthermore, if the inksRosenberg: Digital Negatives For Silver Gelatin PrintsPage 5
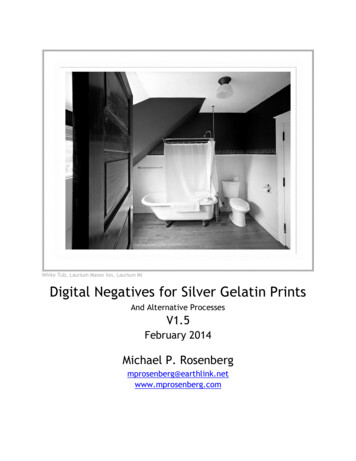
were co-linear, then changing the levels of one ink would change the density of the entirenegative, and thus result in a predicable change in all tonalities. In other words, changes inone ink should affect density from 0-to-100%, increasing or decreasing the contrast index.Ultimately, I realized that I needed to create an ink profile where deposition of ink was linearto the original negative density, similar to log E film density plots.Rather than try to fix existing profiles I decided to start over. The QTR GUI was essentialbecause it showed different options for setting ink curves and densities that were notapparent in working with the text file, and the alterations in the curve is shown in the inkdensity plots. To create a new ink profile, launch the QTR GUI, select Tools Curve Creator,which opens the ink profile curves dialog. The blank dialog appears with a default limit/levelfor black ink, and all other inks are “not used” (Figure 2a). At the top of the dialog box is afield labeled printer model; open and scroll to the printer you are using and select thatprinter. Opening the drop-down menu for the ink provides you with several options, one ofwhich is copy curve (Figure 2b); select copy curve and another drop down menu appearsunder the density setting (see Cyan ink, Fig. 2b); select K (black) in this menu. When this isdone for each of the inks you will have set the density response of all the inks to the K ink,and thus they will have the same curve as that for the black ink. Other options are:Default Ink Limit: Sets the maximum amount of ink deposited, and thus the contrastrange.Black Boost: Will boost the ink limit relative to the default ink limit. This can be leftset to 0, or used to increase the relative amount of ink at one end of the curve toimprove highlights.Figure 2a. Opening menu in QTR GUI, showing options to create ink profile. Default valuesshown.Rosenberg: Digital Negatives For Silver Gelatin PrintsPage 6
Figure 2b. Drop down menu ink options in curve creator.Next, enter the ink limit values for each ink. If no ink limit value is entered it will result inthe default ink value shown in the upper left box being used, but if set to 0 the ink is turnedoff. To demonstrate how each of the inks copy the black ink, I arbitrarily selected ink values,saved the profile ( File Save As), and selected the ‘Show Curve’ button (Figure 3). Noticethe steep upsweep in inks as density approaches 100%. So this is an improvement, in that inkcurves can be made parallel to each other, but further refinement is needed.When looking at plots of ink, remember that we are working in negative space. Lower printtones, or shadows, are toward the left and higher print tones/highlights to the right. Thelower panel in Figure 3 shows that the ink values need to be extended to the left to obtaingood shadow details, and the abrupt rise on the right needs to be decreased (lower panel,Figure 3) to prevent blow out of highlights.Rosenberg: Digital Negatives For Silver Gelatin PrintsPage 7
Figure 3. Arbitrary ink limit values with inks set to copy curve from K (upper panel). Plot ofpercent ink versus ink density showing all inks linked to black ink.Several other settings need to be adjusted to refine the ink curve. In the Curve Creator toolthere is a row of tabs with additional options; the only one relevant for making digitalnegative ink profiles is the second one labeled ‘Gray Curve’ (Figure 4); the two tabs labeled‘Toner Curve’ and the ‘Linearization’ tab are not relevant and can be ignored. The last tablabeled ‘Notes’ is for just that, making notes. Other settings are as follows:Gray Highlight controls ink deposition in the highlights of a print, but in negativespace it controls shadow tonalities.Gray Shadow likewise controls ink deposition in print shadows, but in negatives it isthe inverse – and affects highlights.Overlap controls the point in density values where the inks will cross over (see Figure1, which is set at 55%).Gamma value affects the mid-point of the curves, or the mid-tones of the negatives;values greater than 1.0 raise the curve (lightens mid-tones), values lower than 1.0Rosenberg: Digital Negatives For Silver Gelatin PrintsPage 8
lower the curve (darkens mid-tones).Curve is for entering a correction curve, which is described below.Figure 4. Refinements for modifying ink curves, showing default values when the Gray Curvedialog tab is opened.By trial and error I came up with ink limits that would not result in too much ink beingdeposited in the highlights, which results in the ink pooling on the negative media. Likewise,I empirically derived values for Default ink, Highlights, Shadows, Overlap and Gamma. I havenot found Gray Highlight or Shadow to be useful in making digital negative profiles, and setthese to 0. For the inks have the same curve, but different slopes, the overlap is set to 100.Finally, Gamma was optimized to a value of 1.22 by inspecting the curve, which yielded astraighter line in the ink curve(s) in the mid portion. (In the profile shown in Figure 1 Overlapis 55, and Gamma raises and lowers the Overlap point.) All of my profiles use these sameoption settings in Gray Curve, and only vary in the ink levels.I made darkroom prints using a digital negative of the gray scale test target (provided by RonReeder and included on my web site), scanned the dried print and measured gray values inPhotoshop (see below, Correction Curves). Testing showed a slight boost is needed inhighlights corresponding to gray scale print values greater than 10%. This becomes obvious inthe lower panel of Figure 5 showing ink curves. The right side of the curve corresponding tohigher negative density and print highlights plateaus; this would result in reduced contrastand poor highlight separation. A slight boost in density and contrast was achieved by settingthe LLK ink to Gray Ink, Density to 100 (in reality it never exceeds the default value), andLimit equals 10. Under these conditions only the LLK ink is affected by Black Boost, which isRosenberg: Digital Negatives For Silver Gelatin PrintsPage 9
set at 32. It should be apparent how the LLK ink rises sharply in a limited portion of thecurve.When making projection (analog) prints on poly-contrast paper using a dichroic head, thecyan filter has no effect on exposing the print. Early tests using a digital negative showedthat cyan ink likewise does not contribute. I could have set the ink values for both cyan andlight cyan to 0, but was worried about the cyan jets of print head clogging; therefore, cyanand light cyan inks are set at 2 (higher levels could have been chosen at the risk of too muchink on the negative). Initially I made profiles where the limits for magenta yellow. Thisyielded negatives with an overall magenta cast. My rationale for having magenta limits higherthan yellow is that it would result in a proportional increased local contrast, similar toincreased negative development. Improved local contrast would make the image sharper atedges. I have also generated profiles with the limits of magenta and yellow inks arereversed, resulting in images where I desired a softer look. These are not large changes incontrast, but subtle changes. It may be possible to produce a negative that has no color castif you use only black inks, but using fewer inks has an undesirable side effect as explainedbelow.Rosenberg: Digital Negatives For Silver Gelatin PrintsPage 10
Figure 5. Curve creator with ink values, gray curve settings, and plot of ink density. Note inksdo not extend to the Y axis, and plateau on the left.Rosenberg: Digital Negatives For Silver Gelatin PrintsPage 11
On a Mac a QTR profile is created or edited as a text file in an editor such as TextEdit.Double clicking on a profile will open it in TextEdit. Here is the above file opened as a text(.txt) file that would be edited on a Mac, with the variables highlighted:PRINTER Quad4880CURVE NAME 4880 AgNg Demo 2GRAPH CURVE YESN OF INKS 8DEFAULT INK LIMIT 50BOOST K 32LIMIT K 25LIMIT C 5LIMIT M 18LIMIT Y 14LIMIT LC 7LIMIT LM 16LIMIT LK 12LIMIT LLK 10N OF GRAY PARTS 1GRAY INK 1 KGRAY VAL 1 100GRAY HIGHLIGHT 0GRAY SHADOW 0GRAY OVERLAP 100GRAY GAMMA 1.2GRAY CURVE N OF TONER PARTS 0TONER HIGHLIGHT 10TONER SHADOW 10TONER GAMMA 1TONER CURVE N OF TONER 2 PARTS 0TONER 2 HIGHLIGHT 10TONER 2 SHADOW 10TONER 2 GAMMA 1TONER 2 CURVE N OF UNUSED 0COPY CURVE C KCOPY CURVE M KCOPY CURVE Y KCOPY CURVE LC KCOPY CURVE LM KCOPY CURVE LK KCOPY CURVE LLK KThe double strike-through text is from the tabs in the GUI Curve Creator tool that are notused in making digital negatives, and can be deleted.2. Tone Transition: Linearization and adjustment curves.Comparing the ink curve plots in Figures 1 and 3 to Figure 5 (lower panel) shows a more linearrelationship, but the inks do not extend fully to the left and the slope is not a straight line.Thus, there would still be the problem of smooth tone transitions. This can be addressed byintroducing a gray scale linearization curve created in a Photoshop adjustment layer. (Notethat I am using gray gamma 2.2 both for Photoshop and monitor calibrations. All of theRosenberg: Digital Negatives For Silver Gelatin PrintsPage 12
calibrations standards provided on my website are assigned a profile of gray gamma 2.2.Adobe recommends PC users set gamma to 2.2, and Mac users set gamma to 1.8.)In Photoshop open the gray scale calibration image and create a new layer. Open the curvesdialog: Image Adjustments Curves. Or open an adjustment layer: Layer New AdjustmentLayer Curves. When you look at the curve in Photoshop it is showing positive image space.Curves generated for digital negatives need to be in negative image space (see Figure 6).Since you will be creating a curve for QTR you will need to be in pigment (K) space, place acheck next to the Pigment/Ink box (Figure 6, red arrow).Figure 6. Photoshop curve dialog, showing positive image (monitor) values that will be theopposite for digital negatives. Select Pigment Ink % and make adjustments.To adjust ink profiles in QTR I created a curve that extends inks to the left, and straightensthe curve slope. This is done by placing anchor points on the line, and modifying the portionof the curve from 87-100%K. Shown in Figure 7 is the curve I created. In the QTR programfolder found on my C drive I created a sub-folder (labeled Curves) to save profile curves. Thebelow curve was saved as Kadj 1.acv.Rosenberg: Digital Negatives For Silver Gelatin PrintsPage 13
Figure 7. Photoshop adjustment curve Kadj 01.acv. Note that the box for histogram ischecked and the peaks of the gray scale image can be seen. The slope of the line was modifiedin the portion of the curve that corresponds to shadow values of the negative.This curve is inserted into the ink profile I created. I select the Curve Creator dialog andopen the profile I was working on ( File Open). Clicking on the black ink description box(Gray Ink in Figure 8) reveals a dialog pull-down menu, and I select the option Load Curve(Figure 8). Now the density box is labeled Curve and, when clicked, a new dialog opens toplace a link to an .acv curve. To insert the link click on Browse, navigate to the foldercontaining the curve, select the file, and then save the profile. No change is made in theGray Curves tab. Below are instructions for the Mac using TextEdit.Rosenberg: Digital Negatives For Silver Gelatin PrintsPage 14
Figure 8. Curve Creator dialog drop down box with Load Curve selected, and the density box isnow labeled Curve. Clicking on Curve opens a new dialog to place a link to the .acv filecreated.Loading the Kadj 1.acv curve now results in the inks extending to the left (albeit plateauingon the right), and straighter slope (Figure 9). In fact, now the ink curves look more like a logE plot of T-Max film response curve. Ink density will correlate with percent gray scale of theinverted digital negative image. It can be seen how changes in ink limits have predictablechanges in negative density, affecting silver gelatin print contrast, while not altering tonalrelationships. This profile achieves the objective of linearizing ink density, yielding smoothprint tonalities, excellent shadow details, and delicate highlight tonalities.Rosenberg: Digital Negatives For Silver Gelatin PrintsPage 15
Figure 9. Curve Creator tool dialog with Kadj 1.acv adjustment curve inserted, and showingthe result on the ink curves. Values in dialog boxes under the Gray Curve tab are the same asshown in Fig. 5.If you have a Mac, here is what the corresponding text file looks like. The non-relevant linesfrom the GUI toner curves (having double strike-through) can be deleted:#Notes Refinement of 4880 AgNg-1 ShadBoost 1PRINTER Quad4880CURVE NAME 4880-AgNg-1 Kadj 1GRAPH CURVE YESN OF INKS 8DEFAULT INK LIMIT 50BOOST K 32LIMIT K 22LIMIT C 2LIMIT M 18LIMIT Y 10LIMIT LC 2LIMIT LM 15LIMIT LK 10LIMIT LLK 10N OF GRAY PARTS 1GRAY INK 1 LLKGRAY VAL 1 100GRAY HIGHLIGHT 0Rosenberg: Digital Negatives For Silver Gelatin PrintsPage 16
GRAY SHADOW 0GRAY OVERLAP 100GRAY GAMMA 1.22GRAY CURVE N OF TONER PARTS 0TONER HIGHLIGHT 10TONER SHADOW 10TONER GAMMA 1TONER CURVE N OF TONER 2 PARTS 0TONER 2 HIGHLIGHT 10TONER 2 SHADOW 10TONER 2 GAMMA 1TONER 2 CURVE N OF UNUSED 0CURVE K C:\Program Files (x86)\QuadToneRIP\Curves\Kadj 1.acvCOPY CURVE C KCOPY CURVE M KCOPY CURVE Y KCOPY CURVE LC KCOPY CURVE LM KCOPY CURVE LK KThe link to the adjustment curve is shown, and the first line is a note I made regarding theprofile and changes made (notes tab of the GUI). Preceding the note is a hash-tag indicatingthat it is non-coding.When creating an ink profile there are two locations where a curve can be placed, the inkdescription for K ink, as I have shown above, and in the Gray Curve tab (see Figure 5 middlepanel and Gray Curve in text above). It turns out that it matters where the curve is placed.Figure 10 shows the same profile with Kadj 1.acv placed in the Gray Curve link. When this isdone the black ink slope shifts to the right and the curve rises, and is no longer linear. Noticethat inks begin to plateau at 80% density (compare Figure 10 to Figure 9).I use the term adjustment curve for a curve placed in the ink description to linearize inks. Ifollow Ron Reeder’s convention of using the term correction curve for curves correcting forthe process, and place these in the Gray Curve link. The correction curve will makecorrections to the ink profile for tonal values of the silver gelatin print differing from themonitor. The process of making correction curves is described in detail below.Profiles and curves are available by sending me an e-mail. I continually make adjustments tomy profiles, and will post on my web site their availability. You can try the various profilesyou receive and see which one you like.Rosenberg: Digital Negatives For Silver Gelatin PrintsPage 17
Figure 10. The shadow boost adjustment curve, Kadj 1.acv, linked through the Gray Curvesetting under the Gray Curve tab.2.b. Saving Ink Profiles.Once you have created or adjusted an ink profile using the GUI, you must save the file. If youhave not done so already, open the printer ink combination you are using (e.g., Quad4880)and go to Files save. If importing a profile, drag the file to the printer specific Profilefolder. C:\program (x86)\QTR\Profiles\xxxx-uc, or create a new printer specific file toseparate the profiles from those used to make prints; e.g., 4880-DN.On the Mac you will use an editing program to create a new profile or modify an existingprofile. Then go to Applications Folder QTR Folder Profiles, and open the folder for yourprinter-ink combination. Save to that folder. If you are importing a profile, drag the text fileicon to the folder. Double click on the install icon in the folder and the profile will beinstalled.For naming profiles you create for digital negatives I recommend the convention of using theprinter, darkroom media (e.g., AgNg for silver negative), and sequential numbers to denotedifferent versions. For example: 4880 AgNg 1.Rosenberg: Digital Negatives For Silver Gelatin PrintsPage 18
2.c. Adapting profiles for use on different Epson printersI have both the Epson 4880 and 7880 printers. The profiles I created and tested on my Epson4880 work identically on the 7880. Changing the profile from one printer to another isextremely simple. On the PC it is handled in the GUI curve creator printer option, and on theMac the file is renamed and saved to the appropriate folder. On printers with fewer than the8 inks of the X880 Epson printer series, the appropriate missing ink is set to 0 or the line inthe text file is deleted. On a Mac open the text file and edit the printer line for the printerused and save in the appropriate folder ( Profile Printer). The method of making digitalnegatives outlined here will work for any series of Epson printer that QTR supports.3. Reducing grain.The issue of grain that I, and others, have experienced is partly resolved in this method byusing six inks throughout the negative tonal range (cyan and light cyan do not matter forsilver gelatin prints, but are still used to prevent clogging). The profiles I used for my oldEpson 2400 printer (Figure 1) show the inks overlapping in the mid portion, so that highlightsand shadows would have less ink coverage. Additionally, the newer print heads of Epsonprinters capable of pico-liter size droplets represent a big advance in grain-less prints, sincemore ink droplets can be packed per unit area for each channel of ink. Furthermore, byincreasing ink limits the space between droplets overlap and eliminate or reduce the space.Therefore, I reasoned that I need a digital negative media able to hold a larger amount of ink.Alternative printing techniques rely on UV light for exposing prints, thus the negative mediummust transmit UV light, and inks blocking UV transmission create density. Overheadtransparency material has a relatively thin ceramic coating with a macro porous surface. Theporosity of the print media sets the limit on the amount of ink that it can hold. Grain is notas noticeable in alternative processes due in part to the use of art paper as a substratecoated with the appropriate emulsion for the print, and the rough surface of the art papersoftens and blurs the image enough so grain is not seen.Silver gelatin prints use visible light, so a translucent material can be used for the negative.One translucent material is back-lit white film, which is used extensively for advertising andcommercial displays. Many have used this material as negative media due to its ability totransmit and diffuse light; however, like overhead transparencies, back-lit white film also hasa macro porous surface structure and is also limited in the amount of ink it can hold.I needed a translucent media capable of holding more ink than overhead transparency orwhite film, and that meant a micro porous surface. Glossy resin-coated photo paper has amicro porous surface structure, capable of holding more ink, and dries quickly so ink won’tpool on the surface. Furthermore, edges in the image are sharp, and the digital negative isrobust in handling. I do not see grain in the sky when using glossy resin-coated photo paper.I use Red River UltraPro Gloss, which is available in a variety of cut sheet sizes as well asrolls, and is affordable. The best feature of the paper is that it does not have a watermarkon the back! The paper is 64 lbs/270 gsm, which would seem to be too opaque
digital negatives that yield silver-gelatin prints identical to traditional darkroom prints. Although Ron's book addresses digital negatives for alternative processes, the fundamentals for making digital negatives are the same regardless of the final process. Rather than restate all of what Ron has put in his book, I recommend acquiring his book.