Transcription
Office 365 End User Starter GuideContentsOffice 365 End User Starter Guide . 1How to sign in to Office 365 for Business . 2Install Office for Windows . 3Install Office for Mac. 4Set up a mobile device using Office 365 for business . 5Signing in and using Office 365 for business in a browser . 7Sign in to Office 365 from a browser . 7Change the page you see when you sign in to Office 365 . 8Working with your email, calendar, and contacts in a browser . 9View your messages and send email by using a browser . 9View your calendar and set up a meeting . 10Add, edit, or delete your contacts . 11Working with Office documents in a browser . 11Create a new Office document in a browser . 11Save an Office document in OneDrive for Business by using a browser . 12Edit documents in the browser. 13Want to learn more about working with Office?. 13Working with your files in a browser . 13Access files by using a browser . 13Start using Skype for Business for IM and online meetings . 14Set up an online meeting using Outlook Web App. 14Add a contact in Skype for Business . 15Send an IM in Skype for Business . 16Staying connected with your network in a browser . 17Sign in to the Yammer network in your browser . 171
How to sign in to Office 365 for BusinessSign in to Office 365 for business on your computer or tablet by opening a web browser.Note Microsoft has more than one kind of Office 365 service and each service has its own sign-inpage. Where you sign in depends on which service you are using. If you're unable to sign in at theURL below, you may be signing in to the wrong service. See How to sign in to Office 365 for a list ofsign-in locations. If you're trying to install Office 365 Home, Personal, or University, see Install Office365 Home, Personal, or University.1. Go to http://portal.office.com to sign in.2. Type your user name and password, and then select Sign in.Tip The first time you sign in, you'll use the work account and temporary password that youreceived from your Admin.3. If this is your first time signing in, you're asked to change your password. Type a newpassword, and then select Save.4. To sign out of Office 365, select your name in the upper left corner and select Sign out.Tip After you sign in for the first time, you can go to http://portal.office.com and sign in anytimeusing new password. For quick access, you might want to add the sign-in page to your favorites.2
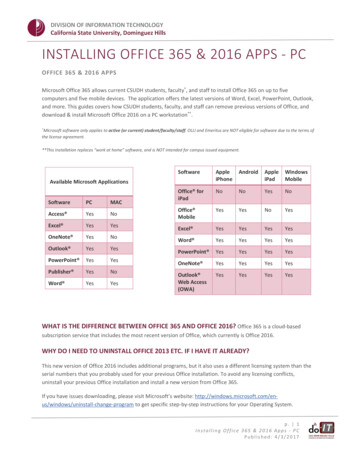
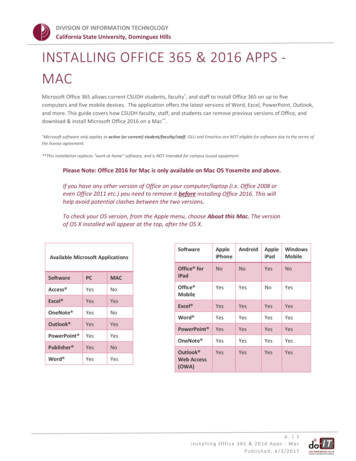
Install Office for Windows1. Sign in to Office 365, at http://portal.office.com/OLS/MySoftware.aspx.If you don't see Office listed, your plan probably doesn't include Office applications. If youknow your plan includes Office, you may not have a license assigned, see What Office 365product or license do I have? If Office is not listed ask your Office 365 administrator to assigna license to you.2. On the Office page, select a Language, and then choose Install.3. At the bottom of the screen, select Run.4. Follow the prompts and accept the license agreement.5. When you see "You're good to go," select All done.3
Now you're ready to start using Office. In the Windows 8 start screen or on the Windows 7 startmenu, type the name of the Office application you want to use, like Word, and open it.Install Office for Mac1. Sign in to Office 365, at http://portal.office.com/OLS/MySoftware.aspx.If you don't see Office listed, your plan probably doesn't include Office applications. If youknow your plan includes Office, you may not have a license assigned, see What Office 365product or license do I have? If Office is not listed ask your Office 365 administrator to assigna license to you.2. On the Office page, select a Language, and then choose Install. This will install Office for Mac2011.3. After the disk image file finishes downloading, select the .dmg file to open the Office installer.4. Accept the license agreement and enter your Mac password to start installing.5. On the Welcome to Office: mac screen, select Sign in to an existing Office 365 Subscription,and then sign in with your Office 365 work or school account.4
Install Outlook for Mac for Office 3651. Sign in to Office 365, at http://portal.office.com/OLS/MySoftware.aspx.2. On the Office page, scroll down to Get Outlook for Mac and select Install. Follow the steps inthe wizard.You can install Outlook for Mac side-by-side with your installation of Office for Mac 2011, but it'srecommended you remove the Outlook for Mac 2011 Dock icon and launch Outlook for Mac usingthe new icon.Delete the Outlook for Mac 2011 icon from the Dock In the Dock, drag the Outlook for Mac 2011 app to the Trash (located at the end of the Dock).Set up a mobile device using Office 365 for businessSelect the mobile device where you want to download and set up Office apps (Word, Excel,PowerPoint, and OneNote), set up email, or see a list of the Office 365 for business mobile apps foryour device.5
Tip To install Office on a Windows tablet, see Install Office using Office 365 for business.MobiledeviceOtherdevicesDownload and set up Office apps(Word, Excel, PowerPoint, andOneNote)Set up Office on an AndroidphoneAdd your Office 365email account (Outlook)Set up Office on an AndroidtabletSet up email on anAndroid tabletOneDrive forBusiness Lync YammerSet up Office on an iPhoneSet up email on aniPhoneOneDrive forBusiness Lync YammerSet up Office on an iPadSet up email on an iPadOneDrive forBusiness Lync YammerSet up Office on a WindowsPhoneSet up email on aWindows PhoneOneDrive forBusiness Lync YammerSet up email on anAndroid phoneAdditional Office365 for businessappsOneDrive forBusiness Lync YammerSet up email on aBlackBerrySet up email on othersmartphones andtablets6
Signing in and using Office 365 for business in a browserWhen you’re signed in to Office 365, you can access any of the apps and services right in the browserwindow. You’ll find your email under Outlook, any appointments or meetings under Calendar, andcontacts under People. There is also a quick access to OneDrive for Business, where you can storeyour work files and access them from your computer, mobile phone, or tablet.Sign in to Office 365 from a browserTo work with Office 365, you first sign in.1. Sign in to Office 365 with your work or school account. For exampleellen@contoso.onmicrosoft.com, ellen@contoso.edu, or ellen@contoso.com. If you're notsure what your work or school account is, check the welcome email message that asked youto sign in the first time.2. At the top of the Office 365 window, just choose where you want to go. Your window willlook like one of these:3. If you select OneDrive, for example, you’ll see a convenient online place where you can workwith any file you save to this location. Because files are in Office 365, you can access themfrom almost anywhere.7
Change the page you see when you sign in to Office 365You can choose what you see when you first sign in to Office 365. For example, if you frequently useemail, you may want to set up Office 365 to show your email every time you sign in.Set up your start page1. Select Settings Office 365 Settings.2. Select Start page.8
3. In the Set your start page box, choose an option, and then select Save.Working with your email, calendar, and contacts in a browserYou can quickly send and receive email, access your calendar, and manage your contacts in Office365 for business and education by using most browsers.View your messages and send email by using a browser1. Sign in to Office 365 at http://portal.office.com with your work or school account. Forexample, ellen@contoso.onmicrosoft.com, ellen@contoso.edu, or ellen@contoso.com. Ifyou're not sure what your work or school account is, check the welcome email message thatasked you to sign in the first time.Tip If you're having trouble signing in, see How to sign in to Office 365.2. At the top of the page, select Outlook. Or, select the app launcherOutlook., and then select9
3. To start a new message, select New mail.4. Add recipient names, a subject, and some text in the body of the message. Select Send.View your calendar and set up a meeting1. Select Calendar. In this example, Work week is selected.2. To set up a meeting or event, select New event.10
Add, edit, or delete your contacts Select People.Working with Office documents in a browserYou can create, save, and edit documents in most browsers. OneDrive for Business in Office 365 forbusiness is the cloud storage location for your work or school documents. It's the place where youcan store, sync, and share your files across multiple devices with ease and security.Create a new Office document in a browser1. Sign in to Office 365 with your work or school account at http://portal.office.com. Forexample, ellen@contoso.onmicrosoft.com, ellen@contoso.edu, or ellen@contoso.com. Ifyou're not sure what your work or school account is, check the welcome email message thatasked you to sign in the first time.Tip If you're having trouble signing in, see How to sign in to Office 365.2. At the top of the page, select OneDrive. Or, select the app launcherOneDrive., and then select3. Select New, and then select the type of document, for example, Word, Excel, or PowerPoint,you want to create.11
Save an Office document in OneDrive for Business by using a browser1. When you create, open, or edit a document in OneDrive for Business, it's automatically savedto the same location.2. To save new Office documents:In Word Online, select Document.In Excel Online, select Book.In PowerPoint Online, select Presentation.3. Type the new name.12
Edit documents in the browserYou can also edit documents you have saved to OneDrive for Business by using a browser.1. To edit a document, next to the name of the file, select More2. In the preview window, select More. Edit in browser.Want to learn more about working with Office?You can find Help in Office applications in the Tell me what you want to do search box. Just type aword like "print" and you'll be offered assistance.Working with your files in a browserAfter working with Office documents in OneDrive for Business, you can work with them from justabout anywhere.Access files by using a browser1. Sign in to Office 365 with your work or school account at http://portal.office.com. Forexample, ellen@contoso.onmicrosoft.com, ellen@contoso.edu, or ellen@contoso.com. Ifyou're not sure what your work or school account is, check the welcome email message thatasked you to sign in the first time.Tip If you're having trouble signing in, see How to sign in to Office 365.2. At the top of the page, select OneDrive. Or, select the app launcherOneDrive., and then select13
3. To open the file you want, select Moreexample, View or Edit. More, and select what you want to do. ForStart using Skype for Business for IM and online meetingsOffice 365 includes Skype for Business, which lets you have instant messaging (IM), audio and videoconversations, and Skype meetings. To download Skype for Business, sign in to Office 365, then at the top ofthe page, click Settings Office 365 settings Software Skype for Business.Set up an online meeting using Outlook Web App1. Sign in to Office 365 with your work or school account at http://portal.office.com. Forexample, ellen@contoso.onmicrosoft.com, ellen@contoso.edu, or ellen@contoso.com. Ifyou're not sure what your work account is, check the welcome email message that asked youto sign in the first time.2. In the Office 365 portal, click the waffle, then click Calendar to open the Calendar app.3. Click the plus sign or New just below the waffle, and fill in the meeting information as usual.4. In the middle of the meeting window, above the message area, select Online meeting.14
Call-in details, like a Join online meeting link appear in the message area. If your account isconfigured for dial-in conferencing, you’ll also see a Find a local number link.5. Set up the meeting.o Name the evento Add or remove attendeeso Choose a start time and set durationo Add other details as needed6. Select Send when you're done.Add a contact in Skype for Business1. In the search box on the Contacts view of the Skype for Business main window, type a name, IMaddress, or desk phone number (if they are in your organization). As you type, search results willstart appearing below the search box and the tabs will change from Groups, Status, Relationships,and New:to My Contacts and Skype Directory:2. If the person you are searching for is in your organization, keep the My Contacts tab selected(that's the default). When My Contacts is selected, Skype for Business searches in yourorganization's address book.15
If the person you are searching for is not in your organization but you know they have a Skypeaccount, click the Skype Directory tab to search for them among the millions of Skype users outthere. Knowing their Skype user name and location helps narrow the search quickly.3. When you see the listing for the person you want to add, point at their picture (or picture displayarea).If they are in your organization (My Contacts), and you want to add them to one of your groups,click theMore Options button, and then choose either Add to Contacts List (then select one ofyour groups) or Add to Favorites.If they are a Skype user, and you want to add them to one of your groups, click the Add tocontacts button, then choose one of your groups or the favorites group to add them.Send an IM in Skype for Business1. Find the person you want to send an instant message to. Do one of the following:- Hover over their picture in the Contacts list and click the IM button.-Double-click anywhere on their contact listing.Right-click their listing and select Send an IM.2. Type your message at bottom of the conversation window.3. (Optional) To send a file or image, do one of the following:a. Drag-and-drop a saved file into the text input area.b. Copy and paste a saved file or any image from an Office program into the text inputarea.c. Press PrtScn on your keyboard to capture an image directly from your screen, and thenpaste it into the text input area.4. (Optional) To add an emoticon, change the font, or mark the message as Important, do any ofthe following:a. Add an emoticon by clicking the Emoticonicon, and then clicking the emoticonyou want to add.b. Change the font or font size by clicking the More options (ellipsis) button.c. Mark your message high-priority by clicking the Importanceicon.d. Send a file by clicking the paperclip and browsing to the file you want to send.5. Press Enter on your keyboard to send the message.6. (Optional) Add other people to the conversation by dragging their contact listing from yourContacts list into the conversation window.16
Staying connected with your network in a browserYammer is a private social network where you can collaborate, communicate, and share informationat work or at school from anywhere. Here's how to get to your Yammer network by using a browseror by installing the mobile app for your device.Sign in to the Yammer network in your browser1. Sign in to Office 365 with your work or school account at http://portal.office.com. Forexample, ellen@contoso.onmicrosoft.com, ellen@contoso.edu, or ellen@contoso.com. Ifyou're not sure what your work or school account is, check the welcome email message thatasked you to sign in the first time.Tip If you're having trouble signing in, see How to sign in to Office 365.2. At the top of the page, select Yammer. Or, select the app launcherYammer., and then select3. If you're new to Yammer, respond to the email message you receive after you sign in toactivate the account.4. If this is your first sign in, you may see a page to invite others to the network. Select Go toyour network.5. The next time you sign in, you’ll go directly to your own company site.17
You can now add yourself to groups, and can post messages and reply to ongoingconversations.18
recommended you remove the Outlook for Mac 2011 Dock icon and launch Outlook for Mac using the new icon. Delete the Outlook for Mac 2011 icon from the Dock In the Dock, drag the Outlook for Mac 2011 app to the Trash (located at the end of the Dock). Set up a mobile device using Office 365 for business