Transcription
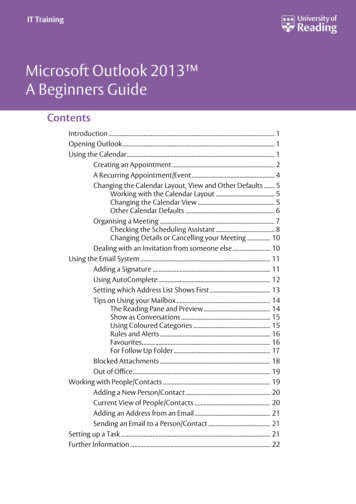
IT TrainingMicrosoft Outlook 2013 A Beginners GuideContentsIntroduction . 1Opening Outlook . 1Using the Calendar. 1Creating an Appointment . 2A Recurring Appointment/Event . 4Changing the Calendar Layout, View and Other Defaults . 5Working with the Calendar Layout . 5Changing the Calendar View . 5Other Calendar Defaults . 6Organising a Meeting . 7Checking the Scheduling Assistant . 8Changing Details or Cancelling your Meeting . 10Dealing with an Invitation from someone else . 10Using the Email System . 11Adding a Signature . 11Using AutoComplete . 12Setting which Address List Shows First . 13Tips on Using your Mailbox . 14The Reading Pane and Preview . 14Show as Conversations . 15Using Coloured Categories . 15Rules and Alerts . 16Favourites. 16For Follow Up Folder . 17Blocked Attachments . 18Out of Office. 19Working with People/Contacts . 19Adding a New Person/Contact . 20Current View of People/Contacts . 20Adding an Address from an Email . 21Sending an Email to a Person/Contact . 21Setting up a Task . 21Further Information . 22
IntroductionThese notes are based on a staff Training Course, Introduction to Using Outlook, that used tobe given, but most of the information can be used and applied by those using MicrosoftOutlook on their PCs on campus.Note: This document assumes that you are familiar with using a windowing system (with its icons,menus and a mouse) and know the procedures of pointing, clicking, double clicking, dragging andmulti-tasking.Opening OutlookTo open Outlook on a PC:1. Click on [Start] (the circular button in the bottom left-hand corner of the screen), All Programs,Microsoft Office 2013 and finally Outlook 2013 – note that it may take a while to fully open up2. The first time that you use Outlook on your own PC, follow the instructions given in UsingOutlook 2010 & 2007 for the first time look.aspx )3. Once Outlook starts, the opening screen will look something like below (assuming it’sopening into a mail folder, e.g. inbox):Using the CalendarThe Calendar is one of the most useful areas within Outlook. You can use it to keep track of bothwork and personal appointments, one-off or recurring appointments, give reminders to yourself ofimportant events or dates, and setup meetings with others.1
Creating an AppointmentTo get to the Calendar in Outlook, click on the [Calendar] button (it may be an icon of a calendar ifCompact Navigation has been set) in the Navigation Pane located in the bottom left-hand corner ofthe Microsoft Outlook window, to the right of the [Mail] button. Your screen should look similar tothe following:Let's put in an appointment for a bit later today. There are a few ways to create an appointment, butperhaps the easiest/most visual way is as follows:1. Assuming you are in Work Week view (this can be changed from the HOME ribbon in theArrange group), click in the main Calendar grid in a time slot that is currently free (usually awhite colour) to select the time for your appointment - this selected area on the Calendar (ahalf-an-hour slot) should go blue (if you want a longer slot/time, just drag down on the mouseto include the next half-an-hour or more)2. Right click on the selected blue area and choose New Appointment from the shortcut menu you should get a window similar to the following:2
3. An Untitled - Appointment window will open in which you can enter a subject, location anddescription, along with other information. For the Subject, type in something appropriate (orOutlook Training Session if you can’t think of anything)4. Move to the Location box (either use the mouse or press the Tab key next to the letter Q onthe keyboard) and type in the location name (or Sail 108 if you can’t think of anything)5. You should find that the Start time and End time have already been setup according to yourselection earlier, but you can still change these at this point. Note the All day event box clicking this box means that your appointment becomes an all-day event, with the start andend time boxes being set to 00:006. In the large window/area below the End time box is where you can write a further description- put what you like here, or if you can't think of anything, try I’m working through these notesto learn more about using Outlook!7. On the APPOINTMENT ribbon at the top of the window, in the Options group, you’ll find someuseful boxes and icons. The Show As box is very useful as it tells you, and also other peoplewho are looking at your Calendar (e.g. to setup a meeting), if you are busy or free at this time.The default setting is usually Busy. Choose the appropriate setting for your appointment8. The Reminder box allows you to set whether Outlook should remind you of the appointment.This can be very useful, and the default setting is set to remind you 15 minutes before theappointment. Click on the down-list arrow to select a different reminder time, or none, if youwant. The reminder will come up later on your screen (assuming you have Outlook stillrunning) as a window similar to below (one option is to snooze it to remind you again later, abit like what you can do with a morning alarm clock!):9. You can give an appointment a category (at the same time making it more visible in yourCalendar as it will have a different colour) by clicking on the Categorize icon and thenchoosing one of the categories from the list (you can change the default label settings andsetup your own ones)10. Click on the [Save & Close] icon at the start of the APPOINTMENT ribbon - you should find thatthe appointment is now setup in your CalendarNote: You can also turn an email message that you receive into an appointment (or meeting) on yourCalendar by dragging the message onto the [Calendar] button in the Navigation Pane (theappointment is set to the next available slot today, with the email message filling out thedescription of the appointment).3
A Recurring Appointment/EventYour new appointment/event is only timetabled for today, but let's say that it was running over 8weeks - this is where the appointment/event can be made recurring, i.e. something that takes placeat regular intervals.1. Find in your Calendar the appointment that you've just setup and double click on it to open it2. Within the Appointment window, click on the Recurrence icon in the Options group in themiddle of the APPOINTMENT ribbon - you should see a window similar to below:3. There are a number of options that can be changed, but in this case you only need to changethe date that the recurring event ends - click in the radio button (circle) to the left of End after:and change the value from 10 to 8 in the box to the right4. Click [OK] and then click on the Save & Close icon on the ribbonYou should find that there is now arecurrence symbol in the bottom right-hand corner of thenew recurring appointment. If you now open this recurring appointment, you will see the followingprompt:You can decide to make a change just to this one occurrence of the appointment, or you can makethe same change to all the appointments in the series. In this case, [Cancel] as you're not going tomake any changes.4
Changing the Calendar Layout, View and Other DefaultsWorking with the Calendar LayoutThe mini-calendar on the left of your Calendar window shows you the current month by default, andany numbers in bold indicate that there is an appointment/event on that day of the month. Youshould see this for the recurring appointment that you’ve just setup.There are also arrow keys at the top of the mini-calendar (to the left and right of the month) thatallow you to move forwards to the next month or backwards to the previous month.You can expand the mini-calendar to show more than just the current month (this could be useful ifyou wanted to move or copy an appointment from the current month to a future month) by restingthe mouse pointer on the horizontal split bar underneath the mini-calendar. When the pointerbecomes a double-headed arrow, drag the pointer downwards until you see mini-calendars for thisand next month. It's up to you how many months you want to show, but this is how it might look ifyou've set it up this way:Changing the Calendar ViewAt the top of your calendar, just above the dates, on the HOME ribbon within the Arrange group, youhave buttons that can switch between the calendar views for Day, Work Week, Week, or Month. Trythese out to see the difference. Return to Work Week view by clicking on the appropriate button.Within the Day, Work Week and Week views, the default time interval for appointment slots is 30minutes, but you can change this by right clicking in the area where the times are shown to the leftof the appointment slots, and choosing the time interval that you want instead from the shortcutmenu, say 15 minutes.5
Other Calendar DefaultsTo see some of the other Calendar defaults that have been setup:1. Click on the FILE tab in the top left-hand corner, followed by Options on the left and finallyCalendar on the left in the Outlook Options window to see the following:Here you can: Customize your work week if you work part-time or night shifts (appointments can still besetup out of normal working hours). Set the appropriate times in the Start time and Endtime boxes and select the check boxes for the desired working days. You can also changethe First day of week if you don't start work on a Monday Under Calendar options, you'll see the option to change the time of the Default remindersor remove it completely by unticking it Allow attendees to propose new times for meetings that you setup – usually, this is a goodoption to have set An [Add Holidays.] button - the default for your Calendar is to include UK holidays, but ifyou also want to include holidays from another country or religious holidays, then this iswhere you would set this up A [Free/Busy Options ] button where you can setup and/or change permissions to yourcalendar. The default permission is set to Free/Busy time, but this can be changed. Whenpeople check to see if you’re available for a meeting, they will only see if you’re free orbusy, but not the details of your appointments, although there are permission levels thatshow the subject and location as well, or the full details. Note that if you are sharing yourcalendar with other people then you will see the names of those people and theirpermission level to your calendar. Within the Calendar Properties window, there is an[Other Free/Busy.] button. If you click on this, you’ll see that the recommended defaultsare set to 12 months and 15 minutes. If you wanted to change these then click in the boxnext to Publish at location6
Under Display options, you can change the Default calendar colour, usually a light bluecolour at the start. By default, different calendars will show in different colours to helpdistinguish between them. To see further options, you will need to vertically scroll downthe Outlook Options window A Time zones section which allows you to show you the time in another country (tickShow a second time zone) - this might be useful if your work involved travel abroad New to Outlook 2013, the weather for your local region can be shown at the top of yourcalendar. By default, you may find this is set to Fahrenheit, but under Weather you can setit to show in CelsiusOrganising a MeetingThis is probably one of the areas that most people are interested in when they hear about Outlook.Organising a meeting is not that difficult to do, but finding out the dates/times when other peopleare available is more difficult and not always possible. Let's see how one would go about organising ameeting (it's really a special type of appointment). Firstly, you need to start with a possible meetingtime/date and choose your attendees (if this is a ‘test’ meeting then make sure you let them knowbeforehand!):1. Click in the main Calendar grid to select the time for your meeting, say later today ortomorrow (you need to have the Calendar in Work Week or Week view) - this area should turnblue2. Right click on the blue area and choose New Meeting Request to get the following:3. You are the only attendee at present (as you are the organiser!). To invite other attendees, clickon [To.]In the Select Attendees and Resources window that appears:4. Click on the dropdown list arrow under Address Book and choose Global Address List (it may bealready set to this by default)When sending emails to staff colleagues within the University of Reading, it is recommended thatyou use their Reading University email address that is within the Global Address List.7
The Global Address List contains a list of all the users and groups that have accounts on theMicrosoft Exchange server. The majority of University staff are now on this.One of the main advantages of using the Global Address List is that when you setup a meeting andsend out meeting invitations, you will be able to use Outlook’s Scheduling Assistant to see when yourcolleagues are free to attend your meeting (assuming that they are also using Outlook and keepingtheir Calendar up-to-date).The list is shown in alphabetical order of the first name or first initial of the person which isn’t veryhelpful! A better way of searching is:5. Click on the More columns radio button just above the Search box6. Type in your search term, e.g. the surname of a colleague you want to come to the meeting,and click [Go] or press Enter 7. Select the name that you want from the list of search results and then click on the [Required]button at the bottom of the window8. Let's also invite someone else as an optional attendee to the meeting so search for thesurname of another colleague9. Click on the [Optional] button just below [Required]10. Click [OK]Checking the Scheduling AssistantYou are returned to the Untitled - Meeting window with the names of your attendees now showingin the box to the right of [To ]. To check whether your attendees can make the suggested date andtime:8
11. Click on the [Scheduling Assistant] icon on the MEETING ribbon – something similar to thefollowing window appears:You should now be able to check more visually if your attendees are free to come to your meeting.Hopefully, you will be able to see the free/busy time information for yourself and your meetingattendees.Note: If you see grey diagonal 'slashes' all across the schedule for a particular attendee, this indicatesthat there is no free/busy time information available for that attendee. This could be because theattendee does not use Microsoft Outlook on Exchange, or they haven't yet used the Calendar tomake any appointments.If the currently selected time for the meeting is no good as one of your attendees is busy or out ofthe office at that time, then you can move the time slots (the blue vertical lines) with the mouse orchange the meeting start and end times to find the next available free time.The final steps are to fill in more details about the meeting and then send off invites:12. Click on [Appointment] on the ribbon at the top13. Fill in the details for the Subject, Location and the body of the message invitation, a bit likebelow:9
Note the [Rooms ] button to the right of the Location box – this can be used to access central roomsacross campus in which you can book a meeting (but note that not many are setup on Exchange).14. If you wanted to attach a file to your meeting, click on the INSERT tab at the top and then the[Attach File] icon to choose the file that you want to attach15. Click on [Send]You should find that a meeting appointment has been put into your Calendar on the appropriateday/time.You will now have to wait to see if your attendees accept or decline the invitation to your meeting!You can keep track of this by:16. Opening up the Meeting item on your Calendar by double clicking on it17. Click on the icon above Tracking in the Show group on the MEETING ribbon - here you can seeif any of your attendees have responded yet18. Close the Meeting windowChanging Details or Cancelling your MeetingIf you find later on that you need to change some details to your meeting, e.g. a different location, orcancel your meeting then you can carry out the following steps:19. Open up the Meeting item on your Calendar by double clicking on it20. If you need to change some details then make those changes and click on the [Send Update]button next to the [From] and [To.] buttons21. If you want to cancel the meeting then click on the [Cancel Meeting] button on the MEETINGribbon – the meeting is deleted from your calendar, and you are given the option of sendingcancellation messages to the attendeesDealing with an Invitation from someone elseAs well as inviting people to your meeting, you may well get invited by others to a meeting they’vearranged. If you do receive a meeting invitation then you can go through the following steps:1. To look at your email, click on the [Mail] button in the Navigation Pane2. Click on the message about the meeting – the invitation should look a bit like below:10
You have the following choices: Accept a meeting that you know you'll be able to attend. When you accept a meeting, themeeting is scheduled in your Calendar and you receive updates if the meeting organiserchanges the details of the meeting. If others view your free/busy time, the time appears asBusy by default Tentative - use this option if you're interested in the meeting, but aren't sure whetheryou'll be able to make it. The meeting is scheduled in your Calendar and that block of timeis displayed to others as tentatively unavailable Decline a meeting if you can't go. Declining a meeting deletes the item from your Calendar(freeing that block of time), but it does not cut your ties with the meeting: You'll still getupdates if the meeting organizer makes them and you'll have the opportunity to respondto the update. (If you truly want to opt out of a meeting, you may want to ask theorganizer to remove your name from the attendee list) Propose New Time - when you choose this and propose a new time, the meeting organiserreceives your request. but as with all things about the meeting, the organiser gets tomake the final decision about the new meeting time. Note that this option might not beavailable if the meeting organiser hasn’t allowed attendees to propose new times Calendar – to check your calendar in a new window3. If you definitely want to attend the meeting then click on the [Accept] button at the top ofyour invitation to see the following options:4. Usually, you would go with the second option of Send the Response NowIf you wanted to Edit the Response before Sending, e.g. to say that you'll be late for the meeting, thenchoose that option. The last option is not one that you should usually choose (as you won't get anyupdates about a possible changed meeting time).5. Go back to your Calendar by clicking on the [Calendar] button in the Navigation Pane - youshould find an entry for that meetingUsing the Email SystemMost, if not all, of you should already be familiar with using email. The next sections will show a fewthings that you might not already know or that are specific to email in Outlook.Adding a SignatureAn automatic signature can be set up so that when you send a message, contact information aboutyou is automatically put at the bottom of your message without you having to type it every time. Itis often useful to include your name, your role at the University, a contact phone number and theweb address of your School/Department/Unit.A guide to creating professional, effective signatures can be found in Email elp/its-help-email/its-help-emailsignature.aspx )11
Try setting up your own signature as follows:1. Click on the FILE tab in the top left-hand corner, followed by Options on the left and finallyMail on the left in the Outlook Options window2. Under the Compose messages section at the top, click the [Signatures.] button on the right3. In the Signatures and Stationery window that appears, click on [New] (if you want to create anew signature). Enter a name for your signature, e.g. Work, and click [OK] (you could have onesignature for work messages and a different one for personal messages)4. Type in the information that you want in your signature. Let your email client use it's 'default'or 'body' font for your signature (there are formatting options to use different fonts, put onbold etc.). An example of how a signature might look is given below:5. Click on [Save] to save the new signature6. Create a second signature for personal use, repeating steps 3 - 5 above7. Setup Work as the default signature for new messages by clicking on the appropriatedropdown list arrow and then click on [OK]. Click on [OK] again back at the Options window8. The Calendar will probably still be showing from what was being done earlier - to get to theMail in Outlook, click on the [Mail] button in the Navigation Pane, to the left of the [Calendar]button. You will be looking at your Inbox9. Click on the [New Email] button (towards the top left-hand corner of your Inbox window) tosend a message - you should now see your Work signature at the end of your messageTip: If you want to change the signature in your message to a different one, e.g. your personalsignature, just right click on the signature and choose the other signature from the menu.Using AutoComplete10. In the text box to the right of the [To.] button, type in the first letter of an email address thatyou’ve used before - you should find that it has remembered the email addresses beginningwith that letter. This is because AutoComplete suggestion has been turned on in Outlook.Select, using the mouse, one of the listed email addressesNote: AutoComplete suggestion is very useful, but sometimes it can be annoying as it may come upwith email addresses that you may have only used once or no longer work. You can delete such anemail address when the AutoComplete suggestion brings it up in the list (literally use the up or down arrow keys to select the address and press the Delete key on the keyboard). There is alsoan option to turn AutoComplete suggestion off completely via FILE, Options, Mail, then scroll downto the Send messages section and turn off the Use Auto-Complete List to suggest names when typing in12
the To, Cc, and Bcc lines check box. There is also an [Empty Auto-Complete List] button if you want toremove the email addresses from the list.Another option in the same area that says Commas can be used to separate multiple messagerecipients should be turned on to allow for cases where email addresses are being copied fromanother system to Outlook, e.g. the RISIS system, specifically where a tutor wants to send emails tostudents on a particular RISIS module.You are going to send a carbon copy of the new message to your own email address. Note thatOutlook is usually setup to save a copy of every message you send in a Sent Items folder (you canturn this off or save to a different folder via the OPTIONS ribbon for a new message).11. Click on the [Cc.] buttonIn the Select Names window that appears:12. Click on the dropdown list arrow under Address Book and choose Global Address List (it mayhave already been set to this)13. Click on the More columns radio button just above the Search: box14. Type in your surname and click [Go] or press Enter 15. Select your full name from the list of search results (you may need to scroll down) and thenclick on the [Cc] button at the bottom of the windowNote the [Bcc] button below the [Cc] button. Bcc stands for Blind Carbon Copy, and means that otherpeople who receive the message will not know that it has also been sent to the blind carbon copyemail address. This can be useful in the case where you want someone to get this message, but notallow the other receivers to know who this someone is. It can also be used when you’re sending amessage to a large number of people, but be aware that this is not normally recommended practiceas it is a technique often used by spam mailers (it’s better to setup or use a mail list with a specificemail address).16. Click [OK]17. Type in a subject for your message, write a short message and click on [Send]. You shouldreceive a copy of this message in your Inbox as you Cc'd it to yourselfNote: You may find that when you first use your Exchange account, no emails seem to be arrivingthere. If this is the case then see the section under Email in the Microsoft Exchange -help-email/its-exchange/exchangefaq.aspx ).Setting which Address List Shows FirstWhen you opened up the Select Names window above to choose who to send an email to or who toinvite to a meeting, it is recommended that it is set to look at the Global Address List on opening.This could be changed to look at your Outlook Contacts folder on opening. If the Global Address Listisn’t your default, and you want it to be:1. In the main Outlook window, click on the HOME tab followed by Address Book (on the right ofthe ribbon)13
2. In the Address Book window, you’ll see some menus at the top. Choose Tools and thenOptions. to see a dialogue box like below:3. In the Addressing dialogue box, select Global Address List from the When opening the addressbook, show this address list first drop-down list (you can also change the order in whichaddress lists are checked on sending e-mail)4. Click [OK] and then close the Address Book windowTips on Using your MailboxHere are some tips that you may find useful.The Reading Pane and PreviewYou will probably find that you can already see the content of one of your messages (the currentlyselected one) in your Inbox towards the right of your screen (just to the left of the To-Do Bar if youhave this showing). This is because the Reading Pane is on by default. This is good for security as youcan view messages safely in the Reading Pane. Potentially malicious scripts or attachments are notactivated or opened automatically in the Reading Pane. If you want to change these:1. Click on the VIEW tab at the top2. Choose Reading Pane under the Layout group on the VIEW ribbon3. Select Right, Bottom or OffFrom the above, you can see that you can have the Reading Pane below or to the right of yourmessages in the Inbox, or turn off the Reading Pane completely (in this case, you would need todouble click on a message in the list to open it in its' own window). There are also further ReadingPane options such as how long it takes for a message to be marked as read.A further refinement is to have Preview turned on. This allows you to preview the first three lines ofmessages in your Inbox, and so gives you some idea of what the message contains before you look atit in more detail. To do this:4. Click on the VIEW tab, followed by Change View (the first button), and then PreviewThis will apply to all the messages in your Inbox.14
Show as ConversationsIf you receive many e-mail messages daily, you could benefit from a grouping option called Show asConversations. This view shows your message list in a conversation-oriented or "threaded" view. Eachconversation can be expanded further to show all messages in the conversation, including messagesyou have already read, or collapsed. You can quickly review and act on messages or completeconversations.To be able to see the above in action, you might need to reply to a message that a colleague haspreviously sent you. When you do this, choose [Reply All] so that you also get a copy of your reply.The reply should now appear in your Inbox. By default, the messages are arranged by date with thenewest on top. To turn on conversations:1. Click on the VIEW tab2. Click on Show as Conversations in the Messages group on the VIEW ribbon3. A prompt will appear asking you if you want to sh
3 3. An Untitled - Appointment window will open in which you can enter a subject, location and description, along with other information. For the Subject, type in something appropriate (or Outlook Training Session if you can't think of anything) 4. Move to the Location box (either use the mouse or press the Tab key next to the letter Q on the keyboard) and type in the location name (or .