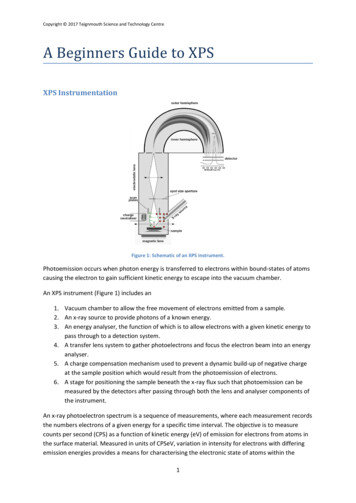
Transcription
XPS 13 7390Setup and SpecificationsRegulatory Model: P82GRegulatory Type: P82G003May 2020Rev. A03
Notes, cautions, and warningsNOTE: A NOTE indicates important information that helps you make better use of your product.CAUTION: A CAUTION indicates either potential damage to hardware or loss of data and tells you how to avoid theproblem.WARNING: A WARNING indicates a potential for property damage, personal injury, or death. 2019-2020 Dell Inc. or its subsidiaries. All rights reserved. Dell, EMC, and other trademarks are trademarks of Dell Inc. or itssubsidiaries. Other trademarks may be trademarks of their respective owners.
Contents1 Set up your XPS 13 7390. 42 Views of XPS 13 7390. 6Front.6Right. 6Left. 7Base. 7Display. 8Bottom. 93 Specifications of XPS 13 7390.10Dimensions and weight.10Processors. 10Chipset. 10Operating system.11Memory. 11Ports and connectors. 11Communications.12Audio. 12Storage. 13Media-card reader.13Keyboard. 13Camera. 14Touchpad.14Touchpad gestures. 15Power adapter. 15Battery.15Display.16Fingerprint reader (optional).17Video. 17Computer environment.174 Keyboard shortcuts.185 Getting help and contacting Dell.20Contents3
1Set up your XPS 13 7390NOTE: The images in this document may differ from your computer depending on the configuration you ordered.1. Connect the power adapter to the primary Thunderbolt 3 (USB Type-C) port with Power Delivery (the USB Type-C port adjacent tothe power-adapter port) and press the power button.NOTE: To conserve battery power, the battery might enter power saving mode. Connect the power adapter andpress the power button to turn on the computer.2. Finish operating system setup.For Ubuntu:Follow the on-screen instructions to complete the setup. For more information about installing and configuring Ubuntu, see theknowledge base articles SLN151664 and SLN151748 at www.dell.com/support.For Windows:Follow the on-screen instructions to complete the setup. When setting up, Dell recommends that you: Connect to a network for Windows updates.NOTE: If connecting to a secured wireless network, enter the password for the wireless network access whenprompted.If connected to the internet, sign-in with or create a Microsoft account. If not connected to the internet, create an offline account.On the Support and Protection screen, enter your contact details.3. Locate and use Dell apps from the Windows Start menu—RecommendedTable 1. Locate Dell appsResourcesDescriptionMy DellCentralized location for key Dell applications, help articles, and other important information about yourcomputer. It also notifies you about the warranty status, recommended accessories, and software updatesif available.4Set up your XPS 13 7390
Table 1. Locate Dell o-actively checks the health of your computer’s hardware and software. The SupportAssist OS Recoverytool troubleshoots issues with the operating system. For more information, see the SupportAssistdocumentation at www.dell.com/support.NOTE: In SupportAssist, click the warranty expiry date to renew or upgrade your warranty.Dell UpdateUpdates your computer with critical fixes and latest device drivers as they become available. For moreinformation about using Dell Update, see the knowledge base article SLN305843 at www.dell.com/support.Dell Digital DeliveryDownload software applications, which are purchased but not pre-installed on your computer. For moreinformation about using Dell Digital Delivery, see the knowledge base article 153764 at www.dell.com/support.Set up your XPS 13 73905
2Views of XPS 13 7390Front1. Power and battery-status lightIndicates the power state and battery state of the computer.Solid white—Power adapter is connected and the battery is charging.Solid amber—Battery charge is low or critical.Off—Battery is fully charged.NOTE: On certain computer models, the power and battery-status light is also used for system diagnostics. For moreinformation, see the Troubleshooting section in your computer’s Service Manual.2. Microphones (4)Provide digital sound input for audio recording, voice calls, and so on.Right1. Right speakerProvides audio output.2. microSD-card slotReads from and writes to the microSD card. The computer supports the following card types: microSecure Digital (SD) microSecure Digital High Capacity (SDHC) microSecure Digital Extended Capacity (SDXC)3. USB 3.1 Gen 2 (Type-C) port with Power Delivery/DisplayPortConnect peripherals such as external storage devices, printers, and external displays.Supports Power Delivery that enables two-way power supply between devices. Provides up to 7.5 W power output that enables fastercharging.NOTE: A USB Type-C to DisplayPort adapter (sold separately) is required to connect a DisplayPort device.4. Headset portConnect headphones or a headset (headphone and microphone combo).6Views of XPS 13 7390
Left1. Security-cable slot (wedge-shaped)Connect a security cable to prevent unauthorized movement of your computer.2. Thunderbolt 3 (USB Type-C) port with Power Delivery (Primary)Supports USB 3.1 Gen 2 Type-C, DisplayPort 1.2, Thunderbolt 3 and also enables you to connect to an external display using a displayadapter. Provides data transfer rates of up to 10 Gbps for USB 3.1 Gen 2 and up to 40 Gbps for Thunderbolt 3. Supports PowerDelivery that enables two-way power supply between devices. Provides up to 5 V/3 A power output that enables faster charging.NOTE: A USB Type-C to DisplayPort adapter (sold separately) is required to connect to a DisplayPort device.NOTE: This is the primary port for power supply. Connect the power adapter to this Thunderbolt 3 (USB Type-C)port with Power Delivery.3. Thunderbolt 3 (USB Type-C) port with Power DeliverySupports USB 3.1 Gen 2 Type-C, DisplayPort 1.2, Thunderbolt 3 and also enables you to connect to an external display using a displayadapter. Provides data transfer rates up to 10 Gbps for USB 3.1 Gen 2 and up to 40 Gbps for Thunderbolt 3. Supports Power Deliverythat enables two-way power supply between devices. Provides up to 5 V/3 A power output that enables faster charging.NOTE: A USB Type-C to DisplayPort adapter (sold separately) is required to connect a DisplayPort device.4. Battery-charge status buttonPress to check the charge remaining in the battery.5. Battery-charge status lights (5)Turns on when the battery-charge status button is pressed. Each light indicates approximately 20% charge.6. Left speakerProvides audio output.Base1. TouchpadMove your finger on the touchpad to move the mouse pointer. Tap to left-click and two finger tap to right-click.2. Left-click areaPress to left-click.3. Right-click areaPress to right-click.Views of XPS 13 73907
4. Power button with optional fingerprint readerPress to turn on the computer if it is turned off, in sleep state, or in hibernate state.When the computer is turned on, press the power button to put the computer into sleep state; press and hold the power button for 10seconds to force shut-down the computer.Press and hold power button over 25 seconds to reset RTC battery if encounter no post issue.If the power button has a fingerprint reader, place your finger on the power button to log in.NOTE: You can customize power-button behavior in Windows. For more information, see Me and My Dell atwww.dell.com/support/manuals.NOTE: The power-status light on the power button is available only on computers without the fingerprint reader.Computers shipped with the fingerprint reader integrated on the power button will not have the power-status lighton the power button.Display1. CameraEnables you to video chat, capture photos, and record videos.2. Camera-status lightTurns on when the camera is in use.8Views of XPS 13 7390
Bottom1. Service TagThe Service Tag is a unique alphanumeric identifier that enables Dell service technicians to identify the hardware components in yourcomputer and access warranty information.Views of XPS 13 73909
3Specifications of XPS 13 7390Dimensions and weightTable 2. Dimensions and weightDescriptionValuesHeight:Front7.80 mm (0.31 in.)Rear11.63 mm (0.46 in.)Width301.76 mm (11.88 in.)Depth199.24 mm (7.84 in.)Weight (maximum)1.29 kg (2.84 lb)NOTE: The weight of your computer depends on theconfiguration ordered and the manufacturing variability.ProcessorsTable 3. ProcessorsDescriptionValuesProcessors10th Generation IntelCore i3-10110U10th Generation IntelCore i5-10210U10th Generation IntelCore i7-10510U10th Generation IntelCore i7-10710UWattage15 W15 W15 W15 WCore count2446Thread count48812SpeedUp to 4.1 GHzUp to 4.2 GHzUp to 4.9 GHzUp to 4.7 GHzCache4 MB6 MB8 MB12 MBIntegrated graphicsIntel UHD GraphicsIntel UHD GraphicsIntel UHD GraphicsIntel UHD GraphicsChipsetTable 4. ChipsetDescriptionValuesChipsetIntegrated in the processorProcessor10th Generation Intel Core i3/i5/i710Specifications of XPS 13 7390
Table 4. Chipset(continued)DescriptionValuesDRAM bus width64-bitFlash EPROM32 MBPCIe busUp to Gen3.0Operating system Windows 10 Home (64-bit)Windows 10 Professional (64-bit)UbuntuMemoryTable 5. Memory specificationsDescriptionValuesSlotsOnboard memoryNOTE: The memory modules are integrated on thesystem board. If the memory modules aremalfunctioning and need to be replaced, a replacementof the system board is necessary.TypeDual-channel LPDDR3Speed2133 MHzMaximum memory16 GBMinimum memory4 GBConfigurations supported 4 GB LPDDR3 at 2133 MHz8 GB LPDDR3 at 2133 MHz16 GB LPDDR3 at 2133 MHzUSB Two USB Thunderbolt 3 (Type-C) ports with Power DeliveryOne USB 3.1 Gen 2 (Type-C) port with Power Delivery/DisplayPortAudioOne headset (headphone and microphone combo) portVideoDisplayPort (DP) 1.2 support through a USB Type-C connectorMedia card readerOne microSD-card slotDocking portNot applicablePorts and connectorsTable 6. External ports and connectorsExternal:Specifications of XPS 13 739011
Table 6. External ports and connectors(continued)External:Power adapter portDC-IN through a USB Type-C connectorSecurityOne security-cable slot (wedge-shaped)Table 7. Internal ports and connectorsInternal:M.2One M.2 2230/2280 slot for solid-state driveNOTE: To learn more about the features of differenttypes of M.2 cards, see the knowledge base articleSLN301626.CommunicationsWireless moduleTable 8. Wireless module specificationsDescriptionValuesModel numberRivet Killer AX1650WTransfer rateUp to 2400 MbpsFrequency bands supported2.4 GHz/5 GHzWireless standards WiFi 802.11a/b/gWi-Fi 4 (WiFi 802.11n)Wi-Fi 5 (WiFi 802.11ac)Wi-Fi 6 (WiFi 802.11ax)Encryption 64-bit/128-bit WEPAES-CCMPTKIPBluetoothBluetooth 5 (Windows 10 supports Bluetooth 5 with the latestWindows update)AudioTable 9. Audio specificationsDescriptionValuesControllerRealtek ALC3271-CG with Waves MaxxAudio ProStereo conversionSupportedInternal interfaceHigh Definition AudioExternal interface7.1 channel output, universal audio jack supports microphone-in,stereo headphones, and headset combo12Specifications of XPS 13 7390
Table 9. Audio TwoInternal speaker amplifierSupported (audio codec built-in amplifier)External volume controlsKeyboard shortcut controlsSpeaker output:Average2WPeak2.5 WSubwoofer outputNot supportedMicrophoneDual-array microphonesStorageYour computer supports one M.2 2230/2280 solid-state drive (either PCIe/NVMe or SATA).NOTE: The M.2 2230 and M.2 2280 solid-state drives each has a unique thermal plate. The thermal plates cannot beinterchanged.Table 10. Storage specificationsStorage typeInterface typeCapacityM.2 2230 solid-state drivePCIe NVMe Gen3 x2 NVMe, up to 32GbpsUp to 256 GBM.2 2280 solid-state drivePCIe Gen3 x4 NVMe, up to 32 GbpsUp to 2 TBMedia-card readerTable 11. Media-card reader specificationsDescriptionValuesTypeOne microSD-card slotCards supported Micro Secure Digital (mSD)Micro Secure Digital High Capacity (mSDHC)Micro Secure Digital Extended Capacity (mSDXC)KeyboardTable 12. Keyboard specificationsDescriptionValuesTypeBacklit keyboardLayoutQWERTYNumber of keys United States and Canada: 82 keysSpecifications of XPS 13 739013
Table 12. Keyboard specifications(continued)DescriptionValues SizeUnited Kingdom: 83 keysJapan: 86 keysX 19.05 mm key pitchY 18.05 mm key pitchShortcut keysSome keys on your keyboard have two symbols on them. Thesekeys can be used to type alternate characters or to performsecondary functions. To type the alternate character, press Shiftand the desired key. To perform secondary functions, press Fn andthe desired key.NOTE: You can define the primary behavior of thefunction keys (F1–F12) changing Function Key Behaviorin BIOS setup program.See Keyboard shortcutsCameraTable 13. Camera specificationsDescriptionValuesNumber of camerasOneTypeFixed-focus lensLocationTop-mount front cameraSensor typeCMOS sensor technologyResolution:Still image0.9 megapixel (HD)Video1280 x 720 (HD) at 30 fpsDiagonal viewing angle78 degreesTouchpadTable 14. Touchpad al305Vertical305Horizontal105 mm (4.13 in.)Vertical65 mm (2.56 in.)Dimensions:14Specifications of XPS 13 7390
Touchpad gesturesFor more information about touchpad gestures for Windows 10, see the Microsoft knowledge base article 4027871 atsupport.microsoft.com.Power adapterTable 15. Power adapter specificationsDescriptionValuesTypeSFF 45 W (USB Type-C)Input voltage100 VAC–240 VACInput frequency50 Hz–60 HzInput current (maximum)1.30 AOutput current (continuous) Rated output voltage20 VDC/15 VDC/9 VDC/5 VDC20 VDC/2.25A15 VDC/3 A9 VDC/3 A5 VDC/3 ATemperature range:Operating0 C to 40 C (32 F to 104 F)Storage-40 C to 70 C (-40 F to 158 F)BatteryTable 16. Battery specificationsDescriptionValuesType4-cell "smart" lithium-ion (52 WHr)Voltage7.60 VDCWeight (maximum)0.22 kg (0.49 lb)Dimensions:Height257.60 mm (10.14 in.)Width98.60 mm (3.88 in.)Depth4.30 mm (0.17 in.)Temperature range:Operating0 C to 35 C (32 F to 95 F)Storage-40 C to 65 C (-40 F to 149 F)Operating timeVaries depending on operating conditions and can significantlyreduce under certain power-intensive conditions.Specifications of XPS 13 739015
Table 16. Battery specifications(continued)DescriptionValuesCharging time (approximate)4 hours (when the computer is off)NOTE: Control the charging time, duration, start andend time, and so on using the Dell Power Managerapplication. For more information on the Dell PowerManager see, Me and My Dell on https://www.dell.com/Life span (approximate)300 discharge/charge cyclesCoin-cell batteryML1220Operating timeVaries depending on operating conditions and can significantlyreduce under certain power-intensive conditions.DisplayTable 17. Display specificationsDecsriptionValuesTypeFull High Definition (FHD)Full High Definition (FHD)Ultra High Definition (UHD)Panel technologyWide Viewing Angle (WVA)Wide Viewing Angle (WVA)Wide Viewing Angle (WVA)Luminance (typical)400 nits400 nits400 nitsHeight165.24 mm (6.51 in.)165.24 mm (6.51 in.)165.24 mm (6.51 in.)Width293.76 mm (11.57 in.)293.76 mm (11.57 in.)293.76 mm (11.57 in.)Diagonal337.82 mm (13.30 in.)337.82 mm (13.30 in.)337.82 mm (13.30 in.)Native resolution1920 x 10801920 x 10803840 x 2160Megapixels2.072.078.29Pixels per inch (PPI)166166331Contrast ratio (min)1000:11000:11000:1Response time (max)30 ms30 ms30 msRefresh rate60 Hz60 Hz60 HzHorizontal view angle898989Vertical view angle898989Pixel pitch0.15 mm0.15 mm0.08 mmPower consumption(maximum)2.9 W2.9 W5.41 WAnti-glare vs ctiveTouch optionsYesNoYesDimensions (active area):16Specifications of XPS 13 7390
Fingerprint reader (optional)Table 18. Fingerprint reader specificationsDescriptionValuesSensor technologyTouchSensor resolution500 dpiSensor area5.5 mm x 4.5 mmSensor pixel size108 x 88VideoTable 19. Discrete graphics specificationsDiscrete graphicsControllerExternal display supportMemory sizeMemory typeNot supportedNot supportedNot supportedNot supportedTable 20. Integrated graphics specificationsIntegrated graphicsControllerExternal display supportMemory sizeProcessorIntel UHD GraphicsDisplayPort (DP) 1.2 support through a USBType-C connectorShared system memory10th Generation IntelCore i3/i5/i7Computer environmentAirborne contaminant level: G1 as defined by ISA-S71.04-1985Table 21. Computer environmentDescriptionOperatingStorageTemperature range0 C to 35 C (32 F to 95 F)-40 C to 65 C (-40 F to 149 F)Relative humidity (maximum)10% to 90% (non-condensing)0% to 95% (non-condensing)Vibration (maximum)*0.66 GRMS1.30 GRMSShock (maximum)110 G†160 G†Altitude (maximum)-15.2 m to 3048 m (4.64 ft to 5518.4 ft)-15.2 m to 10668 m (4.64 ft to 19234.4 ft)* Measured using a random vibration spectrum that simulates user environment.† Measured using a 2 ms half-sine pulse when the hard drive is in use.Specifications of XPS 13 739017
4Keyboard shortcutsNOTE: Keyboard characters may differ depending on the keyboard language configuration. Keys used for shortcutsremain the same across all language configurations.Some keys on your keyboard have two symbols on them. These keys can be used to type alternate characters or to perform secondaryfunctions. The symbol shown on the lower part of the key refers to the character that is typed out when the key is pressed. If you pressshift and the key, the symbol shown on the upper part of the key is typed out. For example, if you press 2, 2 is typed out; if you pressShift 2, @ is typed out.The keys F1-F12 at the top row of the keyboard are function keys for multi-media control, as indicated by the icon at the bottom of thekey. Press the function key to invoke the task represented by the icon. For example, pressing F1 mutes the audio (refer to the tablebelow).However, if the function keys F1-F12 are needed for specific software applications, multi-media functionality can be disabled by pressingFn Esc. Subsequently, multi-media control can be invoked by pressing Fn and the respective function key. For example, mute audio bypressing Fn F1.NOTE: You can also define the primary behavior of the function keys (F1–F12) by changing Function Key Behavior inBIOS setup program.Table 22. List of keyboard shortcutsFunction keyRe-defined key (for multi-media control)BehaviorMute audioDecrease volumeIncrease volumePlay previous track/chapterPlay/PausePlay next track/chapterTask viewSwitch to external displaySearchToggle keyboard backlight (optional)Print screenInsert18Keyboard shortcuts
The Fn key is also used with selected keys on the keyboard to invoke other secondary functions.Table 23. List of keyboard shortcutsFunction keyBehaviorPause/BreakToggle scroll lockSystem requestOpen application menuToggle Fn-key lockPage up/increase brightnessPage down/decrease brightnessKeyboard shortcuts19
5Getting help and contacting DellSelf-help resourcesYou can get information and help on Dell products and services using these self-help resources:Table 24. Self-help resourcesSelf-help resourcesResource locationInformation about Dell products and serviceswww.dell.comMy DellTipsContact SupportIn Windows search, type Contact Support, and press Enter.Online help for operating port/linuxTroubleshooting information, user manuals, set up instructions,product specifications, technical help blogs, drivers, softwareupdates, and so on.www.dell.com/supportDell knowledge base articles for a variety of computer concerns1. Go to www.dell.com/support.2. On the menu bar at the top of the Support page, selectSupport Knowledge Base.3. In the Search field on the Knowledge Base page, type thekeyword, topic, or model number, and then click or tap thesearch icon to view the related articles.Learn and know the following information about your product:See Me and My Dell at www.dell.com/support/manuals. To locate the Me and My Dell relevant to your product, identifyyour product through one of the following:Product specificationsOperating systemSetting up and using your productData backupTroubleshooting and diagnosticsFactory and system restoreBIOS information Select Detect Product.Locate your product through the drop-down menu under ViewProducts.Enter the Service Tag number or Product ID in the searchbar.Contacting DellTo contact Dell for sales, technical support, or customer service issues, see www.dell.com/contactdell.NOTE: Availability varies by country/region and product, and some services may not be available in your country/region.NOTE: If you do not have an active Internet connection, you can find contact information about your purchase invoice,packing slip, bill, or Dell product catalog.20Getting help and contacting Dell
1. Connect the power adapter to the primary Thunderbolt 3 (USB Type-C) port with Power Delivery (the USB Type-C port adjacent to the power-adapter port) and press the power button. NOTE: To conserve battery power, the battery might enter power saving mode. Connect the power adapter and press the power button to turn on the computer. 2.
