Transcription
The version of 20170806Handheld Motion ControllerFor Engraving MachineDM500User’s Manual
1DM500 Motion Controller Introduction1.1 Introduction of ProductDigital Dream has a 20 years history in the numerical control industry, specializing in the research, development and production of various CNC (Computer Numerical Control) systems. DigitalDream aims to combinehigh quality and high reliability with affordability. We produce 1 axis to 6 axes CNC system.Thank you for choosing digital dream’s motion controllers.With a lots of examples and charts,this manualwill describe the features,functions and every operations of our controllers.Pls read this manual carefully beforeany assembling and using.Incorrect handling can result in injury and damage to persons and engravingmachine.Pls keep the manual carefully for convenient to read it at any time in need.DM500 is very professional 4 Axis CNC Motion Controller which is based on embedded system.DM500operates as a standalone system without the need of a computer,and with a pendant,it makes users very convenient to opreate the machines.Our controller adopts Embedded Operating System,by which the controller willnever get virus-infected.And the controller adopts look-ahead algorithm by which the the controller can readmore ahead 30-lines G-code than the operating.All the features guarantees high precision,accuracy and reliability.And the size is very small,oepreation is very easy,very suitable for all size of Engraving machines,Millingmachines and cutting machines and so on.1.2 Performance parameter of the DM5001) Max. 4 Axis;2-4 Axis linear interpolation,any 2 axis circular interpolation;2) 7 opto isolated digital outputs,8 opto isolated digital inputs;3) Support every Input and output port definition by users.4) The controller need 2 power supply,one power supply is for system power,one is for input and outputports power.Both input power is 24V,2A.5) Open-collector output, Max. output current is 500mA,can power the relay directly;6) Differential Pulse and direction output signal,Max. 500Khz per axis;7) Spindle Control: 3 I/O ports control 8 different speeds(3 lines 8 speeds),1 I/O control the Start/Stop;8) The System Support standard G-code.Also Support the popular CAD/CAM software,such as ArtCam,MasterCam,ProE and so on.9) USB flash disk support for G code file input;10) The control system can preview the process path before machining,and it makes the system moresteady,working smoothy and precise;11) Acceleration/Deceleration Mode: S curve;12) Support un-limited size file for machining;13) Manual/Automatic machining function;14) Support the operation to Start a G code from a specific line;15) Support for “Power Cut” recovery. Data is automatically saved;16) Support time-lock function;17) Support 4 kinds operation rights:visitor,operator,admin,super admin;Page -1DM500 User’s Manual
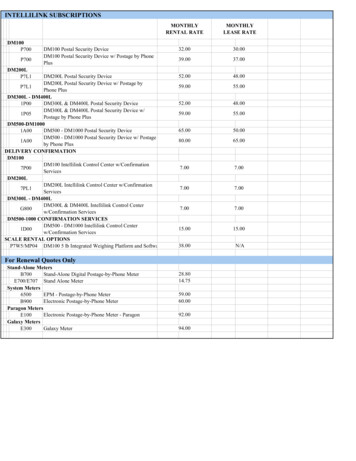
1.3 Appearance, Structure and Size of ProductThe DM500 motion controller contains the handheld motion controller,circuit switching wiring board,andHDMI digital high-definition transmission cable.The handheld motion controller and wiring board are communicated by 2 Meter 37 pins HDMI digitalhigh-definition transmission cable which is shielding twisted-pair cable to avoid interference.The wiring board can be installed by DIN linearguide ways No. C45.116m0m23mm93mmDM500 Pendant Size100 mmPicture 1-172mm118mm88 mmThe wiring board SizePage -2DM500 User’s Manual
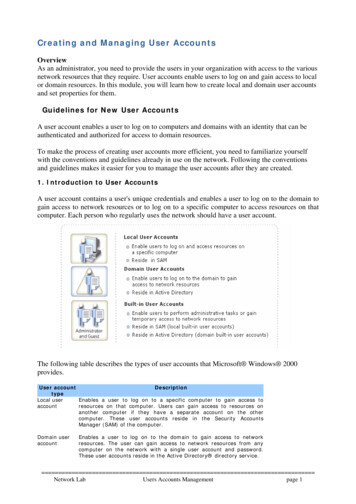
The front panel consists of 23 user keys and the 3.5’’ (480*320 ) LCD.3.5'' Screen23 user’s keys37 pins Male InterfacePage -337 pins Female InterfaceDM500 User’s Manual
1.4 Explanation of AbbreviationsWhen operating the DM500 Controller, the users will come across some English abbreviations. Here a listwith explanationsFRO: Feed Rate OverrideSRO: Spindle Rate OverrideSRJ: Jog Speed SettingF: Feed rate, unit is mm/minS: Spindle Speed, unit rev/min.X: The coordinate code of the X axis.Y: The coordinate code of the Y axis.Z: The coordinate code of the Z axis.A: The coordinate code of the A axisBUSY: The system is busy. You still can adjust FRO and SROREADY: READY mode, any operation can be doneRESET: Reset mode, controller is in “OFF” mode, no operation can be performedCONT: Continuous mode, each axis can be manually jogged with the arrow keysStep :Manual Step Mode,each axis can be jogged in defined stepsMPG: MPG mode. Operate the machine with the MPG (Manual Pulse Generator)AUTO: Run G code. Auto is showing when file is processing1.5 Notes and WarningsKeep away from exposure to moisture or water. This product contains sophisticated electronicsand must not get wet.Wiring warning: the IO input terminal of this controller supports equipment with source power (such asInductive Proximity Switch ). When using this kind of equipment, pay attention to the polarity. Avoid the terminal to be connect with GND. This controllers has analog output for spindle control (0-10V). Please avoidthis terminal to ever connect with GND as damage to the controller may occur.Operation warning. Please observe all security measures when operating the machine. The ESTOPmust be connected and properly labelled. In case of a problem, press the E-stop at once to avoiddamage to humans, animals and the equipment.High voltage danger. The DM500 is connected to18-32V DC. Obey and follow the electricity safetyrules of your country when connecting this equipment.Page -4DM500 User’s Manual
2WiringWiring Board DrawingPage -5
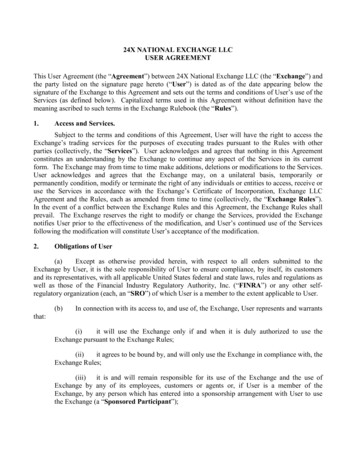
2.1 The Wiring Board InterfacePort Board for DM500Power supply For Inputs and OutputsDC24VCOM Proximity switchX Axis HomeBNBKY Axis HomeBUZ Axis HomeA Axis HomeMechanical swhtchProbeExtended Input Port 1(E-stop)Extended Input Port 2(Start)Extended Input Port tionport5.1KX04X08RXD5.1K5.1K.AP APAD AD-YZA Axis Signal Output Ports(the connections same as the X Axis as below shows).The Max. capacity of the outputports is 30V,500mA.DS26LS31Shieding Twist CableXP COM SpindleStart/stopM3/M5Line 1Line 2Line 3Error OutputCooling M8/M9RYLubrication M10/M11XPXD Y01Y03Y04Y05Y06Y07DC24VCOM-External Power SupplyXD-Y02Driver.Pulse PulseDirection Direction-PE.24VDC24VPower Supply For ContollerGNDNotice:1. The users should prepare two power supply switch for each controller.One is for the controllersystem,one is for the Inputs and Output ports.2. 24V GND is the power supply for the controller,COM and COM- is the common terminal for Inputand Output ports.3. The Low voltage for input signal is effective.By default it is the NPN switch.4. The pulse and direction signal is differential output.Page -6DM500 User’s Manual
2.2 The Wiring Board Ports definitionPin MarkDefinitionNotes24VPower supply 24VDC positive side for System powerGNDPower supply 24VDC negative side for system powerPEThe Power Supply is for controller system.DC24V,3A.SHELL GROUNDCOM Power supply 24VDC positive side for Inputs and Output Ports.COM-Power supply 24VDC negative side for Inputs and Output Ports.XP X Axis Pulse signal output XP-X Axis Pulse signal output -XD X Axis Direction signal output XD-X Axis Direction signal output -YP Y Axis Pulse signal output YP-Y Axis Pulse signal output -YD Y Axis Direction signal output The Power Supply is for Input and Output Ports.DC24V,3A.YD-Y Axis Direction signal output -These Outputs is for Servo Driver/Stepper Driver.ZP Z Axis Pulse signal output Max. output 500Khz for each axis.ZP-Z Axis Pulse signal output -ZD Z Axis Direction signal output ZD-Z Axis Direction signal output -AP A Axis Pulse signal output AP-A Axis Pulse signal output -AD A Axis Direction signal output AD-A Axis Direction signal output -X01X Axis Limit/Home Signal Input PortX02Y Axis Limit/Home Signal Input PortX03Z Axis Limit/Home Signal Input PortX04A Axis Limit/Home Signal Input PortX05Probe Signal Input PortX06Extended Input Port 1,can be configured as E-STOPX07Extended Input Port 2,can be configured as Start or ProbeX08Extended Input Port 3,can be configured as PauseY01Spindle Start/Stop Output PortY02Spindle Speed Setting 1 Output PortY03Spindle Speed Setting 2 Output PortThese Output ports for the controls of Spindle.Y04Spindle Speed Setting 3 Output PortY02/Y03/Y03 are for settings of spindle 8 different speeds.Y05Alarm OutputOpen-collector ng output Port (M8/M9)Y07Lubrication output Port (M10/M11)RXDReceive Port of communicationTXDSend Port of CommunicationGNDGround of Communication PortThese all Input Ports.Support mechanical/Opto/Proximity Limited SwitchLimited Switch Power:24VMode: NPNEffective Voltage:0VRS232Page -7DM500 User’s Manual
2.3 The Wiring Board Ports Description2.3.1 The Power Supply WiringIn general, the power supply of industrial control’s equipment products are complex. They have manydifferent ground levels. The internal power structure of this product is as follows:It’s recommended to add a filter to prevent the electric interference.The power for input/output ports is 24VDC,the power for Main controller system is also 24VDC.Becauseinside of the controller system,the power design for input/output ports and main controller already isolated,itsrecommended to give them two independent power supply.LNNFilterFilterPEPESwitch PowerSupply 1 24VLDB37GNDSwitch PowerSuply 2PEGND 24VPE24VCOM-GNDCOM PEPEMain controller use the same power supply with Input/output ports.(no recommended).LDB37NFilterPESwitch PowerSupply 24VGNDPE24VCOM-GNDCOM PEPEPage -8DM500 User’s Manual
2.3.2 Input Ports Wire MethodWhen the Inputs and Output Ports (COM COM-) use the independent Power supply:COM MotionControllerDC24VXxxCOM-COM DC24VMotionControllerBNBKXxxBUProximity SwitchNPN Normal Open ModeCOM-When the Inputs and Output Ports (COM COM-) share the same Power supply with the controller:24VMotionControllerCOM XxxCOMGND24VMotionControllerCOM Proximity SwitchNPNNormal Open ModeBNBKXxxBUCOMGNDIt’s the best to use the first independent power supply method.Logic low Effective.NPN normal openproximity switch.Page -9DM500 User’s Manual
2.3.3 Output Ports Wire MethodWhen the Inputs and Output Ports (COM COM-) use the independent Power supply:(Recommended)If you connect a Relay hereit’s best to add a DiodeMotionControllerThe Max. capacity of theoutput ports is 30V,500mARYYxxDC 24VYxxCOM-When the Inputs and Output Ports (COM COM-) share the same Power supply with the controller:MotionController24VCOM The Max. capacity of theoutput ports is 30V,500mAIf you connect a Relay hereit’s best to add a DiodeRYYxx1.00.80.60.40.20.0YxxCOMGNDThere is 7 output pins,the electric circuit just as the above file showing.When you connect the relay,pls install a fly-wheel diode as the drawing showing.The first Independent power supply method is recommended.Page -10DM500 User’s Manual
2.3.4 Pulse and Direction signal Output wiringTake X axis for example:MotionControllerPulse XP Pulse-XP-Direction XD ldingCablePls use twist Shieldingcable for the connectionY,Z,A axis wiring are same as X axis;The controller use differencial output methods,And The Max. Output Frequency is 500Khz;Cannot connect as Common anode and cathode;Page -11DM500 User’s Manual
3.3.1Definition of keysThe Panel Keys showed as the photo below: Page -12DM500 User’s Manual
3.2Definition of keysKeys IconDefinitionKeys IconDefinitionMain control page,files display page andParameter page Shift.”CONT MODE” and “STEP MODE” shift.1: Positive movement of A Axis;2: Data 7 input; 2:3: Parameter value increases1: Spindle manual Start/Close2: Sign “-” input.1: Positive movement of Y Axis;2: Data 7 input;3: Cursor moves up.1: Go To workpiece origin.2: Data 0 input1: Z Axis up;2: Data 9 input1: X and Y Zero Clearing.2: Sign “.” inputGo to Operation PageToolpath display switch1:2:3:4:1: Continue working from Break point;2: Backspace.X Axis move left;Data 4 input;Cursor moves left;Page up in menu.1: High/low speed shift;2: Data 5 input.1: Find Machine Zero;2: Cancel.1:2:3:4:1: Z and A Zero Clearing.2: Enter/Select.X Axis moves right;Data 6 input;Cursor moves right;Page down in menu.Shift to the function,such as feeding ratio,Jog distance,spindle speed,coordinationselection and so on.Start operation1: Z Axis down;2: Data 1 input;3: Parameter value decreasesPause operation1: Negative movement of Y Axis;2: Data 2 input;3: Cursor moves down.Reset and E-STOP.Shift between Reset and Ready1: Negative movements for A Axis;2: Data 3 Input.Page -13DM500 User’s Manual
4.Motion Controller System Description4.1Main Page Description1234567891: Controller Current Mode2: Controlller Working Status3: Current machining file.(if the files name in red background color,means the controller cannot read theU-disk)4: Total working time5: Current operation Rights6: The information page7: Main Page8: File Page9: Parameter Page4.2Menu tree structureMenuMain pageFile pagePara pagePage -14DM500 User’s Manual
Main PageFile PageGoto work ZeroPara PageLoading FileAll GoTo ZeroCopy FileX GoTo ZeroPaste FileY GoTo ZeroDelete FleZ GoTo ZeroSearch the Index No. of the Para.Parameter KindsMotor SettingsHand SettingAutomatic SettingsClearSpindle Settings.All Axis ClearPara Backup UX Axis ClearY Axis ClearRestore Para UZ Axis ClearFind Mach ZeroPassword SettingAll Find Mach ZeroOperator Password SettingX Find Mach ZeroAdmin Password SettingY Find Mach ZeroSuper Admin Password SettingZ Find Mach ZeroSoftware RegistrationProbeStart LineLifetime SettingUnlockBreakLifetime SettingNearest PointMul OriginSave originLoad OriginPage -15DM500 User’s Manual
4.3Main Page Description4.3.1 Page description of Main Page1234567810911Press the key,the Screen goes to Main Page.The Page discription:1. Coordinate display: Here you can see the absolute coordinate and mechanical coordinate;2. FRO: FRO controls the Feed Speed. The range is 0%-300%,” %” and “-%” adjust the speed in 10%increments;3. SJR: SJR controls the jogging of the machine;When in Cont Mode, ” %” and “-%” can adjust the speed in 10% increments;When in Step Mode, ” %” and “-%” can change from 0.01mm to 0.1mm to 1mm and to 10mm;4. F: F is the Feeding Speed.It shows the current machining speed;It shows the fixed feeding speed;5. S: S is the spindle speed.It shows the current spindle speed;It also display the spindle status ofSTOP/START;6. Current workpiece Coordination: G54/G55/G56/G57/G58/G59 workpiece coordination;Mach Coordination;7. Manually High/low speed;8. Output signal status;9. Input signal status;10. Version information and Programming date;11. Machining information: G code information when automatically machining;Errors.Page -16DM500 User’s Manual
4.3.2 The Operation of Main PageWhen at the Main Page,and Press the key4.4and the page pop up the list as above.File Page Description4.4.1 Page description of File Page123Press the key, and press the key,the screen goes to File Page as above.By default the page shows the root of U-disk,by pressing other keys you can organize the files.The displayswill show all folders and files in the root directory. The Name of folders and files, the size of files and the timeand date of manipulation. The blue strip indicates the current valid target location.Page -17DM500 User’s Manual
Pressto move upPressto move downPressto quit the file management pagePressIf the blue bar is at “ . .” (as 1), the Enter button will change to the last directory. If the blue barhighlights a folder(as 2), it will open the folder. If the blue bar highlights a G code file(as 3),pressbutton will load the G code and go back to the Main Page for processing the G-code file., this4.4.2 The Operation of the File PageWhen at the File Page,and Press the keyand the page pop up the list as below:Page -18DM500 User’s Manual
4.5Parameter Page Description4.5.1 Page description of Parameter PagePress the key, and press the key,the screen goes to Parameter Page as below:213The Page discription:1. Parameter Name;2. Current Parameter Information,as the photo shows,103 is the Index No;”A axis Manually high speed” isthe parameter name,and “3000” is the parameter Value.3. Current selected parameter value range and unit.Pressto move upPressto move down,to move the cursor and select the right Index No.Pressto select the parameter and start to write it.Press the data keys and pressvalues;if press the keyto save thethen cancelled saving.Page -19DM500 User’s Manual
4.5.2 The Operation of the Parameter PageWhen at the Parameter Page,and Press the keyand the page pop up the list as above.About the File management,we will describe it in next chapter.Page -20DM500 User’s Manual
5.The Motion Controller DM500 Operation5.1System statusThe Motion Controller will have some different status,now we explain the different status:5.1.1 System Status: ResetConditions: when e-stop switch is triggered; when reset key is pressed; Error occured (Hard-limited switch or soft limited switches are triggered.)At the conditons,the system will shift the status to “Reset”,and stop running,to make sure the savety of theoperators and the machines.5.1.2 System Status:ReadyConditions: The E-stop switch is released and no any errors.the system shift from “RESET” to “READY”;At “Ready” Status the controller can work normally.5.1.3 System Status: BusyConditions: When in the Ready status,and select a G-code file and run it,the controller status will shift to “Busy”status.The machine is processing a G-code file.5.1.4 System Status: PausePress this key5.2to Pause the Operation.The preparation of the controller system5.2.1 Axis Direction and Pulse equivalent adjustment5.2.1.1Axis DirectionWhen we debug the machine,firstly we must confirm the every axis direction based on right-hand rule incoordination.If the direction is reverse,you can change the Index No. 390-393 values,change to 1 to 0 or 1 to 0.5.2.1.2 Pulse equivalent adjustmentThe unit of the Pulse equivalent is “p/mm”,it means that when the machine run 1mm how many pulses thecontroller must send.For example,if it is 1000p/mm,the machine running 1mm,then the controller should send 1000 pulses.The Precision: 1/1000mm 0.001mm 1umWhen the pulse equivalent is big,the machining precision is high.And pulse equivalent determin the Max.feed speed,the relationship is:Max feed speed(mm/min) (1/pulse equivalent(p/m)) x frequency(p/s) x 60When the controller Max. frequency is 500Khz,and the pulse equivalent is 1000p/mm,the machine Max.feed speed is 30m/min.Page -21DM500 User’s Manual
5.2.2 The Hard Limit and Soft Limit FunctionThe Hard Limit and Soft Limit determin the machine running size of X/Y/Z Axis.5.2.2.1Soft Limit SettingThe set value will trigger the limit signal.The limit values refer to the machine coordinates, not the work piece coordinate.So only when the Machinecoordinates fixed,the soft limit can be effective.There are two soft limits on positive and negative direction eachaxis.Operation: Fix the Limit/Home Position of Machine coordinate. On the Positive direction users can set a Soft Limit; On the Negative direction users can set a Soft Limit.5.2.2.1Hard Limit SettingThere is one hard limit on one axis,the hard limit share the same limited-switch(Home switch) withHome/Limit of Machine Coordinate on one direction.At the reverse direction,there can be set as the soft-limit.Operation: Configure the home swich as the drawing shows at 2.3.2 (Page 9); Set the Index No. 116 value set as 2,set it as “Negative limit signal(LIMIT--)”Notice: The Input voltage level of limit signal setting is Para Index No. 400-403 and 408-411.5.2.3 Manually Operation of the ControllerThe handheld controller can supply us 3 kinds manually positioning function,these are:Continuously lowspeed feeding;Continuously high speed feeding;Manual Step Mode.5.2.3.1Continuously low speed feedingFeeding to one direction at low speed.Condition: Controller is in READY status; Operate mode is CONT.Operation: Press the keyand shift into low speed mode Select and press the axis key (X 、X-、Y 、Y-、Z 、Z-、A 、A-),then the controller feed in lowspeed continuously. keep on pressing the axis direction key,that can make it moving continuously at low speed; The speed can be set at “SJR” or parameter adjustment.5.2.3.2Continuously High speed feedingFeeding to one direction at high speed.Condition: Controller is in READY status; Operate mode is CONT.Page -22DM500 User’s Manual
Operation: Press the keyand shift into high speed mode Select and press the axis key (X 、X-、Y 、Y-、Z 、Z-、A 、A-),then the controller feed in highspeed continuously. keep on pressing the axis direction key,that can make it moving continuously at high speed; The speed can be set at “SJR” or parameter adjustment.Notice:Normally the high feeding speed is faster then the low feeding speed,pls confirm the axis direction beforeopretation,be sure the safety for the operator and machine.5.2.3.3Step ModeManual Step Mode,each axis can be jogged in defined stepsConditions: Controller is in READY status; Operate mode is STEPOperation: Select and press a key(X 、X-、Y 、Y-、Z 、Z-、A 、A-) the machine jog at the certain directionand axis; press one time and jog at a defined step; In STEP MODE,the distance of one jog is 0.01mm/0.1mm/1mm/10mm Press combination keysandorto change the STEP distance; The STEP jogging speed is same as the ones when in CONT Mode.5.2.4 Running a G Code File5.2.4.1Start running G codeConditions: Controller is in READY status; The operation mode shift to “CONT” or “STEP” modeOperation: Press the start key; the controller will start to process the G-code file selected; The controller status shift from “READY” to “BUSY” When the work finished,the controller status back to “READY”.Page -23DM500 User’s Manual
5.2.5 Fine Machine ZeroBecasue the G54 to G59 Coordiantes are all refers to Mach (Machine) Coordinate,every time the usersstart the controller,should check the origin position and find the machine zero of each axis to confirm theposition.5.2.5.1All axis Find Machine ZeroConditions: Controller is in READY status; The screen go to “Main page”.Operation: Press the key; all the axis move to the limited switch position on the order; after homing,each axis moves away from home switch for a certain distance.(can be set at parametersetting); By default the Homing Sequence is Z-XY-A5.2.5.2Single axis Find Machine ZeroConditions: Controller is in READY status; The screen go to “Main page”.Operation (Take Example as X axis): Press the keyand Find Mach ZeroX Find Mach Zero,then PressTo Confirm. after homing,X axis moves away from home switch for a certain distance.(Parameter setting).Notice:When homing(GoTO find Mach Zero),the soft-limit is invalid.The soft limit can only become effectiveafter the machine coordination built up.The related Index No. is paration of the workpiece5.3.1 Choose Workpiece CoordinateThe controller supplies G54-G59 6 kinds workpiece coordination and one MACH machine coordination.Before running a G code file,the users need to decide one work piece coordinate.Conditions: Controller is in READY status; The screen go to “Main page”.Page -24DM500 User’s Manual
Operation: Continuously Press the Key Keep on pressinguntil the cursor is on coordinate G54-G59 is highlighted;until your coordinate is selected; The current position always refers to thecurrent coordinate.5.3.2 Set a Zero(Origin) Point for workpiece5.3.2.1XY axis and ZA Axis Zero ClearingAfter the workpeice coordinate seleted and before running a G-code,the users should adjust the position theworkpiece and the cutter(Z axis position) manually.Firstly move the X and Y axis to the origin position manually,Press the Key tomake X and Yaxis Zero-clearing.Then Move the Z (and A) axis to the origin position manully and press thekeyto make Z (and A) axis Zero-Clearing.5.3.2.2Single Axis Zero Clearing (Take X Axis as example)When the controller is at READY status.Move X Axis to the origin position manually.Press the Keyand then press5.3.2.3Clearand X Axis Clear,then write into “0” and press the key.Workpiece origin position save and loadConditions: Controller is in READY status; The screen go to “Main page”.Operation (Take Example as X axis): Press the keyand thenMul OriginandSave origin,then Pressto confirmto save the Origin Position Successively press the Keyand thenMul OriginandLoad Origin,then pressto load the origin position.Page -25DM500 User’s Manual
5.4About Tools5.4.1 Automatical ProbeAutomatical Probe function is to Meansure the different kinds cutter’s position on Z Axis by the toolsensor.As the origin position of the workpiece and thickness of the tool sensor already fixed,its very easy tomeasure out the position of the cutters.5.4.1.1 Fixed Position of Tool SensorFirstly we fixed the the Tool sensor,and measure out the relative distance between the tool sensor and workpiece.(X,Y,Z)231The working PieceTool SensorThe thickness of tool sensorThe machine tableCondition: Controller is in READY status; The screen go to “Main page”Operation:1) Set the Para Index No.68 value to 1;(The Parameter 68 value is 1,means Probe function enabled);2) By Para Index No.70,Set the probe port effective electric level.Normally Open is default;3) Set Para Index No. 71 value to 1.Fix the tool sensor.(The parameter 71 value is 1,means Initial tool’sposition is fixed position.)4) Set the tool sensor position,as the above drawing no.2 shows,enter the XYA position at parameter72,73,74;5) Probe at the first time.(Measure the thickness of the tool sensor.)6) Move the Z axis to the surface of work piece,press key7)PressandProbeto zero-clearing;to measure the thickness of tool sensor;8) Save the thickness of the tool sensor into the controller system;9) If the user don’t change the origin positon of the work piece,and when the user changed different lengthcutters,just measure the thickness of the tool sensor and take the new data.10) If the Z Axis Origin(Zero) position is changed,just repeat the action from 6-9.Page -26DM500 User’s Manual
5.4.1.2Floating Tool SensorIf use the floating tool sensor,means the X and Y axis positon of the tool sensor is not fixed.We need tomove the cutter above the tool sensor manually.2 Move the cutter above the tool sensor manuallyThe origin position of the cutter13ToolSensor The thickness of tool sensorThe working PieceThe machine TableThe probe processing of floating tool sensorCondition: Controller is in READY status; The screen go to “Main page”Operation1) Set the Index No.68 value to 1;(The Parameter 68 value is 1,means Probe function enabled);2) By Index No.70,Set the probe port effective electric level.Normally Open is default;3) Set the probe way.Set Index No. 71 value to 0.(The parameter 71 value is 0,means Initial tool’s positionis current position.)4) Go to Parameter 69 and type in the thickness of the tool sensor.You should know it in advance.5) Move the cutter above the tool sensor manually;6) Press the keyandProbe,the pressPage -27to probe.DM500 User’s Manual
5.5 Running a G code file5.5.1 Load a G Code FilePls Insert the U-disk into the interface of the controller.The G-code files are in the U-disk.Conditions: Controller is in READY status;Operations: Insert a U-disk; Press the Key of Menu and shift to the “File Page”,the screen will pop up the files list of U-disk. Use the key ofandandto move the cursor up and down,and press the keysto page left and right,to find the G-code file you want to run. Press the keyto load the G-code file,the then screen goes to the control page,and the selectedfile is the current running file.5.5.2 Run a G-code fileBy previewing and simulating toolpath Function,you can check if the G code file is correct.Conditions: Controller is in READY status;Operations: Press MENU key and shift to File Page.The screen popup the files list from U-disk. Use the key ofpageandto move the cursor up and down,and press the keys and toleft and right,to find the G-code file you want to run. Press the keyto load the G-code file,the then screen goes to the control page,and the selectedfile is the current running file. Press the Key of startand the contoller start to run the file you selected.5.5.3 The Operation of running a G-code File5.5.3.1 Breakpoint OperationWhen there is Power-cutoff,Reset,E-stop,Limted-switch alarm and U-disk disconnected happened,thatwill produce a breakpoints.But,our system can automatically record the breakpoints and continue to processfrom the breakpoint.Conditions: Controller is in READY status; The screen go to “Main page”Page -28DM500 User’s Manual
Operation: Press the key,and the controller will start to work again from the breakpoint line.Notice:Only when you can find out the right origin positon after power cutoff,then you can work again from thebreakpoint,or the position is no right.5.5.3.2Start a G code from a specific lineConditions: Controller is in READY status; The screen go to “Main page”Operation: Press the key,and pressStart Lineand enter into it to press Enter into the specific line No.s.Then Press the keyto confirm.The controller will run theG-code from this line.Notice:If the line No. is very big,then the system may need more time to find the line.5.5.3.3Start a G code from the nearest positionConditions: Controller is in READY status; The screen go to “Main page”Operation: Move the cutter near the workpeice.Press the key,and press Nearest Point ,then controllerwill find a nearest point from the position of the cutter and start to process from this nearest point.Notice:The Controller only can find the nearest point from X and Y axis of the coordinate.5.5.3.4Feed Rate Override(FRO)FRO controls the the machine real time Feed Speed.Use A and Z- to adjust the Feed Speed in 10%increments.The relationship betwen the real time feed speed and the F value is:Real time feed speed F(Feeding Value) x FRO
8) The System Support standard G-code.Also Support the popular CAD/CAM software,such as ArtCam,- MasterCam,ProE and so on. 9) USB flash disk support for G code file input;