Transcription
InterNACHIStudent Course Book“Inspecting Tile Roofs” Online Video nline-video-course.htm7,600 ILES.78AGINGPROCESS.82Metaltiles.84FIBER- ‐CEMENTTILES.87COMPOSITETILES.88
InterNACHIStudent Course BookWelcome to the InterNACHI video course on inspecting tile roofs.This course is designed to help you recognize and identify defects and damage, to determine thesources of those problems as often as possible and to make good recommendations.Roof tiles come in a huge variety of sizes, styles, materials and weights. Covering all facets of alltile types and styles lies beyond the scope of this course. We’ll be concentrating on the basics ofinstallation, defect recognition, and general performance performance characteristics. Along withroof tiles, we’ll cover related components like underlayment, flashing and fasteners. We’ll coverthe general, industry-accepted methods for installation, where to look for defects, how torecognize them, how to determine how serious they are, and how to tell when tile roofs are at ornear the end of their useful lives. The sections on inspecting for damage from wind and hail weredeveloped with the cooperation of members of the insurance and roofing industries.Although we’ll use common terminology throughout this course, you should keep in mind thatdifferent names for the same things are sometimes used in different parts of North America. Theexact terms you choose are not as important as making sure that you explain conditions clearlyand in a way that they will be understood.Tile roof installation methods can vary with the particular type and profile of tile, with themanufacturer’s requirements, with roof height and pitch, with the wind and climate zones inwhich the structure is located, and sometimes with jurisdictional regulations like those ofprovincial, state, county or city governments. Now, I know that sounds pretty complicated, but Ido have a little ray of sunshine for you, and that is that most tile manufacturers and jurisdictionsaccept the installation recommendations of the Tile Roof Institute, and their installation manualsfor moderate and cold weather climates are available for free on their website.Because of the many variables, this course will be limited to examining the properties of, andinstallation methods for a wide variety of the most common types of tile. In general, you’ll belooking to see that the installation method used appears to be adequately protecting the homefrom moisture intrusion and holding tiles in place.TYPES of TILEThe materials most commonly used for roofing tiles are clay and concrete. In the past, tiles madefrom fiber cement were common, but are no longer manufactured in the US due to legislationenacted to limit the use of asbestos in products. Tiles made from a variety of other materials arealso available.The Tile Roof Institute divides roof tiles into four profile classifications:1. Flat profile tiles like flat tiles have a surface rise of ½-inch orPage 2 of 90
InterNACHIStudent Course Bookless.2. Low profile tiles have a rise to width ratio equal to or less than 1 in 5, meaning the tile is amaximum of 1-inch high for every 5 inches inwidth.3. High profile tiles have a rise to width ratio greater than 1 in 5, meaning tiles are at least 1inch high for every 5 inches in widthPage 3 of 90
InterNACHIStudent Course Book4. Accessory tiles are tiles used in conjunction with low, medium or high profile field tiles.Accessory tiles are used at areas like ridges, rakes, hips, valleys and in starter courses.SIDE PROFILESTiles are installed shingle fashion, with each course overlapping tiles in the course below. Tiles inthe same course may interlock, may overlap, or may butt.Page 4 of 90
InterNACHIStudent Course BookPage 5 of 90
InterNACHIStudent Course BookPage 6 of 90
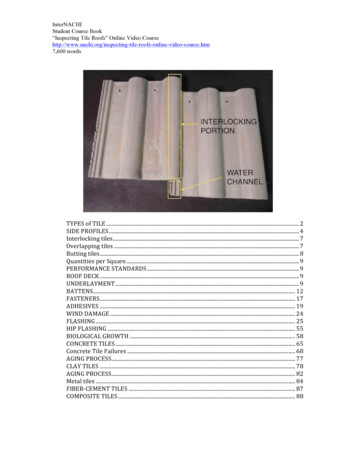
InterNACHIStudent Course BookInterlocking tilesInterlocking tiles are manufactured with edge profiles that fit together to keep tiles aligned andhelp seal against moisture intrusion. Interlocking tiles consist of a coverlock that overlaps anunderlock that also serves as a water channel. Different tiles will have different interlock profilesOverlapping tilesOverlapping tiles may be a two-piece pan and cover, or may be “S-tiles”. Pan tiles are installed incourses oriented vertically up and down the roof, with upper tiles overlapping lower tiles.Page 7 of 90
InterNACHIStudent Course BookButting tilesFlat tiles sometimes simply butt adjacent tiles in the same course. You don’t see butting tile quiteso often and this roof is not in the greatest condition. It has quite a few broken and missing tiles.These are higher quality tiles in good condition.Page 8 of 90
InterNACHIStudent Course BookQuantities per SquareRoof tiles come in a wide variety of sizes. Thicknesses for different models ranges from about3/8- of an inch to an inch and a half. The size of each tile and the exposure determine how manytiles are needed to cover a square, which is an area 10 feet by 10 feet. At maximum exposure, thenumber of tiles per square may be anywhere between 75 and 400.Quantities per SquareWeight can also vary, with Standard clay tiles weighing from 600 to 650 pounds per square,while concrete ties weigh from 800 to 1100 pounds per square. Lightweight concrete tiles mayweigh from 500 pounds to about 800 pounds per square. Some types of plastic comp0osite tiesmay weight less than 250 pounds per square.PERFORMANCE STANDARDSFor strength and resistance to damage from the freeze/thaw cycle, roof tiles should meet ASTMstandards. For concrete tiles, this will be ASTM C1492. For clay tiles it will be ASTM C1167.An important part of the standards are resistance to moisture absorption and damage from thefreeze/thaw cycle. Underwriter’s Laboratory Standard UL2218 is for impact rating. The CoolRoof Rating Council maintains a third-party rating system for radiative properties of roofcovering materials, including tile. Radiative properties are those properties that relate toabsorbing and emitting heat, and reflecting sunlight.ROOF DECKTile may be installed on a variety of roof deck materials, including metal, concrete and eithersolid wood panels or spaced wood boards. When tile is installed over concrete or metal, it will behung on battens that should be fastened to the deck with a fastener type that effectively anchorsthe batten to the roof deck. Whatever the type of roof deck material, it should be structurallyadequate to support the anticipated roof loads, including snow. Confirming the structuraladequacy of the roof deck requires engineering calculations, and lies beyond the scope of atypical roof inspection. Those inspecting roofs should be looking for signs of failure, like saggingrafters or roof deck.UNDERLAYMENTSince tile is not waterproof, proper underlayment is important to good installation. A minimum of30-pound felt underlayment is recommended for installation beneath both clay and concrete tiles.Felt or synthetic underlayment should be fastened with gasketed nails like plastic caps to helpseal nail holes.Underlayment requirements can vary with jurisdiction and will vary with roof pitch.Generally, roofs from 4&12 and greater should have at least one layer of 30-pound asphaltsaturated felt, with a 6-inch endlap and a 2-inch headlap.Slopes between 3&12 and 4&12 should have 90-pound roll roofing, two layers of 30- poundasphalt-saturated felt, or a single-ply membrane like Ice and Water Shield installed. 30-pound feltinstalled with a 19-inch overlap will result in the underlayment being two layers thick.Page 9 of 90
InterNACHIStudent Course BookHere you can see the difference between felt underlayment installed with a 19-inch overlap, at theright, and felt installed with a 2-inch overlap, at the left.Tile on roof slopes of less than 2 ½ &12 are considered to be decorative and should have a builtup roof or waterproof membrane installed beneath the tile.Synthetic underlayment may void the warranty with some tiles, but without documentation, orfamiliarity with the particular brand and model of the tiles on the roof, you will not be able toconfirm the presence of synthetic underlayment as improper.Page 10 of 90
InterNACHIStudent Course BookThis table 1A from the tile roof institute Installation Manual for Moderate Climate Regions givessheathing, underlayment, flashing, headlap and fastener schedules according to roof pitch.Page 11 of 90
InterNACHIStudent Course BookBATTENSHorizontal battensYou may see tiles hung from wood battens installed horizontally across the roof. Tiles used withbattens have anchor lugs that protrude from the underside of the top edge of the tile, and whichPage 12 of 90
InterNACHIStudent Course Bookhook over the battens. Dirt accumulating on the uphill side of battens can retain moisture thataccelerates deterioration of the underlayment at these areas. Requirements for batten installationcan vary with tile manufacturer, with jurisdiction and with the degree of roof slope. In someareas, battens may need to be pressure-treated to resist decay. Battens should have spacesbetween ends at least a half-inch wide to encourage drainage. Other requirements may include theinstallation of counter-battens.Page 13 of 90
InterNACHIStudent Course BookCounter-battensWith the counter-batten system, to improve drainage, battens are first installed vertically,typically every 16 or 24 inches, depending on what’s specified by the manufacturer. HorizontalPage 14 of 90
InterNACHIStudent Course Bookbattens are then installed on centers that will provide the exposure recommended by themanufacturer. Typically a 3-inch headlap is the minimum.One of the purposes of the batten system is to reduce the number of fasteners that penetrate theunderlayment, so fasteners that hold tile in place should penetrate the battens at least ¾ of aninch, but should not penetrate the underlayment.Counter-battens provide a space for airflow that helps keep the tile cool, and encourages drying ofany moisture that finds its way past the tile.As a home inspector, you won’t know the manufacturer’s requirements and won’t be confirmingproper installation unless you’re familiar with the installation requirements of the particular tileinstalled and with any jurisdictional requirements. Instead, you’ll be looking for signs of failure.Battens should be fastened every 24 inches if they’re nailed and every 12 inches if they’restapled. For fastening purposes, battens become part of the roof deck.Over-spanned battens will allow excessive deflection when the roof is walked on or is supportinga snow load. Excessive deflection can crack tiles.It’s important to follow the manufacturer’s instructions regarding batten installation. Battensshould be fastened every 24 inches if they’re nailed and every 12 inches if they’re stapled. Forfastening purposes, battens become part of the roof deck.Over-spanned battens will allow excessive deflection when the roof is walked on or is supportinga snow load. Excessive deflection can crack tiles.Starter coursePage 15 of 90
InterNACHIStudent Course BookThe first course of tile called the “starter” course should have the butts raised at the eves so thatthe starter course will lie on the same plane at the same angle as the field tiles. If this isaccomplished by raising the fascia or using a solid strip then an anti-ponding device like abeveled strip should be installed to prevent runoff from pooling.Here you can see weep holes designed to allow drainage built into the birdstop.Page 16 of 90
InterNACHIStudent Course BookFASTENERSThe type and spacing of the fasteners will vary with local regulations, the climate zone in whichthe structure is located, the roof pitch, height, and design, the roof deck material, the windexposure and the tile manufacturer’s installation requirements. System components should be ofsimilar materials to prevent galvanic corrosion, so if tiles were held in place with galvanized steelclips, you’d want to see galvanized steel nails and that would be hot-dipped galvanized nails,not electro-plated galvanized nails. In coastal environments, in which the salty air is hard onfasteners, copper nails last the longest, followed by stainless steel, followed by galvanized steel.The length of the fastener service life becomes more important when tiles with long service livesare used.These French style tiles were around 60 or 70 years old when this shot was taken and were still ingood condition. Once fasteners fail over a large part of the roof, it may or may not be possible toremove and replace tiles with new fasteners. It depends on the condition of the tiles. So thelifespan of a tile roof is sometimes determined by the lifespan of the fasteners, instead of the tilesthemselves.Fasteners should be corrosion resistant and for tiles mounted directly on the roof deck, longenough to penetrate at least ¾-inch into the roof sheathing and preferably clear through it. Sometile will not require fasteners, and that usually has to do with the roof pitch, whether adhesive isused, and whether the structure is located in a high-wind area. Overdriving fasteners may crackthe tile. Fasteners should be long enough to penetrate roof sheathing a minimum of ¾ inch or passcompletely through it, which ever is less.In addition to nails, tiles may be held in place with screws, hooks, straps, wire, or clips.Whatever method is used, you’ll be looking to confirm that tiles are held firmly in place.Page 17 of 90
InterNACHIStudent Course BookYou may see nose hooks used anywhere, but they are especially helpful on very steep roofs, likethose of 24 & 12 or steeper and in areas that experience high winds. Tiles will typically be heldin place both at their heads, by nails and at their butts, by hooks.You can see here that many of these hooks have broken off. As tile grow old and soft, if they aresupported by hooks only, the hooks may cut through the tile as they have with this older slate rooftile.Page 18 of 90
InterNACHIStudent Course BookADHESIVESTile may be fastened to the roof with adhesives instead of nails or screws. Adhesives have to beof the proper type and applied in the proper quantity and location. Improper quantity and locationmay not allow for proper movement of the tiles during thermal expansion and contraction. Anumber of different types of adhesives may be used, including: mortar and synthetic mortar mastics silicones polymers or tripolymers or whatever adhesive is approved by the local building department.Adhesives may fail for a number of reasons: some types of adhesive have a shelf life and may fail if they’re too old when they’reapplied. some types have storage requirements like high and low temperature limitations. Thesetemperature limitations may also apply to application conditions and can include both thetemperatures of the adhesive and of the materials being adhered. The type of adhesive installed may incompatible with the tile or underlayment. Adhesive may be used in the wrong quantity. Different tiles may have different minimumand maximum amounts. Too much time can elapse between the time the adhesive is applied and when the tile is setin place. Once a tile is placed, if it is removed and repositioned, adhesive may need to be re-applied,so failure to re-apply the adhesive can result in a failed bond. Differential expansion and contraction rates between the adhesive and the tile over thelong-term may cause the bond to fail if the adhesive is a brittle type like mortar. When adhesives alone are used to fasten tiles, tiles may be bonded to underlayment orbattens. If tiles are adhered to underlayment only, the quality of the underlaymentattachment to the roof deck will affect the wind resistance of the tile roof installation. Wet surfaces and even high humidity can cause adhesives to fail.Page 19 of 90
InterNACHIStudent Course BookFoam adhesives generally have a good reputation. Mortar does not have such a good reputation.When you see tiles installed with mortar, look for failed bonds, especially on older roofs and athip and ridge cap tiles.Cap tiles are more vulnerable to wind damage than field tiles. Although you may find either fieldor cap tiles held in place with adhesives, rake tiles will usually be held in place with fasteners.Page 20 of 90
InterNACHIStudent Course BookIf the wrong mortar mix is used, or applied incorrectly, it mayfail prematurely. Using more mortar than required doesn’t necessarily correct the problem.This is a common condition. Lack of fasteners and failure of the adhesive have allowed tiles toslide down the roof slope.Page 21 of 90
InterNACHIStudent Course BookIt’s even more common in areas that are awkward to reach, or are difficult to nail.Page 22 of 90
InterNACHIStudent Course BookHere the headwall flashing was installed before the tile.Page 23 of 90
InterNACHIStudent Course BookThese tiles were held in place using the friction method, which failed in a high wind.Here’s a roof with plenty of mortar. Although this roof is 8 layers thick at the eve, chances aregood that it’s only one layer thick at the peak. Still, it’s heavy, and you’d want to check carefullyfor sagging of roof framing components like rafters, trusses or sheathing.WIND DAMAGEPage 24 of 90
InterNACHIStudent Course BookTile roofs generally do well in wind events due to their weight. Their wind resistance willdepend on the quality of the installation, especially the method of fastening and the use of theproper type and application of adhesives. If wind is strong enough to loosen tiles, they maybecome airborne and are capable of damaging surrounding tiles.Wind damageWind can move even heavy concrete tile if it’s not fastened down well. Wind was able to getbeneath these tiles and flip them onto the flat roof above.FLASHINGBecause of the great variety of tile profiles available, there are a number of different flashingprofiles available. You don’t need to confirm that the flashing recommended by the manufactureris used, but you should check to see if the flashing installed appears to keep the water out of theroof system.Areas of a roof with medium or high profile tile that have gaps, like ridges, hips and valleys andalong the eves, should be filled with some type of pre-formed weather-blocking material. Thismay be made of sheet metal, plastic or other material and supplied by the manufacturer. It mayalso be a material like sheet lead, malleable aluminum or mortar that is formed and placed by theinstaller. The purpose of weather-blocking is to prevent wind-blown rain and snow frompenetrating the roof, to improve the roof’s wind resistance by keeping wind from gettingunderneath the tile, and also to improve it’s fire resistance, since most underlayments areflammable.HeadwallsPage 25 of 90
InterNACHIStudent Course BookCommon headwall flashing has flanges typically 4 to 5 inch in length and comes pre-bent to 120degrees. There should be a gap between the top of the tile and the bottom of the exterior wallcovering material, as you see here.It’s not unusual to see the exterior installed wall-covering material too low. This can cause it tofail prematurely by absorbing moisture from the surface of the tile.Page 26 of 90
InterNACHIStudent Course BookWhen medium or high profile tiles are used, headwall flashing should be pre-formed to the tileprofile or should be made of a material like lead that can be formed to the tile profile.The less expensive method, which is also the more common method, is to use straight flashingand hope for the best.Page 27 of 90
InterNACHIStudent Course BookHeadwall flashing is sometimes installed both above and below the tile, which would reduce thechances of leakage at this location.This is a common headwall installation, although not a great one. The installer used conventionalheadwall flashing, but didn’t use any kind of weatherblocking, so the headwall is vulnerable toleakage from wind-driven rain.Page 28 of 90
InterNACHIStudent Course BookApparently the last piece of flashing on the truck was a little short, so the installer added somelead flashing to the corners that depend on a sealant that will eventually dry, shrink, crack andleak. Also, the installer should have terminated the stucco at least an inch and a half above theflashing.In an effort to seal the headwall, the installers forced too much mortar beneath the flashing,forcing it up.Page 29 of 90
InterNACHIStudent Course BookThis will prevent runoff running down the stucco from draining and it may be absorbed by theexterior wall sheathing, causing decay, or it may degrade the stucco bond.Here is a defective installation in which the headwall flashing was routed beneath the tile.Page 30 of 90
InterNACHIStudent Course BookThis can happen when flashing is installed for an asphalt shingle roof that has been changed totile after the headwall and sidewall flashing has been installed.SidewallsSidewall flashing methods will vary, depending on the tile profile.Sidewall flashing with medium or high profile tile should have continuous pan-flashing with arunoff channel that has an upward return or “hem” at least 3/4 of inch tall.Page 31 of 90
InterNACHIStudent Course BookThe flange should run up the wall at least 4 inches and out over the roof deck at least 6 inches.Sidewall flashing may be bent to whatever angle works in order to match the tile style.This may require some craftsmanship with certain tile profiles.Page 32 of 90
InterNACHIStudent Course BookFlashing at both headwalls and sidewalls should have counter-flashing installed. The exterior wallcovering may serve as the counter-flashing unless the exterior walls are brick or stone.In both brick and stone, counter-flashing should be installed in mortar joints.Plumbing stack pipesFlashing for plumbing stack pipes will vary with the tile profile.Page 33 of 90
InterNACHIStudent Course BookThese illustrations show methods for flashing stack vents. You may not be able to confirm thepresence of flashing that underlies the tiles. Low and high profile tiles should have flashingformed to the tile profile.Page 34 of 90
InterNACHIStudent Course BookFlat tiles should have flashing adequately sealed at the edges.Here you see that the sealant has failed and may allow moisture intrusion.Page 35 of 90
InterNACHIStudent Course BookFor low and high profile tiles, flashing made from a malleable metal like lead or aluminum willallow the flashing to be bent to match the tile profile.Page 36 of 90
InterNACHIStudent Course BookTo avoid leakage, this vent depends on sealant that will eventually fail.When you see a vent installed like this, write it up as a defective condition. It needs to becorrectly flashed.Page 37 of 90
InterNACHIStudent Course BookSimply filling in the gap with mortar as they did with this roof vent won’t prevent runofffrom getting beneath the tile. And also Page 38 of 90
InterNACHIStudent Course BookThese vents are typical of older cast iron vents that have been wrapped in lead that has beensoldered to the flashing.Page 39 of 90
InterNACHIStudent Course BookWhen you see a vent that has been bent like this, it may have been installed this way, or it mayhave been straight originally and suffered damage from some source like sliding snow. If it’sbeen damaged, the solder joint on the uphill side may be open.This illustration from the Tile Roof Institute shows a method for flashing a stack vent with flattile. Note that the edges areRoof ventsPage 40 of 90
InterNACHIStudent Course BookRoof vents should be installed as a two-part system. A flanged sheet-metal box open to the sky isfirst installed on the roof deck, overlapping underlayment on the downhill side and overlapped byunderlayment on the uphill side. If battens are installed, they extend to butt the sides of the boxPage 41 of 90
InterNACHIStudent Course Bookbut are not nailed through the flashing. The roof vent is installed on the battens. The sides of theflanges should be hemmed to direct runoff onto the surface of tiles below the vent.This is a good installation. You’ll see variations, but whatever method is used to install the roofvent, check to see that it will keep water from penetrating the roof structure.Page 42 of 90
InterNACHIStudent Course BookThis is a defective installation.ChimneyPage 43 of 90
InterNACHIStudent Course BookFlashing around a chimney can be installed in a number of ways, but must keep the water out.Where inadequate methods have been used, you may see attempts to stop leakage by applyingsealant.Page 44 of 90
InterNACHIStudent Course BookThe proper recommendation would be to remove tile and install a cricket to prevent moisturefrom pooling on the uphill side of the chimney.Page 45 of 90
InterNACHIStudent Course BookWhere a second penetration exists, like this skylight, the chances of leakage increase.Chimneys less than 30 inches wide can be installed without a cricket. Chimneys 30 inches wideor wider should have a cricket installed to keep runoff from pooling on the uphill side of thechimney.SkylightSkylight flashing is installed in a manner similar to chimney flashing, except that crickets areseldom installed at skylights, even though the risk of leakage from runoff pooling on the uphillside is the same. Tile should be held back from the skylight flashing at least an inch at the uphillside to improve runoff flow.Page 46 of 90
InterNACHIStudent Course BookThe type of sidewall flashing will vary depending on the tile profile used. Medium and highprofile tile will typically use one-piece pan-flashing, which should overlap the apron flashing atthe lower corners.Page 47 of 90
InterNACHIStudent Course BookFlat tile may require step flashing. Unless you walk the tile, it can be difficult to confirm properflashing installation. If you can’t, you should disclaim it.Page 48 of 90
InterNACHIStudent Course BookEvery once in a while you’ll see a condition in which someone has become convinced thatthey’ve hit upon a great idea.Here, you’d want to try to determine what the fasteners are actually anchored into, and mentionthe fact that the flashing is vulnerable to wind-driven rain
Student Course Book Student Course Book Page 4 of 90! 4. Accessory tiles are tiles used in conjunction with low, medium or high profile field tiles. Accessory tiles are used at areas like ridges, rakes, hips, valleys and in starter courses. SIDE PROFILES Tiles are installed shingle fashion, with each course overlapping tiles in the course below.