Transcription
OPERATING INSTRUCTIONSBasic GuidePersonal ComputerModel No.CF-54seriesUseful InformationHandling and Maintenance. 15Installing Software. 19TroubleshootingTroubleshooting (Basic). 24Useful InformationIntroduction. 2Description of Parts. 4First-time Operation. 8Turning On / Turning Off. 13TroubleshootingGetting StartedGetting StartedContentsLIMITED USE LICENSE AGREEMENT. 31Specifications. 35LIMITED WARRANTY. 40Please read these instructions carefully before using this product, and save this manual for future use.AppendixAppendix
IntroductionThank you for purchasing this Panasonic product. For optimum performance and safety, pleaseread these instructions carefully.In these instructions, the names are referred as follows.indicates Windows 8.1 Operating System.indicates Windows 7 Operating System.n Terms and illustrations in these instructionsCAUTION :Getting StartedNOTE:Conditions that may result in minor or moderate injury.Useful and helpful information.Enter :Press [Enter] key.Fn F5 :Press and hold [Fn] key, and then press [F5] key.Align the pointer to the top right (or bottom right) corner of thel Display “Charm”: screen to display Charm menu. Alternatively, flick toward the center of the screen from the right edge.:Click(Settings) and then click(Power).l(Start) - [All Programs] : Click(Start), and then click [All Programs]. You may need todouble-click in some cases.è::Page in these Operating Instructions or in the Reference Manual.Reference to the on-screen manuals.l Some illustrations are simplified to help your understanding and may look different from theactual unit.l If you do not log on as an administrator, you cannot use some functions or cannot displaysome screens.l Refer for the latest information about optional products to the catalogs, etc.l In these instructions, the names and terms are referred as follows. “Windows 8.1 Pro Update 64-bit” as “Windows” or “Windows 8.1” “Windows 7 Professional 32-bit Service Pack 1” and “Windows 7 Professional 64-bitService Pack 1” as “Windows” or “Windows 7” DVD MULTI drive as “CD/DVD drive” Circular media including DVD-ROM and CD-ROM as “discs”lScreen messages are explained in [English (United States)].(Depending on the language preference, some screen messages in these instructions are different from the actual screen messages. For example, [Flight mode] may be displayed insteadof [Airplane mode] in some language preference.)n DisclaimerComputer specifications and manuals are subject to change without notice. Panasonic Corporation assumes no liability for damage incurred directly or indirectly from errors, omissions or discrepancies between the computer and the manuals.2
n TrademarksMicrosoft , Windows , the Windows logo, and IntelliMouse are registered trademarks of MicrosoftCorporation of the United States and/or other countries.Intel, Core and PROSet are either registered trademarks or trademarks of Intel Corporation.SDXC Logo is a registered trademark of SD-3C, LLC.Getting StartedAdobe, the Adobe logo and Adobe Reader are either registered trademarks or trademarks ofAdobe Systems Incorporated in the United States and/or other countries.Bluetooth is a registered trademark owned by Bluetooth SIG, Inc., U.S.A. and licensed toPanasonic Corporation.HDMI, the HDMI Logo and High-Definition Multimedia Interface are trademarks or registeredtrademarks of HDMI Licensing LLC in the United States and other countries.Names of products, brands, etc., appearing in this manual are trademarks or registered trademarks of their respective own companies.n On-screen ManualFor further information about the computer, you can refer to the on-screen manual.l Reference ManualThe Reference Manual contains the practical information to help you fully enjoy the computer’s performance. Update it to the latest version for reference.l Important Battery TipsThe Important Battery Tips will provide you with the battery information so that you can usethe battery in the optimum condition to obtain longer operation time.l Update the on-screen manualsThis describes the procedures to update the on-screen manual.l Connect to a networkThis describes the connection procedures using the network devices mounted on this unit.To access the on-screen manuals, follow the steps below.Double-click [Manual Selector] on the desktop, and select the on-screen manual.Alternatively, click the [Manual Selector] tile, on the Start screen and select the on-screen manual.NOTE [Contents] tab or [Search] tab of the on-screen manuals is displayed on the left side of thewindow. Select tab and display the desired item.3
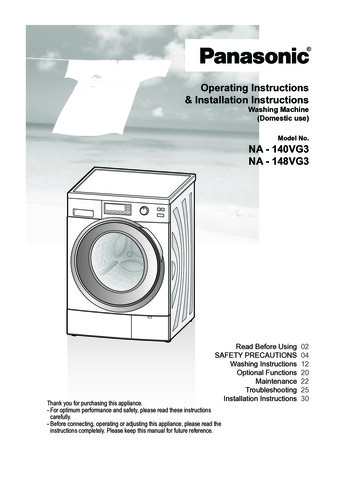
Description of aderFGHGetting StartedIJKLCamera Only for model with camera Reference Manual “Camera”èA: MicrophoneB: Ambient Light SensorC: Camera LensD: Camera IndicatorE: LCD Only for model with touchscreen Reference Manual “Screen Input Operation”èF: LED Indicator: Caps lock: Numeric Lock (NumLk): Scroll Lock (ScrLk): Drive Indicator: SD Memory Card Indicator(Blinking: During access or a password is requested)Reference Manual “SD Memory Card”è: Wireless readyThis indicator lights when WirelessLAN, Bluetooth, and/or Wireless WANare connected and ready. It does notnecessarily indicate the On/Off condition of the wireless connection.Connect to a networkèG: Power SwitchH: Security LockA Kensington cable can be connected. Forfurther information, read the manual thatcomes with the cable.I: Function KeysReference Manual “Key Combinations”èJ: Keyboard4NOPK: CD/DVD Drive*1 / PC Card Slot*2 /Battery Pack Slot 2*3 / Smart Card Slot*4*1Only for model with CD/DVD driveReference Manual “CD/DVD Drive”è*2Only for model with PC card slotReference Manual “PC Card”è*3When using battery pack 2Reference Manual “Battery Power”è*4Only for model with smart card slotL: Battery Pack Slot 1Reference Manual “Battery Power”èM: Fingerprint Reader*5 / ContactlessSmart Card Reader*6*5Only for model with fingerprint readerReference Manual “Fingerprint Reader”è*6 Only for model with contactless smartcard readerReference Manual “Contactless Smart Card Reader”èN: TouchpadReference Manual “Touchpad”èO: Carrying HandleDo not use the handle if the handle is wornor damaged.P: LED Indicator: Power IndicatorOff: Power off/Hibernation, Green:Power on, Blinking Green: SleepBlinking green rapidly: Cannotpower on or resume due to lowtemperature.: Battery Indicator 1: Battery Indicator 2*3Reference Manual “Battery Power”è
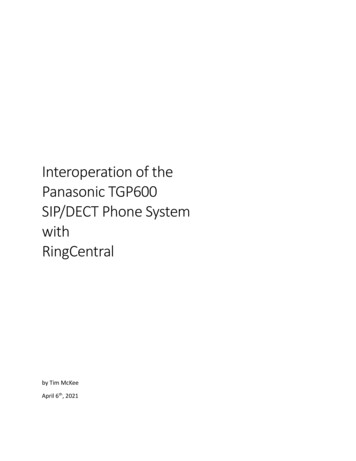
ABCDGetting StartedEFA: Wireless WAN Antenna Only for model with Wireless WAN Connect to a network “Wireless WAN”èB: GPS Antenna Only for model with GPS Reference Manual “GPS”èC: Display LatchD: Wireless LAN Antenna Only for model with Wireless LAN NOTEl This computer contains a magnet andmagnetic products at the locations dashedline circled in the illustration above. Avoidleaving metallic object or magnetic mediain contact with these areas.Connect to a network “Wireless LAN”èE: SpeakerF: Wireless LAN Antenna / Bluetooth Antenna Only for model with Wireless LAN / Bluetooth èConnect to a network “Wireless LAN”“Bluetooth”5
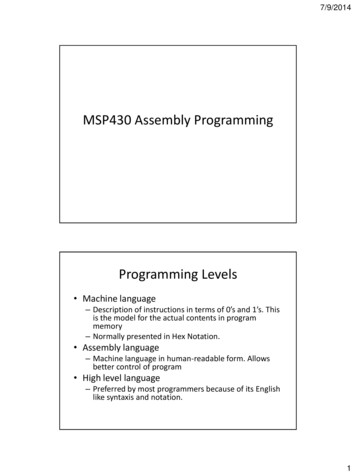
Description of PartsRight sideAB CDEFGHGetting StartedRear sideN *7E6IJKLN *8N *9MA: Hard Disk Drive (Quick Release Drive)Reference Manual “Hard Disk Drive”èB: Wireless SwitchConnect to a network “Disabling/èEnabling Wireless Communication”C: Headset JackA headset or headphone can be connected.D: SD Memory Card SlotKeep SD Memory Cards away from infantsand small children.I: HDMI PortReference Manual “External Display”èReference Manual “SD Memory Card”èE: USB 3.0 PortsReference Manual “USB Devices”èM: Serial Port Only for model with Serial port F: USB 3.0 Port (USB Charging)Do not insert any foreign object in the USB port.Reference Manual “USB Devices”èG: LAN PortConnect to a network “LAN”èH: DC-IN JackN: 2nd LAN Port*7/ USB 2.0 Port*8 /Rugged USB 2.0 Port*9 / GPS*10*7Only for model with 2nd LAN port*8Only for model with USB 2.0 port*9Only for model with rugged USB 2.0 port*10Only for model with GPSJ: SIM Card Slot Only for model with Wireless WAN èConnect to a network “Wireless WAN”K: Ventilation Hole (Exhaust)L: VGA Port Only for model with VGA port èèReference Manual “External Display”Reference Manual “Serial Port”
Bottom sideAHGetting StartedABCDEFGA: Back CoverB: Ventilation Hole (Intake)C: Hard Disk LatchReference Manual “Hard Disk Drive”èD: Expansion Bus ConnectorReference Manual “Port replicator”èE: Battery Latch 1Reference Manual “Battery Power”èF: Battery IndicatorReference Manual “Battery Power”èG: Battery Pack Latch 2 When using battery pack 2 Reference Manual “Battery Power”èH: External Antenna Connector Only for model with External AntennaConnector 7
First-time Operationn PreparationA Check and identify the supplied accessories.If you do not find the described accessories, contact your support office. AC Adaptor. . . . . 1 AC Cord. . . . . . . 1Getting StartedModel No: CF-AA5713A Battery Pack . . . 1Model No: CF-VZSU0GW orCF-VZSU0PW orCF-VZSU0LW Only for model with touchscreen Soft Cloth. . . . . . 1 OPERATING INSTRUCTIONS - BASIC GUIDE (This book) . . . . . . . . . . . . . . . 1Depending on the model, the following items are supplied. Battery Pack . . . . . . . . . . . . . . . . . . . . . . . . . . . . . . . . . . . . . . . . . . . . . . . . . . . . 1Model No: CF-VZSU0KW11Insert the battery packInsert the battery pack until it touch to the secured position.CAUTIONl Make sure the latch is securely locked. Otherwise the batterypack may fall when you carry the computer.l Do not touch the terminals of the battery pack and the computer. Doing so can make the terminals dirty or damaged,and may cause malfunction of the battery pack and the computer. For CF-VZSU0KW 8
22Connect your computer to a power outletThe battery charging starts automatically.CAUTION332Getting Startedl Do not disconnect the AC adaptor and do not switch thewireless switch to on until the first-time operation procedureis completed.l When using the computer for the first time, do not connectany peripheral device except the battery pack and AC adaptor.l Handling the AC adaptorProblems such as sudden voltage drops may arise duringperiods of thunder and lightning. Since this could adverselyaffect your computer, an uninterruptible power source (UPS)is highly recommended unless running from the battery packalone.l When the DC plug is not connected to the computer, disconnect the AC cord from your electrical outlet. Power isconsumed simply by having the AC adaptor plugged into anelectrical outlet.Open the displayA Push the top of the latch (A) to release it.B Hold the side/ handle of the computer with either of yourhands and then lift up the display to open.CAUTION㪘1l Do not open the display wider than necessary (180 ormore), and do not apply excessive pressure to the LCD. Donot open or close the computer holding the edge of the LCDsegment.9
First-time Operation44㻮Getting Started㻯Turn on the computerPress and hold the power switchlights.(B) until the power indicator (C)CAUTIONl Do not press the power switch repeatedly.l The computer will be forcibly turned off if you press and holdthe power switch for four seconds or longer.l Once you turn off the computer, wait for ten seconds or morebefore you turn on the computer again.l Do not perform the following operation until the drive indicaturns off.tor Connecting or disconnecting the AC adaptor Pressing the power switch Touching the keyboard, touchpad, touchscreen only formodel with touchscreen or external mouse Closing the display Turn on/off the wireless switchl When the CPU temperature is high, the computer may notstart up to prevent overheating of the CPU. Wait until thecomputer cools down, and then turn the power on again. Ifthe computer does not power on even after cooling down,contact Panasonic Technical Support (è pages 40 - 48).l Any changes from the default setting of the Setup Utility mustnot be made until the First-time Operation is completed.5Setup WindowsFollow the on-screen instructions.l The computer restarts several times. Do not touch the keyhasboard or touchpad, and wait until the drive indicatorturned off.l After the computer is turned on, the screen remains blackor unchanged for a while, but this is not a malfunction. Waitfor a moment until the Windows setup screen appears.l During setup of Windows, use the touchpad and clicking tomove the pointer and to click an item.l Setup of Windows will take approximately5 minutes /20 minutes.Go to the next step, confirming each message on the display.l You can set the Wireless Network after the setup of Windows is complete.If “Get online” is displayed, select “Skip thisstep”.“Join a wireless network” screen may not appear.10
CAUTIONGetting Startedl You can change the user name, password, image and security setting after setup of Windows.l Remember your password. If you forget the password, youcannot use Windows. Creating a password reset disk beforehand is recommended.l Use standard characters as a computer name: numbers 0through 9, uppercase and lowercase letters from A to Z, andthe hyphen (-) character. If the error message “The computername is not valid” appears, check if characters other thanthe above are not entered. If the error message still remainson the display, set the key entry mode to English (“EN”) andenter characters.l Do not use the following words and characters for username: CON, PRN, AUX, CLOCK , NUL, COM1 to COM9,LPT1 to LPT9, LPT, @, &, space. In particular, if you createa user name (account name) that includes the “@” mark, apassword will be requested at the log-on screen, even if nopassword has been set. If you try to log on without enteringa password, “The user name or password is incorrect.” maysign in /be displayed and you will not be able tolog on to Windows (è page 27).6 Update the on-screen manualSign in /A Connect to the internet.Log on to Windows as an administrator.For further information, refer toConnect to a network.B Update the on-screen manual.Double-click [Manual Selector] on the desktop.Alternatively, click the [Manual Selector] tileon the Start screen.Follow the on-screen instructions.7 Create a recovery discA recovery disc allows you to install OS and restore its factorydefault condition, in case, the recovery partition of the HDD isdamaged.We recommend creating a recovery disc before you begin usingthe computer.Refer to èReference Manual “Recovery Disc Creation Utility” about creating the disc.11
First-time OperationNOTEl PC Information ViewerThis computer periodically records the management information of the hard disk, etc. The maximum data volume for each record is 1024 bytes.This information is only used for estimating the cause in the case when the hard disk goes down byany possibility. They are never sent to outside via network nor used for any other purpose exceptfor the purpose described the above.To disable the function, add the check mark for [Disable the automatic save function for management information history] in [Hard Disk Status] of PC Information Viewer, and click [OK].(èReference Manual “Troubleshooting (Advanced)” - “Checking the Computer’s Usage Status”)Getting Startedn Before using wireless functionA Open the cover, and then Slide the wireless switch to ON.- [Change PC Settings] - [Network] - [Airplane mode].B Display “Charm” and clickSet [Airplane mode] to [Off], and then;Set [Wi-Fi] to [On] (for wireless LAN).Set [Mobile broadband] to [On] (for wireless WAN).Set [GPS] to [On] (for wireless WAN).Set [Bluetooth] to [On] (for Bluetooth).Set [GPS\GNSS] to [On] (for GPS).n To change the partition structureYou can shrink a part of an existing partition to create unallocated disk space, from which you cancreate a new partition.In the default setting, you can use a single partition.ARight-clickat the bottom left corner of the Desktop screen.BCDEFClick(Start) and right-click [Computer], then click [Manage].l A standard user needs to enter an administrator password.Click [Disk Management].Right-click the partition for Windows (“c” drive in the default setting), and click [Shrink Volume].l The partition size depends on the computer specifications.Input the size in [Enter the amount of space to shrink in MB] and click [Shrink].l You cannot input a larger number than the displayed size.l To select [Reinstall Windows to the OS related partitions] in installing OS (è page 21),70 GB /60 GB or more is necessary for [Total size after shrinkin MB].Right-click [Unallocated] (the shrunk space in the step D) and click [New Simple Volume].Follow the on-screen instructions to make the settings, and click [Finish].Wait until formatting is completed.NOTEl You can create an additional partition using remaining unallocated space or newly creatingunallocated space.l To delete a partition, right-click the partition and click [Delete Volume] in the step C.12
Turning On / Turning OffTurning OnPress and hold the power switch(è page 4) until the power indicator(è page 4) lights.NOTEGetting Startedl Do not press the power switch repeatedly.l The computer will forcibly be turned off if you press and hold the power switch for four seconds or longer.l Once you turn off the computer, wait for ten seconds or more before you turn on the computeragain.turns off.l Do not perform the following operation until the drive indicator Connecting or disconnecting the AC adaptor Pressing the power switch Touching the keyboard, touchpad, touchscreen only for model with touchscreen or external mouse Closing the display Turn on/off the wireless switchTurning OffYou can shut down the computer by using either of the following steps. From the Desktop screen:at the bottom left corner of the Desktop screen.A Right-clickB Click [Shut down or sign out] - [Shut down]. From the Start screen:- [Shut down].A Click Both the Start screen and Desktop screen:A Display “Charm” and touch .B Touch [Power] - [Shut down].A Click(Start) - [Shutdown].NOTElTo turn off the computer completely, proceed as follows.- [Change PC settings] - [Update and recovery] - [Recovery].A Display “Charm” and clickB Click [Restart now] under “Advanced startup”.C Click [Turn off your PC].13
Turning On / Turning OffPrecautions against Starting Up/Shutting Downl Do not do the following Connecting or disconnecting the AC adaptor Pressing the power switch Touching the keyboard, touchpad, touchscreen only for model with touchscreen or external mouse Closing the display Turn on/off the wireless switchNOTEGetting Startedl To conserve power, the following power saving methods are set at the time of purchase. The screen automatically turns off after :10 minutes (when AC adaptor is connected) of inactivity5 minutes (when operating on battery power) of inactivity The computer automatically enters sleep*1 after :20 minutes (when AC adaptor is connected) of inactivity15 minutes (when operating on battery power) of inactivity*1Refer toReference Manual “Sleep or Hibernation Functions” about resuming from sleep.14
Handling and MaintenanceOperation environmentl Place the computer on a flat stable surface not subject to shock, vibration, and danger ofdropping. Do not place the computer upright or turn it over. If the computer is exposed to anextremely strong impact, it may become damaged.l Operating environmentTemperature: Operation: -10 C to 50 C {14 F to 122 F} (IEC60068-2-1, 2)*1Storage: -20 C to 60 C {- 4 F to 140 F}Humidity:Operation: 30% to 80% RH (No condensation)Storage: 30% to 90% RH (No condensation)Even within the above temperature/humidity ranges, operation for a long time in extreme environments, smoking nearby, or operation in places where oil is used or where there is a lot ofdust will result in the product deterioration and will shorten the product life.*1Do not expose the skin to this product when using the product in a hot or cold environment.( OPERATING INSTRUCTIONS - Read Me First)If the computer is wet in temperatures of 0 C {32 F} or below, freeze damage may occur. Make sure todry off the computer in such temperatures.Useful Informationl Do not place the computer in the following areas, otherwise the computer may be damaged. Near electronic equipment. Image distortion or noise may occur. In extremely high or low temperature.l As the computer can become hot during operation, keep it away from items that are sensitiveto heat.Handling cautionsThis computer is designed to minimize shock to parts such as the LCD and the hard disk driveand equipped with a drip-proof keyboard, but no warranty is provided against any trouble causedby shock. Be extremely careful when handling the computer.l When carrying the computer: Turn off the computer. Remove all external devices, cables, PC Cards and other protruding objects. Remove a disc in the CD/DVD drive (Only for model with CD/DVD drive). Do not drop or hit the computer against solid objects. Do not leave the display open. Do not grip the display part.l Do not put anything (e.g., a piece of paper) between the display and keyboard.l When you board an airplane, take the computer with you and never put it in your checked luggage. When using the computer on airplane, follow the airline’s instructions.l When carrying a spare battery, put it in a plastic bag to protect its terminals.l The touchpad is designed to be used by finger tip. Do not place any object on its surface anddo not press down strongly with sharp-pointed or hard objects that may leave marks (e.g.,nails, pencils and ball point pens).l Avoid any harmful substances such as oil from getting into the touchpad. The pointer may notwork correctly.l Be careful not to get injured by dropping or getting hit when carrying the computer. Only for model with touchscreen l Use only the pen (optional) to touch the screen. Do not place any object on its surface and donot press down strongly with sharp-pointed or hard objects that may leave marks (e.g., nails,pencils and ball point pens).l Do not use the screen when dust or dirt (e.g., oil) is on the screen. Otherwise foreign particleson the screen/pen (optional) can scratch the screen surface or obstruct the pen (optional)operation.15
Handling and Maintenancel Use the pen (optional) only for touching the screen. Using it for any other purpose may damage the pen (optional) and result in scratches on the screen.n When using peripheral devicesFollow these instructions and the Reference Manual to avoid any damage to the devices. Carefully read the instruction manuals of the peripheral devices.l Use the peripheral devices conforming to the computer’s specifications.l Connect to the connectors in the correct direction.l If it is hard to insert, do not try forcibly but check the connector’s shape, direction, alignment ofpins, etc.l If screws are included, fasten them securely.l Remove the cables when you carry the computer. Do not pull the cables forcibly.n Preventing your computer from unauthorized use via wireless LAN/Bluetooth/wirelessWAN Only for model with wireless LAN/Bluetooth/wireless WAN l Before using wireless LAN/Bluetooth/wireless WAN, make the appropriate security settingssuch as data encryption.Useful Informationn Battery Recalibrationl The battery recalibration may take a long time due to the large battery capacity. This is not amalfunction. When performing “Battery Recalibration” after shutting down Windows Full charge: Approximately 2.5 hours Complete discharge: Approximately 4 hours (with CF-VZSU0GW / CF-VZSU0PW / CFVZSU0LW) / Approx. 3 hours (with CF-VZSU0KW)When performing “Battery Recalibration” without shutting down Windows, it may take moretime to charge / discharge.n Battery durationl Note that the computer consumes electricity even when the computer power is off. If the battery pack is fully charged, the battery will fully discharge in the following period of time:StatusDischarge periodCF-VZSU0GW / CF-VZSU0PW CF-VZSU0LWWhen power is off Approx. 5 weeksApprox. 3.5 weeksApprox. 2.5 daysApprox. 2 daysIn sleep*2*2Approx. 12 daysApprox. 8.5 daysIn hibernation*2When “Wake Up from wired LAN” is enabled.The battery duration while the USB port continuous charging function is not used.MaintenanceTo clean the LCD panelIf drops of water or other stains get on the surface of the LCD panel, wipe them off immediately.Failure to do so may result in staining. Only for model with touchscreen Use the soft cloth included with the computer. (For further information, refer to “SuggestionsAbout Cleaning the LCD Surface”.Reference Manual “Screen Input Operation”) Only for model without touchscreen Wipe with a soft dry cloth such as gauze.16
To clean areas other than the LCD panelWipe with a soft dry cloth such as gauze. When using detergent, dip a soft cloth in water-diluteddetergent and wring it thoroughly.CAUTIONl Do not use benzene, thinner, or rubbing alcohol since it may adversely affect the surface causing discoloration, etc. Do not use commercially-available household cleaners and cosmetics,as they may contain components harmful to the surface.l Do not apply water or detergent directly to the computer, since liquid may enter inside of thecomputer and cause malfunction or damage.Dispose of Computern Preparationl Remove all peripherals (SD memory card, etc.).Reference Manual “Hard Disk Data Erase Utility”)l Erase the stored data. (è Only for model with Built-in Bridge Battery For Europe and U.S.A./Canada Useful InformationAttention CustomersDon’t remove the battery by yourself. The battery must be removed by qualified professionals.When disposing of this product, be sure to contact qualified professionals to remove the battery.Attention Qualified professionals to remove the batteryDispose of this product correctly in accordance with the local regulations after removing thebattery as shown in the following procedure.CAUTIONl Never disassemble the computer except before disposal.l Refer to the precautions when disposing of the computer(è OPERATING INSTRUCTIONS - Read Me First).n1.2.3.Remove the built-in batteryTurn off the computer, and disconnect the AC adaptor.Turn over the computer, remove the battery pack.Remove the screws and the cover (A). Model without 2nd LAN/USB 2.0 port/Rugged USB port/VGA port/Serial port/Discrete Video Controller AA17
Handling and Maintenance4. Remove the cover (B) and lift the expansion bus connector (C).CBè5. Remove the connectors on the built-in bridge battery (F), and then remove the screw (D)and the circuit (E).DEUseful InformationF6. Pull out the built-in bridge battery with the sheet cover.7. Open the sheet cover (G) and remove the built-in bridge battery (H). And confirm therecycle mark of the built-in battery.GH8. Insulate the connectors on the built-in bridge battery by covering them with plastic tape, forexample.18
Installing SoftwareInstalling software will return the computer to the default condition. When you install the software, the hard disk data will be erased.Back up important data to other media or an external hard disk before installation.CAUTIONl Do not remove the quick release drive during installation process.l Do not delete the Recovery Partition on the hard disk. The disk space in the partition is notavailable to store data.To check the Recovery Partition, perform the following methods.ARight-clickat the bottom left corner of the Desktop screen.Click(Start) and right-click [Computer], then click [Manage].l A standard user needs to enter an administrator password.Click [Disk Management].Remove everything and reinstall WindowsnPreparationl Remove all peripherals. (SD memory card, etc.)l Connect the AC adaptor and do not remove it until installation is complete.Perform “Remove everything and reinstall Windows”.Useful Information1- [Change PC settings] - [Update and recovery] - [RecovA Display “Charm” and clickery].B Click [Get Started] under “Remove everything and reinstall Windows”.C Click [Next].D Select the option.l Just remove my filesPerform the reinstallation of the Windows in a few moments (Approximately 20 minutes).l Fully clean the driveBy fully cleaning, the deleted files can not be recovered easily and the security levelwill be increased. The processing time will be longer (Approximately 140 minutes).Follow the on-screen instructions.After the reinstallation, the computer will restart.l Do not interrupt installation, for example by turning off the computer or performing otheroperation.Otherwise installation may become unavailable as Windows may not start up or thedata may be corrupted.2Perform the “First-time Operation” ( page 10).NOTEl The date and time, and the time zone may not be correct. Be sure to set them correctly.34Perform Windows Update. Only for model with TPM Clear TPM.A Perform either of the following procedures.at the bottom left corner of the Desktop screen.l Right-clickon the Start screen.l ClickB Click [Run], then input [tpm.msc] and click [OK].19
Installing SoftwareC Click [Clear TPM ] under “Actions” on the right of the “TPM Manager on Local Computer” screen.D Click [Restart] of the “Manage the TPM security hardware” screen.The computer will restart.E When “TPM configuration change was requested to .” is displayed, press F12 .F Click the Desktop tile, and when “TPM is ready” appears, click [Close].n Disk recoveryYou can reinstall the OS that was pre-installed at the time of purchase (Windows 8.1 or Windows 7).If reinstallation using the method described in “Remove everything and reinstall Windows” is not successful, follow the steps below.Preparationl Remove all peripherals.l Connect the AC adaptor and do
4 Getting Started Description of Parts Camera Only for model with camera è Reference Manual "Camera" A: Microphone B: Ambient Light Sensor C: Camera Lens D: Camera Indicator