Transcription
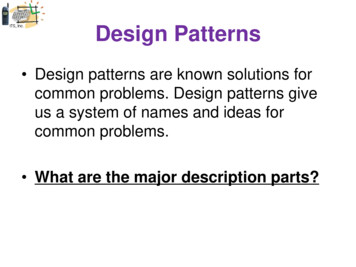
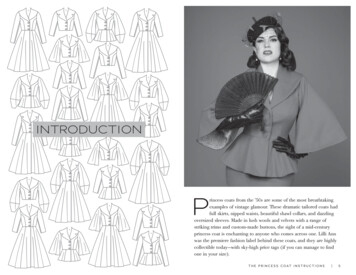
INTRODUCTIONPrincess coats from the ’50s are some of the most breathtakingexamples of vintage glamour. These dramatic tailored coats hadfull skirts, nipped waists, beautiful shawl collars, and dazzlingoversized sleeves. Made in lush wools and velvets with a range ofstriking trims and custom-made buttons, the sight of a mid-centuryprincess coat is enchanting to anyone who comes across one. Lilli Annwas the premiere fashion label behind these coats, and they are highlycollectible today—with sky-high price tags (if you can manage to findone in your size).T H E P R I N C E S S C O A T I N S T R U C T I O N S 5
Lilli Ann was founded in the ’30sby Adolph Schulman, who namedthe company for his wife Lillian.The San Francisco-based companyspecialized in suits and coats andbecame known for their beautifulfabrics and quality manufacturing.Their ad campaigns were pureglamour, featuring wasp-waistedmodels like Dorian Leigh andhigh-profile photographers likeRichard Avedon. The poseswere highly stylized and thesilhouettes beyond dramatic.(Some of my favorite Lilli Ann adsfeature models walking dogs, which is why I had to get my own littlechihuahua, Hattie, involved at the Charm Patterns photo shoot.) Thegarments that remain from this era are truly stunning; they representthe height of mid-century glamour in silhouette, workmanship, andluxury.Your Own Adventure” instructions let you be the mistress of your ownsewing destiny by guiding you through the process for your uniquedesign choices.When I first started learning vintage garment sewing techniques,tailoring a princess coat was my holy grail of sewing projects. I taughtmyself high-end tailoring techniques by reading vintage sewing booksand studying every text on the subject I could find. Eventually I madea beautiful candy apple-red coat with a shawl collar, a full skirt, and asilk polka dot lining. I’ll never forget how proud I was of that projectand what a milestone it was for me in my sewing journey. Designingthis pattern has been especially meaningful for me because of that redcoat: I hope I can pass on the joy of tailoring a truly beautiful pieceof clothing by hand. Don’t forget to share your photos with me—andremember to enjoy every step of the process!xoxo, GertieThe good news is that princess coats are both fun and incrediblysatisfying to make for yourself, so you don’t have to wait for the perfectvintage piece to come along in your size. Armed with a little fitting andtailoring knowledge (which I will guide you through on pages 16–23),it’s not out of reach to make this style for yourself. The best part is thatyou can fit our Princess Coat pattern to your own unique figure, makingit a truly custom-fit, bespoke piece of clothing. Our range of sizes 2–20(plus cup sizes in A–H) make this style truly accessible to anyone witha sewing machine and a little gumption.Of course, here at Charm Patterns we specialize in pairing vintageglamour with enough options and information to satisfy modern homesewists. That’s why we have options for both jackets and coats in thispattern, with a range of interchangeable sleeves (both slim and tailoredor full and flamboyant), collar variations, and even a flared peplum(to get that dramatic Lilli Ann suit silhouette!). Our famous “Choose6 T H E P R I N C E S S C O A T I N S T R U C T I O N ST H E P R I N C E S S C O A T I N S T R U C T I O N S 7
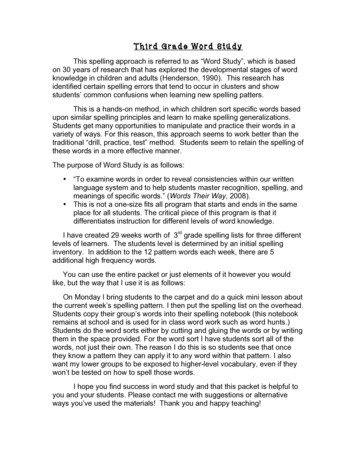
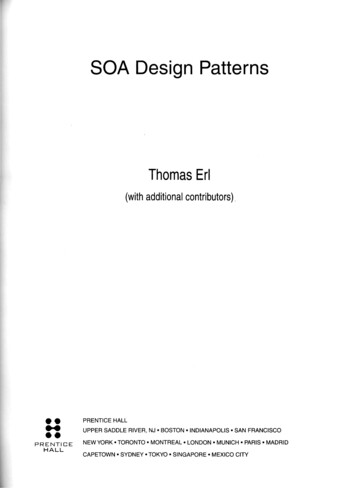
D E S I G N YO U R P R I N C E S S C OATUse this worksheet tosketch, plan,and estimateyardage for your coat!DESIGN OPTIONSNotchedShawl Collar Shawl CollarBodice(Back view)Full SkirtPeplumBellSleeveTailored Sleeve(Long or Three-Quarter)LanternSleeveS O M E P O S S I B L E C O M B I N AT I O N SCropped Jacket with Three-Quarter Tailored SleeveOPTIONPIECE #sYARDAGECollarCoat with Lantern SleeveFABRICJacket with Bell Sleeve and PeplumSleeveCoat with Tailored SleeveSkirtNOTES:8 T H E P R I N C E S S C O A T I N S T R U C T I O N SCropped Jacket with Lantern SleeveT H E P R I N C E S S C O A T I N S T R U C T I O N S 9
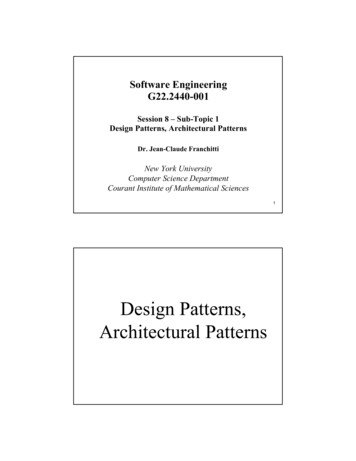
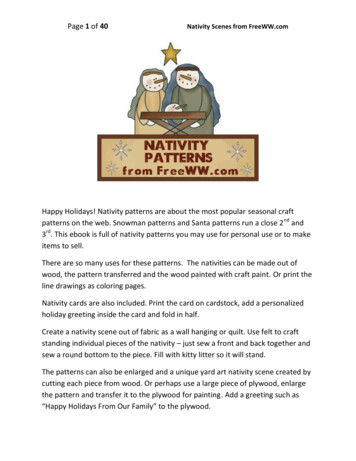
R E Q U I R E D YA R DAG E & C U T T I N GL AYO U T S15Bodice Liningneed additional yardage for directional prints, stripes, plaids, and otherprints that need to be matched across seamlines.Right side ofpattern piece15Wrong side ofpattern piece1945 in1 yd.9 m1 yd.9 m60 in5/8 yd.6 m3/4 yd.7 m4(1, 2, 3, 4, 13, 14, 37)45 in60 inSizes2–10Sizes12–2013/4 yd1.6 m2 yd1.8 m13/8 yd1.3 m11/2 yd1.4 m373745 in, sizes 2-10FOLD213314FOLD45 in, sizes 2-1014337FOLD37Bell Sleeve (9, 12)Sizes2–2045 in, 11/2 yd60 in 1.4 m45 in,60 in11/8 yd1m129FOLD22LanternSleeve2131414FOLD60 in, sizes 2-10NOTE: ifyou'd like toadd extrabody to theBell Sleeveor LanternSleeve, cutpatternpieces ininterfacingas wellas fabric,followinglayouts andyardagesprovided.Bell SleeveInterfacing (12)Sizes2–203/8 yd60 in 0.3 m1245 in, 13/4 yd60 in 1.6 m(9, 10, 11)FOLD60 in, sizes 12-20Sizes2–20LanternSleeveLining(22, 10)Sizes2–2045 in, 13/4 yd60 in 1.6 mLantern SleeveInterfacing (11)Sizes2–2060 inBodiceInterfacingSizes2–2060 in1 yd.9 mBack StayMuslin (27)1(1, 13, 14, 25, 26)2645 in, 1/2 yd60 in .5 m1311271111FOLDFOLD1 2 T H E P R I N C E S S C O A T I N S T R U C T I O N S229FOLD14FOLD1/4 yd.2 m1010Sizes2–2025124372FOLD133FOLD31FOLDBell Sleeve Lining (22)Sizes2–2041FOLD60 in, sizes 12-201920NOTE: cutpiece 37in organzafor boundbuttonholeopenings infacing.45 in, sizes 12-202021242060 in, sizes 2-1013119182118Be sure to note whether the pieces arecut 13on a double or single layer of fabric.For a double layer, there will be a noteindicating FOLD on the layout.118192045 in, sizes 12-20Bodice2121Sizes Sizes2–10 12–2014Note: all pattern piecesare shown in a “without nap” layout. You mayKEY TO LAYOUTS18(18, 19, 20, 21)T H E P R I N C E S S C O A T I N S T R U C T I O N S 1 3
Tailored Sleeve(Long or Three-Quarter)Sizes2–20(15, 16, 17)Sizes2–203345 in, 3/4 yd60 in .7 mFull Skirt Facings,Fabric and InterfacingTailored Sleeve (Long orThree-Quarter) LiningSizes2–203545 in, 3/4 yd60 in .7 m1711/2 yd45 in 1.4 m363460 in3/4 yd.7 mFOLDFOLD16Full Skirt1515(5, 6, 7, 8, 15)6Sizes12–2045 in31/4 yd3m31/2 yd3.2 m60 in21/8 yd1.9 m23/8 yd2.2 m75FOLDSizes2–108FOLD60 in, sizes 2-20Peplum28(28, 29, 30, 31)15Sizes Sizes2–10 12–205687FOLD45 in, sizes 2-2045 in3/4 yd.7 m1 yd.9 m60 in3/4 yd.7 m3/4 yd.7 m45 in60 inSizes2–10Sizes12–203 yd2.7 m3 yd2.7 m21/8 yd1.9 mFOLD45 in, sizes 12-2028312930FOLD8Peplum Facingand Interfacing247845 in, sizes 2-20FOLD60 in, sizes 12-20FOLD60 in, sizes 2-20660 in, sizes 2-10242931242331FOLD76293045 in, sizes 2-103023/8 yd2.2 m23312928Full Skirt Lining6, 7, 8, 23, 24)283024(32)45 in,60 inSizes2–20321 yd.9 mFOLDFOLD1 4 T H E P R I N C E S S C O A T I N S T R U C T I O N ST H E P R I N C E S S C O A T I N S T R U C T I O N S 1 5
A GUIDE TO FITTINGHere are my top tips for choosing a size and diagnosing fit issuesspecifically for the Princess Coat pattern.CHOOSING A SIZEFirst, understand ease: The Size Chart on the envelope correspondsto your body measurements. The Finished Measurements Chart (nextpage) corresponds to the garment measurements. The size chart tellsyou your recommended size based on your measurements, but thefinished measurements give you more information about how thegarment is meant to fit (and could potentially change your mind aboutwhich size to make—it’s just more information!). The Princess Coat ismeant to have more ease than a dress, as it is worn over your clothing.However, the ease is minimal compared to other outerwear garments,since it’s meant to have a cinched hourglass fit. Hip ease is notimportant since the skirt is very full.Start with your body measurements tochoose a size: Measure yourself aroundyour upper bust (under your armpits andabove your breasts), the fullest part ofyour bust, and the smallest part of yourwaist. Make sure to hold the measuringtape snugly and parallel to the ground.Compare your body measurements tothe size chart on the envelope back. First,find your upper bust measurement on thefirst line of the chart to find your size, andthen scan down the cup sizes in that sizecolumn to find your cup size. For instance,a 37-inch (in) upper bust will make youa size 10, and a 39-in full bust means youneed a B cup. Don’t worry if your waistisn’t 32 in, as stated for size 10; read on fortips on adjusting the waist, if needed.1 6 T H E P R I N C E S S C O A T I N S T R U C T I O N SPattern cup sizes can be (and often are) different from bracup sizes: The cup sizes included with this pattern indicate therelationship between your upper bust measurement and your full bustmeasurement. Measure your upper bust and full bust as indicatedabove to find your cup size on the chart. Don’t worry if it’s not thesame cup size you wear in bras. Bra cup sizes are measured by therelationship between the band (underbust) and the full bust, so theycan be slightly different than garment cup sizes. When sewing, it’salways better to go by your measurements than to pick a size based onsomething you’ve bought in a store.Consult the finished measurements: The finished measurementschart (below) provides more information to help you choose a sizeyou’ll feel great in. If you’re between sizes (and lots of people are)the finished measurements can help you decide whether to size up ordown, or to adjust the pattern. They will also help you figure out thebest cup size for you.F I N I S H E D M E AS U R E M E N T S : The bodice pattern was designed to fit with approximately 4 in (10 cm) of ease in the bust and waist. Outerwear, as a rule, has more easethan other styles so that you are able to layer clothing underneath. Also, thick fabricstend to make garments feel snugger. We have designed this pattern with that in mindwhile still retaining the fit and flare proportions of a classic '50s tailored garment. Hipmeasurements are not important when choosing your size, as the skirt is very full.Size246Bust A34.5 in87.6 cm36.5 in92.7 cm38.5 in97.8 cm81040.5 in42.5 in102.9 cm 107.9 cm121416182044.5 in113 cm46.5 in118.1 cm48.5 in123.1 cm50.5 in128.3 cm52.5 in133.4 cmBustB/C35 in37 in39 in41 in43 in45 in47 in49 in51 in53 in88.9 cm94 cm99 cm104.1 cm109.2 cm114.3 cm119.4 cm124.5 cm129.5 cm134.6 cmBustD/DD36 in38 in40 in42 in44 in46 in48 in50 in52 in54 in91.4 cm96.5 cm101.6 cm106.7 cm111.8 cm116.8 cm121.9 cm127 cm132 cm137.2 cmBustF/G37 in39 in41 in43 in45 in47 in49 in51 in53 in55 in94 cm99 cm104.1 cm109.2 cm114.3 cm119.4 cm124.5 cm129.5 cm134.6 cm139.7 cmBust H38 in96.5 cm40 in101.6 cm42 in106.7 cm44 in111.8 cm46 in116.8 cm48 in121.9 cm50 in127 cm52 in132 cm54 in137.2 cm56 in142.2 cmWaist28 in71.1 cm30 in76.2 cm32 in81.3 cm34 in86.4 cm36 in91.4 cm38 in96.5 cm40 in101.6 cm42 in106.7 cm44 in111.8 cm46 in116.8 cm* Skirt sweep for size 8 is 155 in (393.7 cm);finished length is 28 in (71.1 cm).T H E P R I N C E S S C O A T I N S T R U C T I O N S 1 7
P R E L I M I N A RY PAT T E R N A D J U S T M E N T SSome adjustments can be made prior to making a muslin.What to do when you’re more than one size: This is common, andit’s very easy to grade between sizes. For instance, if you’re a size 14in the bust and 16 in the waist, all you have to do is gradually angleout from the 14 at the underarm and taper into the 16 at the waistline.Don’t forget to use the size 16 for the skirt.Always fit by the bust and add to the waist if needed: It’s a verycommon mistake to choose your size based on your waist measurement,especially if your waist is a size or two larger than your bust. Theproblem with this approach is that while you may get a good fit in yourwaist, your shoulders and bust may be swimming in the garment. It’smuch better to aim for the correct fit in the bust (which is difficult toadjust) and add to the waist if needed (which is much easier to adjust).Size charts can’t account for all body types, and it’s very common tohave to widen the waist, no matter what your size is—I do it all the timefor my students!To add to the waist: Figure outhow much you need to add bycalculating the difference betweenyour waist measurement and the42waist measurement on the size chart.Next, divide that by 4 (because youhave four seam allowances at the sideseams). So, if you need to gain 2 in atthe waist, divide that by 4 to get ½ in. This is how much you will addto the side seam allowances. On Bodice pieces 2 and 4 make a mark½ in out from the waistline and continue the horizontal line of thewaist seam out to the mark. Next, position a ruler so that it is angledfrom the original underarm down to the new waistline mark. Draw aline connecting those two points; this is your new side seam.Check Length: Make any lengthSlash & spreadadjustments to the coat skirt and59lantern sleeve before sewing, usingthe length adjustment lines (skirtand lantern sleeve lengths cannotbe adjusted from the bottom, asthey are finished with a facing). Toremove length, take a tuck equal toSlash & overlaphalf the length you wish to add,59folding across the length adjustmentline. To add length, cut across theline, spread the cut to the totallength you wish to remove, and tapepaper behind to secure. Straighten(or “true”) the edges of the pattern piece if needed after adjusting.M A K I N G A M U S L I N A N D D I AG N O S I N G F I T I S S U E SYou must make a muslin (toile) version of the bodice and sleeves tomake and check any necessary adjustments before cutting your fabric.I personally think there’s no real point in trying to make a “wearablemuslin” for this design; your time is much better spent making sure thebodice is correctly and precisely fit to your figure by making as manytest versions as necessary (especially since the coat requires so muchfabric).To make a muslin, cut the outer bodice pieces and the sleeves. Sew thebodice, omitting the lining and facings, using a long machine stitch.Set in the sleeves. Turn in the seam allowances at the collar and frontedges, waistline, and sleeve hems. Mark the buttonholes and centerfront line on your muslin.When trying on the muslin, wear the foundation garments and an outfitthat is similar to what you would wear under the coat. Pin the muslinclosed at the buttonhole marks, making sure the center front lines meet.Is the waist too tight or too loose? Adjust the waistline, asdescribed on p. 18.1 8 T H E P R I N C E S S C O A T I N S T R U C T I O N ST H E P R I N C E S S C O A T I N S T R U C T I O N S 1 9
Is the bust too tight or too loose? Go up or down a cup size, ifpossible. You may also be able to make some small adjustments bypinning in or letting out the princess seams over the bust. Adjust thecurve of the princess seams as needed.1TA I LO R I N G T I P STailoring a garment takes special attention to detail, lots of handstitching, and careful planning. That doesn’t mean it has to take forever!As long as you have the proper tools and don’t cut corners, you canmake a fabulous coat or jacket in a few dedicated sewing sessions.Have the correct pressing supplies: Tailoring is all about pressing1shape into a garment. Have a tailor’s ham, seam roll, and clapper readyfor pressing. A ham helps you press darts and curved areas, a seam rollis great for sleeve pressing, and a clapper helps flatten bulky seams(just steam and then lightly slap the seam with the clapper to flatten).2Use high quality scissors: good, sharp shears are essential for cuttingIs the shoulder too wide or toonarrow? Try this adjustment, whichdoesn’t affect the armscye. Draw adiagonal line from the center of the11shoulder to the curve of the armscye.Cut from the shoulder to the armscye,leaving a hinge at the armscye. Draw asecond line from the center of the cut to the outer shoulder corner. Cutalong that line and leave a hinge at the shoulder. Swing the pieces out tocreate more width for a wide shoulder, pushing the upper triangle downso the shoulder seam is still straight. Push the pieces in, overlapping thecut edges, to take away excess width for a narrow shoulder.Is the tailored sleeve too loose or too tight? Add or remove widthto or from the underarm seams. Youcan either taper to the original width atthe armhole or add/remove the sameamount at the bodice side seams to fit.3Do you have fabric pooling orhorizontal wrinkles at the lowerback? You may need a swaybackadjustment to remove the excess length.2 0 T H E P R I N C E S S C O A T I N S T R U C T I O N S344your fabrics. A rotary cutter can help with slippery lining fabrics andinterfacing. Tailor’s points are small, thick scissors that are especiallyhelpful for clipping and notching thick seam allowances.Press carefully: Wool can be sensitive to direct pressing. You will dothe majority of pressing from the inside of the coat. When pressingfrom the outside of the garment, use a silk organza press cloth ratherthan applying the iron directly to the outer fabric.Supporting a hem: You can use widestrips of interfacing in the hem to supportit and hide hem stitches. Cut interfacingstrips at least 3 in wide on the bias, usingpinking shears (this helps eliminate aridge at the edge of the strip). Fuse thestrips on the skirt’s lower edge on thefabric wrong side. When securing the facings to the skirt, only pick up acouple threads of the interfacing (rather than the coat fabric).Shaping the Peplum: Want a more dramatic shape? Hair canvas is greatfor giving the peplum lots of body and emphasizing its flare, like theLilli Ann jackets that inspired this design. You can buy fusible or sew-inhair canvas. The sew-in variety must be pad-stitched (see Glossary, p.70) to the peplum facing, while fusible hair canvas is ironed on.T H E P R I N C E S S C O A T I N S T R U C T I O N S 2 1
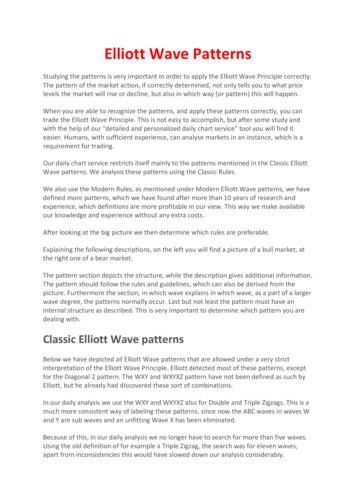
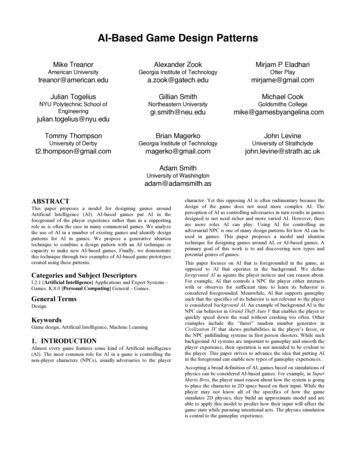
Interfacing: Use high quality interfacing. Weft is the best interfacingAnatomy of a Tailored Garment1. Roll line: this is where the collarrolls to the right side of the coat.Stand2. Stand: the collar from the baseof the neck to the roll line; oftensupported with an extra piece ofinterfacing.3. Fall: the collar from the roll lineto the outer edge.Fall1RollLinefor soft tailoring, while fusible hair canvas is ideal for providing a lot ofsupport. I used hair canvas on the jacket peplum to give it a lot of bodyand flare. These types of interfacings can be purchased in fabric storesthat sell garment fabrics, and online (I like www.fashionsewingsupply.com).Shoulder Pads: You may wish to add shoulder pads to your coat,Break point4. Break point: the point above thefirst button where the collar rollsto the right side of the garment.especially if you have sloping shoulders and notice drag lines on yourmuslin. Thin to medium shoulder pads will give your coat's shoulderssoft structure and improve the fit and appearance of your garment.Stitch the shoulder pads to the coat's shoulder seams by hand beforesewing in the coat lining.If you’d like to learn more about the art of tailoring, I highlyrecommend the book Tailoring: The Classic Guide to Sewing the PerfectJacket. You may also enjoy the tailoring chapter in my book Gertie’s NewBook for Better Sewing.FA B R I C A N D S U P P LY N OT E SFabric: This garment was intended to be made in outerwear fabricslike coating, wool flannel, tweed, bouclé, and suiting. Wool is the easiestfabric to tailor, as it is easily molded with steam. While you can usefabrics like cotton sateen or twill to make this design warm-weatherappropriate, keep in mind that those fabrics aren’t shaped as easily aswool.Lining: Use something durable and slippery, that slides over yourclothing easily. There are specialty lining fabrics made from acetate,polyester, and nylon that work well. You can also use silk charmeuse orcrepe. For cold weather, a flannel-back lining like Sunback or Kasha isperfect: it is a slippery acetate/cotton-blend satin on one side and fuzzyflannel for warmth on the other side.2 2 T H E P R I N C E S S C O A T I N S T R U C T I O N ST H E P R I N C E S S C O A T I N S T R U C T I O N S 2 3
BEFORE SEWINGTransfer marks: Use dressmaker’s tracingpaper and a tracing wheel to copy darts andother pattern marks to the wrong side (WS)of your fabric. Mark the pattern notches bymaking a snip into the point of the notch withthe tip of your scissors.Interface: Many pattern pieces need to beSEWINGINSTRUCTIONSstabilized with fusible interfacing beforesewing. Follow the interfacing cuttinginstructions on the pattern pieces. Apply fusibleinterfacing to the WS of the fabric, using apress cloth and steam. Do not move your ironback and forth; lift it up and press down forseveral seconds at a time until the interfacing isfully adhered.KEY TOILLUSTRATIONSMain fabricRight sideMain fabricWrong sideLiningRight sideLiningWrong sideFusibleinterfacingApply interfacing to the following pieces: Bodice/Undercollar Front (1) Apply Shoulder Reinforcement (25) on top of interfacing on Bodice/Undercollar Front Upper and Lower Lantern Sleeve (9 and 10), if desired for extrastructure Lantern Sleeve Facing (11) Bell Sleeve Facing (12) Bodice/Collar Facing (13) Back Neck Facing (14) Skirt Front Facing (15) Skirt Hem Facing Front (16) Skirt Hem Facing Back (17) Peplum Facing (32)T H E P R I N C E S S C O A T I N S T R U C T I O N S 2 5
Here are some ideas for fancy fabrics and fun design variations.Look at vintage inspiration: ThisTAKE YOUR PRINCESS COATTO THE NEXT LEVELpattern was directly inspired by1950s-era Lilli Ann coats and suits!Spend some time looking at vintageexamples and see what strikes yourfancy. These beautiful designs wereknown for their trims,embellishments, and fancy seaming.One of my favorite variations is colorblocking on a coat’s skirt; I once sawa beautiful Lilli Ann that was cut inroyal blue wool with diagonallyseamed color blocking on the skirt inblack velveteen. Try adding diagonalseams by drawing in your style lineson the coat pattern pieces, cuttingthem apart and adding seamallowances. Cut the color-blockedarea in a contrast color and/or texture.Another classic Lilli Ann touch is toadd bias trim around a shawl collar.Use premade bias trim or cut yourown and stitch by hand or machine tothe collar before constructing.T H E P R I N C E S S C O A T I N S T R U C T I O N S 6 5
piece and cut it in two along the marked Faux Fur Collar AdjustmentLine. Tape some fresh paper behind each piece and add a 5/8 in seamallowance along each cut edge. Cut the upper piece in faux fur and thelower piece in your main coat fabric, then seam the two together.Topstitching: For asportswear-inspired look, trytopstitching around the collar andfront facings of the coat. Experimentwith different thread colors andthicknesses. Use a topstitching needlein your machine. You may also wishto adjust the thread tension to avoida deep ridge.When cutting faux fur, trace the pattern pieces onto the fur’s backingusing a felt tip pen. Use fabric shears to cut along the lines, cutting onlythe backing of the fur (this will help eliminate too much fur shedding,though it’s still crucial to keep a lint roller around for any stray fluff).To trim the skirt in fur, you have acouple options: make the skirt hemfacing pieces taller (4 in finished)and cut them in the fur (rather thanyour coat fabric), and apply them tothe coat’s exterior instead of interior.Alternatively, cut wide bias strips offur and seam them together until theyare long enough to go around theentire coat hem. To apply the trim, sewthe facings/strips with the RS of thefur against the WS of the coat hem.Trim the seam allowances, understitchthe coat hem, and turn the fur to theRS of the coat. Turn in the upper edgeof the fur and hand stitch it to the coat invisibly using a slipstitch.Make a contrast collar: this collarlooks striking in a contrast color ortexture. Try faux Persian lamb, velvet,faux fur, or an animal print. You'llneed about 3/4 yard (.7 m) of contrastfabric. Cut only piece 13 in thecontrast fabric.Add underlining for warmth: If you live in an especially cold climate,Experiment with faux fur: a fur collar and hem trimcan take this coat to pure snow bunny levels of fantasy,like the pink version in the pattern photographs. It's agood idea to modify the collar facing piece before cutting(using the contrast cutting info above), so that the furdoes not extend to the inside of the coat front (wherethe buttons need to pass through). Trace the collar facing6 6 T H E P R I N C E S S C O A T I N S T R U C T I O N S1you may wish to research ways to make a coat warmer. Underliningin lambswool or Thinsulate will make your coat toasty warm! Cutall the outer coat pieces in the underlining fabric and baste them tothe fashion fabric, WS together. Treat the double layer as one duringconstruction. Alternatively, you can try using Sunback or Kasha flannelbacked satin fabric as your lining.Experiment with different fabrics: Raincoating, satin, or even springcottons could make this a year-round garment!T H E P R I N C E S S C O A T I N S T R U C T I O N S 6 7
Basting: a temporary stitch that holds pieces in place before sewingpermanently. Basting is done with a long stitch by hand or by machine.Even basting: This is like a largerunning stitching to hold two layersof fabric in place, usually within theseam allowances. Thread a handneedle and insert the needle into thefabric. Rock the needle in and out ofthe fabric several times, taking large stitches. Pull the needle all the waythrough once it is crowded with fabric. Repeat to continue the line ofstitching.GLOSSARYTailor basting: this diagonal basting worksperfectly for tailored collars and facings,hence its name. To make the stitch, hold theneedle horizontally at all times. Working fromright to left, insert the needle into the fabricfrom the RS and bring it back up about 3/8– ½ in above the entry point. Pull the threadthrough, leaving a 2-in-long tail. Reinsert theneedle about ½ in above the first entry pointand bring it back up about ⅜ – ½ in to theleft, just as before. Pull the thread through tolay flat against the fabric, but do not pull taut. Continue the stitch asbefore. Catch the underlayer of the collar or garment as you stitch. Donot pull stitches too tight, as you don’t want the thread to leave animpression on the fabric.Catchstitch: a hand stitch often usedfor hemming; I like it for stretchfabrics, as it has a bit of give. Workleft to right. Thread a hand-sewingneedle and knot the end; come upthrough the hem allowance only,anchoring the thread. Holding the needle horizontally and with theneedle’s point facing left, take a tiny stitch into the garment about ¼ inT H E P R I N C E S S C O A T I N S T R U C T I O N S 6 9
glamour, featuring wasp-waisted models like Dorian Leigh and high-profile photographers like Richard Avedon. The poses were highly stylized and the silhouettes beyond dramatic. (Some of my favorite Lilli Ann ads feature models walking dogs, which is why I had to get my own little chihuahua, Hattie, involved at the Charm Patterns photo shoot.) The