Transcription
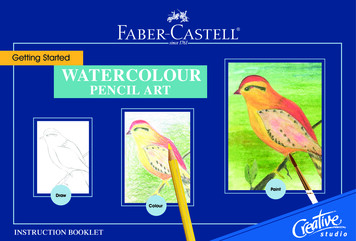
Getting StartedWATERCOLOURPENCIL ARTPaintDrawColourINSTRUCTION BOOKLET
TABLE OF CONTENTSIntroduction . . . . . . . . . . . . . . . . . . . . . . . . . . 1Basic Techniques . . . . . . . . . . . . . . . . . . . . . . . 2Pencil Techniques. . . . . . . . . . . . . . . . . . . . . . . 3Experimenting with Colour Mixing . . . . . . . . . . . 6Papers. . . . . . . . . . . . . . . . . . . . . . . . . . . . . . . 10Shading and Shadows. . . . . . . . . . . . . . . . . . . . 11Creating Texture. . . . . . . . . . . . . . . . . . . . . . . 12Painting Exercises. . . . . . . . . . . . . . . . . . . . . . 13Mixed Media. . . . . . . . . . . . . . . . . . . . . . . . . . 20Collage and Altered Art. . . . . . . . . . . . . . . . . . 23Lettering . . . . . . . . . . . . . . . . . . . . . . . . . . . . 24
Founded in 1761, Faber-Castell is still run by the same family,now in the 8th generation. The company has developed froma small workshop in Germany to an international corporationwhich employs over 5000 people worldwide. Our BrandEssentials encompass four core values:Lothar von Faber1869Count A.W. von Faber-CastellTodayCompetence and TraditionOutstanding QualityInnovation and CreativitySocial and Environmental Responsibility
24LETTERINGYou can do beautiful lettering using the dry pencils,or fill in open letters with colour.Try lettering over a background that you have createdwith the watercolour technique.We hope you have enjoyed your experiences and thatyou will continue to explore and discover the magic ofwatercolour pencil painting.
1Discover the Magic of Watercolour Pencils.This is a truly unique art medium and once you get starteddrawing, painting and experimenting you will be delightedwith the results.Watercolour pencils are very flexible. They offer the dual option ofdrawing with coloured pencils, and then, if you like, with the touchof a wet brush you can get the look of a watercolour painting. Youhave more control than with regular watercolour paints, you caneasily add details and blend and mix colours. The pencils never dryout, aren’t messy, and take up very little space, all of which makesthem perfect for doing art whenever and wherever the opportunitypresents itself.Your kit includes the primary colours (red, yellow, blue) secondarycolours (orange, green, violet) black and magenta. With these eightcolours you will be able to create an almost infinite array of hues,tints and tones.We believe that everyone, with a little encouragement and somesimple instructions, can express their creativity and create still life,landscape, portrait, abstract paintings and more. By experimentingand becoming involved with the materials we hope you will findyour own signature style to make original art that truly expressesyour unique way of seeing and creating.
2BASIC TECHNIQUESIn this book we present many ways to put colour and paint on paper. You can follow the book sequentially or start anywhere bytrying any technique that appeals to you in whatever order you choose.Hold On!Try various grips and placementswith the pencil. For more control,grip the pencil close to the tip.For a freer stroke, move backalong the pencil and drawloosely.TipHold the pencil perpendicular tothe paper or at an angle.Colour with the side of the lead,by holding the pencil almostparallel with the paper.Keep pencils sharpened. Use the pointed tip for details and the side of the lead for colouring in large areas.Brush UpUse the tip of a slightly damp brush for fine details.Press down on the brush to push colour into the paper.Keep the brush full of water to create washes.
23COLLAGE AND ALTERED ARTCreate backgrounds for collage, scrapbook and Altered Art.Paint the surface with white gesso. Add a layer of one ormore colours, using the side of the pencil lead. Brush withwater. The gesso will give an interesting, mottled backgroundonto which you can add collage elements, photos or lettering.The transparent quality of the watercolour pencils makethem ideal over pen work, to tint photocopies and printedOn vintage photos with a matte finish, you can colour directlyon the image. Use only enough water on the brush to blend thecolour.
22StampingWatercolour pencils are the ideal medium to use with rubberstamps because they offer many different applications. Youcan purchase rubber stamping supplies at your local craftstore to get started. Or make your own stamps by cuttingor carving images out of different porous materials such asfoam or potatoes.Stamp an image using a rubber stamp and a permanent inkpad. Colour and paint the image with watercolour pencils.If you use permanent ink, the stamped image will stayintact when you paint over it.Use the watercolour pencils as a stamp pad. Lay downa swatch of intense colour. Wet the swatch. Place yourstamp into the pool of colour that is made and thenstamp the image.Paint a background area with watercolour pencils. Onceyour paint is dry, rubber stamp designs over it usingpermanent ink or watercolour pigment.
3PENCIL TECHNIQUESColour an area with a pencil.Use a clean wet brush and stroke over your pencil marks.The water will turn the pencil into paint.Experiment with different ways to dissolve the pigment. Paint with a wet cotton swab, sponge or cloth. Use your dampened fingers. Spray the coloured pencil with a spray bottle.TipWet a section of the paper.Lightly draw with a pencil.Notice how the pencil marksbleed to create interestingeffects.Brush the tip of a sharpenedpencil with a wet brush.Apply the paint to paper.Since the colour will lighten when you add water, testthe colour before applying it to your finished painting.Dip the very tip of the pencillead into a drop of water.(Don’t plunge the pencil intothe water as it will cause thewood to swell and weaken.)Draw or stipple with thesoftened pencil lead.
4Line and WashDraw the outline of an image with a heavy pencil stroke.With the tip of a wet brush, pull the colour away from theline and into the shape.Pulling ColourColour an area with a watercolour pencil. Using a wetbrush, cotton swab, or your finger, pull the colour intoan adjacent area to complete the shape.Wet on WetUsing a clean brush, wet an area of your paper. Use the“Pulling Colour” technique, transferring the colour intothe wet area. Notice how the colour bleeds as you paint.Wet and DryAdd details to an area of washed colour. Wait for thepainted area to dry before drawing over it with the watercolour pencils.
21Batik DrawingOil Pastel Resist DesignsUse a block of wax, a white candle or crayon to draw adesign. Then skim over the drawing with the side of awatercolour pencil, laying more colour around the borderof your design. Paint the picture with a wet brush, movingcolour over the design. The wax from the candle or crayonwill repel the coloured water and your drawing will emergethrough the paint. Add more colours if you like.Draw designs with brightly coloured oil pastels. Lay aheavy border of watercolour pencil around the outside areaof your drawing. With a very wet brush, paint across thedesign, washing paint over the pastel. The oil pastel is notaffected by the paint. It will resist the watercolour, creatingan interesting effect.
20MIXED MEDIAUse other art materials together with thesewatercolour pencils to create some wonderfulpainting and drawing styles and effects.Pen, Ink and Watercolour WashDraw an object or a scene using a permanent inkpen. In this example, we used a superfine FaberCastell PITT artist pen with India ink.Add washes of colour and different techniquesover the top of your drawing. If you use apermanent ink pen, the line work will stay intactand be visible through the paint.
5Erase with WaterIf an area becomes too intensewith colour, brush over it witha clean wet brush. Then dab itloosely with a rag or spongeto lighten the colour.ScrapingColour an area with a watercolour pencil. Wet thecolour. Now take the tip of the brush handle and pullpaint across the paper.SpatterWet the brush with colourand flick it against a pencilpoint. Protect areas of unwanted colour by maskingwith scrap paper.Brush StrokesUse the very tip of the brush and apply light pressurewhile painting to achieve fine, thin, controlled strokes.Apply more pressure to fanout the brush tip and pullit across the paper creatingdeep, broad strokes.
6EXPERIMENTING WITHColour MIXINGUsing the printed grids in your Watercolour Pad,try different colour applications and combinations.With a graphite pencil or permanent ink pen, notethe colours you use in each grid to build a referencechart for your future paintings.Lightly, with the side of the pencil, fill one cell ofthe grid with a colour. Using more pressure, applythe same colour more heavily in another cell. Brusheach with water and see how the intensity of colourvaries by the amount of colour you put down.Layering is an important technique in watercolourpencil art. Through this method you can achievesubtle colour grading, mix colours and create theillusion of dimensionality.Tip Use a hair dryer or craft heat tool to drythe paint quickly so that you can addmore layers of colour or draw in details.
19Abstract PaintingsDraw a space that you can easily work within. Then drawa continuous line with a graphite pencil or a permanentink pen. Make loops, zig zags, circles; cross over and backtrack. Now fill in the shapes that were created by your linemeanderings. Use different colours and techniques shownin the front of the book.Or scribble and swash colour randomly around your paper.Apply different techniques such as spattering and scraping.Don’t worry about what is forming, just experiment and havefun. When you are finished turn, flip, and crop your imageuntil you find a view that you like.
18Putting it all togetherCreate bands of colour. Use the techniques shown here if youchoose. Each band should represent an area of space such asthe foreground, the sky, mountains, etc. Let the bands blendinto one another. When you are finished draw a frame or usea paper frame to define the picture space.
7Using the side of the lead, fill one half of a cell withone colour. Place another colour next to it. With a wetbrush, stroke over both colours to create a new one.Layer one colour over another by “cross hatching.”Draw a set of parallel lines with the red pencil, then overlapat an angle with the blue pencil. Blend. Try this with differentcolour combinations. Try this with 3 colours.Allow the colours to dry and then go back and add anothercolour. Rich colour and depth can be achieved by applyingmultiple layers of colour. Allow the first layer of watercolourpaint to dry thoroughly and then add more colour to shadeand intensify. By allowing each layer of colour to dry, youwill be able to work the painting to get the desired effect.
8Meet in the Middle:You will use 3 cells for this experiment. Colour mostof one cell green, leave the middle cell blank andcolour the next one blue. Brush the green with water,rinse the brush, then paint the blue cell, moving colourinto the blank cell and pulling some of the green intoit as well. This will create a gradated effect that worksreally well for skies, flower and leaf petals and otherareas where you want to retain some of the originalcolours that are blended into the new colour.What about brown?Based on the colour pencil selection in this kit, avariety of brown tones can be achieved by layeringdifferent ratios of yellow, orange, magenta and black.TipKeep your brush clean when you are paintingby rinsing it thoroughly between colours. Use acloth to wipe off excess colour and to control theamount of wetness.
17FlowersSeveral techniques are useful for making a field of flowers.Use the “Wet on Wet” technique, randomly dotting the wetarea with greens, pinks and purples.Dip a pencil tip in water and stipple random flower petalsover a green patch of grass.Or draw dots, and brush water over them. Go back later toswish in a few green stems.Sand and RockAchieve the look of rock or sand by implying texture. Laydown an area of red, orange and yellow paint. Spatter redand blue dots all throughout the brown paint. Be sure tomask off the rest of your drawing before doing this so youprotect other areas from spatter marks.
16Landscapes in a minuteNot everything we view around us is perfectly clear anddefined. This is especially true in nature with objects we viewfrom afar. For example, when you look at a cloud in the skyyou will notice that there is no definite line making the shapeof that cloud, and no two clouds ever look alike. Thereforepainting landscapes and nature can be very easy.By using several of the techniques shown in the front of thisbooklet, you can make some very convincing landscapes injust a minute.SkyThe “Wet on Wet” technique you learned on page 4 is greatfor creating a cloudy sky. Create a palette of blue and red.Wet the area of your drawing that will be the sky. Pull thecolour from your palette and swish it around the wet areaof your paper mixing to get some purple tones. Make someareas light and some dark.The salt and sandpaper techniques described on page 12 canalso be used to create the illusion of a cloudy sky.GrassFor spiky grass, simply use the scraping technique shownon page 5. The wooden end of your brush makes finestrokes that can represent blades of grass.
9Make a PaletteOn a separate piece of paper draw different colour swatches, applying lots of colour. Use these dry pools of colour as if theywere a watercolour tablet and pull colour to apply to your painting. Notice that the more water you use, the lighter the colourwash becomes. With less water, the colour will be more intense.
10PAPERSThe type of paper you use will have a big effect on the look of your art.The practice paper in the Watercolour Pencil Pad has a smooth surface.Other papers may have more texture with “hills and valleys” on the surfaceand when you colour, the pigment will stay on the hills and miss the valleys.Try different types of paper. Thinner paper makes your art look delicate.Lightly tinted and coloured paper can also be used. Since watercolour pencilis transparent, the background hue of the paper will influence the overallcolouration and mood of your art.Handmade papercan also be usedwith watercolourpencils.Other materialsalso acceptwatercolour pencil:try colouring andpainting on wood,cloth and otherporous surfaces.
15Wash DrawingBy adding some brown tones you can achieve an earthy,monochromatic feel.(A)BlockingStudy the object you wish to paint by squinting your eyes.Do not look for lines that define shapes, but instead lookfor values - lights and darks - and colours. Roughly paintblocks of value and colour that allow each shape and object to emerge. (See A)When you are satisfied that you have captured the essenceof your object, allow the painting to dry. Sharpen thepencils to a fine point and add details. Dip the tip of thepencil into a drop of water to get an expressive look to thelines you make. (See B)(B)
14Wash DrawingA style often used for practice sketching is pen, ink and watercolour wash. It is very popularfor figure and fashion drawing and Asian-inspired art.Although there is no pen included in this kit, you can achieve the same look very simply byjust using your black watercolour pencil. Wash drawings can be done two ways.In the example to the right, a sketch ismade first. Draw an object with a blackwatercolour pencil. Then use a very wetbrush over your pencil marks to createtones and shadow.Another method is to do the wash first. Create a palette of black on the side. In your drawingarea, loosely paint blocks of shadow and tones that represent the object you wish to draw.Once your painting is dry, go back and add detail with a pencil over the top of the wash.
11SHADING AND SHADOWSPainting with pencilsCreate shadow with colourLightly draw an object. Roughly addcolour with the watercolour pencils,leaving the unshadowed portions blank.Then use a wet, clean brush to pull thecolour across and create a soft wash.Create intense shadows by adding layers of colour.Shading with paintLightly draw an object. Using the“palette” method described on page9, roughly paint blocks of colour,leaving blank those areas where thelight is hitting.Paint an object and allow the image to dry.Now add an additional darker colour at thepoints where the shadows are the darkest.Blend the shadows into the existing colour.In this example, we added a blue shadowto the red cherry.
12CREATING TEXTUREWith SandpaperWet your art paper. Rub the tip of the pencil across a sheetof sandpaper and let the colour shavings sprinkle onto thewet paper.With SaltFor a subtle background texture, paint an area with intensecolour. While the paint is still wet, sprinkle salt over thepigment. Let the paint dry completely before brushingaway the salt.With SpongesIn a separate area, make a palette. Wet your palette with abrush. Then pick up the colour with a sponge and transferit to your art paper, stamping the sponge in the drawingarea. Do this in wet or dry areas for different effects.StipplingColour and paint an area and while it is still wet, use thesharp tip of a pencil to make small marks in the same oranother colour.
13PAINTING EXERCISESImprimaturaTry this technique first in a small area - about 4”. Lay downa field of colour over the entire surface of the picture area. Inthis example, a blue watercolour pencil was used. Now drawthe outlines of your images on top of the background colour,using any colour pencil or even a pen. Fill in the shapes youmake with coloured pencil and washes. The backgroundcolour will show through your objects and create a feeling ofharmony, pulling the drawing together.Colour another background withwatercolour pencil. This timeuse a wet brush to actually drawthe objects in your backgroundarea. When it is dry you can addmore colours and details.
Now that you have begun your journey with colour,you can continue to explore the colours and typesof pencils available from Faber-Castell.Creative Studio ART GRIP Watercolour pencilsare available in tins of 12, 24, 36 and 60 colours at anexcellent value for art students and aspiring artists.114260Additional Getting Started Art Kits114224800067# 800094800052800084Discover more great art products at www.faber-castell.com800086
drawing, painting and experimenting you will be delighted with the results. Watercolour pencils are very flexible. They offer the dual option of drawing with coloured pencils, and then, if you like, with the touch of a wet brush you can get the look of a watercolour painting. You have more control than with regular watercolour paints, you can