Transcription
3.0Tutorial
ScreenFlow Version 3.0 TutorialCopyrights and Trademark NoticesCopyright 2012 Telestream, Inc. All rights reserved. No part of this publication may bereproduced, transmitted, transcribed, altered, or translated into any languages withoutthe written permission of Telestream. Information and specifications in this documentare subject to change without notice and do not represent a commitment on the partof Telestream.Telestream, Flip4Mac, FlipFactory, Episode, Telestream MAP, MetaFlip, GraphicsFactory,MotionResolve, ScreenFlow, and Split-and-Stitch are registered trademarks andPipeline, Launch, Wirecast, Videocue, Drive-in, and Vantage are trademarks ofTelestream, Inc.QuickTime, Mac OS X, and Safari are trademarks of Apple, Inc. Bonjour, the Bonjourlogo, and the Bonjour symbol are trademarks of Apple, Inc.MainConcept is a registered trademark of MainConcept LLC and MainConcept AG.Copyright 2004 MainConcept Multimedia Technologies.Microsoft, Windows NT 2000 XP XP Professional Server 2003, Vista, Media Player, MediaEncoder, .Net, Internet Explorer, SQL Server 2005 Express Edition, and Windows MediaTechnologies are trademarks of Microsoft Corporation.ScreenFlow User’s Guide 81020February 2012i
iiScreenFlow Version 3.0 TutorialFebruary 2012ScreenFlow User’s Guide 81020
1Getting StartedThese tours are designed to introduce you to the features and capabilities ofScreenFlow.We encourage you to take these tours before beginning a project. They help you togain a basic understanding of how ScreenFlow works and help to familiarize yourselfwith the program.Every ScreenFlow project is a three step process: first you record your presentation,next you edit your screencast, and finally you export your screencast to a video file orpublish it directly to an Internet video service such as YouTube and others.For video tutorials, please visit our ScreenFlow demos page.Tours Tour 1 – Recording With ScreenFlow Tour 2– Editing Your Screencast Tour 3– Exporting Your Screencast
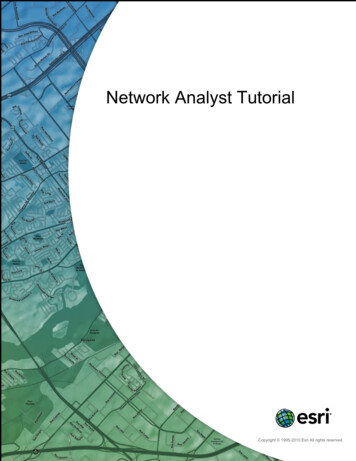
2Getting StartedTour 1 – Recording With ScreenFlowTour 1 – Recording With ScreenFlowWhen launching the program, ScreenFlow displays a Configure Recording window.Figure 1. Screenflow Recording WindowBefore you create your first screencast, take a moment to consider ways of approachingthe process.This first tour focuses on creating a high quality recording for editing and publishing.When creating a screencast, it is important to prepare your recording properly whileconsidering how you intend to use this screencast later in your workflow.We recommend that you create at least one sample recording to familiarize yourselfwith the program before creating your intended screencast.Configuring Your RecordingUse the Configure Recording window to specify your recording sources. Thisautomatically opens when you launch the application, but it can also be accessed fromScreenFlow Helper Configure Recording or File New Recording.Record Desktop from. This option records your computer display. This source recordsby default and cannot be deselected. If you have multiple displays connected, you canchoose between them. ScreenFlow cannot record multiple displays simultaneously.Record Video from. This option records video from any camera connected to yourcomputer. Use the dropdown menu to choose from multiple cameras. Upon selecting asource, a preview image displays below.Record Audio from. This option records from any microphone connected to yourcomputer. Use the dropdown menu to choose from multiple microphones. Uponselecting the source, the volume level is displayed below.Record Computer Audio. Choose this option to record all sounds played through yourcomputer. The ScreenFlow audio driver must be installed to use this setting. If thedriver is not installed, you are prompted to install it.Beginning Your RecordingWhen you are ready, click the Record button. ScreenFlow enters a countdown modebefore recording. You can change the length of this countdown.February 2012ScreenFlow User’s Guide 81020
Getting StartedTour 1 – Recording With ScreenFlowCreate a short presentation then stop your recording: press Shift-Command-2 or selectStop Record from the ScreenFlow Helper menu in the upper-right corner of yourmonitor. .When you stop recording, ScreenFlow opens your recording in the ScreenFlow editingwindow with all of your recorded sources placed in the timeline.Monitor video and computer audio are combined into one clip; camera video andmicrophone audio are combined in another clip, to maintain video/audio sync. Videoand audio can be separated by selecting the clip and choosing Edit Detach Audio.ScreenFlow User’s Guide 81020February 20123
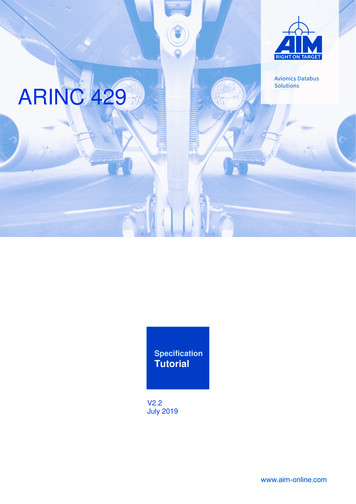
4Getting StartedTour 2– Editing Your ScreencastTour 2– Editing Your ScreencastThe purpose of this tour is to familiarize you with the basic editing features ofScreenFlow. This tour describes some of the most common and basic editingtechniques.When you finish your recording, ScreenFlow creates a new document and recordedmaterial is placed at the beginning of the timeline. All media in the timeline isreferenced to your project’s stored media. Changes made in the timeline or on thecanvas do not alter your original recording.The Editing WindowThe space used for editing is the editing window, which consists of three main panels.Figure 2. Editing WindowCanvasCanvas controlsPropertiesPlayback controlsTimelineCanvasThe large, central area of the editing window is called the canvas. This offers a previewof all content in your screencast. The gray space around the preview is for content thatwill not be present in your exported video. This is used to display off-screen contentpresent in scaling or pan effects. The content displayed on the canvas reflects theposition of the scrubber on the timeline.You can also set the canvas size and background color using the canvas controls.February 2012ScreenFlow User’s Guide 81020
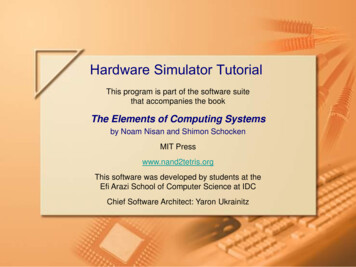
Getting StartedTour 2– Editing Your ScreencastTimelineThe wide area at the bottom of the screen is the timeline. This is a visual representationof the temporal length of your screencast. The scale at the top of the timelinerepresents measurements of time.The red vertical line on the timeline is called the scrubber. This represents the currenttemporal position of the preview currently displayed on the canvas.The timeline is divided into tracks to manage different clips overlapping at the sametime. If the clip is visual (i.e. video, image, or text), the upper most track is displayed overthe lower tracks.Between the canvas and the timeline are playback controls to play your screencast aswell as jump to the beginning or end of your screencast.PropertiesOn the upper-right side of the editing window are the Properties tabs. These are themain editing controls of ScreenFlow and allow you to configure each clip in yourscreencast. It also includes the media library which stores all recorded and importedmedia in an unaltered state.CroppingScreenFlow provides two different types of cropping.Figure 3. Canvas ControlsCanvas CroppingCanvas cropping is used to change the resolution or aspect ratio of the workspace youhave to edit in. This can be useful if you want to constrain your screencast to only aportion of the total recording (i.e. a foreground window).ScreenFlow User’s Guide 81020February 20125
6Getting StartedTour 2– Editing Your ScreencastCanvas cropping is accessible through the canvas control button. This is set bynumerically entering the width and height values or dragging the edge of the canvaswith your mouse cursor.The canvas cannot be set to a value larger than the original recording. Remember, thecanvas size represents your total usable display space, which converts to the frame sizeof your video when you export or publish it.Image CroppingImage cropping is useful for removing content from the edge of a visual clip. Unlikecanvas cropping, image cropping does not limit your workspace but simply alters thecontent of video or image material.To crop an image, select the video or still image presented on your canvas. Thishighlights the image and place handles on the sides. Hold the Control key and drag theedge of the image to crop it.ActionsActions are property changes used to transition the media from one state to another.Actions are added to a clip by selecting the clip, opening the property that you want toalter, then clicking the Add Action button at the bottom of the properties pane. Theaction is placed in relation to the position of the scrubber, but can be moved on theclip. The duration of the action is changed by dragging the edge of the action tolengthen or shorten the action.Figure 4. Video Properties ActionPlace the scrubber before or after the action to make changes to the property relativeto the action. When the scrubber is placed before the action, this sets the properties ofthe clip before the action. When the scrubber is placed after the action, this sets theproperties of the clip after the action.Video PropertiesVideo properties can be used to make changes to any recorded or imported video orimage file. This includes both screen and camera recordings.This tour focuses on the most common features.February 2012ScreenFlow User’s Guide 81020
Getting StartedTour 2– Editing Your ScreencastFigure 5. Video PropertiesScale. Use this option to change the size of a video or image relative to the size of thecanvas. This can be used for highlighting a particular portion of the screen or with avideo action to create a zoom effect.Use the slider or enter a percentage value to change the image scale.Position. Position represents the location of your video or image on the canvas. Theposition is based on the exact placement of the center of your image. Values in theposition field are represented in pixels.You can reposition the image by dragging the image on the canvas, nudging the imagewith the arrow keys, or entering a numerical value in the position fields.Opacity. This is the degree to which the image is translucent. The greater the value, themore opaque the image. If the value is set to zero, the image is invisible.This is used with a video action to fade an image in or out. It is particularly useful if youwould like to periodically display your camera recording.Screen Recording PropertiesScreen recording properties are effects specific to demonstrations using the mouse andkeyboard. They can only be applied to screen recording clips.This tour focuses on the most common features.ScreenFlow User’s Guide 81020February 20127
8Getting StartedTour 2– Editing Your ScreencastFigure 6. Screen Recording PropertiesPointer Zoom. Often it can be difficult to see the mouse in a screencast, particularly ifthe video has been significantly resized. Increasing the pointer zoom value makes themouse cursor larger and easier for the viewer to follow.Click Effect. This feature can be used to make a visual effect when you click yourmouse. Select Radar to project a red circle with each click or Invert to change the cursorfrom black to white with each click.Sound on Click. Select this option to generate a click sound when the mouse button ispressed.Show Keys Pressed. Select this option to display the text as you were typing it whilerecording.Show Modifier Keys Pressed. Select this option to display modifiers used in hotkeycommands, F1 through F12, and the arrow keys.Callout PropertiesCallout Properties are used to highlight a specific portion of the screen. They can onlybe applied to screen recordings. Unlike the other properties, Callout Properties must beused with an action.This tour focuses on the most common features.February 2012ScreenFlow User’s Guide 81020
Getting StartedTour 2– Editing Your ScreencastFigure 7. Callout PropertiesHighlight. Callouts are capable of highlighting an area in three different ways. Mousecursor highlights a circular space around the mouse cursor. Foreground Windowhighlights any window which is currently active. Freehand allows you to draw the areayou want to highlight.Opacity. The opacity slider controls the opacity of the space outside the callout. A lowvalue makes the surrounding area opaque while a high value makes the surroundingarea invisible.Zoom Up. This option magnifies the area inside the callout to make it more prominent.Border. This option increases the range of the callout area to draw attention to a largerspace. This feature is not available with freehand callouts.Media LibraryThe media library stores all recorded and imported media in an unaltered state. Thismaterial may be dragged to your timeline or canvas for editing. You may drag thiscontent into your project multiple times to copy the same material.ScreenFlow User’s Guide 81020February 20129
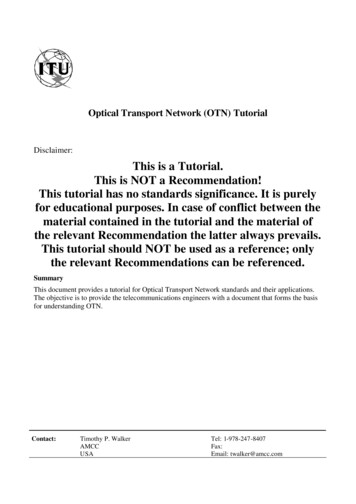
10Getting StartedTour 3– Exporting Your ScreencastTour 3– Exporting Your ScreencastThe purpose of this tour is to familiarize you with exporting your screencast. Screencastprojects are not video files – they are saved as Screenflow documents (with a screenflowextension), which can only be opened and used by ScreenFlow.There are two ways to publish your screencasts – by exporting them to a standardvideo file format (QuickTime or Windows Media) or publishing them directly to anInternet video service, like YouTube.Determining the correct export settings for your screencast depends on the complexityof your screencast and the intended use of the video after it has been produced.This tour explores the basics of ScreenFlow’s export options.Select File Export or press Command-E to export your presentation:Figure 8. Export Settings WindowSave As. Choose a name for your exported video (default: ScreenFlow.mov).Where. Choose a location to export your video.Preset. ScreenFlow has several export presets for your convenience. This tour focuseson the most commonly used presets. Web - High. This is the default export option which encodes using the H.264 codec.It was chosen as the default codec based on both image quality and file size. Web - Low. This is an export option similar to Web - High, but formatted for a lowbandwidth. It plays more smoothly on slow internet connections but the imagequality is not as good as Web - High. Lossless. This is an uncompressed export format ideal for additional editing. This format has the highest quality image but also the largest file size. When exported at100%, the image quality is identical to the original recording.iPad / iPhone / Apple TV / iPod. These export options are formatted based on therecommended video specifications for these devices. They cannot be altered.February 2012ScreenFlow User’s Guide 81020
Getting StartedTour 3– Exporting Your ScreencastWindows Media. This option exports a video in the WMV format. This is a popularformat for Windows users. This option uses a QuickTime plugin called Flip4Mac whichmust be licensed separately.DimensionsThese options are used to set the dimensions of your video export. You should not set asize larger that your canvas size. This does not improve image quality.Scale by. Use this option to scale your project by a percentage value. This is an easyway to shrink your screencast while maintaining the aspect ratio.Scale to custom size. Use this option to set the exact width and height of yourexported video. Click the Letterbox Content box to add letterboxing to your export.Publish to YouTube/Vimeo/FlashIn addition to encoding a video file, ScreenFlow can also publish screencasts directly toYouTube, Vimeo, and Flash. These options are accessible from the File menu.ScreenFlow User’s Guide 81020February 201211
12Getting StartedTour 3– Exporting Your ScreencastFebruary 2012ScreenFlow User’s Guide 81020
time. If the clip is visual (i.e. video, image, or text), the upper most track is displayed over the lower tracks. Between the canvas and the timeline are playback controls to play your screencast as well as jump to the beginning or end of your screencast. Properties On the upper-right side of the editing window are the Properties tabs. These .