Transcription
Unicorn IILarge Character Ink-jet PrinterOperator ManualP/N 462152-01Revision: AD, June 2012
Copyright June 2012, Videojet Technologies Inc. (herein referred to as Videojet). All rightsreserved.This document is the property of Videojet Technologies Inc. and contains confidential andproprietary information owned by Videojet. Any unauthorized copying, use or disclosure of it withoutthe prior written permission of Videojet is strictly prohibited.Videojet Technologies Inc.1500 Mittel BoulevardWood Dale, IL60191-1073 USAwww.videojet.comPhone: 1-800-843-3610Fax:1-800-582-1343Int’l Fax: 630-616-3629Offices - USA: Atlanta, Chicago, Los Angeles, PhiladelphiaINT’L: Canada, France, Germany, Ireland, Japan, Spain,Singapore, The Netherlands,The United KingdomDistributors Worldwide
Table of ContentsChapter 1 — IntroductionUnicorn II Printer . . . . . . . . . . . . . . . . . . . . . . . . . . . . . . . . . . . . . . . . . . . 1–1About the Manual. . . . . . . . . . . . . . . . . . . . . . . . . . . . . . . . . . . . . . . . . . . 1–1Standard Product Features . . . . . . . . . . . . . . . . . . . . . . . . . . . . . . . . . . . 1–2Chapter 2 — Product SafetyIntroduction. . . . . . . . . . . . . . . . . . . . . . . . . . . . . . . . . . . . . . . . . . . . . . . . 2–1Chapter 3 — Fast InstallationPrinter Overview . . . . . . . . . . . . . . . . . . . . . . . . . . . . . . . . . . . . . . . . . . . 3–1Standard Components . . . . . . . . . . . . . . . . . . . . . . . . . . . . . . . . . . . 3–1Printer . . . . . . . . . . . . . . . . . . . . . . . . . . . . . . . . . . . . . . . . . . . . . . . . . 3–2Fast Installation. . . . . . . . . . . . . . . . . . . . . . . . . . . . . . . . . . . . . . . . . . . . . 3–3Installation Procedure . . . . . . . . . . . . . . . . . . . . . . . . . . . . . . . . . . . . 3–3Chapter 4 — Operation and SetupOverview . . . . . . . . . . . . . . . . . . . . . . . . . . . . . . . . . . . . . . . . . . . . . . . . . . 4–1Keyboard Description . . . . . . . . . . . . . . . . . . . . . . . . . . . . . . . . . . . . . . . 4–2Print On/Off . . . . . . . . . . . . . . . . . . . . . . . . . . . . . . . . . . . . . . . . . . . . 4–3Dot Size . . . . . . . . . . . . . . . . . . . . . . . . . . . . . . . . . . . . . . . . . . . . . . . . 4–4Purge . . . . . . . . . . . . . . . . . . . . . . . . . . . . . . . . . . . . . . . . . . . . . . . . . . 4–4Print Delay . . . . . . . . . . . . . . . . . . . . . . . . . . . . . . . . . . . . . . . . . . . . . 4–5Character Width. . . . . . . . . . . . . . . . . . . . . . . . . . . . . . . . . . . . . . . . . 4–5Date . . . . . . . . . . . . . . . . . . . . . . . . . . . . . . . . . . . . . . . . . . . . . . . . . . . 4–6Time . . . . . . . . . . . . . . . . . . . . . . . . . . . . . . . . . . . . . . . . . . . . . . . . . . . 4–6Count Display. . . . . . . . . . . . . . . . . . . . . . . . . . . . . . . . . . . . . . . . . . . 4–7Number/Special Character Key Lock . . . . . . . . . . . . . . . . . . . . . . 4–7Backspace/Delete . . . . . . . . . . . . . . . . . . . . . . . . . . . . . . . . . . . . . . . 4–7Exit . . . . . . . . . . . . . . . . . . . . . . . . . . . . . . . . . . . . . . . . . . . . . . . . . . . . 4–7Input Method Switch. . . . . . . . . . . . . . . . . . . . . . . . . . . . . . . . . . . . . 4–8Capital Lock . . . . . . . . . . . . . . . . . . . . . . . . . . . . . . . . . . . . . . . . . . . . 4–8User Interface . . . . . . . . . . . . . . . . . . . . . . . . . . . . . . . . . . . . . . . . . . . . . . 4–9Start Screen . . . . . . . . . . . . . . . . . . . . . . . . . . . . . . . . . . . . . . . . . . . . . 4–9Main Menu Structure . . . . . . . . . . . . . . . . . . . . . . . . . . . . . . . . . . . . 4–9Chapter 5 — MaintenanceFrequently Used Printer . . . . . . . . . . . . . . . . . . . . . . . . . . . . . . . . . . . . . 5–1Maintenance of the Keyboard and the External ShellRev AD1
Videojet Unicorn II Operator Manualof the Printer . . . . . . . . . . . . . . . . . . . . . . . . . . . . . . . . . . . . . . . . . . 5–1Maintenance of the Nozzle and the Internal Sensor . . . . . . . . . . . 5–2Startup Procedure . . . . . . . . . . . . . . . . . . . . . . . . . . . . . . . . . . . . . . . . . . . 5–3Shutdown Procedure . . . . . . . . . . . . . . . . . . . . . . . . . . . . . . . . . . . . . . . . 5–4Porous . . . . . . . . . . . . . . . . . . . . . . . . . . . . . . . . . . . . . . . . . . . . . . . . . 5–4Non-porous . . . . . . . . . . . . . . . . . . . . . . . . . . . . . . . . . . . . . . . . . . . . . 5–42Rev AD
1IntroductionUnicorn II PrinterThank you for purchasing Videojet's next generation large character inkjet printer — Unicorn II.The Unicorn II large character ink-jet printer is a contactless ink-jet printer.It is used to spray-print large character messages on product outer casesby using porous inks.About the ManualThis manual is intended for operator use and offers relevant informationon how to operate the printer. Unless otherwise stated, printer operatorscan execute all the tasks described in this manual.All occurrences of the word ‘printer’ are references to the Unicorn IIprinter.WarningIf you wish to perform your own service and maintenance on theprinter, make sure that only qualified personnel execute theoperating programs pertaining to printer maintenance.WarningThe term Qualified Personnel refers to individuals who are technicallytrained (have completed relevant training courses on printeroperations), have relevant printer operating experience, and areaware of the potential hazards.Note: This Operator Manual is intended to be a supplement to (and not areplacement for) customer training.Rev ADUnicorn II Printer1-1
Videojet Unicorn II Operator ManualKeep this manual in a safe place for easy reference. Even if you chooseVideojet (or one of its dealers) to provide maintenance for your printer,retain a copy of this Operator manual for future reference.Videojet reserves the rights to update the contents of the manual andprinter performance.Standard Product FeaturesThe product features are listed below: Simple system composition Character size includes 1 line of 16 dots or 2 lines of 7 dots Self-defined time and date format Automatic date rollover time Automatic valid date printing Automatic shift setup (a maximum of four shifts) Automatic count setup (a maximum of ten digits) Print delay distance setup (maximum delay of 50 cm) Adjustable character width Integrated internal product sensor (external sensor can be connected) Standard printing character height (20 mm) Automatic detection and manual setup of production line speed Production line speed range: 6 meter/minute to 60 meter/minute Each message may contain upto 40 characters of 16 dot font or 160characters of 7 dot font (upto 80 characters per line). Message storage capability (maximum 40 messages) Work temperature is 4 C to 49 C Global universal power supply capability Self-adjusted-pressure ink system Bulk ink supply available with ADS ink system1-2Standard Product FeaturesRev AD
2Product SafetyIntroductionVideojet is committed to producing contactless spray coding/codingsystems and ink consumables, that meet high performance and reliabilitystandards. We adopt rigid quality control technology to eliminatepossibilities of product defects and hazards.The Unicorn II large character printers are used to print messages on theouter casing of packing packages. Any other usage of the printer mayresult in injury to the operator.CautionRead through this chapter before using the printer.WarningPERSONAL INJURY. While installing, operating, servicing orperforming maintenance activities on the printer or relevant devices,you must obey the safety rules listed in this chapter.WarningPERSONAL INJURY. All electrical wiring and connections mustcomply with applicable local codes. Consult the appropriateregulatory agency for further information.CautionEQUIPMENT DAMAGE. Use only the attached AC power supplyadapter for Unicorn II.Rev ADIntroduction2-1
Videojet Unicorn II Operator ManualWarningPERSONAL INJURY. The non-porous solvent is volatile andflammable and should not be exposed to explosive environments. Itmust be stored and handled in accordance with local regulations.Do not smoke or use a naked flame in the vicinity of the non-poroussolvents.Immediately after use, remove any tissue or cloth that is saturatedwith the solvent. Dispose all such items in accordance with localregulations.CautionEQUIPMENT DAMAGE. Do not use the printer in a wet or dustyenvironment.WarningPERSONAL INJURY. To remove power in case of emergency,disconnect the power supply from the AC Main.WarningPERSONAL INJURY. The inks and solvents are irritating to the eyesand the respiratory system. To prevent personal injury whilehandling these substances:Always wear protective rubber gloves and clothing.Always wear goggles with side-shields or a face mask. It is alsoadvisable to wear safety glasses when carrying out maintenance.If solvent contaminates the skin, rinse off with running water for atleast 15 minutes.2-2IntroductionRev AD
Videojet Unicorn II Operator ManualWarningPERSONAL INJURY. While operating with inks or solvents, wearbutyl rubber gloves to avoid contact with skin and mucosa (nasalcanal and throat). If skin contact occurs, immediately take off thecontaminated clothes and use soap and water to rinse the affectedarea. If the burning sensation persists, go to the nearest hospital.CautionEQUIPMENT DAMAGE. Only use the approved ink and solventproduced by Videojet.Rev ADIntroduction2-3
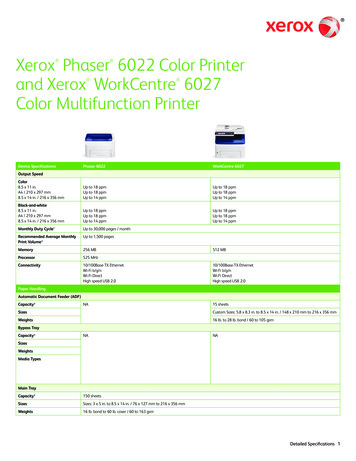
3Fast InstallationPrinter OverviewStandard ComponentsThe standard Unicorn II product package contains the followingcomponents.1. Unicorn II printer2. Ink (230ml)3. Stainless steel tube (outer diameter 1 inch andlength 15 inches)4. Stainless steel tube (outer diameter 1 inch andlength 9 inches)5. Fastening and fixing components6. Power supply adapter and cableFigure 3-1: Standard Unicorn II Packing ComponentsRev ADPrinter Overview3-1
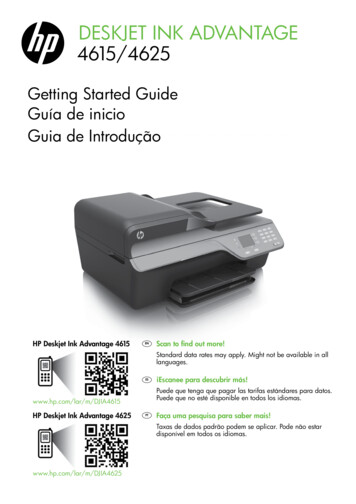
Videojet Unicorn II Operator ManualPrinter1. Controller2. Printhead3. Ink Inlet4. Bracket5. Keyboard6. Screen7. Externally-connectedsensor cover8. External cable9. Internal sensor10. Nozzle block11. DC 12V inputFigure 3-2: Standard Unicorn II Printer3-2Printer OverviewRev AD
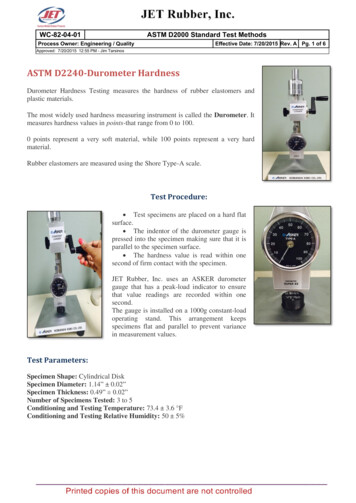
Videojet Unicorn II Operator ManualFast InstallationFigure 3-3: Printer InstallationInstallation ProcedurePrepare for InstallationSelect a mounting location where there are guide bars on the conveyor. Ifnecessary, install the guide bars. This will keep the product at a correctdistance from the printhead (no further away than 6 mm) and prevent anydamage to the unit. Refer to Figure 3-4 on page 3-4.Rev ADFast Installation3-3
Videojet Unicorn II Operator ManualWarningPERSONAL INJURY. Avoid any contact between Unicorn II and theproduct as this will result in poor print quality.6 mm maximumthrow distanceFigure 3-4: Unicorn II and ConveyorProcedureNote: For pictorial guidance on the installation steps, refer to Figure 3-3 onpage 3-3.1 Attach the aluminium clamp to the printer controller mounting frameusing the two screws and two nuts. Refer to Figure 3-5 on page 3-5.Note: Make sure the mounting clamp hole faces the floor.3-4Fast InstallationRev AD
Videojet Unicorn II Operator ManualAluminium ClampFigure 3-5: Printer Controller Mounting Frame2 Attach another aluminium clamp to the production line.For floor mounting, secure the aluminium clamp to the floor usingconcrete anchors. Use standard stainless steel tubes with an outerdiameter of 2.5 cm (1 inch).Note: The conveyor side rails channel should be a 0.32 cm x 6.3 cm(1/8 inches x 2.5 inches) or greater steel.Note: Make sure the Unicorn II mounting bracketry is mounted securely.Avoid any sway or vibration of the printhead. If not, this will affect the printquality.Rev ADFast Installation3-5
Videojet Unicorn II Operator ManualProduction Line GuidelinesFigure 3-6: Unicorn II Production Line Guidelines3 Attach a stainless steel tube to the aluminium clamp installed inStep 2.4 Attach the combined aluminium clamp to the stainless steel tubeinstalled in Step 3.5 Attach the vertical stainless steel tube to the combined aluminiumclamp (refer to Figure 3-6).6 Attach the printer (with the controller) to the vertical stainless steeltube installed in Step 5.Note: Adjust the printhead by loosening the cross clamp with the ratchethandles.Note: The Unicorn II printhead should be perpendicular to the product. Ifsome nozzles are further away from the product than the others, the printquality will suffer.7 Install the plastic end-cap on the surface of the stainless steel tube toprotect the production line operator from being hurt.The installed printer and assembled bracketry are shown in Figure 3-7on page 3-7.Note: After the Unicorn II is in position, tighten the bracketry.3-6Fast InstallationRev AD
Videojet Unicorn II Operator ManualFigure 3-7: Printer AssemblyNote: To achieve optimal print quality, position the printhead nozzles to amaximum throw distance of 6mm from the substrate. (refer Figure 3-8).Prevent any strong wind (like that from a fan) from blowing onto the nozzle.Figure 3-8: Print Distance AdjustmentNote: There are two methods of installing the printer brace. This enables theprinter to move forward and backward by 55.7 mm distance. Refer to Figure 3-9on page 3-8.Rev ADFast Installation3-7
Videojet Unicorn II Operator ManualFigure 3-9: Movement DistanceController Screen SetupAdjust the angle of the controller to monitor the screen and operate thekeyboard as shown in Figure 3-10 on page 3-9.a. Follow direction 1 (in the following figure) to push the controller torelease it from the rotation restriction.b. Follow direction 2 (in the following figure) to rotate the controllerto the angle convenient for operation and monitoring.3-8Fast InstallationRev AD
Videojet Unicorn II Operator ManualFigure 3-10: Printer MovementExternally-connected SensorIf the custo
If the customer orders an externally-connected sensor, perform the installation according to the following steps: 1Peel off 80 mm length of the protection cover from the