Transcription
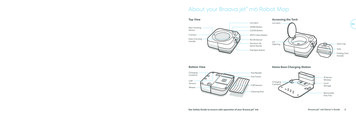
About your Braava jet m6 Robot MopTop ViewAccessing the TankLid LatchRear DockingSensorHOME ButtonCameraSPOT Clean ButtonEasy-CarryingHandleRCON SensorLid LatchENCLEAN ButtonPrecision JetSpray NozzleLidOpeningTank CapTankPad Eject ButtonFolding TankHandleBottom ViewChargingContactsCliffSensorsWheelsHome Base Charging StationPad ReaderPad TracksCliff SensorsCleaning PadSee Safety Guide to ensure safe operation of your Braava jet m6ChargingContactsIR SensorWindowCordStorageRemovableDrip TrayBraava jet m6 Owner’s Guideii
Getting startedEN1Get ready2To start, you’ll need your robot,charging station, drip tray, andpower cord.Position the charging station and plug inChoose an area near an outlet withgood Wi-Fi coverage.Plug the power cord into thecharging station, and then intothe wall.3Attach the drip trayPlace the drip tray onto the frontof the charging station.4Wake up your robotSlide your robot onto the chargingstation contacts to activate the battery.The light ring will light up and after a fewminutes, and a sound will let you knowit’s awake.5Connect and updateConnect your robot to the iRobotHOME App to allow remote control,cleaning customization, and tokeep robot software up to date.EN1.5ft / .5m4ft / 1.5m1.5ft / .5miRobot HOMEWARNING: To prevent the risk of your robot falling down stairs, ensure that the chargingstation is placed at least 4 feet (1.2 meters) away from stairs.3For more information, visit global.irobot.comBraava jet m6 Owner’s Guide4
EN67Attach a cleaning padSlide a wet mopping or dry sweeping padonto the underside of the robot.Fill the tankRemove the tank from the robot.Detach an existing cleaning pad by pressingthe button on the front of the robot.Add Braava jet Hard FloorCleaning Solution (if using).2 fl oz59 mLCleaning pad typesDry Sweeping PadsWashable Wet Mopping Pad(Microfiber)Single Use Dry Sweeping PadWashable Dry Sweeping Pad(Microfiber)When wet mopping, you may add Braava jet Hard Floor Cleaning Solution to the tankbefore adding water. This product isa concentrate that is suitable for all wellsealed hard floors.Important: Braava jet Hard Floor CleaningSolution is the only solution that can besafely used in your robot mop. Please donot use other cleaning solutions.513 fl oz385 mLCleaning SolutionWet Mopping PadsSingle Use Wet Mopping PadENThen fill to top with water.For more information, visit :FullFullsizesizebottle1/21/2bottletankperpertank6 capfuls6 capfulstankperpertank(Includedin box)(Includedin box)(Soldseparately)(Soldseparately)Braava jet m6 Owner’s Guide6
Using Your Braava jet m6 Robot MopCleaningUse your robot frequently to maintain well-conditioned floors.ENJust Press CLEAN C lean smaller designated areas (3.3 ft2 /1 m2) by placing yourrobot at the bottom center of the space you’d like to focus on.Tap(spot clean) to start cleaning.Tap to Start / Pause / ResumeHold for 3 seconds to end a joband put the robot to sleepHold for 10 seconds to reboot Y our robot will automatically explore and clean your home, moving ina methodical manner across the floor, with some overlap from onepass to the next to ensure that every spot on the floor is cleaned threetimes. If you are looking for a quicker clean or a deeper clean than thisdefault setting, or if you want to adjust the amount of water sprayed,you can change your cleaning preferences from the iRobot HOME App. Your robot will return to the charging station at the end of acleaning job, whenever it needs to recharge, or when the tankneeds to be refilled.Note: Note: If the “CLEAN” text is pulsing while charging, your robot is inthe middle of a cleaning job and will automatically resume where it left offonce recharged. T o send the robot back to its charging station, tap (home). A bluelight ring pattern will indicate that the robot is seeking the chargingstation. This feature will only work if your robot started the job from thecharging station. When the robot senses its tank needs to be filled, the light ringindicator will illuminate in a red sweeping motion toward the lid latch.7For more information, visit global.irobot.comTips for Optimizing Performance Y our robot works best when used with the iRobot HOME App. For optimal mopping performance, we recommend that youvacuum first to pick up large dirt and debris before runningBraava jet . Your robot will only run with Braava jet m Series pads, which aremade specifically for Braava jet m Series robots. Use a new pad for each cleaning job, and do not pre-wet thepads prior to use. Keep your charging station plugged in and the area around itclear of clutter. You can use a Dual Mode Virtual Wall Barrier to help keep yourrobot in places you want to be cleaned, and out of the ones youdon’t. (Sold separately) Within the iRobot HOME App, you can adjust cleaningpreferences to modify cleaning power, speed, and coverage.ChargingLithium Ion Battery S lide your robot onto the charging station contacts to activatethe battery.For best results, only use the iRobot Lithium Ion Battery that comes withyour Braava jet m6. ote: Your robot comes with a partial charge, but we recommend thatNyou charge the robot for 3 hours prior to starting the first cleaning job. T he light ring indicator will show the current charging status.This will turn off after 1 minute to save power, but can be shownagain if you press CLEAN. This can also been seen in the iRobotHOME App.Light Ring While ChargingSolid: fully chargedPulsing: charging Y our robot uses a small amount of power whenever it is on thecharging station. You can put the robot in a further-reducedpower state when not in use. For instructions and more details onthis Reduced Power Standby Mode, refer to the iRobotHOME App. For long-term storage, turn off your robot by removing it from thecharging station and holding down (home) for 10 seconds.Store your robot in a cool, dry place.ENWARNING: Lithium ion batteries and products that contain lithium ionbatteries are subject to stringent transportation regulations. If you need toship this product (with the battery included) for service, travel or any otherreason, you MUST follow these shipping instructions. Battery MUST be turned off before shipping. Turn off the battery by removing the robot from the charging stationand holding down(home) for 10 seconds. All indicators will turn off. Package the product in its original packaging. Ship via ground transportation only (no air shipping). If you need further assistance, contact our Customer Care team.Troubleshooting Y our robot will tell you somethingis wrong by playing an audio alertand turning the light ring indicatorred. Press CLEAN for details.Further support and instructionalvideos are available in the iRobotHOME App.Red LightRing A fter 90 minutes of inactivity off thecharging station, your robot willautomatically end its cleaning job.Low battery. Please charge.Braava jet m6 Owner’s Guide8
Care and MaintenanceENCleaning the Sensors andPad ReaderCleaning the WheelsClean sensors on the bottom ofyour robot with a damp cloth.Pull off any visible debris or hair thatgathers around the wheels.Important: Do not spray cleaningsolution or water onto the sensors orsensor openings.9For more information, visit global.irobot.comCleaning the TankCleaning the Body of the RobotWipe clean with a damp cloth.If you notice an odor from the tank12Fill the tank with warm water.Do not use boiling water.3Close cap and lightly shakethe tank.4Remove the tank from yourrobot mop.Rinse the tank and repeatas necessary.Cleaning the Drip Tray12Remove the robot from thecharging station.Separate the drip tray by lifting it upfrom charging station.Caring for Washable Cleaning PadsNote: You can clean your washable padstwo ways: either by hand washing, or in awashing machine.ENHand WashingThoroughly wash the pad with warm water.3Clean the drip tray with a damp cloth orwith warm water in sink.4Dry thoroughly before reattachingthe drip tray to the charging station.5Put your robot mop back onto thecharging station.Machine WashingWash using the warm cycle, then air dry.Do not put in dryer. Do not wash with delicates.Braava jet m6 Owner’s Guide10
iRobot Customer CareUSA & CanadaENIf you have questions or comments about your Braava jet robot mop,please contact iRobot before contacting a retailer.You can start by visiting www.irobot.com for support tips, frequentlyasked questions and information about accessories. This informationcan also be found in the iRobot HOME App. If you need furtherassistance, call our Customer Care team at (877) 855-8593.iRobot Customer Care Hours Monday to Friday, 9AM – 9PM Eastern Time Saturday and Sunday 9AM – 6PM Eastern TimeOutside USA & CanadaVisit www.global.irobot.com to: Learn more about iRobot in your country. Get hints and tips to improve your Braava jet robot mop’s performance. Get answers to questions. Contact your local support center.11For more information, visit global.irobot.comRegulatory InformationThis device complies with part 15 of the FCC Rules. Operation issubject to the following two conditions: (1) This device may not causeharmful interference, and (2) this device must accept any interferencereceived, including interference that may cause undesired operation.This device complies with Industry Canada license-exempt RSSstandard(s). Operation is subject to the following two conditions: 1)This device may not cause interference, and 2) this device must acceptany interference, including interference that may cause undesiredoperation of the device. Changes or modifications not expressly approved by iRobotCorporation could void the user’s authority to operate theequipment. This equipment has been tested and found to comply with the limitsfor a Class B digital device, pursuant to part 15 of the FCC Rulesas well as ICES-003 Rules. These limits are designed to providereasonable protection against harmful interference in a residentialinstallation. This equipment generates, uses and can radiate radiofrequency energy and, if not installed and used in accordance withthe instructions, may cause harmful interference to radio communications. However, there is no guarantee that interference to radiocommunication will not occur in a particular installation. If thisequipment does cause harmful interference to radio or televisionreception, which can be determined by turning the equipment offand on, the user is encouraged to try to correct the interference byone or more of the following measures: Reorient or relocate the receiving antenna.Regulatory Model: RMA-Y1 Increase the separation between the equipment and receiver. Connect the equipment into an outlet on a circuit different fromthat to which the receiver is connected. Consult the dealer or an experienced radio/TV technicianfor help. Under Industry Canada regulations, this radio transmitter may onlyoperate using an antenna of a type and maximum (or lesser) gainapproved for the transmitter by Industry Canada. To reducepotential radio interference to other users, the antenna type andits gain should be so chosen that the equivalent isotropicallyradiated power (e.i.r.p.) is not more than the necessary forsuccessful communication. FCC Radiation Exposure Statement: This product complies withFCC §2.1093(b) for portable RF exposure limits, set forth for anuncontrolled environment and is safe for the intended operation asdescribed in this manual. ISED Radiation Exposure Statement: This product complies with theCanadian Standard RSS-102 for portable RF exposure limits, setforth for an uncontrolled environment and is safe for the intendedoperation as described in this manual.For battery recycling go to call2recycle.org;or call 1-800-822-8837 2019 iRobot Corporation, 8 Crosby Drive, Bedford, MA 01730 USA. All rights reserved.iRobot, Braava jet, and Virtual Wall are registered trademarks of iRobot Corporation, in theUnited States and other countries. App Store is a trademark of Apple, Inc., registered in the U.S.and other countries. Google Play is a trademark of Google, Inc. Wi-Fi and the Wi-Fi logo areregistered trademarks of Wi-Fi Alliance.Braava jet m6 Owner’s Guide12WC#: 4625522EN
Pad Reader Clean sensors on the bottom of your robot with a damp cloth. Cleaning the Wheels Pull off any visible debris or hair that gathers around the wheels. Important: Do not spray cleaning solution or water onto the sensors or sensor openings. Cleaning the Body of the Robot Wipe clean with a damp cloth. Cleaning the Tank