Transcription
Microsoft PowerPoint 2010 - Level 2CHAPTER 5ANIMATIONINFOCUSWPL P814You can animate text, pictures, shapes, tables, SmartArt graphicsand other objects to add pizzazz to your presentation. Addinganimation simply means to add a special visual or sound effect toan object including entrance and exit effects, changes in size andcolour, and even movement. For example, you may choose toreveal bulleted points on a slide one line at a time to control yourpresentation, or you could have an image of a ball bounce acrossthe screen just to add some amusement.Another type of animation involves slide transition effects. Byapplying a transition to the slides, you can control the way one slidemoves to the next during the slide show.In this session you will: Watsonia Publishinggain an understanding of animationlearn how to apply animation to textlearn how to apply animation to objectslearn how to apply multiple animation effects to an objectlearn how to use apply motion paths to objectsgain an understanding of the animation panelearn how to set timing details for an effectlearn how to animate SmartArt graphicslearn how to apply transitions to slides.Page 43Chapter 5 - Animation
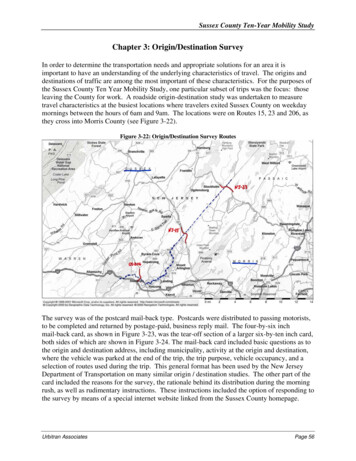
Microsoft PowerPoint 2010 - Level 2UNDERSTANDING ANIMATIONYou can use animation to effectively manage theflow of information in your presentation,emphasise key points and to increaseparticipants’ interest in your presentation. Thereare four types of animation effects in PowerPoint –entrance, emphasis, exit and motion paths. Thesereflect the point at which you want the animation tooccur.Types Of EffectsMany of PowerPoint’s animation effects are listed in the Animationsgallery. Each effect has an icon that indicates the way the effect works.The effects are grouped into the following four groups.EntranceEntrance effects control the way objects appear on your slide. For example, you mayhave individual lines of text fly in from the side of the slide, or have the slide titlesgradually fading in as the slides display.EmphasisEmphasis effects control how the audience’s eye is drawn to the animated object. Forexample, you may make an image pulse or spin or have a line of text move in a waveshape.ExitExit effects determine how the animated objects will leave the slide. For example, animage may bounce or shrink and turn off a slide.Motion PathsMotion paths control the movement of your text or objects around the slide. For example,you could make objects move up and down, move in a specific shape or even createyour own custom path for an object to follow.If you can’t find the required animation effect in the Animations gallery, you can display the entirecollection of each type of effect (such as entrance or exit) by selecting an option at the bottom of thegallery to open the Change Effects dialog box (see the example above to the right). Here, the animationeffects are grouped according to the impact of the effect – Basic, Subtle, Moderate and Exciting – andfor motion paths Basic, Lines & Curves and Special. Watsonia PublishingPage 44Chapter 5 - Animation
Microsoft PowerPoint 2010 - Level 2ANIMATING TEXTNot only can animation help to make yourpresentation more dynamic, but you can use it toeffectively control the flow of information. Forexample, you can animate each point of text toappear when you are ready to talk about it. This willensure your audience listens to you rather thanreading the remaining information on the slide.4 Watsonia PublishingPage 45Chapter 5 - Animation
Microsoft PowerPoint 2010 - Level 2ANIMATING OBJECTSAs well as animating text, you can applyanimation to objects either to emphasise aconcept or just to grab the audience’s attention.Just be aware, however, not to overdo theSameFileTry This Yourself: animation in a presentation. Too much animationcan be distracting – you want your audience to goaway remembering the content of the presentation,not the whizz-bang animation!4Continue using the previousfile or open the file P814Animation 2.pptx.Display Slide 1 in the SlideswindowClick on the arrow shape toselect itClick on More forAnimation to display theAnimation gallery, then clickon Fly In under Entrance toapply the effectThis effect would look betterif the arrow flew in from theleft rather than from thebottom of the slide Click on Effect Optionsin the Animation group6The options listed in thisgallery will depend on theeffect that is applied Select From LeftClick on Previewin thePreview group to test theeffectThe arrow will now appearfrom the left side of the slide.Notice also that the iconshown in the Effect Optionstool on the ribbon reflects thechange of directionFor Your Reference Handy to Know To apply animation to an object:1. Select the object You cannot set effect options for allanimation effects. When this is the case,Effect Optionswill be greyed out in theribbon.2. Click on More for Animation3. Click on the desired effect4. Click on Previewto preview the slide Watsonia PublishingPage 46Chapter 5 - Animation
Microsoft PowerPoint 2010 - Level 2APPLYING MULTIPLE EFFECTSYou can apply more than one effect to the sameobject. But, if you select the second effect fromthe Animation gallery, it will simply replace thefirst effect that was applied to the object. Instead,SameFileTry This Yourself: you must select additional effects from the AddAnimation gallery. When multiple effects areapplied to an object, Multiple will be selected in theAnimation gallery rather than the effect names.3Continue using the previousfile with this exercise, oropen the file P814Animation 3.pptx.Display Slide 3 in the SlideswindowClick on the image to select itClick on More forAnimation to display theAnimation gallery, then clickon Bounce under Entranceto apply the effect6Let’s add another effect Click on Add Animationin the Advanced Animationgroup to display the AddAnimation galleryClick on Spin underEmphasis to apply anemphasis effectLet’s add an exit effect 7Repeat steps 4 and 5 toapply the Shrink & Turn exiteffectClick on Previewin thePreview group to test theeffectsCurrently, these effectswould need to be triggeredindividually. But we’ll fix thissoonFor Your Reference Handy to Know To apply multiple animation effects to an object:1. Select the object2. Click on More for Animation and click onthe desired effect3. Click on Add Animationand click on thedesired effect4. Click on Previewto preview the slide Use animations and sound effects sparingly.While well-placed animations can help toeffectively communicate your message, toomuch animation can be off-putting. Watsonia Publishing To force multiple animation effects to worksimultaneously as one effect, you must settiming options in the Animation pane.Page 47Chapter 5 - Animation
Microsoft PowerPoint 2010 - Level 2APPLYING MOTION PATHSWhile effects like Fly In and Fly Out can controlthe movement of an object to a certain degree,motion paths give you total control. The centreof an object will follow the motion path. There areSameFileTry This Yourself: many pre-set motion paths and shapes from whichyou can select, plus an option for drawing a custompath. A motion path has a beginning and an endpoint which are shown as a green and red arrow.2Continue using the previousfile with this exercise, oropen the file P814Animation 4.pptx.Display Slide 1 in the Slideswindow, then click on the textA New DirectionLet’s apply a motion path tothis text so that it will comeonto the slide and move intoposition Drag it off the slide, asshownWe want the text to start offthe slide 4Click on More forAnimation to display theAnimation gallery, then clickon Custom Path underMotion PathsClick on the centre of theselected text, hold down theleft mouse button and drag todraw a path similar to asshown, double-clicking at theend point to complete themotion pathClick on Previewin thePreview group to test theeffectThe centre point of the textplaceholder will follow themotion pathFor Your Reference Handy to Know To draw a motion path:1. Click on the text or object to be animated If you’re not happy with a motion path afterpreviewing it, it is probably best to press to undo the path and then start again.Although you can drag a handle of a selectedmotion path, it is not easy to edit the path bydoing this.2. Click on More for Animation3. Click on Custom Path under Motion Paths4. Draw the path from the centre of the objectand double-click at the end of the path Watsonia PublishingPage 48Chapter 5 - Animation
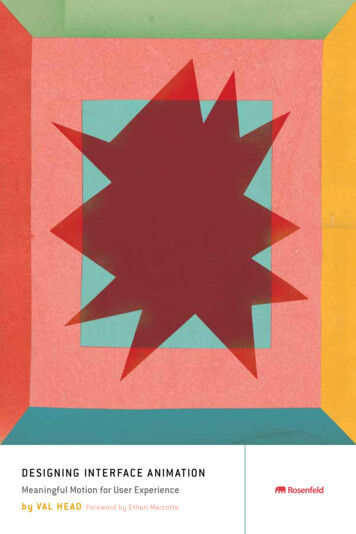
Microsoft PowerPoint 2010 - Level 2THE ANIMATION PANEWhen you add animations to objects on a slide,PowerPoint automatically numbers eachanimation with a numbered tag. These tags don’ttell you a lot about the animations except theirorder. By displaying the Animation pane, you cansee at a glance a list of all animations on the slidealong with information about the effects such as thetype of effect, duration of the effect, and more.Hovering over anorange timeline barwill display the startand end time forthe effect, e.g.,Start: 0s, End: 2s.3142Hovering over anumber, start timingicon, effect icon orobject to which theeffect is applied willdisplay how the effectis initiated, the name ofeffect and the objectthat it affects.5 Animation effects are listed in the Animation pane in the order that you added them to the slide andthis is the order in which they will play. By default, the animation effects are numbered – thesenumbers match the numbered tags shown on the slide.Notice that the fifth and sixth effects above are not numbered. These two effects have been set toStart After Previous (see below) and both this start timing option and the Start With Previousoption automatically remove the number as these effects will play automatically. The start timing icons indicate how an animation effect will be initiated.Start On Click ( )The animation effect will start when you click the mouse. This is thedefault value.Start With Previous (no icon) The animation effect will start when the previous effect starts. Thislets you combine multiple effects to work simultaneously as oneeffect.Start After Previous ( )The animation effect will start immediately after the previousanimation has finished.Pale orange timelines indicate the duration of the effect. Notice that a gap exists between the end ofthe fourth effect and the start of the fifth effect as a Delay has been set in Timing.You can hide these by clicking on an effect and then clicking on the menu iconShow Advanced Timeline. Click on an effect to display the menu icon. Click on the menu iconand selectingto display the menu.The animation effects will play in the order in which they are listed in the Animation pane. If youwant them to play in a different order, simply click on the effect that you wish to move and click onthe appropriate Re-Order arrow. Watsonia PublishingPage 49Chapter 5 - Animation
Microsoft PowerPoint 2010 - Level 2SETTING THE TIMINGWhen you apply animations to objects, they arecreated automatically to start with a mouse click.This is ideal if you want to control when text on aslide appears in a presentation. But if you want aSameFileTry This Yourself: heading to appear automatically when a slidedisplays or you want to combine several effects toplay simultaneously, you will need to change thetiming for the effect.2345Continue using the previousfile or open the file P814Animation 5.pptx.Display Slide 3 in the Slideswindow, then click on theimage to select itClick on Animation Panein the Advanced Animationgroup to open the AnimationpaneCurrently, the three effectsrequire you to click to triggerthem. Let’s change this Click on effect 1 in theAnimation pane to select it,then click on the drop arrowfor Start in the Timing groupand select With PreviousThe effect will be renumberedto 0 Click on effect 1 (middleeffect), then repeat step 3 toselect After Previous in StartThe gap between the timelinesof the first and second effectsshows the Delay in the startingtime. Also, the length of thesecond effect’s timeline hasshortened now to reflect thereduction in its Duration.6The timeline will shift Click on the down spinnerarrowfor Duration to 0.5,then click on the up spinnerarrowfor Delay to 1.5Click on effect 1 (last effect)and repeat step 3 to selectWith Previous in StartPreview the effectThe third effect will move toalign with the starting time ofthe previous effect.For Your Reference Handy to Know To set the timing for an effect:1. Select the effect2. Set Start, Duration and Delay as desired inthe Timing group on the Animation tabTo display the Animation pane:1. Click on Animation Panein theAdvanced Animation group Duration is the time it takes for one cycle ofthe effect. For example, reducing the Spinduration will make the object spin quicker. Watsonia Publishing You can set the Start, Duration and Delayof an effect by clicking on it in the Animationpane, clicking on the drop arrowandselecting Timing.Page 50Chapter 5 - Animation
Microsoft PowerPoint 2010 - Level 2ANIMATING SMARTART GRAPHICSAnimating SmartArt is a bit different to animatingother shapes and objects. For one, anyconnecting lines in a SmartArt can’t be animatedindividually, and secondly, you can’t change theorder in which the individual shapes in a SmartArtappear – you can only reverse the order. You can,however, select whether the animation applies tothe SmartArt as a whole, level by level and so on.SameFileTry This Yourself: Continue using the previous fileor open the file P814Animation 6.pptx.Display Slide 6 in the Slidewindow, then click anywhere onthe SmartArt to select it3Click on More for Animationand click on FadeThe full graphic will appear Click on Effect Optionsinthe Animation group to openthe Effect Options gallery4Currently, the animation isapplied to the entire SmartArt Point to each of the options tosee how they will affect thegraphic, then click on Level atOnceTwo animations will be applied:one to the blue shapes and oneto the white shapes. The blueshapes will appear before thewhite shapes 5Click on the animation in theAnimation pane, click on thedrop arrowand select EffectOptions, then click on theSmartArt Animation tabTick Reverse order, click on[OK] and then preview theanimationThe white shapes will appearbefore the blue ones nowFor Your Reference Handy to Know To animate a SmartArt graphic:1. Select the SmartArt Not all animations are available for SmartArt.2. Click on More for Animation3. If desired, click on Effect Optionsselect an option4. If desired, set the Timing options Watsonia Publishingand You can’t use the Re-Order tools in theAnimation pane to change the order of theanimations of the individual shapes of aSmartArt graphic. You can only reverse theorder.Page 51Chapter 5 - Animation
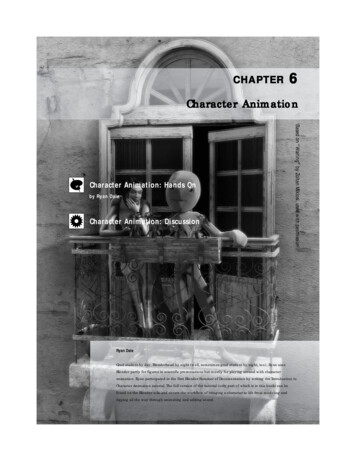
Microsoft PowerPoint 2010 - Level 2APPLYING SLIDE TRANSITIONSAs well as controlling the behaviour of objects ona slide, you can control the transition betweenslides during a presentation. Slide transitioneffects are used to reflect the changing of a topic,OpenFileTry This Yourself: rather like flipping a page in a book. A word ofcaution: it is unlikely that you will need both slidetransitions and animation effects.3Before starting this exerciseyou MUST open the file P814Animation 7.pptx.Display Slide 1, then click onthe Transitions tab to open itClick on More forTransitions to This Slide todisplay the Transition galleryApply several transitions tosee how they work – our firstsample shows Vortex at work– then apply the Fly Throughunder Dynamic Content toapply this transition to Slide 1Vortex – an exciting effectYou can have the transitionsadvance by clicking the mouseand/or automatically after acertain period of time Click on the up spinner arrowfor Advance Slide After inthe Timing group until it reads2:00By leaving On Mouse Clickticked you are leaving youroptions open Click on Apply To Allin theTiming group to apply thistransition and timing to allslides in the presentationClick on Slide Showin thestatus bar to check thepresentation, then presswhen you’ve seen enoughFly Through – a dynamic content effect (ie the non-animatedcontent flies onto the slide)For Your Reference Handy to Know To apply slide transition effects:1. Display the slide Slide transitions provide a quick alternative toanimating the objects on a slide. Forexample, use a plain background and fly theslides in from different directions. This makesthe text and diagrams appear to fly, but theyare controlled by a single slide transitioneffect instead of multiple animation effects.2. Click on More for Transitions to ThisSlide on the Transitions tab3. Select the desired option4. Click on Apply To Allif required Watsonia PublishingPage 52Chapter 5 - Animation
motion path Click on Preview in the Preview group to test the effect The centre point of the text placeholder will follow the motion path For Your Reference To draw a motion path: 1. Click on the text or object to be animated 2. Click on More for Animation 3. Click on Custom Path under Motion Paths 4. Draw the path from the centre of the object