Transcription
IT TrainingMicrosoft Word 2013 An Essential Guide (Level 1)ContentsIntroduction . 1Logging on to an IT Managed Computer . 1Using the Mouse and Keyboard . 1Starting Microsoft Word . 2Writing Your Document . 3Entering Your Text . 3Correcting Mistakes . 3Changing the Look of Your Text . 4Aligning Text on the Page . 4Altering Line Spacing . 5Changing Fonts . 5Changing Font Size . 5Bold, Italic and Underline. 6Subscript and Superscript. 6Saving Your Work . 6Working with Selected Text . 8Selecting the Text . 8Cut, Copy and Paste. 9Making Multiple Copies and the Clipboard . 9Drag and Drop . 10Further Formatting. 10Bulleted and Numbered Lists . 10Correcting Spelling and Grammar . 11Closing a Document . 13Opening an Existing Document . 13Starting a New Document. 14Printing . 14Using Help . 15Where to go Next . 16Leaving Microsoft Word and Logging Out . 16
IntroductionThese notes are designed to cover the essential features of Microsoft Word. It covers everythingwhich all users should know, whether they are complete beginners or are already reasonablyfamiliar with Word. Once you have made sure you know the fundamentals, take a look at theintermediate level guide, Microsoft Word - An Intermediate Guide.Logging on to an IT Managed ComputerIf you are using an IT Lab PC running Windows 7, you will first need to start up the computer. Evenif the screen is black, the computer should be running.1. If the screen is black, press any key to activate the computer2. If the screen still remains black, check the last user hasn't turned off the monitor or PC3. Next press Ctrl Alt Delete - i.e. hold down both the Ctrl and Alt keys and press Delete You should now be able to login:4. Press Enter or click on [OK] then type your username and password into the boxes on thescreenThe Enter key is the upside-down L-shaped key on the right of the main keyboard – a duplicate keycan be found on the far right of the keyboard, in the numeric keypad, with the word Enter written onit.Tip: The Tab key, above Caps Lock on the far left of the keyboard, moves the typing between theboxes.5. Press Enter or click on [OK] to complete the loginUsing the Mouse and KeyboardThe mouse has two buttons separated by a central scrolling wheel. Throughout this course, alwayspress the left mouse button when told to click on a tab or button (unless explicitly told to right click, inwhich case press the right mouse button).If you haven't used a keyboard before you may think the order of keys is confusing. Don't worryabout this - you soon get used to it. It is in fact designed for touch typing (using all fingers), with themost frequently-used keys in convenient positions. If you would like to learn how to type properly,there are several free typing tutors published on the web – just type typing tutor into anybrowser's search box.To get CAPITAL LETTERS you can use the Caps Lock key but this is only really used for typingeverything in upper case. If you require just a single letter (or a character above the numbers on thetop row) then hold down the Shift key (immediately above Ctrl on both the left and right) asyou press the relevant key.1
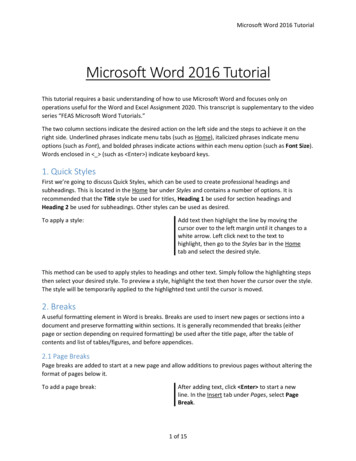
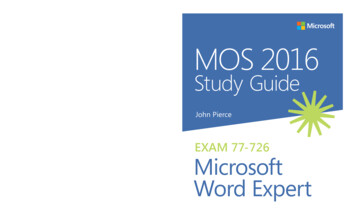
Starting Microsoft WordTo load Microsoft Word:1. Click on the Start button in the bottom left corner of the screen2. Choose All Programs then Microsoft Office 2013 followed by Word 2013Tip: You'll probably be using Word quite frequently in the future, so it's worth putting it as an iconon the Desktop. To do this, repeat the above steps, but at the last step, right click (i.e. press the rightmouse button) and choose Send to followed by Desktop (create shortcut). To load Word in future,simply double click on the Desktop icon.If a Welcome to Office 2013 window appears then you can either work through this short tutorial byclicking Next in the bottom right-hand corner or close it immediately by clicking on the X in the topright-hand corner.3. Press Enter for Blank document to start up a new documentA window similar to that shown below will open, ready for you to begin typing:In the top left-hand corner is the Quick Access Toolbar which contains icons to a few commands, e.g.Save and Undo, and to which you can add further buttons by clicking on the down-arrow to the right. Belowthis is the Ribbon, with tabs along the top and command icons on each tab. These can be used to giveinstructions to Word. The File tab contains the commands to Open, Save and Print your document.Scroll bars are provided on the right (and bottom) to let you move up and down (or sideways across)your work. At the very bottom of the window, there is information about where you are in yourdocument on the Status Bar - here you are on Page 1 of 1. Some of the other information that isshown on here is a word count and the proofing errors checker (there is a cross if there are proofingerrors). On the right-hand side of the Status Bar are icons to change the view of the page, and tozoom in or out, i.e. make the text on the screen bigger or smaller (note this doesn't affect theprinted page).2
Writing Your DocumentEntering Your TextHaving introduced you to the layout, it's time to start typing a document:1. Type in a few words, pressing the spacebar once after each word to separate them (thespacebar is the long key along the bottom of the keyboard)If you are not very fast at typing just type some imaginary words, pressing keys at random, butremember to include spaces between the words.2. Continue typing across the screen - the words will automatically spill onto a new line whenyou reach the right-hand side (this is known as wraparound)3. Continue typing until you have at least three lines of text then press Enter to mark the endof the paragraphIMPORTANT: When using a word processor, do NOT press the Enter key at the end of each line. Ifyou need your work double spaced (each line followed by a blank line) then you simply change theparagraph's line spacing - this is covered later on. Press Enter only when you want to start a newparagraph. In Word, a blank line is automatically inserted between each paragraph, so you needonly press Enter once.A jagged red (or occasionally blue) line may appear beneath your text. Don't worry about this - Wordis telling you that what you typed is not recognised (the words are not in the dictionary) or that thegrammar may be incorrect. You'll learn more about this later.Tip: Avoid pressing the spacebar or Enter key more than twice in succession. In particular, donot use spaces to centre a heading, line up words in columns, or to add extra blank lines to force aheading onto a new page. There are special key presses that do these things for you (tabs and hardpage breaks) that are covered in our Microsoft Word - An Intermediate Guide.4. Practice typing a couple of extra paragraphs, pressing Enter once at the end of eachCorrecting MistakesDon't worry if you go wrong, as it is very easy to correct your work. The Backspace key(immediately above Enter in the main section of the keyboard) can be used to delete the lastcharacter(s) typed.1. Press Backspace a few times and note what happensYou should have noticed a flashing vertical bar on the screen at the end of your work. This marksthe insertion point. Anything that you type will always appear at the insertion point. You can movethe insertion point around your work by using the arrow keys to the right of the main keyboard. Youcan also change its position by moving the mouse pointer on the screen and clicking where youwant the insertion point to be.2. Press the arrow keys to move the insertion point around - note that you can hold down a keyto move more rapidly3. Move the mouse to position the pointer in the middle of a paragraph and click on the mousebutton - the insertion point should have moved to where you clicked4. Type in some more words - watch how the text which follows moves sideways to make roomfor the new wordsAs the text moves, the following lines of the paragraph are redrawn automatically. Within aparagraph, the Backspace key works as before but you can also remove characters forwards:3
5. Press the Delete key (immediately to the right of Enter ) a few times and note whathappensHere you are only practicing on text you do not need to keep, but you may accidentally delete wordsthat you needed. Do not panic! If you ever make a mistake when using Word then you can undoyour error by using the [Undo] button.Undo This can be found on the Quick Access Bar in the top left-hand corner. The undo button can be usedmore than once to undo a series of actions by clicking on the dropdown arrow next to it andselecting the actions to be undone.6. Click on the [Undo] button several times to see its effectNote that there's also a [Redo] button (to the right of [Undo]) if you accidentally undo too much!Tip: Word lets you use control key combinations to issue commands from the keyboard. Thecombination Ctrl z (hold down Ctrl and press z ) can be used to undo something. Ctrl y can be used for redo.Changing the Look of Your TextWith Microsoft Word, it's easy to change the appearance of your work. You can change the format ofparagraphs (each can have its own settings), the typeface of the words (you can have different settingsfor single words/phrases or individual characters, such as superscript) or the layout on the pages (youcan have different layouts for particular sections of your work, such as a sideways page). The pagelayout is covered in the Microsoft Word - Intermediate Guide.Aligning Text on the PageAlign Left -Centre -Align Right -Justify -With Microsoft Word, it's easy to change the layout of a paragraph. This is done by first moving theinsertion point (typing position) into that paragraph. You can then decide how you want yourparagraph to look.1. Move the insertion point into the paragraph you want to change (anywhere will do)When typing a document you normally want text to align on the left-hand side of the page. Somepeople prefer text to be justified - this is where text aligns both left and right. You can also align textto the right (e.g. for an address) or to the centre (e.g. for a title or heading). You can use the buttonsshown above (they are on the HOME tab in the Paragraph group) to control how text is aligned on thepage.2. Try out all four justification buttons (or use Ctrl l , Ctrl e , Ctrl r and Ctrl j ) - note thatonly the current paragraph is affected; each paragraph can have its own justification settingTip: If you like justified text, consider turning on hyphenation. This automatically splits a long word atthe end of a line in two, improving the layout considerably. To turn this on, move to the PAGELAYOUT tab, then click on the [Hyphenation] button in the Page Setup group and choose Automatic.4
Altering Line SpacingLine Spacing Sometimes you might be asked to double space your work (or use some other spacing). You shouldstill be in the paragraph where you tested the different justification settings, so:1. Click on the list arrow attached to the [Line Spacing] button in the Paragraph group2. Select 2.0 for double spacingTip: You can also use Ctrl 2 (hold down Ctrl and press 2 ) for double, Ctrl 1 for single and Ctrl 5 for one-and-a-half spacing. Ctrl 0 adds a blank line before a paragraph.Note that the justification and line spacing settings are carried forward from one paragraph to thenext. You usually set these up before you even start typing. Sometimes, however, you might want tochange these settings for part of your work (e.g. you might decide to have a table or quotation oneand-a-half spaced, with the rest of your text double spaced). You can either do this as you type or alterthe settings later.Changing FontsFont Another setting you may want to change is the font (and/or font size). It's easiest to set this up beforeyou start typing - the settings are then carried forward as you continue typing your text.The starting font for a new document in Word is usually set to Calibri (Body). You might want to usea different style of lettering (font or typeface) to personalise your work. Several fonts are available inWord. If you want to change the current font:1. Move the typing position to the end of your document (pressing Ctrl End takes you there)2. Click on the list arrow attached to the [Font] button on the HOME tab3. Click on the font you require, e.g. Rdg Swift – you can either scroll down the list to find the fontyou want, or type in the name of the font to pick it up more quickly – and type a few wordsNote: The fonts, Rdg Swift and Rdg Vesta, are specific University of Reading fonts that have beensetup for use with the University Staff Templates.Some fonts (e.g. Symbol and Wingdings) produce non-Roman letters or iconic symbols. Courier Newgives a typewriter font. Sans-serif fonts, such as Cambria and Ariel, give clear headings.Changing Font SizeFont Size Generally a point size of 10, 11 or 12 is used for the body of the text while point sizes of 13 to 16 areused for headings. The current size (11) is shown in the font size box. To alter this:1. Click on the list arrow attached to the [Font Size] button on the HOME tab2. Click on the size you require - for example, 12 – and type a few wordsTip: You can also type the number directly into the font size box (press Enter to set it). This allowsyou to select a font size not in the list, for example 13 or a bigger number if you want very largecharacters.Note that you can also change the size of your font using [Increase Font Size] (Ctrl ) or [DecreaseFont Size] (Ctrl ) immediately to the right of the [Font Size] button. The buttons below these include5
[Text Highlight Color], which can be used like a highlighter pen, and [Font Color] should you wanttext in a colour other than black.Bold, Italic and UnderlineBold -Italic -Underline -As well as changing the font and font size, you can make some other fairly simple formattingchanges that change the look of your text. Here try out the bold, italic and underline buttons whichare in the Font group on the HOME tab.1. Click on the [Bold] button and type in some new words - you will find that these words appearin a darker colour2. To turn off bold, click on the [Bold] button again3. Try out the [Italic] and [Underline] buttons as in the above steps (note that the drop-downarrow next to Underline gives a list of other types of lines, e.g. double underline)Note that you can have your text with more than one of these options set on - bold italic orunderlined italic, for example. For emphasis, it is usually best to stick to bold. Italic is often used inthe title of a paper or journal in bibliographies or references, and underline can be used for aheading or subheading.Tip: The control key combinations to turn on/off bold, italic or underline are respectively, Ctrl b for bold, Ctrl i for italic and Ctrl u for underline.Subscript and SuperscriptSubscript -Superscript -Superscript and subscript work in exactly the same way as bold etc. The buttons are just a littlefurther to the right, in the Font group:1. Click on the [Subscript] button and type a couple of characters2. Click on [Subscript] again to revert to normal typing (or use Ctrl )3. Type a couple of characters then try out [Superscript] as well, if you like (or use Ctrl Shift )Saving Your WorkYou should save your work regularly - ideally every 10 minutes so that you don't lose what you havetyped should the computer stop working. Word does have an autosave facility which should guardagainst loss of work; however this is not a proper save and should not be relied on.1. Click on the [Save] button on the Quick Access Toolbar (or move to the FILE tab and choose Save)6
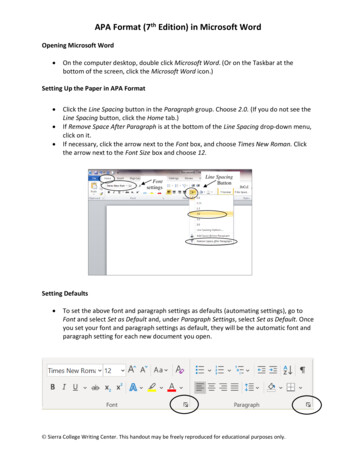
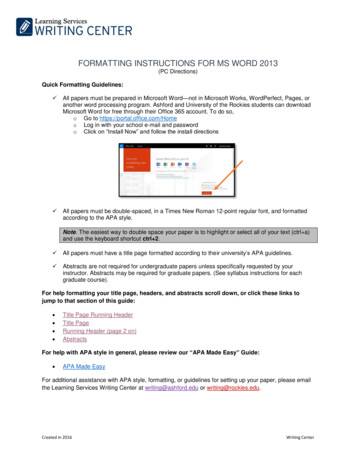
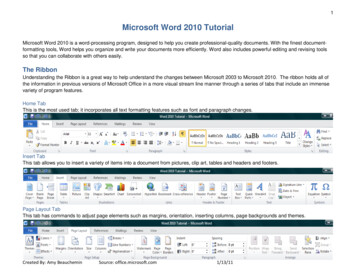
For a new document, a Save As screen will appear:Usually, you will want to save the document on the computer you’re using or a connected drive, butit’s also possible to save into a Cloud storage area such as OneDrive or another web location.2. Click on My Documents on the right under ComputerA Save As dialog box similar to that below will appear:3. Type a name for your work (e.g. test document) - there's no need to clear the File name: boxfirst; whatever you type will replace what's there alreadyNote: you should mainly use letters and numbers for your file names (spaces, hyphens andunderscores are also permitted); Do not use any other punctuation marks as they can causeproblems.Your work will be saved to Documents, which has been set up to be on drive N: on the computers oncampus. This is an area on the network where you can save your own work, known as your homedirectory. No one else has access to your home directory; you connect to it whenever you logon to anIT Lab computer. Backup copies of the files in your home directory are made hourly, so you shouldnever lose any of your work.7
Note: By using Save As rather than Save, you can save your work as a Word 97-2003 document so that itis compatible with earlier versions of Word. This would make it easier for anyone who has an olderversion of Word to open the document. However, any features that are only available in a laterversion of Word would not be saved (a warning message will be displayed to say which features theseare).4. Press Enter or click on [Save]Once you have given your document a name, this will appear (instead of the original name,Document1) at the top of the window. An extension .docx (or .doc for Word 2003 and earlier) is addedautomatically.Remember: It is a good idea to save your work regularly. The easiest way to do this is to press Ctrls .Working with Selected TextSelecting text is very important as it identifies which section of text you want Word to modify. It canbe used to change how some text looks, to move or copy text within a document, betweendocuments or between different applications (e.g. Word and an email), and to delete or replace text.Selecting the TextSelecting can be done in several different ways, depending on how much text is involved. Anyselected text can be de-selected by pressing an arrow key or clicking on the mouse button once. Asimple way to select part of your text is by dragging through it as follows:1. Move the mouse so that the pointer on the screen is at the start of the text that you want tochange2. Hold down the mouse button, and keep it held down3. Drag the mouse sideways to move the pointer to the end of the text that you would like tochange – the selected text now has a dark background4. When you are happy with your selection, release the mouse buttonIf you accidentally select the wrong text, click the mouse once (this will release the selection) and tryagain.Tip: Minor adjustments to a selected area can be made by holding down the Shift key andpressing the left arrow or right arrow key. This method can also be used instead of draggingthrough the text. Rows of text can be selected using the down arrow or up arrow keys.Text can also be selected in various other ways. Try out the following on your text: A single word - point to it using the mouse then double click on the mouse button - yourselected word should be highlighted. Click once on the mouse to de-select it A single line - position the mouse pointer in the left-hand margin (where its shape changes toan arrow pointing inwards) and click once A whole paragraph - either double click in the left margin or click three times within the text The whole document - either click three times in the left margin or press Ctrl a A sentence - hold down Ctrl and click anywhere within the sentence A short piece of text - drag through the text to be selected A long piece of text - click at the start of the text to be selected then move down, using thescroll bars, and hold down Shift as you click at the end of the selection To modify an existing selection - hold down Shift and use the arrow keys8
Tip: If ever you want to replace some words with something different, simply select the words to bereplaced and then type the new ones (the selected text automatically disappears). You can also deletea section of text by first selecting it and then pressing the Backspace or Delete key.Cut, Copy and PasteThe above buttons are visible on the far left of the HOME tab in the Clipboard group.Moving text around a document is done by:i.ii.iii.Selecting itCutting or copying it from its present positionPasting it back to its new oneYou can copy information within the same document, from one document to another, or from oneprogram to another (for example, text on a web page can be copied into your Word document).1. Move to the top of your document (pressing Ctrl Home takes you straight there) and selectthe first paragraph of text (double click at the left or three times within the paragraph)2. Click on the [Cut] button and the paragraph will disappear - do not be alarmed, it has notbeen lost, but has been copied onto the Clipboard3. Move the insertion point down to the end of your text (press Ctrl End to move you straightthere) and add a new line, if necessary, by pressing Enter 4. Click on the [Paste] button - your original paragraph will be pasted into its new positionTip: You can also use Ctrl x to issue a cut command - use Ctrl c for copy and Ctrl v for paste.You’ll find that a paste options iconappears next to the pasted text – pressing Ctrl displaysvarious options as to how you want the pasted text to look (leave it as Keep Source Formatting). Afurther range of options can be found via Paste Special, accessed via the arrow below the [Paste]button on the HOME tab.Note also the [Format Painter] button. This is used to copy the format (font and/or paragraph settings)from one piece of text to another:5. Select the text (or paragraph) whose format you wish to copy - try the text you made boldearlier6. Click on the [Format Painter] button (the pointer becomes a paintbrush)7. Drag through another piece of text - release the mouse button and it too becomes boldThis can be especially useful in the case where you notice that a paragraph looks different from therest of the paragraphs on that page. You can use the [Format Painter] button to quickly correct thisproblem.Making Multiple Copies and the ClipboardWhen making multiple copies of text, you normally Copy rather than Cut it to the clipboard:1. Select some text (a few words will do) and click on the [Copy] button (or press Ctrl c )Tip: If you right click on selected text you can Copy (or Cut) it from a pop-up menu.Your original text will remain where it is, but a copy of it has been placed on the Clipboard.2. Move the insertion point to where you want to paste the text9
3. Click on the [Paste] button (or press Ctrl v or right click and use Paste Options)4. Repeat steps 2 and 3 and a second copy of the text will appearThe Clipboard, which is normally hidden, will only store the last item that you cut or copied. If it isdisplayed, however, up to 24 items can be stored on it. To display the clipboard:5. Click on the Clipboard group arrowjust below the [Format Painter] button – this will openthe Clipboard in a Task Pane on the left6. Select another part of your text and [Copy] it - watch it appear on the Clipboard7. Move the insertion point then click on the new clipboard entry to paste it into your text8. Repeat the above step but click on the original clipboard entryYou won't need to paste any of the text again, so it's a good idea to empty the clipboard:9. Click on the [Clear All] button in the Clipboard pane10. Close the Clipboard by clicking on its [Close] button (the little x in the top right corner of thepane)Drag and DropIf you wish to move text a short way then you can use the drag and drop technique:1. Select some text - a few words is sufficient2. Move the mouse pointer into the highlighted area then hold down the mouse buttonThe pointer becomes an arrow with a box attached and in the left-hand corner of the Status Bar atthe bottom of your Word window it says Move to where?3. Keeping the mouse button held down, drag the text to a new place in your document (as youmove the cursor a faint dotted line appears - this is where the selected text will be dropped)4. Release the button - the text will be moved to its new position5. Practice moving selected text to other positionsTip: The key combination Alt Shift with the up/down arrow key moves the current paragraph upor down the page, one paragraph at a time.Further FormattingMost of your text will be with the same layout of paragraphs. However, sometimes you will need tochange the layout for other special sections (e.g. for a list).Bulleted and Numbered ListsBullets -Numbering -It is often useful to create lists using either bullets or numbers. The [Bullets] button gives you abulleted list where the order doesn’t matter:1. Move to the end of your text (press Ctrl End ) and make sure you are on a blank line2. Click on the [Bullets] button (on the HOME tab in the Paragraph group) – a bullet point shouldappear3. Type a couple of words against each bullet point, pressing Enter once after each one4. Press Enter again at the end (i.e. on an empty bullet point) to turn the bullets off10
Numbers are applied in a similar fashion using the [Numbering] button where the order isimportant:5. Click on the [Numbering] button - a number 1. appears6. Type in two short paragraphs (one a couple of lines long), pressing Enter once after each oneNote that each paragraph is numbered and that the first line of text is indented slightly to allow forthe number. The second line of text is also indented, to line up with the words of the first line.7. Move to the end of the paragraph numbered 1 and press Enter - a new number will beinserted in the correct sequence with later lines re-numbered8. Press Tab (the button to the left of the letter Q on the keyboard) and the numberingchanges to a. and is indented further – type a few characters9. Press Enter (the letter b.appears) then Shift Tab (the letter changes to the number 2.)10. Press Delete and the extra line will disappear11. Move to the last line in the list (which should be empty) and press Enter to turn thenumbering offTip: Sometimes you might want more than one paragraph under a bulleted or numbered point. Toachieve this, hold down Shift as you press Enter to end a paragraph (it’s best to have the textleft-aligned –justified text doesn’t look good).Note that the down arrows to the right of both the bullets and numbering buttons give youalternative types of bullets and numbering.Correcting Spelling and GrammarSpelling and Grammar Word checks the spelling and grammar as you type. A red squiggly line under a word denotes thatWord thinks it has been spelt incorrectly; if the line is blue then the grammar may be incorrect. Youcan check the whole or part of the text for mistakes using the [Spelling & Grammar] button.1. On the blank line at the end of your text type the following misspelt text:howe mamy speling andother erors is their on thsi sentance? There was 11.Note that as you type the words, Word automatically corrects certain mistakes: it capitalises the first word in a sentence (Howe) it automatically corrects certain misspellings (e.g. thsi to this and sentance to sentence)2. Select the above line (e.g. click 3 times on it) - Word can spell-check just a selected area3. Move to the REVIEW tab and click on the [Spelling and Grammar] button (the first)11
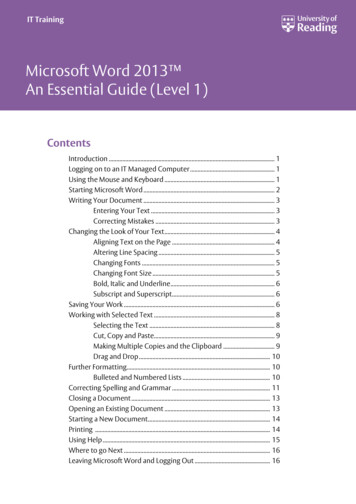
In the Spelling task pane that appears on the right of your document:4. Choose the correct spelling of many in the top box – click on [Change]5. Continue in the same manner w
2 Starting Microsoft Word To load Microsoft Word: 1. Click on the Start button in the bottom left corner of the screen 2. Choose All Programs then Microsoft Office 2013 followed by Word 2013 Tip: You'll probably be using Word quite frequently in the future, so it's worth putting it as an icon on the Desktop.To do this, repeat the above steps, but at the last step, right click (i.e. press the right