Transcription
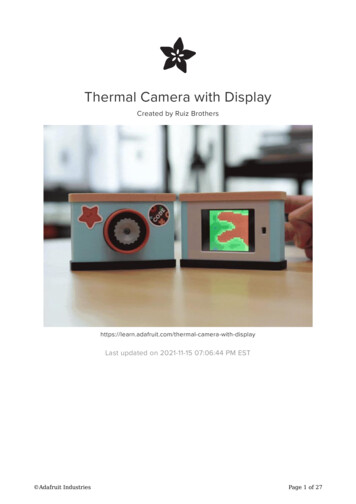
Thermal Camera with DisplayCreated by Ruiz with-displayLast updated on 2021-11-15 07:06:44 PM EST Adafruit IndustriesPage 1 of 27
Table of ContentsOverview5 5556667889Heat-Vision Arduino Camera!Fun & Useful ToolDIY Thermal CameraEnclosure DesignIR Thermal Camera SensorArduino Thermal CameraPrerequisite GuidesElectronic ComponentsHardware and SuppliesCool Tools!Software Adafruit HUZZAH32 Arduino IDE SetupInstalling Libraries in ArduinoUploading CodeArduino SketchCircuit Diagram101011111112 Circuit Diagram Battery Power12133D Printing13 1313141415151516What If I Don't Have A 3D Printer?3D Printed PartsFunky Fresh Colors!Design Source FilesSlice SettingsCamera Lens AssemblySecure Lens to Camera BodyAttach Lens Cover DetailsSlide Switch Wires for Slide SwitchTinning WiresTinning Slide Switch PinsConnect Wires to SwitchConnect Switch to Feather161616171717AMG883318 1818181919202020Wires for AMG8833Heat ShrinkThird Helping HandWire TinningTinning PinsHeader PinsConnect Wires to HeaderSeparate Header PinsTFT FeatherWing Install HUZZAH32 to TFT FeatherWing Flush Headers Adafruit Industries212121Page 2 of 27
Connect Wires from AMG8833Assembly Install AMG to LensSecure Sensor to MountConnect BatteryInstall Switch to CoverTFT InstallationInstall TFTMounting The BatterySecured BatteryOrientation SyncInstall Camera Sensor to LensCheck OrientationFinal Assembly Joining Parts TogetherAlign FeaturesBody AssembledSnap-On CoversAssembled Camera BodyStickers! Adafruit Page 3 of 27
Adafruit IndustriesPage 4 of 27
OverviewHeat-Vision Arduino Camera!In this project we’ll show you how to build simple a thermal camera. This mini thermalcamera can sense the surface temperature of things and display them as a colorfulheatmap. Temperatures are rendered in real-time and displayed as different colors toform a heat map.Fun & Useful ToolThermographic cameras can be used for finding hidden problems from heating andcooling issues. They’re a neat tool for doing thermal home inspections andtroubleshooting. It’s fun to take it in the garage to reveal embedded electrical systemsand looking at automobiles. Maybe make a game out of spotting hidden features.DIY Thermal CameraThermographic Cameras (https://adafru.it/CiQ) normally have low resolution and thehigher performance ones can be quite expensive. The AMG8833 thermal camerasensors are easier to come-by and easy to use with Arduino with the Adafruit Libraryand demo code. Adafruit IndustriesPage 5 of 27
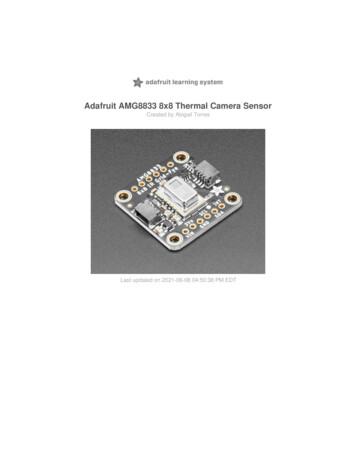
Enclosure DesignInspired by the classic Diana Toy Camera (https://adafru.it/CiS), the enclosure featuresa kawaii aesthetic thats both simplistic and stylish. The IR thermal sensor is securedto the faux lens assembly while the TFT display and micro-controller are secured tothe back cover.IR Thermal Camera SensorThe Adafruit AMG8833 breakout (https://adafru.it/y8d) features an IR thermalcamera sensor from Panasonic. It uses an8x8 array of IR thermal sensors. It's likethose fancy thermal cameras, butcompact and simple enough for easyintegration. When connected to yourmicrocontroller (or raspberry Pi) it willreturn an array of 64 individual infraredtemperature readings over I2C.Arduino Thermal CameraTo make a cool thermal camera, we can add a small 2.4in TFT display, 500mAhbattery and a Feather HUZZAH32. In this project, we're using the demo code includedwith the Adafruit AMG8833 Library for Arduino. This simple thermal camera displays arange of different colors that represent temperature readings. i.e, hot is red and coldis blue. Adafruit IndustriesPage 6 of 27
Prerequisite GuidesIf your new to electronics and the Adafruit Feather, I suggest you walk through thefollowing guides to get the basics. The Adafruit Feather HUZZAH32 guide will walkyou through setting it up with the Arduino IDE. See the AMG8833 IR Thermal Cameraguide for more information. Adafruit AMG8833 IR Thermal Camera (https://adafru.it/CiU) Adafruit HUZZAH32 – EPS32 Feather Board (https://adafru.it/CiV) TFT FeatherWing – 2.4" 320x240 Touchscreen (https://adafru.it/vvE) Adafruit IndustriesPage 7 of 27
Electronic ComponentsThe HUZZAH32 Feather, IR Thermal Camera breakout and TFT FeatherWing are themain electronic components used in this project.1 x Thermal t AMG8833 IR1 x Adafruit HUZZAH32https://www.adafruit.com/product/3707ESP32 Feather Board1 x TFT 4" 320x240 Touchscreen1 x 500mAh m Ion Polymer Battery - 3.7v 500mAh1 x Slide rd-friendly SPDTHardware and SuppliesJust a few screws, stickers and wires.6 x M2.5 x .45 x 5mmFlat Phillips Machine Screws1 x Pimonoi Super Sticker Selection!The cuttest, nerdiest stickers!!1 x 30AWG 2051Silicone Covered Stranded1 x Solder Wirehttps://www.adafruit.com/product/734Solder Spool - 1/4 lb SAC305 RoHS lead-free / 0.031"rosin-core - 0.25 lb / 100 g1 x Heat Shrink olored Heat Shrink Pack - 3/32" 1/8" 3/16"Diameters Adafruit IndustriesPage 8 of 27
1 x Mounting Putty TackLoctite Fun-Tak Mounting Putty 2-Ouncehttps://www.amazon.com/dp/B001F57ZPW/Cool Tools!These help make the project a smooth building experience. You don't need them allof them, but I recommend them.1 x Ultimaker 33D Printer1 x Wire s://www.adafruit.com/product/527Hakko Professsional Quality 20-30 AWG Wire Strippers CSP-30-11 x Wire Cuttershttps://www.adafruit.com/product/152Flush diagonal cutters - CHP1701 x Soldering Ironhttps://www.adafruit.com/product/180Adjustable 30W 110V soldering iron - XY-258 110V1 x se Jr. - PV-2011 x Helping Third Handshttps://www.adafruit.com/product/291Helping Third Hand Magnifier W/Magnifying Glass Tool MZ101 Adafruit IndustriesPage 9 of 27
SoftwareAdafruit HUZZAH32 Arduino IDE SetupWe'll upload the thermal camera demo sketch to the HUZZAH32 using the ArduinoIDE. We'll need to install the board profile and libraries installed before uploading thecode. Let's start with setting up the Feather board. Click the link below and follow thesetup instruction from the HUZZAH32 guide. Once complete, come back here tocontinue.Setup HUZZAH32 with Arduino Adafruit IndustriesPage 10 of 27
https://adafru.it/AKrInstalling Libraries in ArduinoWith the board profile, we can then install the dependencies. We'll use Arduino's builtin Library Manage to install the libraries. Goto Sketch Include Library and select Manage Libraries. Here, we'll search for the following libraries and install the latestversion. AMG8833 Library (https://adafru.it/xfw) Adafruit ILI9341 Library (https://adafru.it/d4d) Adafruit GFX Library (https://adafru.it/aJa) Adafruit BusIO Library (https://adafru.it/GxD)Uploading CodeWith the HUZZAH32 Feather board profile and Arduino libraries installed, in ArduinoIDE select the thermal cam interpolate sketch under the File Examples Adafruit AMG88xx menu. Connect the Feather board to your computer via microUSBcable and select the SiLABS under the Tools Port menu (Option might be nameddifferent using Windows OS).Upload the code to the Feather using the Upload command, Cmd U or clicking the arrow icon.Arduino SketchSelect the Thermal Cam Interpolate demo from the AMG88xx library Adafruit IndustriesPage 11 of 27
Circuit DiagramCircuit DiagramThis provides a visual reference for wiring of the components. They aren't true toscale, just meant to be used as reference. The Feather ESP32 is designed to snaponto the back of the TFT FeatherWing. 3V from AMG to 3V on TFT Feather GND from AMG to GND on TFT Feather Adafruit IndustriesPage 12 of 27
SDA from AMG to SDA on TFT Feather SCL from AMG to SCL on TFT Feather Switch to GND on Feather ESP32 Switch to EN on Feather ESP32Battery PowerThe 500mAh lithium polymer battery connects directly to the JST connector on theAdafruit Feather ESP32.3D PrintingWhat If I Don't Have A 3D Printer?Not to worry! You can use a 3D printing service such as 3DHubs (https://adafru.it/jNb)or MakeXYZ (https://adafru.it/veh) to have a local 3D printer operator 3D print andship you parts to you. This is a great way to get your parts 3D printed by local makers.You could also try checking out your local Library or search for a Maker Space.3D Printed PartsAll of the parts are 3D printed with FDM type 3D printers using various coloredfilaments. All of the parts are separated into pieces to make 3D printing easier.Assembly is pretty easy and straight forward. Use the links below to download theSTLs files. Adafruit IndustriesPage 13 of 27
Funky Fresh Colors!Most of the filaments are from MeltInk3D – They come in different diameters andflavors of PLA. Heres a list of the filaments used in this project. Aqua PLA – MeltInk3D (https://adafru.it/Ci-) Magenta PLA – MeltInk3D (https://adafru.it/Cj1) Black PLA – MeltInk3D (https://adafru.it/Cj2) Cool Gray PLA – MeltInk3D (https://adafru.it/Cj3) Silver PLA – MeltInk3D (https://adafru.it/Cj5) WoodFill PLA – ColorFabb (https://adafru.it/Cj7)Design Source FilesThe camera body assembly was designed in Fusion 360. This can be downloaded indifferent formats like STEP, SAT and more. Electronic components like the AMG8833,ESP32, and TFT Feather Wing can be extracted from the Fusion 360 Archive.Download Source – Fusion 360Archivehttps://adafru.it/AKtDownload STLs from Thingiversehttps://adafru.it/AKu Adafruit IndustriesPage 14 of 27
Slice SettingsThese parts have been tested and 3Dprinted on an Ultimaker 2 and 3 usingPLA filament. The parts were sliced usingCURA 3.x with the following slicesettings. 220C extruder temp 65c bed temp 0.2 layer height 0.38 line width 2 Wall Line Count – 0.4 nozzle 20% infill 50mm/s print speedFor good bed plate adhesion, a 3-4mmwidth Brim might be necessary to 3Dprint the frame of the camera body.Camera Lens AssemblyThe lens is fitted through the hole frominside the camera body. Press the lensthrough until the flange is flush with thesurface. The flange has two tabs withmounting holes. Line those up with theones in the camera body.Secure Lens to CameraBodyWhile holding the assembly together,insert and fasten two M2.5 x 6mmmachine screws into the mounting holesand fully tighten. Adafruit IndustriesPage 15 of 27
Attach Lens Cover DetailsUse superglue to adhere the fauxfocusing ring to the lens cover. This gearlooking part doesn't actually do anythingfunctional, its purely for atheistic.Slide SwitchWires for Slide SwitchThis little slide switch is great forembedding in small projects. We'll bewiring this up directly to the FeatherHUZZAH32. Measure and cut two piecesof wire, about 6cm (2in) in length.Tinning Wires30AWG wires are great because they'reboth flexible and durable. To prevent thestrands of wire from fraying, it's a goodidea to tin them with a bit of solder. Adafruit IndustriesPage 16 of 27
Tinning Slide Switch PinsThe slide switch has three pins on it, weonly need two of them. Snip off either thefar left or right, but not the middle! Add abit of solder to the remaining two.They're a bit long and can be trimmedshorter.Connect Wires to SwitchNow we can attach the two wires to thepins on the slide switch. A set of thirdhelping hands are great for holding theswitch in place while soldering the wires.Connect Switch to FeatherSolder one wire from the switch to the ENpin on top of the Adafruit FeatherHUZZAH32. Solder the other wire to theGND pin. It may be helpful to add a smallbit of solder to the pin to make it easierto attach a wire. Adafruit IndustriesPage 17 of 27
AMG8833Wires for AMG8833Four wired connections are necessary toconnect the thermal camera sensor tothe Adafruit Feather HUZZAH32. Thesecan be about 10cm (4in) in length.Different colored wires are helpful attelling connections apart.Heat ShrinkA bit of heat shrink tubing can help keepthese wires bundled together.Third Helping HandA handy way to tin a set of wires is toprop them up on one of the littlegrabbers. Separate the wires and tinthem up with a bit of solder. Adafruit IndustriesPage 18 of 27
Wire TinningDon't forget the opposite ends of eachwire. Commence soldering!Tinning PinsAdd a bit of solder to the pins on thethermal camera sensor breakout board. Apanavise jr. can hold the PCB in placewhile soldering.Connect Wires to AMG8833Carefully solder the wires into the pins onthe thermal camera breakout. Heat upthe soldered pin with the tip of thesoldering iron and insert a wire while thesolder is molten. Adafruit IndustriesPage 19 of 27
Header PinsTo make the wiring a bit easier, we'regoing to solder wires to male headers.Grab a strip of header pins and tin theshort ends with a bit of solder – Becareful not to melt the plastic! Thirdhelping helps are really useful here, donot try to hold headers while soldering –It'll burn the tips of your fingers!If the tip of the soldering iron is held on a strip of headers too long, it will meltthe plastic housing and damage the alignment of the pins.Connect Wires to HeaderAttach the wires from the thermal camerasensor by soldering them to the tinnedends.Separate Header PinsUse a pair of flush cutters to snip awaythe excess header pins and separate thewires from each other. Adafruit IndustriesPage 20 of 27
TFT FeatherWingInstall HUZZAH32 to TFTFeatherWingThe Adafruit Feather snap onto the backof the TFT FeatherWing with the headerpins inserting into the female headers.Flush HeadersIf the header pins are visible they mayneed to be trimmed short. The plastichousing of the male headers ought to beflush with the female headers. Use a pairof flush diagonal cutters to trim theheader pins short.Be careful not to trim the header pins too short! About half their total length issuffice.Connect Wires fromAMG8833Now you can plug in the male headerpins from the thermal camera sensor tothe spare headers on the back of the TFTFeatherWing. You can also trim theheader pins short to fully seat them flushwith the female headers. Adafruit IndustriesPage 21 of 27
AssemblyInstall AMG to LensLay the PCB of the sensor over thestandoffs on the camera lens cover. Turnit over and see if the lens of the sensorlines up with the small hole in the cover.Rotate to orient the PCB so it's centeredwith the hole.Secure Sensor to MountWhile holding the PCB onto the lenscover, insert four of the M2.5 x 5mmmachine screws to the mounting holesand fasten until fully tightened.Connect BatteryThe 500mAh lipo battery can be directlyplugged into the female JST connectoron the Adafruit Feather HUZZAH32board. Adafruit IndustriesPage 22 of 27
Install Switch to CoverThe on/off switch can be press fitted intothe little housing on the side of the backcover part. It should be able to snap in atan angle and held in place with friction.TFT InstallationThe TFT FeatherWing features mountingholes on each corner and will be securedto the back cover part of the case withfour M2.5 x 5mm machine screws.Install TFTPlace the PCB of display over the fourstandoffs and flip the assembly over tosee if the screen cut is properly lined up.Orient the display so they're correctlypositioned. Insert and fasten four M2.5 x5mm machine screws into the mountingholes. Adafruit IndustriesPage 23 of 27
Mounting The BatteryThe 500mAh lipo battery can be securedto the back of the TFT display with a bitof mounting tack. Just make sure it's nottouching the reset button.Secured BatteryI would rerouting the cable of the batteryin between the Feather and TFT display.Also make sure the battery isn't able toactuate the reset button, or else badthings can happen!Orientation SyncThe orientation of the thermal camerasensor and the display need to be setupcorrectly before installing the circuit intothe camera body. Play around with thearrangement to determine the correctorientation of the components. Adafruit IndustriesPage 24 of 27
Install Camera Sensor toLensNow that you got a firm understanding ofthe orientation, press fit the lens coverthrough the back of the camera lensframe. You'll need to determine whichway is up, down, left and right.Check OrientationBefore fitting the back cover part ontothe camera body, double check thecircuit to see if the orientation is still insync. Turn it on and use your finger tosee if it's following expect movement onthe display.Final AssemblyJoining Parts TogetherIf everything is lined up, fit the camerabody over the back cover. Be sure to fitthe groves on the cover onto the edgesof the camera body. Adafruit IndustriesPage 25 of 27
Align FeaturesThe back cover part features a sliding railon each side. The camera body featuresedges that mate with the rail.Body AssembledBefore closing it up, look inside the caseand see if any wires are being kinked.Turn on the circuit to see if everything isworking properly.Snap-On CoversIf everything looks good, fit the top andbottom cover parts over the camerabody. Make sure they're properly lined upbefore pressing them fully in. Theopening in bottom cover should be linedup with the microUSB port of the Feather. Adafruit IndustriesPage 26 of 27
Assembled Camera BodyCheck and inspect the camera body tosee if everything is fully seated,connected and intact. Shouldn't hear anyrattling when shaking – It should bepretty solid!Stickers!The camera body felt a little bit too plainfor me so I added these cute stickersfrom Pimoronoi (https://adafru.it/AKv). Adafruit IndustriesPage 27 of 27
Nov 15, 2021 · The camera body assembly was designed in Fusion 360. This can be downloaded in different formats like STEP, SAT and more. Electronic components like the AMG8833, ESP32, and TFT Feather Wing can be extracted from the Fusion 360 Archive. Download Source – Fusion 360 Archive https://adafru.it