Transcription
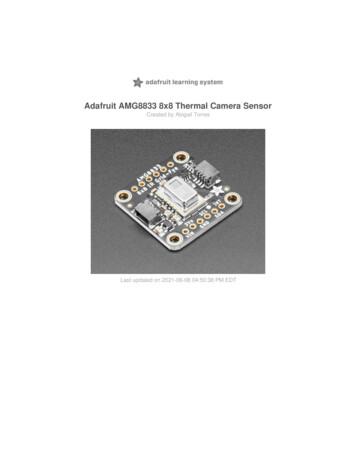
Adafruit AMG8833 8x8 Thermal Camera SensorCreated by Abigail TorresLast updated on 2021-06-08 04:50:38 PM EDT
Guide ContentsGuide ContentsOverviewPinouts237Power Pins:Logic pins:78Assembly9Prepare the header strips:Add the breakout board:And Solder!9910Arduino Wiring & TestI2C WiringDownload Adafruit AMG88xx libraryLoad Thermistor TestPixel Array OutputLibrary ReferenceArduino Library DocsArduino Thermal CameraPython & CircuitPythonCircuitPython Microcontroller WiringPython Computer WiringCircuitPython Installation of AMG88xx LibraryPython Installation of AMG88xx LibraryCircuitPython & Python UsageFull Example CodePython DocsRaspberry Pi Thermal CameraSetup PiTFTInstall Python SoftwareWiring Up SensorRun example codeDownloadsDocumentsSchematic and Fab Print STEMMA QT VersionSchematic and Fab Print FeatherWing VersionSchematic Original Breakout VersionDimensions Original Breakout Version Adafruit 021222223252627272728323232333434Page 2 of 36
OverviewAdd heat-vision to your project and with an Adafruit AMG8833 Grid-EYE Breakout! This sensor fromPanasonic is an 8x8 array of IR thermal sensors. When connected to your microcontroller (or raspberry Pi)it will return an array of 64 individual infrared temperature readings over I2C. It's like those fancy thermalcameras, but compact and simple enough for easy integration. Adafruit 833-8x8-thermal-camera-sensorPage 3 of 36
This part will measure temperatures ranging from 0 C to 80 C (32 F to 176 F) with an accuracy of - 2.5 C(4.5 F). It can detect a human from a distance of up to 7 meters (23) feet. With a maximum frame rate of10Hz, It's perfect for creating your own human detector or mini thermal camera. We have code for usingthis breakout on an Arduino or compatible (the sensor communicates over I2C) or on a Raspberry Pi withPython. On the Pi, with a bit of image processing help from the SciPy python library we were able tointerpolate the 8x8 grid and get some pretty nice results!The AMG8833 is the next generation of 8x8 thermal IR sensors from Panasonic, and offers higherperformance than it's predecessor the AMG8831. The sensor only supports I2C, and has a configurableinterrupt pin that can fire when any individual pixel goes above or below a thresholds that you set.To make it easy to use, we pick & placed it on a breakout board with a 3.3V regulator and level shifting.So you can use it with any 3V or 5V microcontroller or computer. Adafruit 833-8x8-thermal-camera-sensorPage 4 of 36
Should you wish to avoid soldering, we now also include our StemmaQT (https://adafru.it/HMB) connectors (SparkFun Qwiic (https://adafru.it/Fpw) compatible). Using thesehandy connectors you can simply plug in the sensor, no soldering required! QT Cable is not included,but we have a variety in the shop (https://adafru.it/JnB).Even better - We've done all the hard work here, with example code and supporting software libraries toget you up in running in just a few lines of code! Adafruit 833-8x8-thermal-camera-sensorPage 5 of 36
There are two versions of this board - the STEMMA QT version shown above, and the originalheader-only version shown below. Code works the same on both! Adafruit 833-8x8-thermal-camera-sensorPage 6 of 36
PinoutsThis camera has 4 mounting holes, and two header strips. Only the bottom strip is connected to thesensor. The top set of breakouts is there for mechanical stability only!Power Pins: Adafruit 833-8x8-thermal-camera-sensorPage 7 of 36
Vin - this is the power pin. Since the sensor uses 3.3V, we have included an onboard voltageregulator that will take 3-5VDC and safely convert it down. To power the board, give it the samepower as the logic level of your microcontroller - e.g. for a 5V micro like Arduino, use 5V3Vo - this is the 3.3V output from the voltage regulator, you can grab up to 100mA from this if youlikeGND - common ground for power and logicLogic pins:SCL - this is the I2C clock pin, connect to your microcontrollers I2C clock line. There is a 10K pullupon this pin and it is level shifted so you can use 3 - 5VDC.SDA - this is the I2C data pin, connect to your microcontrollers I2C data line. There is a 10K pullup onthis pin and it is level shifted so you can use 3 - 5VDC.INT - this is the interrupt-output pin. It is 3V logic and you can use it to detect when something movesor changes in the sensor vision path.STEMMA QT (https://adafru.it/Ft4) - These connectors allow you to connectors to dev boardswith STEMMA QT connectors or to other things with various associatedaccessories (https://adafru.it/Ft6)The 6 holes at the top of the board are provided for stability and are not connected to anything. Use theseif you want your sensor to sit nice and flat on a breadboard or Perma-Proto. Adafruit 833-8x8-thermal-camera-sensorPage 8 of 36
AssemblyPrepare the header strips:Cut the strips to length if necessary. It will be easier tosolder if you insert it into a breadboard - long pins downAdd the breakout board:Place the breakout board over the pins so that the shortpins poke through the breakout pads Adafruit 833-8x8-thermal-camera-sensorPage 9 of 36
And Solder!Be sure to solder all pins for reliable electrical contact.(For tips on soldering, be sure to check out our Guide toExcellent Soldering (https://adafru.it/aTk)). Adafruit 833-8x8-thermal-camera-sensorPage 10 of 36
You're done! Check your solder joints visually andcontinue onto the next steps Adafruit 833-8x8-thermal-camera-sensorPage 11 of 36
Arduino Wiring & TestYou can easily wire this breakout to any microcontroller, we'll be using an Arduino. You can use any otherkind of microcontroller as well as long as it has I2C clock and I2C data lines.I2C WiringConnect Vin to the power supply, 3-5V is fine. Usethe same voltage that the microcontroller logic isbased off of. For most Arduinos, that is 5V (red wireon STEMMA QT version)Connect GND to common power/data ground (blackwire on STEMMA QT version)Connect the SCL pin to the I2C clock SCL pin onyour Arduino. (yellow wire on STEMMA QT version)On an UNO & '328 based Arduino, this is alsoknown as A5, on a Mega it is also known as digital21 and on a Leonardo/Micro, digital 3Connect the SDA pin to the I2C data SDA pin onyour Arduino. (blue wire on STEMMA QT version)On an UNO & '328 based Arduino, this is alsoknown as A4, on a Mega it is also known as digital20 and on a Leonardo/Micro, digital 2By default, the I2C address is 0x69. If you solder thejumper on the back of the board labeled "Addr", theaddress will change to 0x68. Adafruit 833-8x8-thermal-camera-sensorPage 12 of 36
Download Adafruit AMG88xx libraryTo begin reading sensor data, you will need to install the Adafruit AMG88xx library (https://adafru.it/xfw).Start up the IDE and open the Library Manager:Type in AMG88xx until you see the Adafruit Library pop up. Click Install!We also have a great tutorial on Arduino library installation duino-libraries-install-use (https://adafru.it/aYM)Load Thermistor TestOpen up File- Examples- Adafruit AMG88xx- amg88xx test and upload to your Arduino wired up tothe sensor. This example just connects to the sensor and reads the internal thermistor to test yourconnections. Adafruit 833-8x8-thermal-camera-sensorPage 13 of 36
Once uploaded to your Arduino, open up the serial console at 9600 baud speed to see the internalthermistor reading. If you get a reading of 26 degrees (room temperature) then everything is wired andworking correctly!Pixel Array OutputOK now that we know the sensor is working, let's read actual thermal data. Load up File - Examples - Adafruit AMG88 - pixels testUpload the code, and open the serial console at 9600 baud rate. You should see a printout of the array of Adafruit 833-8x8-thermal-camera-sensorPage 14 of 36
readings every second. Each number is the detected temperature in Celsius, and in the 8x8 grid orderthat comes from the sensorThe numbers should increase if you put your hand or face above the sensor. They'll decrease if you holdup something cold in front of the sensor eyeLibrary ReferenceTo create the object, useAdafruit AMG88xx amg;Initialize the sensor usingstatus amg.begin();if (!status) {Serial.println("Could not find a valid AMG88xx sensor, check wiring!");while (1);}to read the pixels you will need an array to place the readings into. Once you have one, you can callreadPixels. Make sure the array you create is big enough by using the pre-definedAMG88xx PIXEL ARRAY SIZE macro.float pixels[AMG88xx PIXEL ARRAY SIZE];amg.readPixels(pixels); Adafruit 833-8x8-thermal-camera-sensorPage 15 of 36
Arduino Library DocsArduino Library Docs (https://adafru.it/Au6) Adafruit 833-8x8-thermal-camera-sensorPage 16 of 36
Arduino Thermal CameraTo make your Arduino into a cool thermal camera, we can add a small display.In this example we use an Adafruit 1.44" Color TFT. With some code changes, you can use other sizedisplays but a color display is best of course.Adafruit 1.44" Color TFT LCD Display with MicroSD Card breakoutThis lovely little display breakout is the best way to add a small, colorful and bright display to any project. Since the display uses 4-wireSPI to communicate and has its own. 14.95In StockAdd to CartKeep your AMG8833 breakout wired as you already have it from the Wiring & Test section above, andadd your TFT like thisOnce everything is all wired up, load up File- Examples- Adafruit AMG88xx- thermal camHit upload and you should have a simple thermal camera! Adafruit 833-8x8-thermal-camera-sensorPage 17 of 36
James DV has also sent over a version that is optimized if you want a faster display-updaterate (https://adafru.it/BPj) Adafruit 833-8x8-thermal-camera-sensorPage 18 of 36
Python & CircuitPythonIt's easy to use the AMG8833 sensor with Python or CircuitPython and the Adafruit CircuitPythonAMG88xx (https://adafru.it/xha) module. This module allows you to easily write Python code that readsthermal imaging data from the sensor.You can use this sensor with any CircuitPython microcontroller board or with a computer that has GPIOand Python thanks to Adafruit Blinka, our CircuitPython-for-Python compatibilitylibrary (https://adafru.it/BSN).CircuitPython Microcontroller WiringFirst wire up a AMG8833 to your board exactly as shown on the previous pages for Arduino. Here's anexample of wiring a Feather M0 to the sensor with I2C: Adafruit 833-8x8-thermal-camera-sensorPage 19 of 36
Board 3V to sensor VIN (red wire on STEMMA QTversion)Board GND to sensor GND (black wire on STEMMAQT version)Board SCL to sensor SCL (yellow wire on STEMMAQT version)Board SDA to sensor SDA (blue wire on STEMMAQT version)Python Computer WiringSince there's dozens of Linux computers/boards you can use we will show wiring for Raspberry Pi. For Adafruit 833-8x8-thermal-camera-sensorPage 20 of 36
other platforms, please visit the guide for CircuitPython on Linux to see whether your platform issupported (https://adafru.it/BSN).Here's the Raspberry Pi wired with I2C:Pi 3V3 to sensor VIN (red wire on STEMMA QTversion)Pi GND to sensor GND (black wire on STEMMA QTversion)Pi SCL to sensor SCL (yellow wire on STEMMA QTversion)Pi SDA to sensor SDA (blue wire on STEMMA QTversion)CircuitPython Installation of AMG88xx LibraryYou'll need to install the Adafruit CircuitPython AMG88xx (https://adafru.it/xha) library on yourCircuitPython board. Adafruit 833-8x8-thermal-camera-sensorPage 21 of 36
First make sure you are running the latest version of Adafruit CircuitPython (https://adafru.it/Amd) for yourboard.Next you'll need to install the necessary libraries to use the hardware--carefully follow the steps to findand install these libraries from Adafruit's CircuitPython library bundle (https://adafru.it/uap). OurCircuitPython starter guide has a great page on how to install the library bundle (https://adafru.it/ABU).For non-express boards like the Trinket M0 or Gemma M0, you'll need to manually install the necessarylibraries from the bundle:adafruit amg88xx.mpyadafruit bus deviceBefore continuing make sure your board's lib folder or root filesystem has the adafruit amg88xx.mpy,and adafruit bus device files and folders copied over.Next connect to the board's serial REPL (https://adafru.it/Awz) so you are at the CircuitPython prompt.Python Installation of AMG88xx LibraryYou'll need to install the Adafruit Blinka library that provides the CircuitPython support in Python. Thismay also require enabling I2C on your platform and verifying you are running Python 3. Since eachplatform is a little different, and Linux changes often, please visit the CircuitPython on Linux guide to getyour computer ready (https://adafru.it/BSN)!Once that's done, from your command line run the following command:sudo pip3 install adafruit-circuitpython-amg88xxIf your default Python is version 3 you may need to run 'pip' instead. Just make sure you aren't trying touse CircuitPython on Python 2.x, it isn't supported!CircuitPython & Python UsageTo demonstrate the usage of the sensor we'll initialize it and read the thermal imaging data the board'sPython REPL.If you're using an I2C connection run the following code to import the necessary modules and initialize theI2C connection with the sensor: Adafruit 833-8x8-thermal-camera-sensorPage 22 of 36
import timeimport busioimport boardimport adafruit amg88xxi2c busio.I2C(board.SCL, board.SDA)amg adafruit amg88xx.AMG88XX(i2c)Now you're ready to read values from the sensor using any of these properties:temperature - The sensor temperature in degrees Celsius.pixels - Temperature of each pixel across the sensor in Celsius. Temperatures are stored in a twodimensional list where the first index is the row and the second is the column. The first row is on theside closest to the writing on the sensor.For example, to print the pixel temp once every second until you tell it to stop:while True:for row in amg.pixels:print(['{0:.1f}'.format(temp) for temp in row])print("")print("\n")time.sleep(1)That's all there is to using AMG88ss with CircuitPython!Full Example Code Adafruit 833-8x8-thermal-camera-sensorPage 23 of 36
# SPDX-FileCopyrightText: 2021 ladyada for Adafruit Industries# SPDX-License-Identifier: MITimportimportimportimporttimebusioboardadafruit amg88xxi2c busio.I2C(board.SCL, board.SDA)amg adafruit amg88xx.AMG88XX(i2c)while True:for row in amg.pixels:# Pad to 1 decimal placeprint(["{0:.1f}".format(temp) for temp in row])print("")print("\n")time.sleep(1) Adafruit 833-8x8-thermal-camera-sensorPage 24 of 36
Python DocsPython Docs (https://adafru.it/C41) Adafruit 833-8x8-thermal-camera-sensorPage 25 of 36
Raspberry Pi Thermal CameraThe Raspberry Pi also has an i2c interface, and even better has processing capability to interpolate andfilter the sensor output. By adding processing power, you can 'turn' the 8x8 output into what appears tobe a higher-resolution display.We're using a PiTFT 2.8" and a Pi Cobbler but the code can be adapted to output to the HDMI display we're using pygame to draw to the framebuffer.You can use any Raspberry Pi computer, from Pi A to Pi 3 or even a Pi Zero, but we happen to have a Pi3 on our desk set up already so we're using that.Raspberry Pi 3 - Model B - ARMv8 with 1G RAMDid you really think the Raspberry Pi would stop getting better? At this point, we sound like a broken record, extolling on the new Pi’smyriad improvements like we’re. 35.00In StockAdd to CartPiTFT Plus Assembled 320x240 2.8" TFT Resistive TouchscreenIs this not the cutest little display for the Raspberry Pi? It features a 2.8" display with 320x240 16-bit color pixels and a resistive touchoverlay. The plate uses the high. 34.95In StockAdd to Cart Adafruit 833-8x8-thermal-camera-sensorPage 26 of 36
Assembled Pi T-Cobbler Plus - GPIO BreakoutThis is the assembled version of the Pi T-Cobbler Plus. It only works with the Raspberry Pi Model Zero, A , B , Pi 2, Pi 3 & Pi 4! (AnyPi with 2x20. 7.95In StockAdd to CartSetup PiTFTIf you have not done so already, the first thing you will need to do is setup your PiTFT. Instructions on howto do so can be found in this guide (https://adafru.it/sha).Install Python SoftwareOnce your PiTFT is all set up, and you have Internet access set up go back to this page and install thePython software for the AMG8833 so you can read data from the sensor. (https://adafru.it/C8B)Finally, install both pygame and scipy. Pygame lets us draw easily to a screen using python, we'll use thatto make the display work. Scipy is a powerful scientific/data processing library that we can use tomagically turn the 8x8 64 pixel array into something that looks more like a 32x32 1024 pixel array.Wow, isn't digital signal processing cool?sudo apt-get install -y python-scipy python-pygamesudo pip3 install colourWiring Up SensorWith the Pi powered off, we can wire up the sensor to the Pi Cobbler like this:Connect Vin to the 3V or 5V power supply (either is fine)Connect GND to the ground pin on the CobblerConnect SDA to SDA on the CobblerConnect SCL to SCL on the CobblerYou can also use direct wires, we happen to have a Cobbler ready. remember you can plug the cobblerinto the bottom of the PiTFT to get access to all the pins! Adafruit 833-8x8-thermal-camera-sensorPage 27 of 36
Now you should be able to verify that the sensor is wired up correctly by asking the Pi to detect whataddresses it can see on the I2C bus:sudo i2cdetect -y 1It should show up under its default address ( 0x69). If you don't see 0x69, check your wiring, did youinstall I2C support, etc?Run example code Adafruit 833-8x8-thermal-camera-sensorPage 28 of 36
At long last, we are finally ready to run our example code# SPDX-FileCopyrightText: 2021 ladyada for Adafruit Industries# SPDX-License-Identifier: MIT"""This example is for Raspberry Pi (Linux) only!It will not work on microcontrollers running CircuitPython!"""import osimport mathimport timeimportimportimportimportnumpy as nppygamebusioboardfrom scipy.interpolate import griddatafrom colour import Colorimport adafruit amg88xxi2c bus busio.I2C(board.SCL, board.SDA)# low range of the sensor (this will be blue on the screen)MINTEMP 26.0# high range of the sensor (this will be red on the screen)MAXTEMP 32.0# how many color values we can haveCOLORDEPTH 1024os.putenv("SDL FBDEV", "/dev/fb1")# pylint: disable no-memberpygame.init()# pylint: enable no-member# initialize the sensorsensor adafruit amg88xx.AMG88XX(i2c bus)# pylint: disable invalid-slice-inde
May 25, 2021 · interpolate the 8x8 grid and get some pretty nice results! The AMG8833 is the next generation of 8x8 thermal IR sensors from Panasonic, and offers higher performance than it's predecessor the AMG8831. The sensor only supports I2C, and has a configurable interrupt pin that can fire when any i