Transcription
1
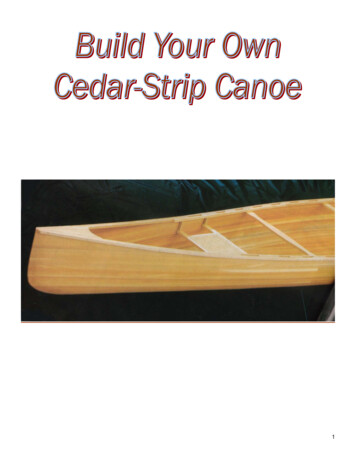
Cedar-Strip CanoeOne of the most beautiful and desired canoes is the cedar-strip canoe. Until now you eitherhad to pay someone upwards of 3000 to build you one, or wrestle your way through 300pages of plans to build your own. These plans are just as in-depth as the more difficultplans, the difference is we have eliminated all of the duplicate information you really do notneed to know to build one of these canoes.If you are like me, I know what you're probably thinking: 'I want a canoe just like that, andI'd love to build one, but this is just too big and too difficult a project for me."I think you're in for a pleasant surprise. This is a large project, and it is time-consuming.But it’s like painting your house - lots of time and lots of work, but not all that difficult ifyou approach it properly. Unlike most forms of boat-building, a cedar-strip canoe is veryforgiving in its construction. A first-time canoe builder with modest tool skills can build anexcellent craft. This would be an excellent project to involve your teenage in.This canoe is 18 ft. long, and is designed as a general-purpose family touring craft forcamping and general flatwater paddling. It is not designed to run class 5 rapids. It'sstable, moderately fast, carries plenty of weight, has no keel, and is easy to portage. Thiscanoe will weigh in at about 55 lbs. when completed.The plans are presented in 3 logical steps;Part 1: Building the form on which to build your canoePart 2: Stripping the canoe with cedar stripsPart 3: Fiberglassing and finishing the canoe.Each step includes a shopping list and a cutting list, directions and illustrations. It issuggested that you read the entire sequence of steps and familiarize yourself with theprocess before beginning your canoe. Make sure you have a source of materials, theknowledge to put them together, the tools for the job, and the room to accommodate yourefforts.When finished, you will be the proud owner of one of the most beautiful canoes everdesigned. Follow the directions and illustrations for an easily built canoe you can enjoy foryears to come.2
Part 1: Building the form on which to build your canoeAssembling the wooden form on which your canoe will be built.WHAT IS A CEDAR-STRIP CANOE, ANYWAY? The basic idea behind a cedar-strip canoe isto make a hull of narrow wood strips, each one glued to the next with ordinary carpenter'sglue, and then cover the hull with fiberglass, inside and out. The wooden hull by itself isweak, but the two layers of fiberglass make the canoe extremely strong, lightweight andwaterproof. No ribs are needed, no canvas covering, and no caulking.This "sandwich" construction, with the fiberglass as bread and wood as the filling, is alsowhy this type of canoe is very forgiving to a novice builder - the wooden strips don't have tobe fitted very exactly, because the fiberglass covers all the gaps.As we start to build the canoe, we begin by assembling the "strongback," which is basicallya long sawhorse on which to work. We then attach the molds, which are curved plywoodpieces that the hull will be built on. The plans show clearly what the strongback and moldslook like.WHAT IT TAKES TO BUILDYou don't need the skills of an expert woodworker to make a cedar-strip canoe. If you canoperate a table saw or radial arm saw, you can do it. You do need patience and persistence,however. There are a lot of wooden strips to put on, and there's plenty of surface area tosand. You should count on it taking about 150 - 175 hours to finish the canoe. In addition,the materials will cost around 450 - 500. A garage or covered patio is the best place forbuilding, because you need 12 - 16 ft. of clearance in front of and behind your saw forcutting the long strips. Furthermore, sanding the glued-up hull produces clouds ofsawdust, and applying the fiberglass produces noxious fumes. You could work in abasement shop, but be sure you can get the finished canoe out, and install a powerful fanto exhaust dust and fumes.The tools you will need are:Power tools: table saw or radial arm saw, jigsaw, electric drill, belt sander, orbital sanderand router.Hand tools: wrenches, chalk line, ten 2-in. spring clamps, four 6-in. clamps, two stapleguns, Surform file, hand plane, two 7 in. or 9 in. paint rollers and three trays, two paintscrapers, coping saw, and a combination square.Miscellaneous: church-key can opener or small tack puller, 20 clothespins, cartridge-typerespirator, safety goggles, dust masks and rubber gloves.If you're ready, take a deep breath, and let's get started.3
What you need for the first step.SHOPPING LISTITEM22” x 28" poster board19” x 24" tracing paper½” x 4' x 8' exterior fir plywood2” x 4" x 12' pine1” x 6" x 8' pine¼” x 5" hex head bolts with nuts and washers1-4” x 3" hex head bolts with nuts and washers1/4" x 2-1/2" hex head bolts with nuts and washers1/4" x 2" hex head bolts with nuts and washers1/4" x 3" lag bolts#6 x 2-1/2" drywall screws#6 x 1-1/2" drywall screws1” brads1” x 10" x 16' cedarQUANTITY3 sheets5 sheets2 sheets72282622050465034
CUT STRONGBACK PIECES TO SIZEThis is possibly the most important step in building your canoe. Be precise and build yourstrongback level and straight. This is the beginning, and a mistake or sloppiness here willresult in a canoe that is hard to handle, or worse.Begin by cutting all the plywood pieces A - M to the dimensions given in the following“Cutting List”.Cut the leg supports (M) to their finished shapes.Cut the pine pieces N - U to their finished dimensions, then cut the tapered ends of the toppieces 12270CUTTING LISTSIZE & DESCRIPTION1/2" x 20" x 24" fir plywood (grid layout board)1/2" x 12" x 18-1/2" fir plywood (end molds)1/2" x 6-1/4" x 16" fir plywood (molds 1 and 13)1/2" x 13-1/2" x 14-1/4" fir plywood (molds 2 and 12)1/2" x 13-1/4" x 20" fir plywood (molds 3 and 11)1/2" x 12-1/2" x 25" fir plywood (molds 4 and 10)1/2" x 12" x 30" fir plywood (molds 5 and 9)1/2" x 12" x 33-1/4" fir plywood (molds 6 and 8)1/2" x 12" x 34-1/4" fir plywood (mold 7)1/2" x 3-1/2" x 7" fir plywood (end mold supports)1/2" x 3-1/2" x 12" fir plywood (end mold supports)1/2" x 10" x 20" fir plywood (leg supports)1-1/2" x 3-1/2" x 12' pine (strongback sides)1-1/2" x 3-1/2" x 48" pine (strongback ends)1-1/2" x 3-1/2" x 24" pine (strongback centers and feet)1-1/2" x 3-1/2" x 36" pine (strongback legs)1-1/2" x 1-1/2" x 10" pine (mold supports)1-1/2" x 1-1/2" x 4" pine (mold supports)3/4" x 5-1/2" x 8'pine (strongback top)1/4" x 3/4" x 16'cedar (hull)The following page contains a diagram to help you with this process. Each square on thediagram equals 1” to help you transfer and increase the size of the molds.5
6
THE GRID LAYOUT BOARDThe grid layout board is used for drawing all the mold shapes to their full size. The shapesare then transferred to poster board templates, and then to the plywood pieces B - J. Thismay seem like a cumbersome process, but the payoff is that your canoe will be symmetricaland smooth.Draw the 1-in. grid on the grid layout board (A). To eliminate any confusion, transfer oneset of mold shapes at a time. Start with molds l and 13. Transfer the intersecting pointsfrom our grid to yours. Draw the curves joining the intersecting points and complete themold half’s shape (Photos 1 & 2).Now transfer the remaining mold shapes, and the 1/2-in. hole locations.7
8
MAKE POSTER BOARD TEMPLATESTrace the individual mold shapes to separate sheets of heavy tracing paper. Don't forget thehole locations (Photo 2).Cut the shapes out about 1/2 in. outside of the drawn lines.Tape the tracing paper shapes to pieces of poster board, but don't cover the pencil lineswith tape. Use a center punch to transfer the hole locations to the poster board, thencarefully cut out the shapes. Then check the accuracy of these templates against the gridpattern.9
CUT OUT THE MOLDSDraw center lines dividing the width on both sides of all the plywood mold pieces C - J.Trace the poster board shapes to one piece of each pair of plywood mold pieces and to thecenter mold 7 (Photo 4).10
Stack the pairs of plywood mold pieces and screw them together with 1-in. screws.Cut and sand them as a unit so the shapes of the two molds are exactly the same (Photo 5).Drill the 1/2-in. holes, and then separate the screwed-together pieces.11
ASSEMBLE THE STRONGBACKScrew the pine strongback pieces N - Q together (Photo 6).Screw the strongback top (U) to the strongback. Assemble the legs (Q, R, M) and then boltthe legs to the strongback.VERY IMPORTANT: Make sure you keep everything plumb and aligned.12
MOUNT THE MOLD SUPPORTSUse a chalk line to snap a center line down the length of the strongback top (Photo 7).Mark the locations of the molds on the strongback top. The spaces between the molds areequal except for those between molds 6 and 7 and molds 8 and 7, which are 1/4 in. lessthan the rest.13
Draw center lines dividing the length on all sides of the mold supports (S, T). Drill the boltholes in the mold supports and end mold supports (K, L). Drill the holes in the ends of thestrongback for the end mold supports (L), then bolt them in place. Bolt the mold supportsto the strongback (Photo 8).14
MOUNT AND ALIGN THE MOLDSBolt the end mold supports (K) to the end molds, and then to the strongback (Photo 9).15
Align the end molds so they're parallel to each other and in a straight line (Photo 10). Placeposter board shims under the end mold supports to adjust the end molds.16
Bolt the molds to the mold supports (Photo 11).17
Screw a screw to the top edge of each end mold and tie a string between the screws. Alignthe center lines of the molds to the string (Photo 12).IMPORTANT: Be fussy about this step, because the canoe won't paddle straight if all themolds aren't in a straight line.18
CHECK THE FAIRNESS OF THE MOLDS"Fair" is a boat-building term that describes a curve that is smooth, without bumps orhollows. To ensure that your canoe hull is fair, you must carefully align the molds.Start by cutting the cedar strips (V) that will be used to build the hull (Photo 13), andchoose one of the strips as a fairing strip.First, lay it across the last couple of molds and the end mold. Bevel the edges of the endmold at about a 15-degree angle with a rasp so the strip lies flat on it.19
Lay the fairing batten across the molds at different positions and look along it to see if it'sflat against the molds (Photo 14). Check one area on one side and then the same area onthe other side. The batten should lie similarly on both sides. Check all the molds in manyplaces and make any necessary adjustments by shifting the molds slightly on thestrongback or by trimming or shimming.When it looks like the cedar strips will lie smoothly on the molds, you're ready to continuewith Part 2 of the plans.20
Cedar-Strip Canoe One of the most beautiful and desired canoes is the cedar-strip canoe. Until now you either had to pay someone upwards of 3000 to build you one, or wrestle your way through 300 pa