Transcription
WiresharkQuick-StartGuideInstructions on Using the Wireshark Packet AnalyzerJuly 2, 2008
Table of ContentsChapter 1: Getting Started . 3I)Current Version. 4II) Installation. 4III) Specifying the Default Network Adapter . 5Chapter 2: Using Wireshark. 7I)Two ways to capture some packets:. 7II) Examining the Capture . 10III) What if I can’t find any packets? . 11IV) Looking at Packets Captured by Wireshark. 12V) Some Options to Analyze Captured Packets . 13VI) Saving Captures . 15Appendix 1: Packets Captured: Explanation and Troubleshooting . 16I)Switches or Routers versus Hubs. 16II) Your Network Adapter . 17III) Comment on Cable Modems . 18IV) Problem with Wireless LANs and Windows . 18V) Other Problems and Issues. 18Appendix 2: Filters in Wireshark. 20Appendix 3: Hits Versus Page Views. 22
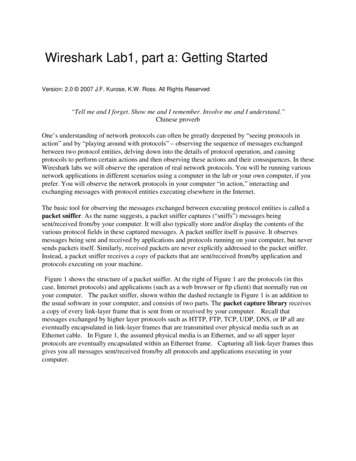
Wireshark Quickstart GuideChapter 1: Getting StartedYou can find moreinformation on theWireshark web site atwww.wireshark.com .Wireshark may notwork on Windowscomputers usingwireless networkadapters. Tryswitching offPromiscuous mode(Edit / Preferences /Capture). For morediscussion of whatWireshark can or cannot capture, refer toAppendix 1Wireshark is a network packet analyzer, known previously asEthereal. It lets you examine the network traffic flowing intoand out of your Windows or Unix machine. Networkprofessionals use Wireshark to troubleshoot networkingproblems, but it is also an excellent way to learn exactly howthe network protocols work. For example, it allows us to see thedata that your system sends and receives when you type a webaddress into a web browser (e.g., Internet Explorer or Mozilla’sFirefox).As a metaphor for Wireshark’soperation, pretend that you couldtake a special magnifying glassand look into the network cablecoming out of the back of yourpersonal computer. You wouldsee the bits of information,encoded as electrical pulses,flowing into and out of yourcomputer.If Wireshark stopped there, itwould only be of limitedFigure 1: Wireshark lets you see theuse – it is difficult tonetwork traffic entering and leavingmake sense out of a rawyour computer.stream of data.However, Wireshark also contains a protocol analyzer thatunderstands a massive number of protocols, containing over78,000 filters. It converts the data stream to a listing of packetsflowing in and out of the computer. It allows you to examine anindividual packet, and drill down through the layers ofencapsulation until the application-level payload is revealed.Wireshark is developed as open source software. This meansthat the software is developed as a community effort, and thesource code is freely available. Furthermore, it is licensed underthe GNU General Public License(http://www.gnu.org/licenses/gpl.html). This license gives youthe right to use the software for free. However, you may not sellthe software, or a derivative of it. Also, if you modify theprogram code, you must be willing to submit the changes backto the open source community.3
Wireshark Quickstart GuideRefer to Appendix 1 for a discussion of the type of packets thatWireshark captures. This discussion also explains how yourparticular network configuration may affect the type of packetsyou see.I)Current VersionThis documentation is based on Wireshark version 1.0.1(released 30 June 2008), running on Windows Vista and XP.Although you may find a newer release available when youdownload the software, the concepts in this manual should stillbe relevant.The Wireshark website is a rich source ofhelp for bothbeginners and experts.Although thisQuickStart guiderecommends specificitems on the web site,the reader is asked touse the Wiresharkmenu system to locatethe referenced items.The Wireshark menusystem will remaincurrent as changes aremade to the web site.Wireshark was in a “beta” mode for a very long time. Thematurity of the software might surprise many who may expectsoftware with such a low version number to be less thancomplete. Far from being a recent development, Wireshark(under the earlier name of Ethereal) was first released in 1998,and has been in continuous development since that time.Wireshark is supported in Unix (including Mac OSX), Linux,and Windows (from Win9x and NT4 through to Vista andServer 2008). The installation process will, of course, bedifferent for each operating system. But once installed theoperation should be very similar if not identical.More detailed documentation can be found on the Wiresharkweb site at: www.wireshark.com .II)The Wiresharkinstallation packagewill also installWinPcap unless youoverride the settings.Wireshark will notwork unless WinPcapis also installed.InstallationWireshark can be downloaded directly from the Wireshark website at www.wireshark.com . The download is an exe file ofapproximately 20MB. Save the file to an appropriate location,such as your desktop. When the file is downloaded, double clickon it to start the installation process. The default installationsettings should work fine. WinPcap may need to run asadministrator, especially on Vista. There is a setting called“NPF” which by default is turned on during the installation onVista, but not on XP. It would be unwise to change this setting– keep the default installation settings unless you fullyunderstand the implications of changing something.One option that is pre-selected is “WinPcap”. This is a requiredcomponent of Wireshark, and it must be installed for Wiresharkto work properly. WinPcap is essentially a driver which allowsthe network packets to be intercepted and copied before the4
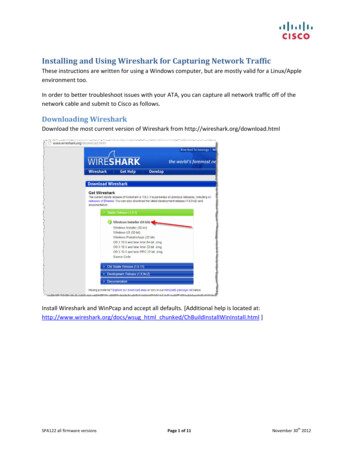
Wireshark Quickstart Guidewindows network stack processes the data. Without WinPcap,you may still use Wireshark to analyze previously captured databut you will not be able to perform the actual data capture.While WinPcap allows the capture of “raw” data, there will besome slight differences between the data that is provided toWireshark, and the data which actually exists “on the wire”.This is because the network card may process the datagramwithin its firmware and not pass all of the data to the operatingsystem. One example is that most network cards do not deliver802.3 preamble or CRC fields to the operating system.III)Specifying the Default Network AdapterWhen you first start Wireshark you must tell it which networkadapter to use. You can make this selection before beginning acapture, but doing so every time is tedious. If you want to preconfigure the default network adapter then go to the Edit menuand choose “Preferences”.Figure 2: Choose Preferences from the Edit MenuWhen the preferences screen appears you must1) Click on the “Capture” menu;2) Click on the down arrow and select the correct network card(you may see several alternatives including generic deviceswhich will not work), and3) Click on the “OK” button.5
Wireshark Quickstart GuideFigure 3: Preferences DialogNote: The apply button may be hidden. On many displays, thedialog box runs off the bottom of the screen. If you can not seethe apply button, click on the blue bar at the top of the windowand drag the box upward.Many other settings may be configured within the preferencesdialog box. If you find that you are regularly changing settingsbefore starting a capture, then you may benefit from settingyour preferred settings as defaults. For now, this guide willleave all defaults in their initial state.6
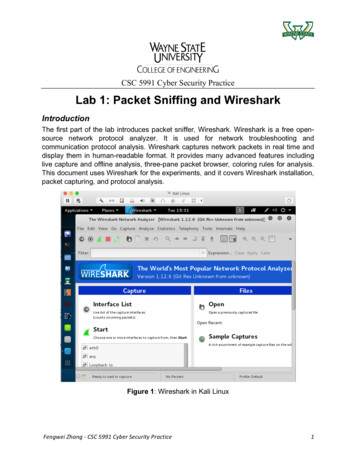
Wireshark Quickstart GuideChapter 2: Using WiresharkI)Two ways to capture some packets:i) A Simple captureYou are now ready to capture packets coming to and from yourmachine. Begin the capture process by selecting the “Capture”menu and then clicking “Start”.Wireshark will immediately begin capturing data from thenetwork adapter you selected earlier, or give an error messagethat no adapter is selected if you didn’t perform the preconfiguration.You can stop the capture by selecting “stop” from the capturemenu.ii) Selecting “Capture Options” beforeCapturingMany people prefer to take an extra step before beginning thecapture which lets a number of features be configured. Click the“Capture” menu then select “Options”. You should see a dialogas in Figure 4. A number of options are available in this dialog.Some, such as “capture filter”, are for more advanced use.However, a number of options are available which are veryuseful even during basic captures. A number of these items arehighlighted in Figure 4, including:1) Update list of packets in real time: This tells Wireshark todisplays packets as they captured rather than waiting untilthe capture is stopped (default is on).2) Automatic scrolling in live capture: If the previous item isselected, this tells Wireshark to scroll the packets so thatyou are viewing the most recent (default is on).7
Wireshark Quickstart GuideFigure 4 Capture Options3) Hide Capture Info dialog: The “Capture Info” dialog wasalways displayed in earlier versions of Wireshark andEthereal but is now disabled by default. This dialog displaysa bar-graph summary of the protocols during the capture,but disappears when the capture is stopped. This dialog isshown in Figure 5. You may find this useful in decidingwhether you have captured enough of the packets of interestto you (default is on – i.e. hide)8
Wireshark Quickstart GuideFigure 5 Capture Info Dialog4) Enable MAC name resolution: This tells Wireshark todisplay the name of the manufacturer of the network cardwhen it lists the MAC address. Figure 6 shows an exampleof MAC name resolution with a MAC address generatedfrom an Asiarock network card (default is on).Figure 6 MAC name resolution5) Enable network name resolution: Network NameResolution (NNR) tells Wireshark to use names, such ascnn.com, in the summaries. If NNR is turned off, you willonly see IP addresses in the summary. This setting onlyaffects the summary. Even with names turned on, you caneasily see the IP address by clicking on the packet andexamining the packet details. However, it is easier to selectpackets if the names are available to identify networkservers.However, this requires Wireshark to perform a DNS lookupfor every IP address. If you are connected to the internet,this may be trivial. But if you are working offline then youwill need to wait for very DNS lookup to be attempted, and9
Wireshark Quickstart Guidetime-out and fail. This may take an exceptionally long time,and make Wireshark appear to freeze. Also, the DNS lookupwill add extra packets into the capture. This adds anartificial component to the capture. This feature is turned offby default; you may prefer to turn it on if you are workingon a computer with access to a DNS server.6) Enable transport name resolution: This option tellsWireshark to display the typical name of a protocol ratherthan the port value. For example, a datagram with port 80will be displayed as HTTP. However, you should rememberthat this is a simple lookup of a table. It is possible thatsome other, non-http, traffic may actually be using this port(default is on)7) Stop Capture: The items in this section allow you to preselect a stop condition for the capture. You may select tostop after a number of packets, an amount of data, or periodof time. It is often interesting to close all applications, andthen capture all traffic over a minute or two while yourcomputer is “idle”. This will show you the normalbackground traffic existing on your network (default is on).When you have selected the items which you prefer, click the“start” button.II)Examining the CaptureStart a capture using either of the above methods. You mayimmediately see packets being saved to your machine. Thistraffic is most likely normal background activity.Let’s create some packets for Wireshark to capture. WithWireshark running and capturing packets, go to a web browser(e.g., Internet Explorer, Mozilla’s Firefox, Opera, or Safari),and type in a web address, such as www.cnn.com .When the web page finished loading, go back to Wireshark andthrough the menu click “Capture” then “Stop”, or use the shortcut CTRL-E (for End). If you have changed the setting todisplay the “Capture Info” dialog box (Figure 5), you just needto click the “stop” button.Don’t be surprised if Wireshark captures quite a few packets ofinformation. As Appendix 3 explains, displaying a web pagerequires more separate server requests than most people realize.10
Wireshark Quickstart GuideIII)What if I can’t find any packets?If you don’t see any packets while Wireshark is performing thecapture, you may have de-selected the option to “Updatepackets in real time (item 1 in Figure 4). When the capturestops, you should see Wireshark process and load each packetwhich was captured.There are several things to check out if you don’t see packetsafter you end the capture.1) When you were setting up Wireshark, did you select thenetwork adapter that is being used to interface with thenetwork?Refer to section Error! Reference source not found.,Figure 2, and Figure 3 in Chapter 1: Getting Started. Youcan also change the interface in a drop-down box theCapture Options dialog2) Are you using a wireless connection on a Windowsmachine?Filters can ‘hide’ yourtraffic. Even if youdidn’t set a filter, somecommandsautomatically setfilters. Refer toAppendix 2 to find outhow to clear filters.Wireshark is not able to capture packets on some wirelessconnections within Windows. Refer to section IV) inAppendix 1 for a possible workaround and moreinformation.3) Are you using filters?Wireshark can filter results so that only certain types ofpackets are captured. If the capture filter is set and nopackets matched the filter then you will have captured nopackets. There is nothing you can do except repeat thecapture either without the capture filter or ensure that thespecified packets are created. There is also a display filterthat will hide any packet not meeting a specified condition.An example of a filter condition would be to only displaypackets sent to/from a specific IP address. If you set a filter,and then have no traffic that matches the filter, then you willnot see any packets. Click the “clear” button next to thedisplay filter to view all packets (see Figure 11). For moreinformation on filters refer to Appendix 2.4) Did you create any traffic for Wireshark to filter?After you go to the “Capture” menu and choose “Start”, youmust leave Wireshark running. If the Capture Info dialog is11
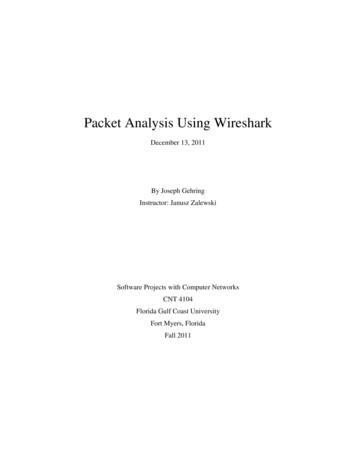
Wireshark Quickstart Guidedisplayed – do not click the “Stop” button. Then go to yourweb browser and enter a web address, such aswww.cnn.com . Finally return to Wireshark and click on the“stop” button.5) If none of these options worked, go to the Wireshark website and check the FAQs, the documentation and the wiki atwww.wireshark.com .IV)Looking at Packets Captured byWiresharkOnce you have captured a set of packets, Wireshark shouldpresent you with a colorful window as shown in Figure 7 below.Figure 7: Packet Listing WindowThis window is divided into three areas.i) Window Area 1: SummaryAt the top is a colorful listing of all of the packets captured.Each line is a summary of a single frame or packet that wascaptured. The colors represent a coding scheme that can be usedto quickly detect the type of packet. For example, thepredominant color in the graphic above is light green. Lightgreen is the color for HTTP packets.ii) Window Area 2: DetailWhen you click on a packet in area 1, the packet structure isshown in area 2. In the screenshot above, the packet shown indark blue has been selected; therefore area 2 shows more detailson that packet. In order to see more details, refer to Figure 8below. This figure shows an enlarged version of area 2 from theprevious figure.12
Wireshark Quickstart GuideFigure 8: Areas 2 Details (Extract from previous figure)The first line of area two is created by Wireshark and containsstatistical and informational data about the frame. It shows thatthis is the eighth frame (packet) that Wireshark captured. Thenext line in area 2 reveals that it was an Ethernet packet. Sincethe payload of this Ethernet packet was an Internet Protocol (IP)packet, the third line indicates that. You will also notice thatthere is a plus next to the first two lines and a minus next to theIP line. You can click on a plus to get more details on the packetcontents. This has been done for the IP line so that the user cansee the header information for the packet.iii) Window Area 3: RAW DataClicking on a portion of the packet in area two changes thedisplay in area 3. This was done in Figure 8 to select the IPflags field, in Figure 9 the hex of the flags field is selected. Area3 has two parts. On the left are sixteen columns of twocharacters each. This is the raw hexadecimal code that makes upthe packet. On the right is the Unicode version of thishexadecimal code. If you click on an http line in window 2, youmight notice English looking get commands or html commandsin this right area.Figure 9 Hexadecimal ViewV)Some Options to Analyze CapturedPacketsWireshark has several options to explore and analyze captureddata. Feel free to explore the full set of options; however thissection will discuss a few key capabilities.13
Wireshark Quickstart Guidei) FiltersFollowing a TCPstream also hidessome of the data bysetting a display filter.“Clear” the displayfilter (Appendix 2) toreveal the entire dataset.Filters can be used to narrow in the focus on only importantpackets. See Appendix 2 for a discussion of filters.ii) Follow TCP StreamChoose a TCP packet from the packet listing window (Area 1 inFigure 7). Right click on the chosen packet and select “FollowTCP Stream”. Wireshark will open a new window and displaythe set of data as it is seen by the application layer. Forexample, in the case of a HTTP response, this would be theHTTP data and the web page to be delivered to the browser.However, the “Follow TCP Stream” command also doessomething that may confuse you – it automatically filters thepacket display so that only packets relating to this stream aredisplayed. As a result, you may need to “Clear” (Appendix 2)the display filter after using “Follow TCP Stream” if you wantto look at other packet data.iii) Conversations and EndpointsUnder the statistics menu at the top of the main screen you canexplore “Conversations” and “Endpoints”.First, remember that the network traffic you capture may havetraffic to/from more than one computer. There is a good chancethat your LAN protocol is Ethernet, and Ethernet is designed toshare a single network among many users. As a result, you maysee packets for other users in your packet data. Even if yournetwork is connected through a switch, you may see broadcastpackets to other users.Using endpoints lets you isolate traffic so that you are onlylooking at traffic to/from a specific machine. An endpoint canbe defined by network layer. For example, a single MACaddress on your machine is one endpoint. If you are running anemail client and a web browser at the same time, all of thattraffic will be consolidated through your computer’s MACaddress. However, if at the TCP layer, an endpoint definitionincludes the port number of the application. Therefore, at theTCP layer, the traffic for the email client and the web browserwill be separated. Wireshark’s endpoint report lets you selectthe network layer of interest, and then to see the summarizedendpoint traffic for that layer.14
Wireshark Quickstart GuideA conversation report is similar to an endpoint report. Aconversation is defined as all of the traffic between two specificendpoints. As an example, consider packets at the TCP level.Let’s say that you started capturing packets and then went totwo web sites: www.cnn.com and www.usatoday.com . Theendpoint report on your web browser will combine all trafficfrom your browser and both of these web sites. A conversationreport between your browser and the www.cnn.com site wouldexclude the data from www.usatoday.com .VI)Saving CapturesWireshark also allows you to capture a set of packets and save itto a file that can be opened later. In addition to the obvious uses,this allows two unique capabilities. Instructors may wish to save one capture file anddistribute it to all students. This allows instructorsto pose a set of questions on a consistent data set,and to know that each student has appropriate datato answer the questions. In some circumstances, for example using awireless network connection, students may havedifficulty capturing packets. In these cases,Wireshark will still be able to analyze packets fromsaved files created on another platform or with othertools. These students can capture a set of packets onany accessible machine; save the captured packets;and transfer the saved file to their personal machinefor analysis.15
Wireshark Quickstart GuideAppendix 1: Packets Captured: Explanationand TroubleshootingWireshark is designed to show you all packets that come intoand out of your computer. You are probably using Ethernet foryour LAN, and Ethernet is a shared-access protocol. As a result,Wireshark would theoretically allow you to see the followingtypes of traffic: Packets sent to/from your computer. Broadcast packets sent to all computers on yourlocal network. Packets sent to/from any other computers on yourlocal network.However, several factors may keep you from seeing some of thepackets on your network.I)Switches or Routers versus HubsEthernet assumes that your local network looks like somevariation of a bus, and that traffic to any computer on the localnetwork will be seen by any other computer on that network.In practice, Ethernet networks often use a star topology,wherein all of the computers are linked to a central unit. In theearly days of Ethernet, this central unit was called a hub. A hublistens to each incoming port and repeats everything that it hearsout to every port. Although a hub’s physical network topologyis a star, logically it acts like a bus topology – every station onthe network sees all of the traffic on the network. Therefore, ifyour network uses a hub, your machine should be able to reportboth the traffic to your machine and also the traffic to all othermachines on your network.The problem with hubs is that they reduce capacity since eachstation must pick their packets out of a lot of irrelevant trafficfor other stations. Today, it is more normal to build networksswitches and routers. You can refer to your textbook for adescription of the differences in these devices. However, thesimple explanation is that they work to insure that each stationonly sees the traffic that it needs to see. It is likely that yournetwork’s central unit is a switch or a router. If this is the case,your computer (and Wireshark) will be able to see traffic that isaddressed to/from your computer and broadcast traffic for allcomputers on the network, but you will not be able to see16
Wireshark Quickstart Guidepackets sent to/from other computers that are not addressed toyour computer.Some higher-end switches have the capability to duplicate alltraffic passing through the switch and to send the copied trafficto a single port. This may be done by an administrator during atroubleshooting exercise and is normally disabled. This featureis known variously as “port mirroring” or “port spanning”II)Your Network AdapterMany computers today have more than one network adapter.For example, many laptops have both wireless network adapters(802.11 a/b/g) and wired adapters. You must make sure thatWireshark is listening to the correct adapter or it will not seeany traffic. You can check which adapters are receiving data byclicking on the “Capture” menu then selecting “Interface”. InFigure 10 you can see that Wireshark believes that there are sixinterfaces, but that only the first one is receiving packets. Fromthis dialog you can select to: start a capture on a specific interface configure options before starting a capture on a specificinterface view details of a particular interfaceFigure 10 Captures/Interface dialogThe default adapter is setup in the menu“Edit/Preferences/Capture” – make sure you choose to save anychanges using the dialog button at the bottom of the window.You can alter the selected interface for a single capture by goingthrough the “Capture Options” dialog (see Figure 4)One of the options in the capture settings is to set “promiscuousmode”. Typically, network adapters will screen out all trafficthat is not destined for the computer. With this settingWireshark will send a message to your network card telling it to17
Wireshark Quickstart Guidepass through all traffic it sees. Even if you are on a broadcast, orhub-type network, Wireshark may not report traffic from/toother computers if promiscuous mode is not turned on.III)When editingpreferences, saveusing the save button.On some monitors thebutton may be off thebottom of the screen,and you must move thewindow up to find it. Ifyou don’t save you willlose your changes.Comment on Cable ModemsTypically, high-speed cable internet connections are sharedconnections. Theoretically, this means that you should be ableto see the network traffic of your neighbors who have cablemodems when you use Wireshark. The data entering yourpremises may include traffic from your neighbors. However, inmany (most?) cases this neighbor-traffic is not visible insideyour local network. Cable companies typically implementfiltering and even authentication services inside their modemsthat eliminate packets that are not destined for the local system.IV)Problem with Wireless LANs andWindowsWireshark may not be able to report packets on a Windowscomputer using a wireless (802.11 a/b/g) adapter. Onesuggested workaround is to try turning off promiscuous mode.You can find this setting in the Edit menu under the Preferencesmenu choice. Once the resulting dialogue box appears, click onthe “Capture” menu choice on the left side. Clear the check boxso that “Capture packets in promiscuous mode:” is not checked.Click on the “Save” button at the bottom of the screen, andfinally, click on the “OK” button at the bottom of the screen. Onsome monitors the OK button may be off of the bottom of thescreen; your settings will not be saved if you click anotherbutton. Furthermore, your changes will be lost if you close thewindow by clicking on the x in the top right corner of thewindow.As an alternative, Microsoft has a similar free product called“Network Monitor” which can analyze 802.11 packets (free, butnot open source). For more information seehttp://blogs.technet.com/netmon/V)Other Problems and IssuesOther problems and issues may be addressed on the Wiresharkweb site. Some interesting references include:18
Wireshark Quickstart Guide lhttp://wiki.Wireshark.com/19
Wireshark Quickstart GuideAppendix 2: Filters in WiresharkWireshark can filter results so that you only see certain packets.An example of a filter condition would be to only rememberpackets sent to/from a specific IP address.Wireshark uses two types of filters, capture filters and displayfilters. Capture filters are used to decide which packets shouldbe kept. Only packets that meet filter criteria will be kept.Display filters work after the capture is completed. They restrictwhich packets are shown, but they don’t actually discard anyinformation. Capture filters would be more useful on very busynetworks when you need to limit the amount of data yourmachine needs to process. On the other hand, display filtersdon’t actually save any memory; display filters let youtemporarily focus an analysis without losing any underlyinginformation.Capture filters can be set in two different places. Go to theCapture menu and select “Options” and you will find a selectionfor capture filters. Alternatively, Go to the Capture menu andselect “Capture Filters”. From the “Capture Filters” dialog boxyou will see a help menu that will explain how the functionworks.Display filters can be entered at the top of the display screen.Figure 11 below shows a display filter entered into the displayfilter dialog box at the top of the screen.Even if you have neverentered a filter, somecommandsautomatically enterfilters for you – forexample the “FollowTCP Stream”command. If you finddata is missing, makesure that t
Wireshark Quickstart Guide 6 Figure 3: Preferences Dialog Note: The apply button may be hidden. On many di