Transcription
61-Key Electronic KeyboardINSTRUCTION MANUAL4219634
Congratulations!Congratulations on your purchase of the Nexxtech Electronic Keyboard! This electronic keyboard is a high quality with upto 128 voices, 100 styles and 100 songs. Before you use this keyboard, we recommend that you carefully read throughthis manual. Please keep the instruction manual for future reference.Care of Your KeyboardYour keyboard will remain in good condition if you follow these simple guidelines:Electrical InterferenceLocation Do not expose the unit to the following conditions inorder to avoid deformation, discolouration or moreserious damage: Direct sunlight High temperatures (near heat sources or in anenclosed heated area) Excessive humidity Excessive dust Strong vibrationsPower Supply Turn the power switch OFF when the instrument isnot in use.The AC adapter should be unplugged from the ACoutlet if the instrument is not to be used for a longperiod of time.Unplug the AC adapter during storms.Avoid plugging the AC adapter into the same outletas other appliances with high power consumption,such as electric heaters or ovens. Also, avoid usingmulti-plug adaptor since these can result in reducedsound quality, operation errors and possible damage.Turn Power OFF When Making Connections To avoid damage to the instrument and other devicesto which it is connected, turn the power switchesof all related devices OFF prior to connecting ordisconnecting cables.Handling and Transport Never apply excessive force to the controls,connectors or other parts of the instrument.Always unplug cables by gripping the plug firmly, butnot pulling on the cable.Disconnect all cables before moving the instrument.Physical shocks caused by dropping, bumping orplacing heavy objects on the instrument can result inscratches and more serious damage.Cleaning Clean the cabinet and panel with a dry soft cloth.A slightly damp cloth may be used to removestubborn grime and dirt.Never use cleaners such as alcohol or thinner.Avoid placing vinyl object on top of the unit (vinyl canstick to and discolor the surface).2This instrument contains digital circuitry and maycause interference if placed too close to radioor television receivers. If this occurs, move theinstrument further away from the affected equipment.
The FCC Wants You to KnowModifications not authorized by the manufacturer may void users authority to operate this device.Note: This equipment has been tested and found to comply with the limits for a Class B digital device, pursuant to Part 15of the FCC Rules. These limits are designed to provide reasonable protection against harmful interference in a residentialinstallation. This equipment generates, uses and can radiate radio frequency energy and, if not installed and used inaccordance with the instructions, may cause harmful interference to radio communications.However, there is no guarantee that interference will not occur in a particular installation. If this equipment does causeharmful interference to radio or television reception, which can be determined by turning the equipment off and on, theuser is encouraged to try to correct the interference by one or more of the following measures: Reorient or relocate the receiving antenna. Increase the separation between the equipment and receiver. Connect the equipment into an outlet on a circuit different from that to which the receiver is connected. Consult the dealer or an experienced radio/TV technician for help.Circuit City Global Sourcing, Ltd.CAUTION: DO NOT ALLOW THE PRODUCT TO BE EXPOSED TORAIN OR MOISTURE. USE ONLY WITH SPECIFIED ADAPTER ORCABLE.This device complies with Part 15 of the FCC Rules. Operation issubject to the following two conditions:(1) This device may not cause harmful interference, and(2) This device must accept any interference received,including interference that may cause undesired operations.This Class B digital apparatus complies with Canadian ICES-003.3
Main Features 61 keys touch keyboard, 16 velocity level, TOUCH ON/OFF Multi-functional LCD which can display the keyboard and staff 128 realistic voices (including 123 PCM voices, 4 Chinese voices and one drum kit) 100 auto accompanying styles 100 songs 3 lesson modes Auto Chord Bass ON/OFF Record and playback 5 memory spaces 16 levels of ACCOMP VOLUME SYNC, START/STOP, FILL IN/VARIATION, FILL IN/NORMAL and INTRO/EDITING controls for different styles. CHORD DICTIONARY for beginners. Others: Piano, Sustain 16-channel for MIDI OUT4
ContentsGeneral Guide .51. Front Panel .52. Rear Panel Jack .53. LCD Display.5Power Supply .6Connections .7- Headphone Jack.7- AUX OUT Jack .7- MIDI OUT .7Play Demo Songs .8Play Songs .9Lessons . 9-10- Start Lesson . 10- Lesson 1 . 10- Lesson 2 . 10- Lesson 3 . 10Selecting and Playing a Voice .11Voices and Effects . 12-13- Piano Voice. 12- Transpose . 12- Sustain Voice . 12- Touch . 13Selecting a Style . 13-14Playing a Style . 14-16- Playing a Selected Style . 14-15- Set the Tempo . 15- Style Control . 15-16- Accomp. Volume. 16Memory . 16One Touch Settings . 17Function Select . 17-18- Transpose . 18- Beat . 18- MIDI Channel. 18- Effect . 18Metronome . 19Record and Playback . 19-20- Record . 19-20- Playback . 20Chord Dictionary . 20-21MIDI. 21- What is MIDI? . 21- MIDI OUT . 21Specifications . 22Appendix 1 - Voice List . 23Appendix 2 - Style List . 24Appendix 3 - Song List . 25Appendix 4 - DEMO List . 26Appendix 5 - MIDI Implementation Chart . 26Appendix 6 - Chord Table . 26Warranty. 275
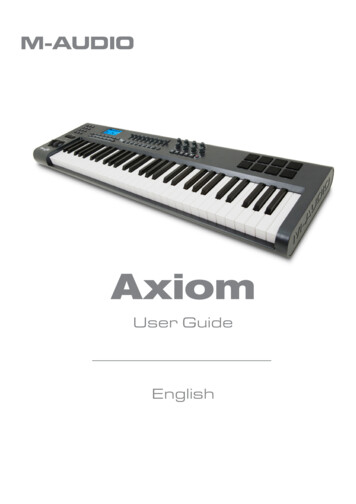
General Guide1. FRONT PANEL1) POWER SWITCH2) MASTER VOLUME3) ACCOMP VOLUME2. REAR PANEL4) TEMPO5) CHORD DIRECTORY1) MIDI OUT port6) AUTO BASS CHORD2) AUX. OUT jack7) LESSON3) PHONES jack8) STORE/M1-M54) DC 9-12V jack9) O.T.S.10) START/STOP11) SYNC12) INTRO/EDITING13) FILL-IN A14) FILL-IN B15) PIANO16) METRONOME17) SUSTAIN3. LCD DISPLAY18) TOUCH19) DEMO1) A.B.C.10) TEMPO/COUNT20) RECORD2) LESSON 111) VOICE NUMBER21) PLAY/STOP3) LESSON 212) CHORD22) FUNCTION4) LESSON 313) TREBLE CLEF23) VOICE5) VOICE14) BASS CLEF24) STYLE6) STYLE15) O.T.S.25) SONG7) SONG16) M1-M526) NUMERIC KEYPAD8) RECORD27) LCD DISPLAY9) BEAT6
Power SupplyThis electronic keyboard can be powered by a current from astandard household wall outlet (using the specified AC adapter) orby batteries.Using the AC AdapterMake sure that only the specified AC adapter for this electronickeyboard is used. The adapter shall be 12V DC output, 800mA,and centre positive type. Make sure to turn off the electronickeyboard before you connect the adapter into the AC wall outletand the cord into the unit.CAUTIONS! Use only the specified AC adapter. Use of another type ofadapter creates a danger of fire and electrical shockFor safety’s sake, make sure to unplug the AC adapterfrom the wall outlet whenever leaving the electronickeyboard unattended for a long time. Using BatteriesAlways make sure to turn the keyboard off before inserting newbatteries or replacing old ones.To insert new batteries:1. Open the battery compartment underneath the keyboard.2. Insert 6 D size (SUM-1, R-20) batteries into the batterycompartment, noting the correct polarity.3. Replace the compartment cover and make sure it locks firmlyin place.Low battery indications:Any of the following symptoms may indicate low battery power.Replace batteries as soon as possible whenever any of thefollowing occurs: A dim and difficult to read LCD display. Abnormally low speaker/headphone volume. Distortion on the sound output. Sudden power failure when playing at a high volume. Abnormal playing of the rhythms or demo songs. Dimming of the display when playing at a high volume.CAUTIONS! When inserting batteries, make sure to follow the polaritymarkings.Never use batteries of different types.Never mix old batteries with new ones.Replace the batteries as soon as possible after any signof discharge.Always remove the batteries from the keyboard’sbatteries compartment when the keyboard is notexpected to be used for a long period of time. 7
ConnectionsThe Headphone JackIf you prefer to play with headphones for high quality personalmonitoring, plug a stereo headphone set into the rear panelPHONES jack.Plugging a set of headphones into the PHONES jack will shut offthe speakers automatically.The AUX OUT JackThe AUX OUT jack delivers the output of the keyboard forconnection to an external amplifier.Using an audio cord, plug it into the AUX OUT jack located on therear panel. Then plug the other end of the cord into LINE IN or AUXIN of the amplifier.The MIDI OUT JackThe MIDI IN connector receivers MIDI data from an external MIDIdevice. The MIDI OUT connector transmit MIDI data generated bythe electronic keyboard to an external MIDI device.DEFINITION: MIDI (Musical Instrument Digital Interface) is a world-standarddigital communications interface/language that allows multipleelectronic instruments, computers, and other related devices tocommunicate with each other within a connection.WARNINGTo avoid damage to the instrument and other devicesto which it is connected, turn the power switches of thiskeyboard and all related devices OFF when you want toplug in or unplug between this instrument and all relateddevices.8
Play Demo SongsTurn the Power On and Adjust the VolumePO WE ROF FON1. Connect the DC power correctly and then press [POWER] to turn it on.2. Adjust the volume to an appropriate level by turning the [MASTER VOLUME] switch.MAST ER V OL UMEMINMA XPlaying a Demo SongA selection of 6 demo songs are built-in for your listeningpleasure or for fun.This will give you a good idea of what your keyboard can do.1. Press the [DEMO] button at any time to enter demo mode.All 6 demos will play from the first in the sequence. At thistime the LCD displays d-xx.2. You can use the [0-9] or the (-/OFF)/( /ON) button to selecta demo song. When a song is selected, the song number ofthe selected song will flash for 3 seconds before the demosong starts.3. To stop the demo song, press the [DEMO] button again orsimply press the [START/STOP] button.NOTE: All the keys are inactive in this mode except forthe [DEMO], [START/STOP], [TEMPO] and [0-9]number keys. The keyboard in inactive as well.9
Play SongsA selection of 100 songs are built-in for your listeningpleasure or for fun.You can use the Melody Off function to turn off the melodyof the song and learn to play by following the signals onthe display.1. Press the [SONG] button during the voice, style,piano, dictionary, etc. modes. All 100 songs will playfrom the current song in sequence. At this time, theSong indicator on the LCD will light up, and the LCDdisplays the song number s-xx.2. You can use the [0-9] or the (-/OFF)/( /ON) buttonsto select a song. When a song is selected, the songnumber of the selected song will flash for 3 secondsbefore the song starts.3. If you want to listen to a specific song, press the[START/STOP] button to start the song in song mode.The song will play repeatedly. At this time the keyboard isinactive. Press [START/STOP] again to stop the song.NOTE: All the keys are inactive in this mode exceptfor the [DEMO], [START/STOP], [TEMPO]and [0-9] number keys. The keyboardin inactive as well, except for pressing[LESSON].LessonIn song mode, press the [LESSON] to enter thelesson mode. Three lesson modes (LESSON 1, 2,3) are provided for users to learn, grading the user’sperformance when complete.10
Start LessonIn song mode, press the [LESSON] button to choose toenter one of the three lesson modes or to exit the lessonmode in a loop. Press the [START/STOP] button to startor stop the lesson.If you play the wrong notes or miss one, the score willdecrease.LESSON 1 (One key)The melody notes are displayed on the LCD. If you pressany keys when there is a note in the song, the notewill sound out correctly no matter what keys you havepressed.LESSON 2 (Waiting)The song will not sound until you play the right notes.LESSON 3 (Melody off)The song will be playing and the melody is off. You shouldplay the notes correctly at the proper time.GradeLESSON 1, LESSON 2 and LESSON 3 all have thegrading function. During the lesson mode, the LCD willdisplay your score and tell you what level you are at.There are four levels:Level One:80-100excellentLevel Two60-79very goodLevel Three 30-59goodLevel Fourbelow 30okAfter the results are given by the keyboard, the song playsagain and remains in Lesson mode.11
Selecting and Playing a VoiceThe keyboard has 128 voices that you can select andplay on the keyboard. Before you select a voice, makesure you have selected VOICE mode. Press the [VOICE]button to select the VOICE mode.The [-/OFF] and [ /ON] ButtonsWhen the VOICE mode is selected, these buttons step upor down trough the voice list. Press these buttons brieflyto step to the next voice in the corresponding direction, orhold the button to scroll rapidly through the voices in thecorresponding direction.The selected voice number shows on the display.The Number ButtonsThe number buttons can be used to directly enter thenumber of the desired voice, thereby immediatelyselecting the voice without having to step through anumber of other voices.1. When selecting a voice 01-99, you can directly usethe number keys [0-9] to input the voice number.2. To select a voice 100-128, press the number key[1] and hold it for a few seconds. The LCD will thendisplay 1 which indicates one-hundred. After that, usethe number keys to input 00-28 for voices 100-128.12
Voices and EffectsPiano Voice1. Press [PIANO] to set the entire keyboard to Pianomode. The LCD displays PIANO and the voice ischanged to piano immediately.2. The piano mode does not function when the styleis playing. Press [PIANO] again or [FUNCTION],[DEMO] [VOICE], [O.T.S.], [PLAY/STOP], [SONG],[STYLE], [RECORD] and the memory keys will makethe keyboard exit PIANO mode. The LCD and thevoice will go back to the previous settings.3. If you don’t use the [PIANO] to exit, the voice willremain as the piano voice.TransposePress [FUNCTION], and the LCD will display: XPS 00.Use the [ ] or [-] to shift the pitch in intervals of 6 semitones.Sustain Voice1. After powering on, the Sustain function isautomatically set to off.2. Press the [SUSTAIN] button to shift the SUSTAIN ON/OFF status and the SUSTAIN indicator on the LCDwill light on or off in this mode.13
TouchThere are 16 velocity levels. After powering on, the Touchfunction is automatically set to ON.1. Press the [TOUCH] button and the LCD displays TCON.2. Press the [TOUCH] button again and the LCDdisplays TC OFF.Selecting a StyleThe keyboard has 100 different Auto-Accompanimentstyles that can be used to provide fully-orchestratedaccompaniment. The sophisticated Auto-Accompanimentsystem can provide automated bass and chord backingthat is perfectly matched to the selected accompanimentstyle.1. After powering on, the style is automatically set tonumber one. When you press [STYLE] button, youcan use [ ]/[-] or the number keys to select thedesired style.2. When selecting styles 01-99, you can directly use thenumber keys [0-9] to input the voice number.14
3. To select a style above 100, you can press thenumber key [1] and hold it for a few seconds.4. When a style is playing, you can select a new style atany time. The number of the new style will display onthe LCD immediately. If the style changes at beat one,the new style will play at once; if the style changes atany other beat, the new style will start playing fromthe next measure. The new style will play with the oldtempo.Playing a StylePlaying a Selected Style1. Start a stylePress [START/STOP] button, and the drum part of thestyle will play at once. When the ABC is on, you canhear the drum part as well as the bass and chord afteryou play a chord.2. Sync startPress [SYNC] button and the beat indicator will flashat the speed of the current tempo. You can startplaying the song by tapping any keys on the keyboardwhen the ABC is off.You can only start the style with the chord and bassby tapping a chord in the chord range of the keyboardwhen ABC is on.15
3. Press the [INTRO/ENDING] before selecting astyle:The style will enter NORMAL or VARIATION afterplaying an intro. You can insert a fill in and enter twodifferent status’: NORMAL and VARIATION by using[FILL-IN A] and [FILL-IN B] respectively.You can also use the [INTRO/ENDING] to stop thestyle when the style is playing at end.4. Stop a style:Press [START/STOP] to stop the playing style.Set the tempoPress [TEMPO ] and [TEMPO-] buttons to change thestyle tempo. (Ranging from 30-280).When style stops, the tempo will change with the styleautomatically to the default tempo.When style is playing, the tempo will not change with thestyle.At this time, pressing both [TEMPO ] and [TEMPO-]simultaneously will change the tempo to change the style’sdefault tempo value.Style control1. INTRO:To start an intro, you can press [START/STOP] or[SYNC], and then press [INTRO/ENDING].If you press a valid chord, you will hear an intro whichleads you into the main style. An indicator of eitherNOR or VAR will flash on the LCD while the intro isplaying.2. FILL-IN A:When the style is playing, you can press [FILL-IN A]to enter normal status. When Fill-In is playing, theindicator NOR will be flashing on the LCD.16
3. FILL-IN B:When the style is playing, you can press [FILL-IN B]to enter the variation status.When Fill-In is playing, the indicator VAR on the LCDis flashing4. ENDING:When the style is playing, you can press [INTRO/ENDING] to play an ending. Normally the style endswith the ending.You can use the [FILL-IN A][FILL-IN B] to make thestyle go back to the normal or variation status.The indicator NOR or VAR on the LCD will flash whenan ending is playing.Accomp Volume1. Press [ACC.VOL ]/[ACC.VOL-] button to change thestyle volume.The LCD will display: ACP XX. The range is from 0 to15. These buttons are inactive during SONG mode.2. Press both [ACC.VOL ] and [ACC.VOL-] at thesame time, it will set the accompaniment volume backto default level 12.Memory1.There are 5 memory spaces in the keyboard.2. Press [STORE], hold and then press [M1] or [M2M5] and you can store voice, style, tempo, accomp.volume, sustain, touch and functions to [M1] (or[M2-M5]) to memory. You can easily recall them bypressing the button once during the performance.NOTE: The memory data will change to its defaultpowering off.17
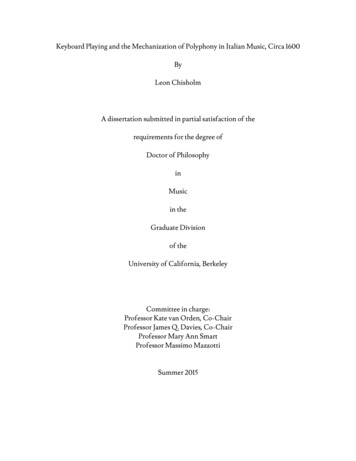
One Touch SettingsUsing the O.T.S. buttons to select the desired voices to thematch the style. Each style has 4 sets of O.T.S. Settings.Press the [O.T.S.] button to change to O.T.S. setting. Theindicators O.T.S. and M1 both light up on the LCD.[M1] and [M2] are used for normal.[M3] and [M4] are used for variation.[M5] is not used here.Press [O.T.S.] again to exit the O.T.S. mode. Now the[M1-M5] spaces are used as memory registers again.NOTE: You can only use the memory in O.T.S. mode.Function SelectFunction Parameters18ContentsLCD Display RangeDefaultTRANSPOSEXPS 00-6- 60BEATMET 0400, 02-0904MIDICHA 0101-1601EFFECTEFF ONON/OFFOFF
Accomp VolumePress the [FUNCTION] button and the LCD displays XPS00, then use the [ ]/[-] to change the transpose value from-6 to 6.BeatPress the [FUNCTION] button two times and the LCDdisplays: MET 04, then use the [ ]/[-] to change the metrobeat 0, 2, 3, 4, 5, 6, 7, 8, 9.MIDI ChannelPress the [FUNCTION] button three times and the LCDdisplays: CHA XX, then use the [ ]/[-]to change the MIDIout channel ranging from 01 to 16.EffectPress the [FUNCTION] button four times and the LCDdisplays: EFF OFF, then use the [ ]/[-] to change theeffect to on or off.19
MetronomePress the [METRO] button, the metronome will workas the current tempo, and the beat dot will flash in timewith the tempo. The tempo can be changed. Press the[METRO] button again to turn the metronome off.The beat count follows a style when a style is playing. Thevalue remains in beat when the style is stopped.The metronome is inactive during SONG and DICT mode.NOTE: When recording, you can turn the metronomeon but it will not be recorded.Record and PlaybackRecord1. Ready Recording:Press the [RECORD] button, and the RECORDindicator on the LCD lights up. Four beat dots willflash together indicating that it is in Ready Recordmode. You can now change the voice style and so onbefore you start recording.2. Start Recording:In Ready Record mode, press [START/STOP] to startthe style and enter recording mode.You can use the [START/STOP] to start or stop thestyle during recording.In Record Ready mode, you can enter the recording modeby pressing the keyboard.When ABC is turned on, you can press the keys on thechord area to start the style directly.(When ABC is off, you can start the style only by the[START/STOP] button.)In Record Ready mode, the [SYNC] button is inactive.20
3. Finish Record:Press [RECORD] button to stop recording.If the recording memory is full, the recording stops automatically and the LCDdisplays: FULL for a few seconds.When style is playing, press the [INTRO/ENDING] button.When ending is over, the recording stops automatically.PlaybackWhen recording stops, press [PLAY/STOP] to playback your recording.Press [PLAY/STOP] again to stop playback.NOTE: The data in the memory will be lost if you turn off the keyboard.You can only record one track and the re-recording operation willreplace the old one.Record and PlaybackYou can use this to learn how to play chords. You can notenter the DICTIONARY mode when metro, song or styleis on.Operation Guide1. Press the [CHORD DICTIONARY] button, and theLCD displays DICT. The default chord is CM.2. Press any keys on chord area or press thecorresponding keys according to the label showingthe chord root and chord type. The LCD will give youthe right keys you should play.21
3. Press the keys according to the LCD. If you play right,the keyboard will give a sound indicator.MIDIWhat is MIDI?MIDI stands for Musical Instrument Digital Interface. MIDIis a worldwide standard that makes it possible for variouselectronic musical instruments and other devices such ascomputers to ‘communicate’.The keyboard is equipped with MIDI OUT terminals, whichare located on the rear panel.MIDI OUTThe keyboard can send out several kinds
accordance with the instructions, may cause harmful interference to radio communications. However, there is no guarantee that interference will not occur in a particular installation. If this equipment does cause harmful interference to radio or television reception, which c