Transcription
nexVortex Setup GuideAT&T SYNAPSEMay 2012510 SPRING STREET HERNDON VA 20170 1 855.639.8888
AT&T Synapse Setup GuideIntroductionThis document is intended only for nexVortex customers and resellers as an aid to setting up theSynapse Small & Medium Business Phone System from AT&T to connect to the nexVortex BusinessGrade SIP Trunking Service. Related Synapse documents include: Synapse Installation Guide i17 or later Synapse Administrator’s Guide i15 or laterYou can view and download these documents from www.telephones.att.com/synapseguides. Further AT&T Synapse information can be found at telephones.att.com/smb or call 1 (888) 916‐2007. In Canada dial 1 (888) 883‐2474. Further help may be obtained by emailing support@nexvortex.com.If you find any errors in this document or have any suggestions, please email us atsupport@nexvortex.com so that we can make updates to this document.Important! Your DNS AddressYour specific DNS address was provided in the Account Set Up email you received the day youopened your account. Your Authentication User ID and password are also in this email. If youneed assistance locating this information, please contact support@nexvortex.com.Note: For all instructions throughout this Guide, you must substitute your DNS address whereverxx.xx.xxx.xxx is referenced.2510 SPRING STREET HERNDON VA 20170 1 855.639.8888Confidential nexVortex, Inc.
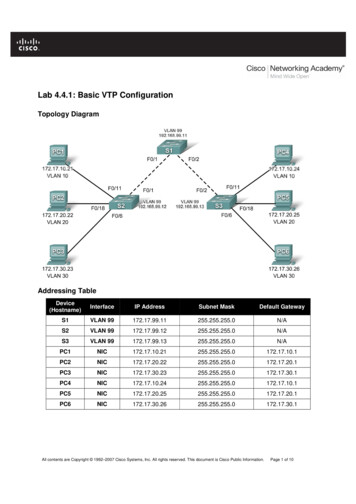
AT&T Synapse Setup GuideSystem and Network Components Required for SIP Trunking ServiceThe necessary components and setup for Synapse using NexVortex SIP Trunking are shown in Figure 1.All Synapse Desksets and Gateways must be running the same software versions (2.2.0 or later).Figure 1 Synapse with SIP TrunkingGeneral network requirementsRouterTo provide NAT traversal, use a SIP ALG (Application Gateway Layer)‐capable router.Two ALG‐capable routers have been tested for use with the Synapse SIP Gateway.1. Cisco RV180 SW V1.0.0.30 or later with ALG enabled. Note: Enable SIP ALG on the router before youconnect the SIP Gateway to the network.2. Cisco 1921 (ISR) SW V15.0 or later with ALG enabled. Please consult your IT engineer and make surethat SIP ALG is enabled.Internet ConnectionIt is recommended to order Static IPs from your Internet provider.Ensure that your Internet connection has sufficient bandwidth to handle your projected VOIP call traffic.In general, each simultaneous call requires 100 kb/s on the uplink.3510 SPRING STREET HERNDON VA 20170 1 855.639.8888Confidential nexVortex, Inc.
AT&T Synapse Setup GuideConfigurationThis section describes how to configure the SIP Gateway Account Settings to support nexVortex SIPTrunking.Software Version CompatibilitySynapse systems with software versions 2.2.0 and later support the features described in this guide. AllGateways and Desksets must have the same software versions installed. To determine the software version of the SB67070 SIP Gateway from the device front panel, pressSELECT, SELECT, and then DOWN. The software version appears. To determine the SB67020 Deskset software version, press MENU, then 4, and then to display thesoftware version. To determine the SB67030/031 Deskset software version, press MENU, then 4. See the P Firmwareversion.To determine the software version of all installed devices, log in as administrator (see Logging In toSynapse as Administrator on page 5), then click Detailed Site Information to see the software versionsand other information. There may be a delay as the system gathers this information.4510 SPRING STREET HERNDON VA 20170 1 855.639.8888Confidential nexVortex, Inc.
AT&T Synapse Setup GuideTo update device software, see “Updating Devices” in the Synapse Administrator’s Guide, available atwww.telephones.att.com/synapseguides.Logging In to Synapse as AdministratorThe Synapse WebUI allows you to configure the SIP Gateway for nexVortex SIP Trunking.To access the Synapse WebUI and log in:1. Connect your computer to the same IP subnet as the Synapse system, or ensure that devices ondifferent subnets are able to communicate. For example, you can connect your computer to the PCport on the back of a Deskset.2. On the Deskset, press MENU then 4. The Deskset Information screen appears.3. Find the IP address on the Deskset Information screen.4. Open a browser. Depending on your browser, some of the pages presented here may look differentand have different controls.5. Type the Deskset IP Address in the browser address bar and press Enter. The Login page appears.5510 SPRING STREET HERNDON VA 20170 1 855.639.8888Confidential nexVortex, Inc.
AT&T Synapse Setup Guide6. Enter your login credentials. If logging in for the first time, enter admin in the Login Name field and12345 in the Password field, then click Login. You can change your Admin ID and password once youare logged in.7. Click topics from the navigation list on the left side of the WebUI to see them. For your security, theWebUI times out after being idle for 10 minutes, after which you must log in again.Configuring the SIP GatewayTo configure SIP Account Settings:1. In the navigation menu at left, click SIP Gateway Settings. The SIP Account Settings page appears asshown in Figure 2.6510 SPRING STREET HERNDON VA 20170 1 855.639.8888Confidential nexVortex, Inc.
AT&T Synapse Setup GuideFigure 2 nexVortex SIP Account Settings2. Set the Account Type as SIP Trunking.3. Select Create New Account, or select an account to edit. If you have already created an account, aDelete Account button appears on the page. Clicking Delete Account deletes the account and loadsan empty account page.4. Enter the rest of the SIP Account Settings. Refer to the example shown in Figure 2 for the location ofeach setting.7510 SPRING STREET HERNDON VA 20170 1 855.639.8888Confidential nexVortex, Inc.
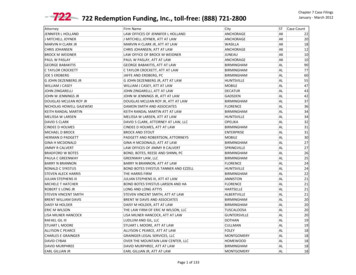
AT&T Synapse Setup GuideBasic SettingsMenu ItemDescriptionRecommendedsettingAccount EnabledEnables or Disables the account. You must enable the account before itcan be used. Disabling the account does not erase the settings associatedwith the account.EnabledAccount NameThe SIP account name appears on the Dial Plan Settings page and theTrunk Reservation page.As desiredMax CallsEnter the number of simultaneous call sessions you purchased. The maximumvalue is 16. Setting the Max Calls to a value that is less than the currentnumber of Trunk Reservations for the SIP Account will generate an error.As purchasedDisplay NameThe Display Name is the text portion of the Caller ID that is displayed foroutgoing calls.As desiredUser NameUser Name as provided by nexVortex. The User Name, also known as theAccount ID, is usually the assigned primary telephone number that nexVortexhas provided to you. Synapse will only accept digits for a User Name.As specified bynexVortexAuth User NameProvided by nexVortex.As specified bynexVortexAuth UserPasswordProvided by nexVortex.As specified bynexVortexRegistration SettingsMenu ItemDescriptionStatic lank(unchecked)Applies to dynamic registration. It is a re‐registration timeout value sent to theSIP Provider. This is usually overridden by a re‐registration interval determinedby the service provider’s response. The default setting is 3600 seconds.60DescriptionRecommendedsettingServer SettingsMenu ItemSIP ServerAddress or URLSIP Server PortAs specified bynexVortexPort 5060, the default setting, is typically used for SIP transmission.50608510 SPRING STREET HERNDON VA 20170 1 855.639.8888Confidential nexVortex, Inc.
AT&T Synapse Setup GuideCodec ConfigurationMenu ItemDescriptionRecommendedsettingDisabled CodecsThe SIP Gateway uses the audio codecs in the order they are listed on aper call basis. You can choose codecs based on the speed versus audioperformance required.G.711aEnabled CodecsG.711u, G.7295. Click Apply to save your changes.The SIP Gateway Registration LED should turn green when the SIP Gateway has successfully registeredto nexVortex SIP Trunking.Configuring the Dial PlanBefore configuring the Dial Plan, see “Dial Plan Settings” in the Synapse System Administrator’s Guidei15 or later available at http://telephones.att.com/synapseguides.To configure Synapse Dial Plan settings:1. In the navigation menu at left, click Dial Plan Settings. The Dial Plan Settings page appears.9510 SPRING STREET HERNDON VA 20170 1 855.639.8888Confidential nexVortex, Inc.
AT&T Synapse Setup Guide2. Set the Default Routing Priority. Ensure that the nexVortex SIP Trunking Account that youconfigured is included in the priority list. You can: exclude a trunk by selecting it, then clicking Remove. You may want to exclude a trunk if it isbeing used for a fax line or a door phone line, for example. move a trunk up or down the priority list by selecting it, then clicking or .3. Set the Call Log/Messages Prefix according to your Dialing Rules. You can enter a maximum of eightdigits using only the characters 0–9, #, *, or P. Leave the field blank if the Dialing Rules do not use anumber for external line access.4. Enter or modify Dialing Rule patterns. For more information, see “About Dialing Rules” in theSynapse System Administrator’s Guide.5. Select a Route for each Dialing Rule pattern as required. The list of routes includes all availabletrunks in the system, as well as the Default Routing Priority. You can route a Dialing Rule pattern touse the SIP Gateway only, or to use the Default Routing Priority.10510 SPRING STREET HERNDON VA 20170 1 855.639.8888Confidential nexVortex, Inc.
AT&T Synapse Setup Guide6. Click Apply to save these settings.Configuring the nexVortex ServiceAfter ordering your nexVortex service and configuring the Synapse system, you must configure numberrouting in your nexVortex account.1. From the nexVortex Account Setup email, obtain the ‘WEBLOGIN UserName’ and log in to yournexVortex account at www.nexvortex.com.2. If you have a static IP address: Click Settings on the left‐hand side and then select Number Routing. The Settings NumberRouting page appears, showing the phone numbers that you ordered from nexVortex. For each phone number, click the check box next to the number, then click the EDIT button. Anumber routing edit window appears. In the Translation box, enter how you want the call presented to the Synapse system (e.g.8015551234 can be presented as 8015551234 or 1234567890 or johnsmith). In the Term Type box, select Static. In the IP Address/Contact box, enter the static IP address you obtained from your Internetservice provider.3. If you have a dynamic IP address, please email support@nexvortex.com11510 SPRING STREET HERNDON VA 20170 1 855.639.8888Confidential nexVortex, Inc.
AT&T Synapse Setup Guide4. Charge up your account by clicking the CHARGEUP button on the top right of the screen. nexVortexis a prepay service and once a positive balance is on your account it will be placed in the ‘Active’state and you can make and receive calls.TroubleshootingNote: For customer service, repair, replacement, or warranty service for Synapse products, visitwww.telephones.att.com/smb or call 1 (888) 916‐2007. In Canada dial 1 (888) 883‐2474.Device LogIf you have trouble with your system and you require customer service, they may need the device log fortroubleshooting purposes. You can generate a device log on the Device Log page.You can also configure a device log prior to generating the log. Your Synapse Product Support specialistmay want to see specific information in the device log. If so, you must configure the device log using aconfiguration file that your Synapse support person provides.To configure the Device Log:1. In the navigation menu at left, click Device Management, then Device Log.2. In the Device Log list, select the desired device.3. Under Configure Device Log, click Browse. and select the Device Log Configuration file.4. Click Configure Device Log. After configuration is complete, you can proceed with generating theDevice Log, as described below.To generate the Device Log:1. In the navigation menu at left, click Device Management, then Device Log. The Device Log pageappears.12510 SPRING STREET HERNDON VA 20170 1 855.639.8888Confidential nexVortex, Inc.
AT&T Synapse Setup Guide2. In the Device Log list, select the desired device and click Save Device Log. It takes a minute for thefile to generate.3. When the file is complete, save the file on your computer.After the download is complete you should provide the file to the installer or customer service.General Troubleshooting TopicsGeneral problems with setup, registration and calls.CauseActionCauses can vary, but several issues can becorrected by restarting the router and theGateway.1. Disconnect the SIP Gateway from the network byunplugging the cable from the Gateway LAN port.2. Power cycle the router and the SIP Gateway.3. Reconnect the LAN cable to the SIP Gateway.SIP Gateway REG LED is RED or SIP Registration status on the WebUI is Unknown.CauseActionIncorrect SIP account settings.Make sure your SIP Account settings are set as per yourSIP service provider’s requirements.On the WebUI SIP Account Settings page, ensure StaticRegistration is not selected.Network connection problems.Make sure you have a reliable Internet connection forthe SIP Gateway.Make sure the SIP service is not down.13510 SPRING STREET HERNDON VA 20170 1 855.639.8888Confidential nexVortex, Inc.
AT&T Synapse Setup GuideSIP Gateway is not working.CauseActionNo power to the Gateway.Check the front panel LEDs on the Gateway:Make sure the Power LED is on. If not, connect power tothe Gateway.Make sure that the SYN/ACT and REGISTRATION LEDsare both on solid GREEN.Incorrect SIP account settings.Make sure your SIP account settings are set as per yourSIP service provider’s requirements.Network connection problems.Make sure the SIP Gateway is synchronized to thesystem. Check the WebUI Detailed System Informationpage.Make sure you have a reliable Internet connection forthe SIP Gateway.Make sure the SIP service is not down.Calls on the SIP Gateway terminate unexpectedly.CauseActionIssues with SIP account settings.Make sure that your SIP account is registered. TheREGISTRATION LED on the SIP Gateway front panelshould be solid GREEN and the Registration Status onthe WebUI SIP Account Settings should show Registered.On the WebUI SIP Account Settings page, ensure StaticRegistration is not selected.Incorrect SIP account settings.Make sure your SIP account settings are set as per yourSIP service provider’s requirements.Network connection problems.Make sure the SIP Gateway is synchronized to the system.Check the WebUI Detailed System Information page.Make sure you have a reliable Internet connection forthe SIP Gateway.Try port forwarding on the router, the port specified forthe SIP Server to the SIP Gateway LAN address.Make sure the SIP service is not down.14510 SPRING STREET HERNDON VA 20170 1 855.639.8888Confidential nexVortex, Inc.
AT&T Synapse Setup GuideCalls on the SIP Gateway have intermittent audio.CauseActionToo many simultaneous calls approaching orexceeding available network bandwidth.Enable G.729 codec, or give G.729 priority over G.711.Increase network bandwidth to allow for the maximumnumber of simultaneous calls you have purchased.Calls on the SIP Gateway have one‐way audio.CauseActionIncorrect LAN configuration.Check your LAN configuration for the Gateway. Werecommend using the IP subnet 192.x.x.x.15510 SPRING STREET HERNDON VA 20170 1 855.639.8888Confidential nexVortex, Inc.
nexVortex Setup Guide. . Cisco RV180 SW V1.0.0.30 or later with ALG enabled. Note: Enable SIP ALG on the router before you connect the SIP Gateway tok.the networ . Click topics from the navigation list on thetlef side of the WebUI to see them. For your security, the WebUI times out after being idle for 10 minutes, after which you must log .