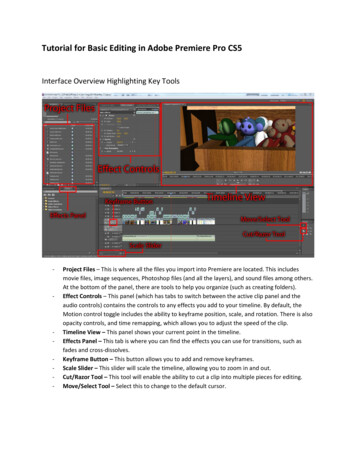
Transcription
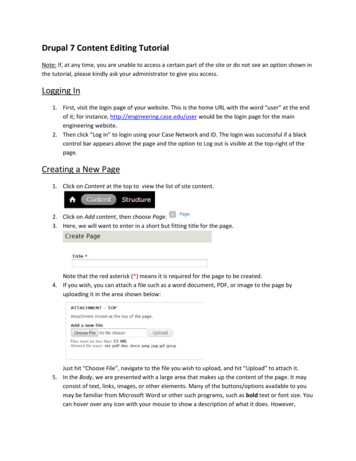
Drupal 7 Content Editing TutorialNote: If, at any time, you are unable to access a certain part of the site or do not see an option shown inthe tutorial, please kindly ask your administrator to give you access.Logging In1. First, visit the login page of your website. This is the home URL with the word “user” at the endof it; for instance, http://engineering.case.edu/user would be the login page for the mainengineering website.2. Then click “Log in” to login using your Case Network and ID. The login was successful if a blackcontrol bar appears above the page and the option to Log out is visible at the top-right of thepage.Creating a New Page1. Click on Content at the top to view the list of site content.2. Click on Add content, then choose Page.3. Here, we will want to enter in a short but fitting title for the page.Note that the red asterisk (*) means it is required for the page to be created.4. If you wish, you can attach a file such as a word document, PDF, or image to the page byuploading it in the area shown below:Just hit “Choose File”, navigate to the file you wish to upload, and hit “Upload” to attach it.5. In the Body, we are presented with a large area that makes up the content of the page. It mayconsist of text, links, images, or other elements. Many of the buttons/options available to youmay be familiar from Microsoft Word or other such programs, such as bold text or font size. Youcan hover over any icon with your mouse to show a description of what it does. However,
inserting links and images into a page can be a bit more complicated, and so these topics will becovered in a later section.6. After scrolling down, you will notice many settings/options available to you. You can click on anysection to bring up the relevant settings. One important setting is the inclusion of your page onthe menu. To add it to the menu, click the checkbox next to “Provide a menu link”.7. You will then need to fill out some basic information about your page. Generally speaking, thelink will go under the main menu, and while weight affects page ordering, it can be difficult toknow which number to put, so it is possible to edit it via the Structure part of the site at a latertime. Here is an example:8. There are other options such as the URL path settings (which allows you to change the URL yourpage is accessed at), revision information (which allows you to essentially create back-ups of thepage; this is only useful for editing pages, however), access permissions and commentingsettings, authoring information, and finally publishing options (if you want your page live,“Published” should be checked).
9. Once you are done changing your pages settings (aside from menu links, they will often be set totheir defaults), hit “Preview” to view your page, or “Save” to finish creating it.Inserting an ImageBegin by clicking the “Image” button, pictured here:.A menu like so should pop-up:There are two ways to add an image. The first is to enter the URL of an image from online. For instance,the Google logo is located at: https://www.google.com/images/srpr/logo4w.png and by entering thatunder “URL”, we can add the image to our website. (However, be wary of copyrighted images whenusing images from online.)The other option is to upload the image from our computer and onto the website. To do this, we mustfirst select “Browse Server”. From here, select “Upload” at the top-left, then select “Choose File”.
You may then navigate to an image file on your computer and double-click it to choose it, then hit theUpload button at the bottom to upload it. Your image should now appear on the right. Double-click thename (or click it once and hit “insert file” at the top) to insert it.Notice that upon entering an image, the Preview box will now show an example of your image beingused in a page. Furthermore, you may now edit the various options given to you.Breakdown of OptionsAlternative text is optional text regarding the image (e.g. a couple-word description or title for theimage).Width and height control the dimensions of the image. You may enter new ones to resize it if you wish.Notice that by default, changing one dimension automatically adjusts the other one: you can stop this byclicking the small lock to the right of the width/height boxes.Entering a number for Border will add a black border to the image. A value of 0 means no border, and avalue of 1 or 2 will place a thin border around the image.HSpace and VSpace control the horizontal and vertical spacing respectively. This is the space betweenthe image and any text around it. This helps separate the text from the image (which simply put, oftenlooks nicer). A value such as 5 or 10 may be appropriate here.Lastly, alignment allows you to control where the image is in relation to the text. Setting it to left willplace the image to the left and the text to the right, assuming there is enough space to fit both. Setting itto right will do the opposite, placing the image to the right and the text to the left. “None” will simplyplace text above and below the image, as opposed to next to it.Example of Image Properties:
When you are done changing image options, hit “OK” to insert your image. If needed, you may rightclick the image in the Body to bring up the option to edit it again.Inserting a LinkA link allows you to create text that someone can click on to take them to another website. To create alink, we may enter the URl directly, or we may enter text first and turn it into a link.The link button is featured on the left below:Click on it to bring up a small menu. To link to a page, make the link type “URL”; to link to an e-mail (thatsomeone can click on and send an e-mail to), make the link type “E-mail”. Then simply enter the URL,such as www.case.edu, or the e-mail address, such as abc123@case.edu.Afterwards, hit “OK” to create the link.The alternate way to create a link is to enter text in the Body and highlight it. Then click the link buttononce more (pictured above) and enter the URL or e-mail address. This will turn the text into a clickablelink just like before.Editing a PageOnce you have created the page, you may wish to edit it. To do this, navigate to the page either usingthe menu on the left or by going clicking on Content at the top and clicking on the name of the page inthe list of pages below.Once you are on the page you wish to edit, you should see the option to View or Edit the page at thetop.
Simply click “Edit” to be brought back to the same page editor you used to create the page. Be sure tohit “Save” at the bottom to save your changes when you are done.
Drupal 7 Content Editing Tutorial . Note: If, at any time, you are unable to access a certain part of the site or do not see an option shown in the tutorial, please kindly ask your administrator to give you access. Logging In . 1. First, visit the login page of your website. This is