Transcription
Manual for Manufacturing MetalSilos for Grain StorageSwiss Agency for Development andCo-operation / SDCSecond Edition; November 2008
POSTHARVEST AMERICAArtisan’s Name:This manual is the result of 30 yearsof POSTCOSECHA experience inmaking metal silos in Central America, Cuba, Perú, Paraguay, Kenya, andother countries where POSTCOSECHA supported activities for grain storage.ElaborationSwiss Agency for Development andCo-operation t.chAuthorsTranslationPostharvest National Programmes inHonduras, Guatemala, Nicaragua andEl Salvador.Margarita CruzPhotographsEdmundo Lobo, René Galdámez, JohannSieber, Pierre LevasseurIllustrations:Katia Lara, Rubén Montoya and RenéGaldámezDesign:René GaldámezFirst edition in SpanishSecond editionThird editionFourth editionFirst edition in EnglishSecond EditionFirst edition in French1985199019911998199920081999500 copies150 copies2,000 copies2,000 copies500 copies500 copies
PrefaceSince 1980 SDC has sponsored the “POSTCOSECHA” postharvest loss reductionProgramme for maize and beans in Central America. With lasting impact: The massivespread of simple metal silos manufactured by local tinsmiths has enabled smallholderfarmers to considerably reduce crop loss and enjoy much greater food security. At thesame time, the activity created rural businesses, which in turn have generated employment.Be it in Honduras or Guatemala, Nicaragua or El Salvador: The silver grey cylindricalsilos sponsored by the SDC’s POSTCOSECHA Programme are dotting the CentralAmerican landscape. POSTCOSECHA, the Spanish term for “post-harvest”, has become the label of the metal silo approach in helping to ensure that agricultural productscan be stored for personal consumption or later sale. Metal silos are easy to handle andcome in various sizes. Any farmer who has a silo on his farm can eat maize or beans allyear round and is free to decide when to bring his surplus harvest to market. POSTCOSECHA introduced and scaled-up massively the new storage technique in four countriesfrom 1980 to 2003. By 2007, there were over half a million silos being used in thesefour countries. Moreover, the silo manufacturing activity is a welcome additional sourceof income for nearly 900 farmer tinsmiths: when they are not working in the fields, theyspend their time producing silos. Farmers in Central America nowadays are able to savean estimated 50,000 tonnes of agricultural products from crop loss each year, whichamounts to about USD 12 million in preserved value.The present manual is the result of a revision of the manuals prepared in 1985 and1991. Neither design nor technical specifications have been changed since 1984, but adigitalization of all manual components was organized in 2008. Practical experience hasmade it possible to improve the technical and didactic contents of the manual, especiallyconcerning the topic of artisans as entrepreneurs. This manual has been developed toserve as accompanying material for a practical course in silo manufacturing under theguidance of an instructor. Adequate selection of artisans is crucial to success. Uponcompletion of the course, artisans can use the manual as a guide and reference work.We hope this manual will also be useful for institutions involved in ensuring food security, as it contains crucial knowledge for building, promotion and marketing of metal silos.Currently SDC is promoting a two-year project which targets and experimentally implements the “POSTCOSECHA” metal silo approach in selected pilot areas and countriesof East and Southern Africa (ESA), drawing on SDC’s highly successful experiences inCentral and South America and the Caribbean and validating its application potentialin ESA. Apart from initiating the program in Africa, the project will provide SDC withconclusive insights on the viability, impact potential and actual scale-out pathway for alonger-term program in ESA.If you have any further questions, please do not hesitate to contact the Head Office ofSDC, through www.postharvest.ch.Bern, Switzerland; November 2008Max Streit
CONTENTSBASICINFORMATIONPORTABLE HEATING APPLIANCEFOR SOLDERINGIRONSSILOUse And Handling of SiloMaterialsToolsPractical Advice5182027Steps for Manufacturing the Portable HeatingAppliance for Soldering IronsPortable Heating Appliance for Soldering IronsCylinderFolded EdgeInterlockingCylinder Bottom and LidSoldering Iron HolderRivetsLugsCharcoal HoldCylinder Lid2829303438404447495254Steps for Manufacturing the SiloSilo Components5859Silo MeasurementsFoldoutCutting Pieces for SilosCylinderFolded EdgesSeed OutletInterlockingBuilding the CylinderSolderingBottom and Lid (540 kg and 800 kg)Bottom (1,360 kg)Lid (1,360 kg)Intake ThroatPlacing and Soldering Cylinder Lid and BottomLid for Intake ThroatNeck for Seed OutletLid for Seed OutletOptional LockFinishing Touches616270717374818491951021041071131171183
CONTENTSADDITIONALINFORMATION4Silo DeliveryManufacture Control and Silo SalesFrequent MistakesSilo RepairsSilo PromotionPostcosecha Metal SheetTraining ProgrammeQuality SealThe Artisan as EntrepreneurThe Artisan as InventorSheet to Calculate Silo Manufacturing Costs120130132134137141143146148152157POSTCOSECHA AMERICA
BASIC INFORMATIONSILO USE AND HANDLINGEXPLANATION REGARDING ADEQUATE USEAND HANDLINGAdvice on the Handling of Grain and the Metal SiloDear Artisan .Each Silo Should Carry a PosterMETAL SILOUSE AND HANDLINGIn the following, you will find and explanation for each illustration on the“Metal Silo Use and Handling” poster, intended to guarantee appropriatesilo use and handling.POSTCOSECHA AMERICA5
6POSTCOSECHA AMERICA
POSTCOSECHA AMERICA7
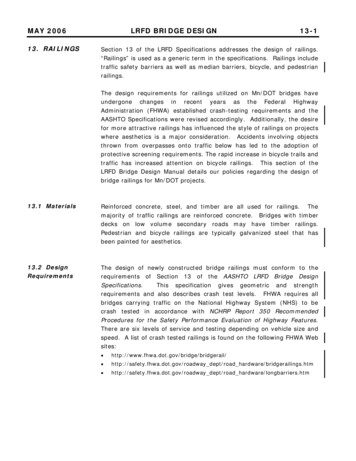
BASIC INFORMATIONSILO USE AND HANDLING1.Drying and Cleaningesydaorm When the grain comes from the field it is ready foropen-air storage but not for the silo. The grain is dry when it makes a prattling soundupon being tossed or is hard to bite. If you believe the grain is thoroughly dried out,leave out under a strong sun for three moredays. Once the grain is completely dry, allow it one morenight for cooling. If you store grain that is not dry enough it will develop fungi, a bad smell, lumps and fermentation,which in extreme cases may even cause the siloitself to burst open and thus be ruined.YES2.Correct Silo Location The silo should be placed under a roof, eitherin the house corridor or inside the houseitself (though not touching the walls). Underno circumstance should the silo be exposedto the sun. The silo should be placed on an even wooden platform so as to avoid contact with theground. The silo should be located in a clean place.8POSTCOSECHA AMERICA
BASIC INFORMATIONSILO USE AND HANDLING3.Wrong Silo Location Protect the silo from the sun and the rain. Place the silo on an even wooden platform. Do not put bags containing fertilisers closeto the silo. They may cause oxidation. Do not put heavy objects on top of the silo.4.Grain Fumigation Once the grain to be stored is inside the silo, fumigate it with phosphine tablets under a numberof trade names (PHOSTOXIN, GASTION, DETIA,QUICKPHOS or CELPHOS tablets) to destroyany insects remaining from the field. To eliminate the insects the number of tabletsshould be the same regardless whether the silois full, half-full or less than half-full.Tablets800 kg800 kg Always put the tablets on the surface of the grain.The tablets should be wrapped in paper or maizehusks. The tablets are toxic. Avoid touching them.POSTCOSECHA AMERICA9
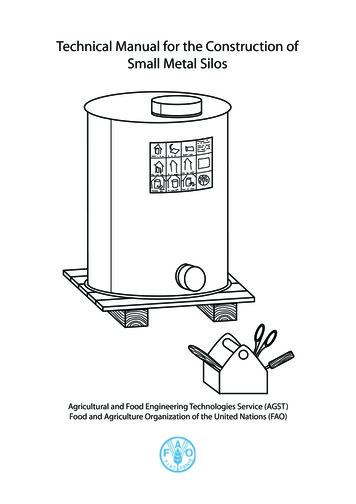
BASIC INFORMATIONSILO USE AND HANDLING5.Incorrect Placement ofTablets Never put the tablets amidst thegrain while filling the silo. Avoid breathing gas fumes from thetablets. They are dangerous to humanhealth. The tablets should be placed on thesurface of the grain wrapped in paperor maize husks. This allows for easylater disposal of the used tablets.Doses of Phosphine Tablets to be Used6tablets1,360 kg4tablets800 kg6. Amount of Tablets The number of tablets to be used for onefumigation depends on the volume capacity of the metal silo and not on the amountof grain in the silo. As a general rule, 1 tablet is used forevery 227 kg of silo holding capacity.3tablets540 kg2tablets360kg1tablet180 kg The tablets should never be broken up.For example, if you fumigate an 800 kgsilo you must use 4 tablets and not 3.6tablets.Use only phosphine tablets10POSTCOSECHA AMERICA
BASIC INFORMATIONSILO USE AND HANDLING7Sealing the Silo All of the materials to be used should be athand before the tablets are placed on the surface of the grain. The silo can be easily and comfortably sealedhermetically with tallow, soft soap, wax, andgrease or by means of a rubber band or tape. Before putting tablets into the silo, seal theseed outlet with its soldered interlocking jointsfacing upward.TalloworRubberBand After putting tablets into the silo, seal the intakethroat with its soldered interlocking joints facing forward.8.RubberBandChecking for Leaks Once tablets have been put on top of thegrain, wait 3 to 5 hours before checking if gasfumes from the tablets are leaking. If there is a leak of gas fumes, there will be asmell like that of garlic.3 to 5 hours later Cover the spot from which gas fumes areescaping with wax or soap, or call in an artisan to make the necessary repairs in case theleak is due to a manufacturing error. Continue to check for leaks on a daily basis.POSTCOSECHA AMERICA11
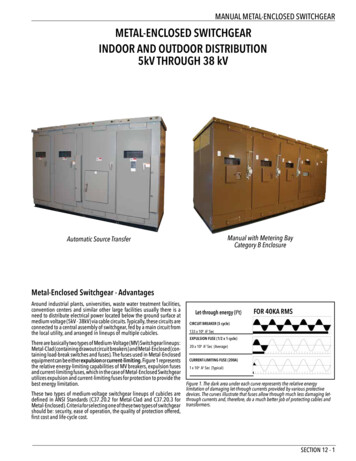
BASIC INFORMATIONSILO USE AND HANDLING9.Fumigation Period For fumigation to be effective the siloshould be hermetically sealed, with noleaks that allow gas fumes to escape.The silo should be kept closed and tightlysealed for 10 days. The grain is ready to be eaten 1 day afterthe fumigation period is over. Keep the intake throat and seed outletclosed in order to prevent new insect infestations.10.Periodical Checking Check the grain both at the intake throat andat the seed outlet every 15 to 30 days.Dry grain withoutlive insects If the grain contains moisture, remove it fromthe silo and expose it to the sun, as shownin drawing 1. If live insects are detected, you will have tofumigate again using the same recommended amount of tablets, based on silo capacity. Remember to seal both lids with tallow,soap, or grease for 10 days.12POSTCOSECHA AMERICA
BASIC INFORMATIONSILO USE AND HANDLING11.Correct EmptyingYES For complete emptying of silo, use a smallwooden hoe.12. Wrong Emptying When there is little grain left, never tilt the siloto pour grain out. The silo may be damaged,dented or its bottom may become detached.POSTCOSECHA AMERICA13
BASIC INFORMATIONSILO USE AND HANDLING13.Silo Care and Maintenance Once completely empty, the silo should becleaned both inside and outside. A slim person can crawl into the silo to cleanthe inside. The immediate surroundings of the silo shouldbe also clean. After several years of silo use some oxidationmay occur. Oxidation spots must be scrubbedwith sandpaper and painted with anticorrosivesilver paint. In case of damage to the silo, call a Postharvest artisan to perform necessary repairs.14. Each Poster Contains theFollowing Information: Name of Postharvest artisan Name of the institution that transfers the silo Date of silo manufacture Silo capacity in kg Number of tablets to be used when fumigating Silo sale price Silo number assigned by the artisanArtisan’s NameName of the InstitutionDate of silo manufactureSiloCapacityAmount of Tabletsfor this SiloSilo PriceNumber of SiloThis information is also recorded in theartisan’s notebook.By following these recommendations you may be certain the storedgrain will maintain its quality for many months and you will feed yourfamily with healthy and nutritious meals.14POSTCOSECHA AMERICA
BASIC INFORMATIONSILO USE AND HANDLINGFor greater security you can put a lock on the seedoutlet.POSTCOSECHA AMERICA15
BASIC INFORMATIONSILO USE AND HANDLINGTo transport the silo on foot: Tie a long poleto each side of the silo,as shown in the drawing.16POSTCOSECHA AMERICA
BASIC INFORMATIONSILO USE AND HANDLINGTo transport the silo by truck:Tie the silo platform (bottom) ora temporary wooden frame (top)down firmly, using 4 ropes attached to the sides of the truckbed, as shown in the drawing.POSTCOSECHA AMERICA 7
BASIC INFORMATIONMATERIALSMaterials to Buy:18POSTCOSECHA AMERICA
BASIC INFORMATIONMATERIALSGALVANISED SHEET A galvanised sheet is a sheet with a molten zinc surface. Tinsmiths prefer to use these sheetsbecause they are easy to work with and are not damaged by gentle tapping with a mallet orhammer. The sheet is 0.5 mm thick, and is known as gauge 26.A 26 gauge good quality sheet should be used:- The zinc covering should not come off when the sheet is being cut or folded.-The surface should be even and smooth, not rough.- The galvanised sheet should not break when folded (as is the case with a non-tempered sheet). Bad galvanisation may produce oxidation of the sheet and lead to leaks. If the galvanisation isdamaged it should be painted over. In Central America, the “Postcosecha” metal sheet is 6 feet long by 3 feet wide or180 cm by 90 cm.TIN BAR Tin for soldering contains 50% tin and 50% lead. You can melt your own lead-tin alloy.ACID Hydrochloric acid can be bought at the chemist’s. One litre is enough for 50 silos. Make sure youdo not spill the acid!PINE RESIN Resin is used to clean and tin the soldering irons. One kilogram of resin is enough for 10 silos.Ammonium salt can be used for the same purpose, but is use should be avoided because it mayaffect your health and damage the soldering irons rapidly.ALUMINUM PAINT Aluminum paint protects the sheet from corrosion and improves silo appearance, which makes itmore presentable for sale. Due to Hydrochloric acid stains all soldering must be painted from theinside and outside. One quarter (1/4) gallon (approximately 1 litre) will be enough for 25 silos of1,360-kg capacity.CHARCOAL Use charcoal to heat the soldering irons. One silo requires approximately 7 kg of charcoal.POSTCOSECHA AMERICA19
BASIC INFORMATIONTOOLSTools to Buy- Tape measure- Square- Two straight soldering-irons- Wire brush- Ball pin hammer- Chisel- Shears- Pliers- Screwdriver- Heating iron or an iron- Paint brush- Wide bender- Narrow bender- Metal plate- 2m Angle- Round beam- Workbench- Piece of square beam203m longCarpenter No. 12.Insertion of the copper point weighs from 500to 800 gramsFour rows500 grams is acceptable1 cm wideNo.12, good quality with sheathedhandles.1cm wide7 mm wideWith a square edge and curved ironsides 20 cm x 10 cm and 2-3 cm thick.2.5 cm wide20-25 mm with a slot exactly 5 mm deep10 mm with a slot exactly 5mm deep3 cm x 40 cm x 0.6 cm square edge2 m x 2”x0.6 cmsquare edge10 cm diameter x 1m longFirm, made of wood, 2.5m long5 cm x 10 cm x 240 cm used for hammering,must be hardwoodPOSTCOSECHA AMERICA
BASIC INFORMATIONTOOLSPOSTCOSECHA AMERICA21
BASIC INFORMATIONTOOLSTools to be Made beforeManufacturing the Silo- Workbench- Mallet- Gage marker- Container for tinning- Small brush- Benders- Portable Heating Appliancefor Soldering IronsThe workshop Make sure you have enough room to work in. Your working place should have a roof. Levelling the Ground:If there is no cemented space, level the ground by- digging,- cleaning it of all stones,- wetting and flattening the ground.22POSTCOSECHA AMERICA
BASIC INFORMATIONTOOLSWorkbench Build yourself a workbench.2.5 m long90 cm wide80 cm high or according to your hip height (seealso p.64) Hold the angle with 3” (8cm) nails or screws. Makesure the nails do not stick out.Correct the Angle: Check visually to make sure that the angle isstraight on both sides of the bench mark. If the angle requires correction, take out any nailwhere the line along the bench is not perfectlystraight and nail it back in while applying pressurefrom the side. If the edge of the bench is still not good enough,you must plane it down until is is perfectly straight,using a carpenter’s plane.NOTE: If the angle is not placed correctly, the folded edges will be of poor quality! Install a round beam or a pipe. Using a couple of strips, fasten a 1m long roundbeam with a 10 cm diameter to the workbench.POSTCOSECHA AMERICA23
BASIC INFORMATIONTOOLSSmall Brush for HydrochloricAcid Cut out a small 2 x 8 cm strip. Shape it into a channel form. Slip in a little bristle at the tip. They should overlap to allow for theintroduction of the bristle. Close the tip firmly. Even the bristles, leaving them 1 cm long.NOTE: 1 cm length is best for applying the acid.24POSTCOSECHA AMERICA
BASIC INFORMATIONTOOLSGAGE MARKERS Take a piece of galvanised sheet and cut the gagemarkers at:- 5mm for folding edges.- 8mm for toothing.- 10mm for marking the slanted angle. Keep correcting if necessary until the measurements are exactly corect.BENDERSYou will need a 10 mm wide bender and a20-25 mm wide bender. Cut an 8-cm strip from a metal plate 6 mm thick. Carefully cut a slot 5mm deep along the length ofthe strip. Use a file to make a diagonal slant onthe wider side of the strip.NOTE: For the bender to be accurate, itshould be made in a workshop thathas a bench vise.MALLET Use a piece of wood at least 1 inch thick (25.4 mm).Make a wide end and a handle as shown in thephoto.POSTCOSECHA AMERICA25
BASIC INFORMATIONTOOLSSheet Scriber Determine the radius of the scriber you need. Cut off a narrow strip, 2 cm longer than theradius. Pierce the strip on one side with a nail.Radius Measure the radius starting from the centre of thepierced hole and score the lenght of the radius andadd 2 mm for the bendet tip. The tip is cut by shears as shown in the photo. Thenit is bent.Container for Tinning The container diameter should be at least 25cm. Use a piece of leftover galvanised sheet and apair of pliers to make a rim for the container.NOTE: Nail the container to a piece of wood toachieve a fixed position.26POSTCOSECHA AMERICA
BASIC INFORMATIONPRACTICAL ADVICEMeasuringCirclesCYLINDER: The body of a silo or portable heatingappliance for soldering irons forms awith a lid and a bottom.CIRCUMFERENCE A circumference is the result of multiplyingthe diameter of a circle by 3.14.DIAMETER The lid and bottom of a cylinder form acircle of a particular diameter.DiameterRADIUS: Half the diameter is a ,which is the distance from the centre ofthe circle to its rim.SCRIBER A scriber is set to the radius desired.A radius multiplied by two gives usthe .POSTCOSECHA AMERICA27
STEPS FOR MAKING A PORTABLE HEATING APPLIANCE FOR SOLDERING IRONS1. Preparing the Metal Sheet to Make the Cylinder2. Making the CYLINDER3. Making the BOTTOM4. Joining the BOTTOM to the cylinder5. Making the SOLDERING IRON HOLDER and attaching it to thecylinder6. Making the LUGS and the HANDLE and attaching them to thecylinder7. Making the CHARCOAL HOLD and placing it inside the cylinder8. Making the CYLINDER LID and joining it to the cylinder.9. FINISHED PORTABLE HEATING APPLIANCE FOR SOLDERINGIRONS28POSTCOSECHA AMERICA
PARTS OF PORTABLE HEATING APPLIANCE FOR SOLDERING IRONSThe Future ArtisanAs a future manufacturer of metal silos you are about to be assigned your first practical task.The Portable heating appliance for soldering ironsThis appliance will allow you to heat the soldering irons.It will also be useful as a toolbox to carry your instruments overlong distances.CYLINDER LIDHANDLELUGSCHARCOALHOLDSOLDERINGIRONS HOLDERCYLINDERAIR VENTSBOTTOMPOSTCOSECHA AMERICA29
PORTABLE HEATING APPLIANCE FOR SOLDERING IRONSTHE CYLINDER1The Cylinder Score a 30cm x 68cm piece of galvanised sheet.2The Cylinder Cut the piece out using shears.Note: Hold the sheet for easy cutting, as shown inthe photo.3Scoring the Folded Edges Use a 5 mm gage marker to score both sides atthe 30 cm length to fold the edges. Mark the corners with another line on both the 68cm length sides, as shown in drawing 1.30POSTCOSECHA AMERICA
PORTABLE HEATING APPLIANCE FOR SOLDERING IRONSTHE CYLINDERCutting the Corners4 Cut the corners with the tip of the shears. Observe that one side is cut so that it is slanted.Scoring an Opening for theSoldering-irons5 Mark a 4 cm line from the edge of the galvanisedsheet, as shown in the drawing. Set the centre of a semicircle by measuring 9.5cm from the edge also. Mark the centre by using a nail and tapping itgently.NOTE: Be sure not to pierce the sheet when tapping the nail!Scoring a Semicircle6 Make a 5.5 cm scriber. Place a nail at the centre and score the semicircle. Be sure the scriber starts and ends at the 4 cmline when scoring the semicircle.NOTE: To avoid mistakes, the nail should fit snuglyinto the hole of the scriber.POSTCOSECHA AMERICA31
PORTABLE HEATING APPLIANCE FOR SOLDERING IRONSTHE CYLINDER7Marking Air Vents Air comes in through the vents, thus keeping thecharcoal burning in the portable heating appliance for soldering irons . This keeps the requiredtemperature steady when heating the solderingirons.8Triangle Template Cut a 7.5 x 5 cm piece of galvanised sheet andtrace a line as shown in the drawing. First cut a template for scribing triangles.9Marking Triangles The cylinder sheet is scribed as shown in the photo(No.7) and drawing (No.8), above.NOTE: The base of the 7.5 cm long template is usedas reference.32POSTCOSECHA AMERICA
PORTABLE HEATING APPLIANCE FOR SOLDERING IRONSTHE CYLINDERCutting out the and Openingfor the Soldering-Irons10 Put the sheet on a square beam or joist. Begin cutting with the chisel. The chisel should be in a slanted rather than vertical position. Finish cutting with the shears.NOTE: The chisel should be sharp.Smoothing out the Rim11 Smooth out the rim with a hammer.Cutting Triangles12 Cut both sides of each triangle with the chisel. Do not smooth out the rims!Note: Further on the triangles will be folded.POSTCOSECHA AMERICA33
PORTABLE HEATING APPLIANCE FOR SOLDERING IRONSTHE FOLDED EDGE131. Fold the edge to a 90degree angle.2. Set the foldededge.14The Folded Edge isMade in Three Steps3. Form a 30 degreeslanted angle.Folding the Edge At each of the 30 cm long sides, fold the edgewith a mallet in such a way that one faces upwardand the other faces downward. Place the sheet in such a way that the 5 mmscore line is over the angle. Fold a section along the right side.Note: Use three fingers of your left hand to holdthe sheet down, as shown in the photo.15Folding the Edge Make a 90 degree fold by delivering heavy blowswith a mallet along the scored line. Press the folded edge tightly against the rightangle.Note: Remember to hold the sheet down with threefingers along the angle and move them forward as you advance with the mallet.34POSTCOSECHA AMERICA
PORTABLE HEATING APPLIANCE FOR SOLDERING IRONSTHE FOLDED EDGESetting the Folded Edgewith the Mallet. Step 116 With the mallet tilted, begin setting the foldededge. Tap along the length, gently and evenly.Note: Tap the mallet in a regular and even manner.Continuing to Set theFolded Edge. Step 217 With the mallet still in a somewhat inclined position, continue to set the folded edge. Again, tap along the length, gently and evenly!Flattening the FoldedEdge. Step 318Folds With the mallet now in a fully horizontal position,tap the folded edge downwards until it nearlytouches the sheet.POSTCOSECHA AMERICA35
PORTABLE HEATING APPLIANCE FOR SOLDERING IRONSTHE FOLDED EDGE19 Checking and Correctingthe Folded Edge. Step 4 The folded edge should be uniformly 5mm wide. Use a gage marker to check for imperfections. Faulty folded edges must be corrected.Note: A folded edge must have no faults whatsoever, otherwise the interlocking folded joints will beweak and the galvanised sheets will come loose.20 Scoring for the SlantedAngle Score along the folded edge using a 1cm gagemarker.21 Forming a Slante 30 DegreeAngle The slanted angle is made with a single heavyblow using the mallet. First form the slanted angle on the right side of thesheet. This will allow the helper to hold the sheetin place. Starting from the left, fold the entire sheet untilyou have completed the slanted angle.36POSTCOSECHA AMERICA
PORTABLE HEATING APPLIANCE FOR SOLDERING IRONSTHE FOLDED EDGEFiling the Screwdriver22 Use a file or a sharpening stone to round off oneof the screwdriver edges. This will make the screwdriver slide along betterwhen opening the folded edge.Opening the Fold23 Slide the screwdriver along the folded edge toopen the fold. Press the screwdriver against the folded edge. Remember to hold the sheet firmly with your lefthand. Keep your left hand behind the screwdriver at alltimes to avoid accidents.Slanted AnglesOpened FoldsPOSTCOSECHA AMERICA37
PORTABLE HEATING APPLIANCE FOR SOLDERING IRONSINTERLOCKING24 Rounding the Sheet Use the round beam to round the sheet. Apply pressure with your hands and slide thesheet around the beam, starting from the edge. The cylinder circle is shaped gradually to avoidcreasing.25 Interlocking Join the sides of the circle and interlock the foldededges firmly together. Slide the cylinder over the round beam. Hammer the right-hand side first. Set the folded edge by hammering steadily fromleft to right.Note: Hammer vertically. Do not strike the sides ofthe folded edge to avoid denting the sheet.26 Securing the InterlockingFolded Joint Secure the interlocking joint with three chiselstitches on each side.Note: This is done because a portable heating appliance for soldering irons has no solderededges.38POSTCOSECHA AMERICA
PORTABLE HEATING APPLIANCE FOR SOLDERING IRONSINTERLOCKINGFolding the Cylinder Edge27 Fold both ends of the cylinder using the squareside of a 5 mm narrow bender. Do not fold the cylinder edge close to the interlocking joint.Evening up the Folded Edgeon Both Ends of the Cylinder28 Holding the cylinder over the angle, make sure theedges are even on both sides of the cylinder. Cut the folded edge with the shears to make iteven at the interlocking joint.POSTCOSECHA AMERICA39
PORTABLE HEATING APPLIANCE FOR SOLDERING IRONSCYLINDER BOTTOM AND LID29Bottom and Lid The portable heating appliance for soldering ironshas a bottom and a lid. The lid has an opening forletting the smoke out.30Rounding the Cylinder Round the cylinder with your hands.31Bottom Diameter Take two cross-measurements. Find the average of the measurements. Add 1 cm for the folded edge.40POSTCOSECHA AMERICA
PORTABLE HEATING APPLIANCE FOR SOLDERING IRONSCYLINDER BOTTOM AND LIDScriber32 Radius of the bottom is cm. Make a scriber of that size.Scoring the Circle33 First score two lines in opposite directions, so thatthey cross each other. Check size with a tape measure. When the measurements are correct, score thecircle. Score the lid using the same measurements.Note: The diameter of the circle must be precise.If you have to repeat scoring, do so on theback of the same sheet.Cutting the Bottomand the Lid34 Check the measurements before cutting. Use the shears to cut the bottom and the lid.POSTCOSECHA AMERICA41
PORTABLE HEATING APPLIANCE FOR SOLDERING IRONSCYLINDER BOTTOM35Bottom Folded Edges The folded edge is made with the 5 mm narrowbender, holding the slanted side inwards.36Placing the Bottom First, put the bottom in place.37Tapping the FoldedEdge Tap the folded edge little by little. Hold the metal plate in an inclined position.Note: Avoid forming corners along the folded edgeby slow an even tapping along the entirecircumference.42POSTCOSECHA AMERICA
PORTABLE HEATING APPLIANCE FOR SOLDERING IRONSCYLINDER BOTTOM38Setting the Folded EdgeLittle by Little Do not set the folded edge too tightly. When the bottom is well in place, put the coalheating iron under the portable heating appliancefor soldering irons. Use the coal heating iron underneath as a support to set the folded edge.39Setting the Bottom Turn the appliance upside down. Place the folded edge over the angle. Set the folded edge with the hammer.Note: Be sure to hammer the folded edge on a hardsurface.POSTCOSECHA AMERICA43
PORTABLE HEATING APPLIANCE FOR SOLDERING IRONSSOLDERING IRON HOLDERS40Soldering Iron Holder A soldering iron holder is attached to the portableheating appliance for soldering irons.414 cmSoldering Iron Holder4 cm4 cm16 cm4 cm18.5 cm4 cm2 cm Cut out a 16 cm x 18.5 cm sheet. Score it as shown in the drawing. Cut the corners at 2 cm x 4 cm.42Straight Cut Make two cuts 4 cm deep, starting from the edge.44POSTCOSECHA AMERICA
PORTABLE HEATING APPLIANCE FOR SOLDERING IRONSSOLDERING IRON HOLDERSFolding the Sides43 Fold the sides of the holder until they form a channel.Holes44 Use a chisel or nail to make holes along the 4 cmcuts.Bending the Lugs45 Bend the lugs as closely as possible to the cylinder.POSTCOSECHA AMERICA45
PORTABLE HEATING APPLIANCE FOR SOLDERING IRONSSOLDERING IRON HOLDERSHOLDERS46Mark the Placement ofthe Holder Incline the holder a little. Mark places for holes on the cylinder. These arefor the holder.47Piercing the Marks Over a wooden beam, pierce the marks with achisel to make the holes.46POSTCOSECHA AMERICA
PORTABLE HEATING APPLIANCE FOR SOLDERING IRONSRIVETSMaking a Rivet10 mm485 mm15 mm Cut two 5 mm x 5 cm strips. Fold the strip in half.Making a Rivet49 Apply pressure with a pair of pliers and hammerthe head of the rivet. Cut the corners off.Placing the Rivet50 Place the rivet with its head on the outside. Rest the cylinder on the angle.POSTCOSECHA AMERICA47
PORTABLE HEATING APPLIANCE FOR SOLDERING IRONSRIVET51Riveting Use pliers to set the sheet. Open the rivet with the screwdriver and hammer itinto place.52Bending the Air Vents Bend all the air vents inwards with the chisel.Note: The triangles support the charcoal hold.48POSTCOSECHA AMERICA
PORTABLE HEATING APPLIANCE FOR SOLDERING IRONSLUGSLugs for the Handle53 Lugs are needed to hold the handle
Check the grain both at the intake throat and at the seed outlet every 15 to 30 days. If the grain contains moisture, remove it from the silo and expose it to the sun, as shown in drawing 1. If live insects are detected, you will have to fumigate again using the same