Transcription
Technical Manual for the Construction ofSmall Metal SilosAgricultural and Food Engineering Technologies Service (AGST)Food and Agriculture Organization of the United Nations (FAO)
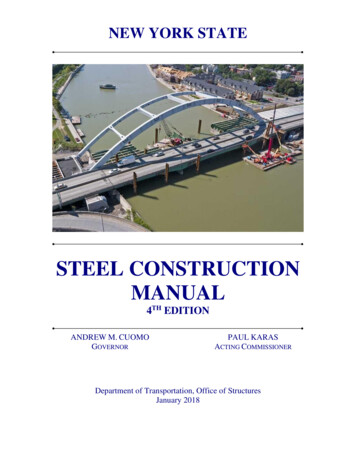
Parts of the SiloParts of the SiloInlet opening and coverTopInstruction sheetBodyPlatformBottom2Outlet opening and cover
AcknowledgementsAcknowledgementsThis document is largely based on previous materials produced by the Swiss Agency forDevelopment and Cooperation (SDC). The structure of some sections has been usedalmost directly. Earlier efforts by those working within the FAO such as A. Arancibia andY. Calvamontes contributed aspects such as the material-use plans for the five regularlysized silos and the basis for some of the illustrations.This revision and simplification has been carried out under the supervision of D Mejíaand F. Mazaud of the FAO.M. Howell, January 20053
4
Things to Think AboutThings to Think AboutFlexibilityWhen you are gathering all the tools and materials you need to build the first silo, you may not find everything on the list. Be resourceful. If you can’t find certain tools, ask the hardware dealer to help you. Maybesomething else will work. Ask other metal workers or jewellers for advice about alternative sources forsolder, cleaners and fluxes.The thickness of the steel sheets can be changed slightly. Remember that thicker sheets will be more difficult to cut with the shears and much thinner sheets will not be strong enough for large silos. Don’t usesheets less than 0.4 mm. The ratio of tin to lead in the solder is also flexible. 50% / 50 % is the best but 35%tin / 65% lead is also acceptable.Copper soldering irons heated in charcoal are reliable, low-cost tools which can be made and used in almost any community. In some areas, propane gas cylinders may be available and inexpensive. In that case,gas soldering torches can be used and may actually be more valuable for doing other kinds of metalwork.SafetySome of the materials can be hazardous to your health. The acid and the flux should be used carefully.These materials can also damage your tools and the silo if they are not used properly. The solder used tomake the silo contains lead.Precautions for you and your family against lead exposure.Do not breathe the vapours while soldering. Have good ventilation in the workshop.Do not eat, drink or smoke until you have washed your hands.Do not allow children into the work area.Wet the floor when you sweep to reduce dust.Save the solder drops in a bucket to return to the metal recycler.Wear over-clothes and leave them in the workshop or remove them before you go into the house.Never dump or bury lead near homes, water or agricultural land.The cut edges of the metal pieces are very sharp. Wear gloves and shoes and sweep the scraps off thebench and floor with a brush.Protect eyes with glasses or goggles especially when using the acid. Always have in the shop clean waterand something to neutralise the acid such as sodium bicarbonate (baking soda) or calcium carbonate. Donot use the acid directly from the one litre bottle. It will be expensive and dangerous if it spills. Use a smallglass jar, 50-100 ml, with a lid or stopper. Clearly mark the jar “ACID” and keep it in a safe place.5
Things to Think AboutStory SticksA story stick is very useful for keeping track of the measurements for each size of silo. It is especially helpfulwith the larger pieces which would require large patterns. It is a piece of wood with labeled markings thathelp you set your compass and mark large pieces without using your tape measure every time. This canhelp reduce measuring mistakes.Outlet openingCentreOutlet coverInlet openingInlet coverTop and bottom250 kg silo (radius)Using a story stick to set the compass for marking the hole for the inlet opening.Inlet stripZero250 kg silo (lengths)Outlet stripUsing a story stick to mark the length of the inlet strip.6Inlet stripBody sheet
Things to Think AboutPatternsThink about making patterns for some of the smaller pieces of the silo. This can save time when drawingon the sheets before cutting. You can use wood, plastic, cardboard, heavy paper or scrap metal. Make thepatterns carefully. Label them clearly. Write the name of the piece and the size of the silo. Keep patterns foreach size of silo together.Outlet coverA pattern for marking the size of theoutlet opening holeCentreRelief cutA metal pattern for marking the reliefcut at each corner of the body sheets250 kg silo (top and bottom)A metal pattern for drawing large circles if no large compass can be foundWaste and RecyclingSweep your workspace often and save the extra metal. Put the small pieces in a bucket. Maybe you cansell them to the metal recycler. Put aside any large scraps for yourself. You can use them to make repairs todamaged silos. You can use them to make other small projects or try to sell them to another metalworker.Improve the WorkshopSome simple improvements to your workshop may help you work faster and more comfortably. For example, if you are going to build many silos then maybe you will buy many sheets of metal at one time. You canbuild a rack to store the sheets so they don’t get in your way or become damaged.7
8
Supplies and EquipmentSupplies and EquipmentHere is a list of all of the things that you need to build a silo. You also need a place to work and a bench towork on. The following pages show what everything looks like.ToolsCommon toolsMost of these tools can be found at the hardware dealer.One square, 25 cm or moreOne tape measure, at least 3 m with a hook at the zero pointOne pair of pliers, 1 cm wideOne hammer with flat face, 300-400 gOne metal working chisel, 1.5 cm wideOne pair of metal cutting shears, Number12. These must be good quality.One wire brushOne small acid brushOne large, flat screw driverOne paint brush, about 5 cm wideTwo small clamps, minimum opening 6 cmTwo or three soldering irons with copper heads, 500-750 gOne small charcoal heater for the soldering ironsA pair of gloves and a brush to sweep away small scraps to protect your hands.Some kind of glasses, goggles or visor to protect your eyes.Special toolsA carpenter or metal worker can make some of these tools. You can make some of the tools yourself.One large compass or set of trammels able to open 65 cmA smaller compass for drawing the small circles will be useful, too.One wooden malletOne bending toolOne counterblowOne marking gaugeOne simple box to hold all of the small tools.MaterialsGalvanised steel sheets, 0.5 mm (26 gauge). The number needed depends on the silo you plan to build.Solder, the best is 50%lead/ 50%tinHydrochloric or muriatic acid 10% ConcentrationFlux such as rosin or sal ammoniac (ammonium chloride)Paint, never use lead based paint!Soap powder and ragsCharcoal9
Supplies and Equipment Common ToolsCommon ToolsMost of these tools can be found at the hardware dealer.PencilOne square, 25 cm ormoreOne tape measure, atleast 3 m with a hook1One hammer with flat face,300-400 gOne metal-working chisel, 1.5 cm wide23One pair of pliers, 1 cm wideOne wire brushTwo or three soldering irons with copper heads, 500-750 gOne pair of metal-cutting shears. These must be good quality!103m
Supplies and Equipment Common ToolsOne paint brush, about 5 cm wideTwo small clamps, minimum opening 6 cmOne small acid brushOne large, flat screwdriverOne simple tool box to hold all of the smalltools.One small heater for the soldering irons, eitherfor gas or charcoalOne brush to sweep awaysmall scrapsOne pair of gloves to protect your hands.Some kind of glasses or goggles to protectyour eyes.11
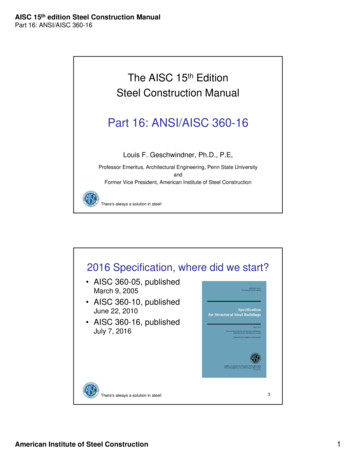
Supplies and Equipment Special ToolsSpecial ToolsA carpenter or metal worker can make some of these tools. You can make some of the tools yourself.One counterblowThis is a heavy piece of metal, about 500g. It could be something like an old castiron clothes iron or an old sledge hammer head.One marking gauge.The measurements must be accurate.One large compass able to open 65 cm.A small compass will be useful, too.One wooden malletUse a piece of scrap wood, about 5 cm x 10 cm x 30cm. Make a 10 cm handle at one end.8 mm5 mm10 mm12 mmOne spacer pieceThis is a piece of the same metal used formaking the silo. Fold one edge over.One bending toolThis is a small piece of metal bar, about 2 cm wide,0.5 cm thick and 5-10 cm long. It has a cut in eachend. The cuts must be 8 mm deep. This measurement is important.2 cm1 cm10 cm8 mm128 mm
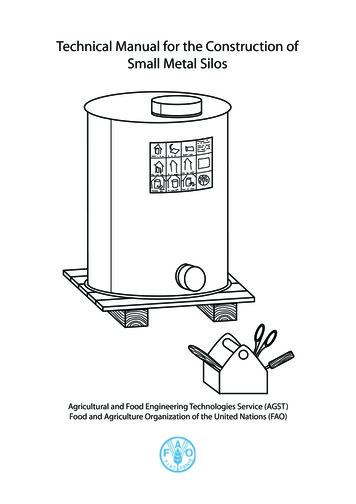
Supplies and Equipment MaterialsMaterialsMaterials are the things you consume when you build a silo. The amounts needed for a 100 kg silo and a1800 kg silo are listed.Galvanised steel sheets, 0.5 mm (26 gauge)(1 - 6 sheets / silo)Be careful when moving and storing the sheets that they don’tbecome damaged. Any scratches in the zinc coating will haveto be painted to prevent rust.Solder, stick or roll. The best is 50% tin / 50%lead(300g - 1 kg / silo)Flux such as rosin or sal ammoniac (ammonium chloride).(20 - 50g / silo)FLUX50% Sn / 50% PbSoap powder and rags.Hydrochloric or muriatic acid10% Concentration. Do notuse the acid directly from theone litre bottle. Use a smallglass jar, 50-100 ml, with a lidor stopper.(20 - 50 ml / silo)SOAPACID1 litreCharcoal for heating the solderingirons.(2 - 6 kg / silo)ACID50 mlAnti-rust paint,never use lead based paint!(80 - 250 ml / silo)CHARCOALPAINT13
Supplies and Equipment BenchBenchAt the very least, you need a simple bench. You can make the one shown in the drawing. One edge of thewooden plank is covered with a piece of angle iron.Wooden plank, 5 cm x 25 cm x 2.5 m long.Wooden log, 10 cm diameter x 1 m.One piece of angle iron, 3 cm x 3 cm x 2.5 m.Two barrels or sawhorses, about 80 cm high.If you have a good, sturdy worktable then you can attach the angle iron to the table.Angle iron, 3 cm by 3cm by 2.5 m.WorkshopThe work space can be very simple. In order to build the largest silos, a workshop should be at least 2.5 mby 5 m. It should have a hard floor; the best is cement. A small table for your tools will be useful.Your workshop must be secure. Your tools are valuable and are the key to your livelihood. If you can’t lockthem safely then bring them home.14
Basic Skills Measuring and MarkingBasic SkillsThese are skills that you will use at almost every step of the process of making a silo.Measuring and MarkingCareful measuring is very important. This section explains how to use the measuring and marking tools.The tape measure has a hookat the end. Put the hook on theedge of the sheet and make aV-shaped mark with the point ofthe V at your measurement. Holdthe tape parallel to the edge thatyou are measuring along. Hereyou see a mark at 8 cm.123456783mThe square makes marks 90degrees to the edge of the sheet.Use it to mark short lines. Putthe stock of the square along theedge of the sheet and put theblade at the point of the V markthat you made with the tapemeasure.15
Basic Skills Measuring and Marking1233mYou need two marks to draw along line. Here the tape measureis used to make two marks 2 cmfrom the edge of the sheet.Use a straight edge to connectthe marks.The marking gauge scratches aline parallel to the edge of thesheet. Here the gauge is usedto make a line 12 mm from theedge. Hold the marking gauge90 degrees to the edge of thesheet.12 mm1690
Basic Skills Measuring and MarkingThe compass makes all of the circles. To measure the opening of the points of the compass, use the storystick and adjust the compass to the mark.Inlet openingOutlet openingCentreOutlet coverInlet coverTop and bottom250 kg silo (radius)When the measurement is set,use the compass as shown in theillustration to find where to placethe centre point of the circle.Don’t scratch too hard or you willdamage the galvanisation.Draw the circle.17
Basic Skills SolderingSolderingSoldering is another very important part of this process. Learning to solder well and quickly will save time,solder and charcoal. It will also help you make good quality silos that last for a long time.First you must prepare the soldering irons. The face of the iron that you will use for soldering must becleaned and coated with tin. Begin by scrubbing the face of the iron with the wire brush. Wipe the ironwith a rag.Heat the irons in the fire. When you heat the irons for soldering they should never glow red hot. This willdamage the copper and waste time and charcoal.18
Basic Skills SolderingRemove one of the irons to see if it is hot enough. It is ready when it is uncomfortable to hold 20 cm fromyour face.20 cmWipe the iron with a rag.UXFLRub the face of the hot iron in a shallow metal dish. If you are using resin then also add a little fine sand.Ammonium chloride is more corrosive than resin. It will cause the copper in the irons to deteriorate faster.Avoid breathing the vapours.Wipe the iron with a rag again.19
Basic Skills SolderingApply a little acid to clean the jointjust before soldering.For long joints, only apply the acidfor about 30 cm at one time.Be careful not to spread the acidon other parts of the metal.30 cmACIDUse the clean face of the iron tomelt solder into the joint. Hold thewhole face of the iron on the joint.Drag the iron slowly along whilemelting solder from the bar. Ifyou see any holes, go back and fixthem.When the solder no longer meltseasily, return the iron to the fireand use another one.Use the whole face of the iron, not only the tip!20
Basic Skills SolderingCheck for holes along the wholejoint. If you find any then fix themnow. Apply a drop of acid at thespot and melt a little solder intothe hole.ACIDUse a rag with soap and water toclean the areas where the acidtouched. Dry the area with a cloth.SOAP21
22
Building the Silo First StepsBuilding the SiloLook through the manual before you start so that you understand the basic process.First StepsBefore you start to build a silo you need to assemble all of your tools and materials. Clean your workspace.Using the square, check that thecorner angles of each sheet are90 degrees. This is especiallyimportant for the sheets that willbe used for the body of the silo.Cut off only the smallest amountnecessary to make the end of thesheet square.90Using the measurement tools or patterns, mark the pieces forthe body, openings and covers of the silo. Refer to the pagesthat show plans for the silo you want to build. Before startingto cut, be sure to write on each piece so you know which iswhich.FCHIBE1233mA223
Building the Silo First StepsCut the hole for the outlet opening in one ofthe body sheets. The edge of the hole must be3 cm from the edge of the sheet.7.5 cmUse the hammer and chisel to start thecut. Finish with the shears. Smooththe cut edge of the hole with the hammer on the bench.243 cm
Building the Silo First StepsMake the relief cut at all four corners of the sheets that makethe body. Make the square cuts on the edges that will jointo the top and to the bottom. Make the angled cuts on theedges that will join to each other to make the body of thesilo.Top edge of Silorelief cut8 mm8 mm8 mm8 mm8 mm8 mm8 mm8 mmBottom edge of Silo25
26
Building the Silo Forming the BodyForming the Body of the Silo Using the Seam MethodThe seam method is used to join the sheets that make the body of the silo. Do this whole process on twoopposite edges of every sheet so that they look exactly like the drawing.Use the marking gauge to make an 8 mm mark along the edge you are going to fold.8 mmUse the wooden mallet and the edge of the bench with the angle iron to begin the fold.27
Building the Silo Forming the BodyTurn the sheet over.Use the spacer while you close the fold along the entire edge. At this point, the fold should be uniform andeven.Now use the marking gauge to make a 12 mm mark on the same side of the sheet as the fold.12 mm28
Building the Silo Forming the BodyUse the spacer and the wooden mallet. Bend the edge to about 20 degrees on the bench. The edge mustbe bent away from the side with the fold.You may need to use the screwdriver to reopen the folded edge.29
Building the Silo Forming the BodyThe body of the silo you are making may be made of more than one sheet. Fit the sheets together on thebench or on the floor. Lay the sheets out flat. This is very important. Make sure that the seam comes together along the entire edge of the sheet. Make sure that the top and bottom of the two sheets are wellaligned.Sheet 1Pound the seams closed with the hammer.30Sheet 2Sheet 3
Building the Silo Forming the BodyJoin the last seam over the bench. Close the last seam the same way you did the others.Solder the seams on one side of the sheet. The seam must be completely sealed with solder. The side withthe solder will be the outside of the silo.31
Building the Silo Forming the BodySolder only on the outside of the silo.Stand the silo with the outlet opening up to begin the process of joining the bottom of the silo to the body.32
Building the Silo Making the Top and BottomMaking the Top and Bottom of the SiloSmaller silos have tops and bottoms made from one piece. Larger silos have tops and bottoms made of twopieces. This section shows how to make both types.The compass draws the large circles. To measure the opening of the points of the compass, use the storystick and adjust the compass to the mark for the top and bottom radius.Inlet openingOutlet openingCentreCentreOutlet coverInlet coverTop and bottomRadius of the Top and BottomWhen the measurement is set, use the compass as shown in the illustration to find where to place the centre point of the circle.33
Building the Silo Making the Top and BottomThe next steps show how to make tops and bottoms from two pieces. Make sure you clearly mark the centre point. You will need to find the centre again later to draw the smaller part of the circle. Be careful not topoke a hole at the centre point.First pieceSecond pieceMake relief cuts at the ends of the straight edge where the seam will be.8 mm8mm34
Building the Silo Making the Top and BottomPut the larger piece of the circle on top of the sheet that you will use for the smaller piece. Align the edgesand trace the relief cuts.Use the seam method to join the pieces together.35
Building the Silo Making the Top and BottomPound the seam closed with the hammer but do not solder yet.Use the same centre point. Mark andcut the rest of the circle.Solder only on the side that will be theoutside of the silo. Put a drop of solderto cover the centre point of the circle.36
Building the Silo Joining the Bottom to the BodyJoining the Bottom of the Silo to the Body Using the Flange MethodThe flange method is used to join the top and bottom of the silo to the body of the silo. This section describes joining the bottom of the silo to the body but the method is the same for the other assemblies.Use the 8 mm bending tool to create a flange around the entire circumference of the cylinder. The flangemust be bent to 90 degrees toward the outside of the silo.90After using the bending tool, the flange will be wavy and uneven. Go around the edge carefully with thehammer and the counterblow to smooth out the flange. Stop when the flange is flat and even.37
Building the Silo Joining the Bottom to the BodyNow use the 8 mm bending tool to create another flange around the edge of the bottom piece. Bend theentire edge up 90 degrees all the way around. There is no need to smooth this flange like you did beforebecause it will be completely folded when you are finished.Put the bottom piece, flange down, over the body of the silo to see if they are the same shape.38
Building the Silo Joining the Bottom to the BodyWhen you put them together they might not fit well at first. The body of the silo might not be a true circle.Mark with a pencil at the spots where it doesn’t fit the bottom. Then gently tap it with the hammer fromthe inside. Only hit near the edge and be careful not to damage the soldered seams!When the body of the silo fits the
One pair of pliers, 1 cm wide One hammer with flat face, 300-400 g One metal working chisel, 1.5 cm wide One pair of metal cutting shears, Number12. These must be good quality. One wire brush One small acid b