Transcription
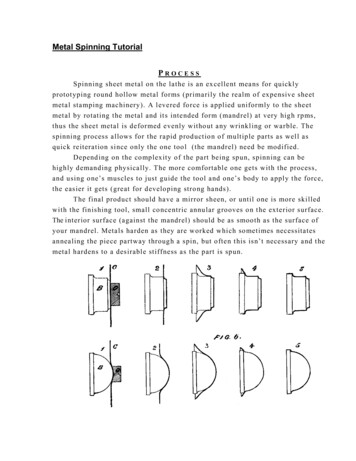
Metal Spinning TutorialPROCESSSpinning sheet metal on the lathe is an excellent means for quicklyprototyping round hollow metal forms (primarily the realm of expensive sheetmetal stamping machinery). A levered force is applied uniformly to the sheetmetal by rotating the metal and its intended form (mandrel) at very high rpms,thus the sheet metal is deformed evenly without any wrinkling or warble. Thespinning process allows for the rapid production of multiple parts as well asquick reiteration since only the one tool (the mandrel) need be modified.Depending on the complexity of the part being spun, spinning can behighly demanding physically. The more comfortable one gets with the process,and using one’s muscles to just guide the tool and one’s body to apply the force,the easier it gets (great for developing strong hands).The final product should have a mirror sheen, or until one is more skilledwith the finishing tool, small concentric annular grooves on the exterior surface.The interior surface (against the mandrel) should be as smooth as the surface ofyour mandrel. Metals harden as they are worked which sometimes necessitatesannealing the piece partway through a spin, but often this isn’t necessary and themetal hardens to a desirable stiffness as the part is spun.
APPLICATIONSSpinning is a great means for manufacturing low cost rapid prototypes inmetal, because it requires a minimum of time and money to produce parts. Anaverage part can be spun in five to ten (5-10) minutes once one is familiar withthe process.Smooth parabolic curves (bell form) are ideal for spinning as the metal iscomfortable deforming along a parabolic curve. The venturi form of velocitystacks for racing car carburetors is a common application of the spinningtechnology. A solid cylinder such as a Coca-cola can be spun, but a minimum ofdraft angle is required to pull the part back off the form (see mandrel section formore). Elliptical and off-center forms can be created, but they require great careand patience.There is also the opportunity to create concentric strengthening ribs whichadd dramatically to the stiffness and strength of the part. These can be formeddirectly (over the mandrel) or spun in the air (tricky) as the part is closed downonto the mandrel. An edge may also be folded over itself or with wire inside tocreate a finished, smooth edge to the part.METALSAlmost every metal that is available in sheet form may be spun (tubing canbe pinched or swaged but is usually made from harder alloys). However, a fewmetals are ideally suited to the art of spinning. Aluminum is fantastically elasticand easy to form so long as it has been annealed. The softer (i.e. purer, nonalloyed) the aluminum the better. Hence, 3003 is better than 5052 , and 1100-0 isthe best to use especially since 3003 doesn’t anodize very well. However, 5052is the strongest work hardening aluminum, but harder to form. Try to buy thealuminum sheet annealed (1100-0, 3003-0, etc.; not 1100-H32, 6061-T6, etc.). Hdenotes strain hardenable aluminums and T denotes thermally treated aluminums.Sheet metal can be spun in thicknesses of 0.040" to 0.100" with hand tools.Stainless steel is even more elastic (stretching before tearing) thanaluminum (50%-68% elongation!) but requires significantly more force to form.The Austenitic range (200-300 series) of stainless steels form best, 201 and 301having the greatest elongation. Similarly, the lower the Carbon content in mildsteel the easier it is to form. Copper has excellent elongation (very formable)and doubles its tensile strength when work hardened, but if it hardens before the
part is finished then the part must be annealed to prevent shearing and cracking.Brass is a copper-zinc alloy and has similar properties to copper in itsformability but brass work hardens less and requires more force. Other exoticmetals may be spun: titanium, magnesium (@ 600 F), silver, gold, etc., but theyrequire extra care and consideration.C HARTO F ALLOY COMPOSITION A N D RELATIVE ELONGATION :Generally, the greater the % elongation is the more formable the material.Note: Recommended materials in bold face type.Mater ialA llo y co mposition% elong ation for 2 " A luminum 1100-099 %A l60 % elo ngat ion A lu minu m 2014- T690%Al - 4 .4%Cu - 1 %Mg, Mn, Si13% elong ation A lu minu m 3003-098%Al - 0 .12%Cu - 1.2%Mn30% elong ation A lu minu m 5052-097%Al - 2 .5%Mg - 0.25%Cr25% elong ation A lu minu m 6061- T61%Mg - 0.6%Si - 0.28%Cu , Cr17% elong ation A lu minu m 7075- T690%Al - 1 .6%Cu - 2.5 %Mg11% elong ation Co mme r c ial Br ass90%Cu - 10%Zn45% elong ation Red Brass80%Cu - 20%Zn50% elong ation Y ello w Bra ss65 %C u - 35%Zn64 % elo ngat ion Free Cu tting Br ass61%Cu - 35%Zn - 3%Pb60% elong ation Pho sphor Bron ze91%Cu - 8%Sn65% elong ation Mangan ese Bron ze89%Cu - 11%Mn40% elong ation C opper99 %C u60 % elo ngat ion N ickel Silver ( co ins)70%Cu - 5%Zn - 25%N i45% elong ation Steel ( low carbon )98%Fe - 0 .3%C - 1 %Mn, Si, Cu20% elong ationMar tensitic: 400 - 50092%Fe - 1 %C - 10%Cr10% elong ationFer r itic: 405,430 ,44620%Cr - 0 .2%C - 1.5 %Mn20% elong ationAustenitic : 201,30118 %C r - 0.1 %C - 8 %N i68 % elo ngat ion26%Cr - 0 .03%C - 22 %N i50% elong ation99%Ti25% elong ation Stain less Steel302,304,310 ,321 Titan iu mA l alu min um, C carbon, Cr chromiu m, Cu copp er, Fe Iron, Mn mang anese,Mg magn e siu m, Ni n ick e l, Pb lead, Si silicon, Sn tin, Ti titan iu m, Zn zinc
T OOLSThere are an infinite variety of tool profiles that can be forged in mildsteel for spinning the material into different shapes. A long handle providesample leverage to work the material down the mandrel in smooth efficientstrokes. The wooden butt of the tool is placed in one's armpit such that one'sbody weight provides the force and one's arms are free to guide the tool in asmooth and precise manner. The tool is usually about three (3) feet long with aone (1) inch diameter steel rod forged into the preferred tool point.Duck's BillSheep's Nose
The primary tools are the Sheep's nose used for most of the forming, andthe Duck's bill used for finishing (see a & b above) the fully formed piece. Thehooked nose of the Sheep's nose is ideal for forming tight radii as well as havinga decreasing radius that makes it easy to form the metal over a variety of curves.The Duck's bill has a flat side for finishing straight surfaces and a rounded sideto finish curved surfaces. The tool post is essentially a rounded pin protrudingfrom a boring bar mounted on the crossfeed such that the pin acts as a fulcrumaround which the hand tool can be leveraged. The tool post is moved as the partforms down the mandrel so that a consistent lever arm is maintained.
A.B.C.D.E.ToolpostMandrelSheet Metal BlankFollowerTailstockCustom grooving or forming tools can be easily fabricated and evenmounted directly to the crossfeed if it is a simple form. Spinning with the toolattached to the crossfeed limits one's ability to feel the material and form itsmoothly. A compromise, for example, is swaging where a rolling tool forms themetal without a buildup of friction (i.e. bad surface finish).Professional spinning shops typically use tools with rollers mounted on afive (5) foot long steel tube handle for forming everything (from lamp shades topots) and a peg board mounted on the cross feed so that they can form the partsas quickly and efficiently as possible. There are also a few manufacturers thathave CNC spinning lathes, but it is generally a lost art in the age of metalstamping.LubricantA lubricating wax or grease is essential to a quality finish and just beingable to remove your part from the mandrel. Stick wax works great although itgets lumpy sometimes. Grease doesn't lubricate as long and tends to spray all
over the place. There are some special brown spinning waxes that last longerthan the others, but it is messier than the grease. Therefore, stick wax (availableat ShopTools or Danmar) is a great general-purpose lubricant. However, anotherlubricant might be better for use under the part on the mandrel to facilitate theremoval of the part from the mandrel.Gloves are an important safety and performance-enhancing tool. A leatherwelding glove worn on the left or clamping hand alleviates pressure andvibration causing fatigue and numbness. It also protects the hand from thespinning part. Cotton (not nylon) gloves can be worn for comfort as well, but theleather is, obviously, preferable.Files and sandpaper can be used for final finishing, but as one gets moreproficient at spinning sanding shouldn't be necessary.Another necessity is a grungy workshirt as any lubricant will spray one'sattire with a nice Dalmatian pattern.SAFETYSince one is spinning at very high speeds and ap plying a large amount offorce by hand, safety awareness is essential. Directly mounting the mandrel to aheadstock plate (there are a couple on the lathe bench) is preferable as there areno protruding jaws to run into with the tool or one's hand. This has the addedbenefit of automatically centering your tool every time you mount it on the lathe(highly recommended). The 3-Jaw chuck is the biggest danger one will confrontwhen spinning. If the mandrel is chucked up in the 3-Jaw then one should leaveplenty of room between the 3-jaw and the finished part and exercise extremecaution when the tool is anywhere close to the 3-Jaw. The use of the 3-Jaw alsoprohibits turning the lathe at high rpm's for finishing (max. 1000rpm with 3Jaw).It is important to be aware of what state the material being spun is in, i.e.is there localized hardening, are there thin spots, likely shearing or wrinkling,etc.? Make sure the tailstock is clamped tightly as well as all the headstockbolts and tool post. Always move the tool post away from the part when sandingor filing so that it doesn't catch on anything. If the part fails (shear or extremewarpage), brake the lathe fully and stop the part with a tool before it sands agroove into the mandrel.Wearing a glove on the left clamping hand will protect one from the sharpedge of the spinning part and absorb vibrations that cause numbness. Use one's
body weight to apply the force to the part so that the arms are free to guide thetool, otherwise one will fatigue very quickly and not be as smooth and precise(see forming section). Curl one's fingers over the tool post and away from thepart. File sharp edges off of part to eliminate burr cuts, but be sure to clean allchips and debris off the mandrel or it will scratch the mandrel and damage thepart.MANDRELThe mandrel or buck is the form over which the sheet metal blank isformed. There are limits to the shapes one can spin, but, generally, themore complicated the form the greater the need for care in machining themandrel. As mentioned in the Safety section, it is highly recommended tomount your mandrel directly to a headstock plate with at least three (3)3/8"-16 bolts. Once bolted and centered on the lathe all subsequentmachining will create a perfectly centered mandrel (every time youremount, too). If the 3-Jaw must be used with the mandrel then acentering hole in the end of the mandrel is imperative for re-centering.The mandrel can be machined from a variety of materials, each ofwhich has its own cost and strength attributes. Renshape and wood are thecheapest buck-making materials, with Renshape less likely to hold anedge without cracking where wood will deform after repeated spinningefforts. Wood mandrels are excellent for simple bowl and bell forms (nohard corners). Aluminum mandrels are fairly sturdy but tend to gall,especially if spinning aluminum over them; not recommended unlessspinning copper or other soft metals.Steel MandrelA mild steel mandrel requires extra up front machining (a carbidetool works wonders), but it yields a superior finish surprisingly easily (afile, then 120-600 sanding), holds sharp corners and subtle radii throughmultiple parts (up to the 100's), and stays centered. A smooth finish isessential to removing the part without damaging it. When finishing theface of the mandrel extra care should be exerted with steel so that themandrel isn't knocked off center necessitating shimming and retorquing
(been there). A half center is a useful tool for finishing the face with thealignment help of the tailstock.Therefore, if one is spinning a simple form and only needs a fewparts, a wood or Renshape mandrel can be used. If one is attempting tospin a more difficult form and needs a greater number of parts and/orattempts, then steel is highly recommended (besides it's satisfying tomachine).It is important to design the mandrel with at least a 1 draft angleso that the part can be removed from the mandrel. Smooth curves are themost forgiving forms for spinning, but sharp corners can be accomplishedas long as the material isn't stretched to quickly. The general rule for theoverall proportions is for the mandrel to be shorter than it is wide, but asone gets more skilled at spinning these rules can be pushed.UndercutsThe part can't be removed from the mandrel if there are undercuts,but if necessary parts can be spun with undercuts if the mandrel is dividedinto pieces that can be notched and bolted together, and most importantlyunbolted without damaging the finished part.It is advisable to leave at least 2-4" of mandrel beyond the desiredfinished part length (toward the headstock) so that the part can be finishedcleanly and without the danger of back extrusion (the part will literallyextrude toward the tail stock if it has nowhere to go forward). It ispreferable to have a small dimple or otherwise non-flat face on themandrel so that the sheet metal blank will stay centered during thespinning process when sandwiched between the mandrel and a follower inthe tailstock (see lathe section).It is possible to spin an elliptical or asymmetrical form, but itrequires extreme skill and moral turpitude.L ATHEThe headstock is the driving face of the lathe and is the side towhich the mandrel is mounted, preferably on a headstock mounting platerather than a 3-Jaw chuck as emphasized in the Safety section.The tailstock is clamped down securely with a live center pressingagainst a follower (usually aluminum or steel) made to reflect the shape
of the mandrel face such that the sheet metal blank is sandwiched tightlyagainst the mandrel and can't slide out.Spinning should be accomplished at 900-1200rpm for forming, and1800rpm for finishing (but max. 1000rpm if using 3-Jaw chuck). The toolpost should be moved to follow the form every 2-3 inches.Precision centering of the mandrel is critical to final finish and theoverall ease of spinning (very sore armpits from eccentric chatter).F ORMINGForming is accomplished by working with the material, feeling itsstructure, its grain, its hardness, its willingness to move in the directionsthat you want it to. It is critical that one be sensitive to the material'swillingness to move so that you can force the material down the mandrelsmoothly, quickly, and most importantly, evenly. Smooth, even rowingstrokes are the key to spinning good parts.One should spin it thin and smooth, like throwing a thin wall claypot; in fact, the process of spinning sheet metal is remarkably similar.One must push enough material down onto the mandrel without stretchingor warping the remaining material so that a smooth, steady draw of thematerial over the mandrel is accomplished.The sheet metal blank should be a disc approximately equal inradius to the desired part's length plus radius times 80%[D .8(l r)].
A.B.C.D.E.ToolpostMandrelSheet Metal BlankFollowerTailstockOne's body weight and the fulcrum of the tool post are used tocreate a powerful lever arm that almost effortlessly moves the materialdown the mandrel. The effort comes in trying to direct and smooth thematerial. So, it is important to save one's arm and hand energy for guidingthe tool and not for applying force to the part. As mentioned in the Toolssection, the wooden butt of the 3-foot long spinning tool is placed in thearmpit and held in place with the right hand near the middle and the lefthand curled around the tool post securing the tool to the pivot or fulcrum.Once the lathe is turning, one holds the tool as described and leans slowlydown and to the right while sweeping the tool smoothly across the partfrom inside to outside (right to left).The hooked tip of the Sheep's nose tool should be placed below thefollower (at 6 O'clock) for maximum force with the least amount ofchatter. Initially, small orbital strokes near the center of the part (or asnear to center as the follower allows) should slowly push the sheet metalblank into a flared bell shape, again moving inside to outside. Exert carebecause the part is not yet seated and could easily be knocked off-center.
Seating the PartOnce the blank has been flared about 1" then the part should bepersuasively pushed against the mandrel so that at least the top 1/2" of thepart is seated securely on the mandrel . A solid drone is discernible whenthere is no gap between the part and the mandrel. If seating on a mandrelwith a sharp edge extra care should be taken not to overwork the edge(cracking) while still assuring a secure seating of the part.Once the part has been seated then it is merely a matter of patienceas the rest of the forming follows quite predictably. The bell curve orhyperbolic flare is the shape the material wants to take, so one allows it togo where it wants so long as there is a valley to push down onto themandrel and a hill or bump to keep the outer edge from warping or misaligning when the blank is stretched down onto the mandrel. For simplebowl and bell shapes a bump isn't necessary, but for more complicated(especially more cylindrical) forms maintaining a bubble near the outercircumference of the blank is critical to prevent warping and warbling.
Forming MotionThe laying down of the material onto the mandrel is accomplishedwith short inside to outside moves, but the bump is smoothed from theoutside back in such that the top of the bump is smoothed to the insidewith several gentle strokes, then when the material (the valley) is laiddown onto the mandrel the bump will flare out again.The material will get easier to move as the part is closer tocompletion (unless it has work hardened too much in which case it shouldbe annealed), but patience must be exercised so that the fully formed partrequires a minimum of finishing. Just keep repeating the same smoothfluid strokes from inside to outside until the part is seated and then startto move the material from the outside in, but always try to leave a bumpor rib to protect against warping and over-stretching.FlaringSometimes, the part will flare too much toward the tailstock whenlaying the part down too hard (maintaining a rib prevents this). Severalcleaning swipes from inside to outside with extra force applied at the endof the stroke should form the part back to a subtle flare. Alternately, thepart will sometimes fold toward the headstock in which case strongcleaning swipes from inside to outside with extra force applied in the
middle should pop the part back toward the tailstock. If not then the partmay be worked from the backside, but this is not very clean.If warbling occurs try to wipe it out with smooth hard strokes, butif the warbles are along the edge then a wood stick (with the spinningtools) with a slot in it can be forced over the edge of the part and twistedwhile steadying on the tool rest which should smooth the warbles.Important: keep the mandrel and part clean of any chips or debris toprevent scratching of the mandrel and damage to the part; and clean thepart and re-lubricate when there are any signs of material build-up,especially with gall-happy aluminum.TrimmingRemember to plan for trimming part at end; cutting tool can bemounted on tool rest, but may leave a groove in mandrel (prohibitingfinishing past that point on future parts); so bandsaw and belt sander are asafe trimming option, especially if unsure of desired final length.FINISHINGFinishing is accomplished with smooth right to left sweeps with theDuckbill spinning tool using the flat side for straight surfaces, androunded side for curves and radii. The Sheep's Nose tool can be used fortight corners, but the duckbill is favored for most finishing. Finishingshould be done at very high rpm's (1200 rpm) so that a minimum of forceneed be applied and very smooth fluid strokes can be used.It is important to feel the material on a more subtle level whenfinishing, the hills and valleys felt during forming are now very minuteand require extra sensitivity to smooth the hills into the valleys. A pushand release rhythm of hills into valleys literally moves a few thousandthsof material down the part so that an even, smooth finish with fine annulargrooving is achieved. Careful of working one area too thin oroverheating, which causes stress fractures.CRAFTSpinning is truly a lost art form in the age of deep draw metal stamping,but it is much more economical (for runs under 100,000) and yields a moreperfectly finished final part (no stretch marks). It is a fantastic process to
establish an intuitive sense of materials and how can best take advantage of amaterial's intrinsic properties. There is a sense of quality inherent to the processof metal spinning that makes it a true craft. Developing a feel for the materialwith all of one's senses allows one to push the material and the spinning processto yield a perfect part effortlessly. Listening to the tool on the part; feeling theresistance of the material; learning the rhythms of spin forming; interacting withthe structural transformations that are occurring as the part is formed down themandrel are key to the art of spinning.V1.0 Metal SpinningP e t e rR u b i nF l e t t e r perf 11.10.95
Nov 10, 1995 · Metal Spinning Tutorial P ROCESS Spinning sheet metal on the lathe is an excellent means for quickly prototyping round hollow metal forms (primarily the realm of expensive sheet metal stamping machinery). A levered force is applied uniformly to the sheet metal by rotating the metal