Transcription
MEDICAL DIVISIONFrom Eye to InsightM320User Manual10734261 - Version 02
Thank you for purchasing a Leica surgical microscope, M320.In developing our systems, we have placed great emphasis on simple, selfexplanatory operation. Nevertheless, we suggest studying this user manual indetail in order to utilize all the benefits of your new surgical microscope.For valuable information about Leica Microsystems products and services, andthe address of your nearest Leica representative, please visit our website:www.leica-microsystems.comThank you for choosing our products. We hope that you will enjoy the qualityand performance of your Leica Microsystems surgical microscope.Leica Microsystems (Schweiz)AG Medical DivisionMax-Schmidheiny-Strasse 201 CH-9435 HeerbruggTel.: 41 71 726 3333Fax: 41 71 726 3334Legal disclaimerAll specifications are subject to change without notice.The information provided by this manual is directly related to the operation ofthe equipment. Medical decision remains the responsibility of the clinician.Leica Microsystems has made every effort to provide a complete and clear usermanual highlighting the key areas of product use. Should additional informationregarding the use of the product be required, please contact your local Leicarepresentative.You should never use a medical product of Leica Microsystems without the fullunderstanding of the use and the performance of the product.LiabilityFor our liability, please see our standard sales terms and conditions. Nothing inthis disclaimer will limit any of our liabilities in any way that is not permitted underapplicable law, or exclude any of our liabilities that may not be excluded underapplicable law.IIM320 Ref. 10734261 / Version 02
Contents1234567Introduction1.1 About this user manual1.2 Symbols in this user manual1.3 Required toolsProduct identificationSafety notes3.1 Intended use3.2 Indications for use3.3 Contraindications3.4 Information for the person responsiblefor the instrument3.5 User qualifications3.6 Directions for the user of the instrument3.7 Dangers of useSigns and labels7.18 Changing the accessories of the surgicalmicroscope and balancing the swing arm7.19 Adjusting the parfocalitywith camera and monitor7.20 Adjusting the parfocalitywithout camera and monitor7.21 Check the remote control and camera7.22 Checklist before surgery2425268Operation8.1 Starting up8.2 Adjusting the design LED illuminator8.3 Adjusting the working distance8.4 Adjusting the illumination8.5 Re-equipping during operation8.6 Decommissioning8.7 Binocular tubes8.8 External orange filter8.9 Double Iris Diaphragm272728282929293030309Video Camera9.1 Information9.2 SD Memory Card9.3 Remote control9.4 On Screen Menu313132323310Care and maintenance10.1 Care instructions10.2 Maintenance10.3 Notes on reprocessing of resterilizable products10.4 Changing fuses474747495122223444445567Design5.1 Stands5.2 Swing arm and horizontal arm5.3 Optics carrier5.4 Microscope carrier5.5 Brake knobs/articulation brakes5.6 Connections10101111121213Functions6.1 Illumination6.2 Balancing system6.3 Footbrakes14141415Preperation before surgery7.1 Transportation7.2 Installing the accessories7.3 Documentation output7.4 Handles7.5 ErgonOptic Dent7.6 ErgoWedge7.7 Objectives7.8 Protective glass7.9 Installing the binocular tube7.10 Eyepieces7.11 Adapters7.12 Positioning at the operating table7.13 Mounting sterile components7.14 Installing the drape7.15 Balancing the swing arm7.16 Adjusting the interpupillary distance7.17 Checking the Disposal23235212What to do if . ?12.1 Microscope12.2 Video camera53535413Specifications13.1 Electrical data13.2 Surgical microscope13.3 Lamps13.4 Stands13.5 Optical data13.6 Accessories13.7 Video accessories13.8 Ambient conditions13.9 Electromagnetic compatibility (EMC)13.10 Compliance IEC 60601-1-213.11 Standards fulfilled13.12 Limitations on use13.13 Working range13.14 Dimensions F12 (in mm)555555555656565757585859596061M320 Ref. 10734261 / Version 021
Introduction1Introduction1.1About this user manual1.2The symbols used in this user manual have the following meaning:In this user manual the surgical microscope M320 is described. Thepresent user manual applies to the M320 with the followingstand variants: F12, C12, W12, FP12, TC12, LW12 and TP12.SymbolIn addition to notes on the use of the instruments thisuser manual gives important safety information (seechapter 3, "Safety notes").XSymbols in this user manualRead this user manual carefully before operating theproduct.WarningwordMeaningWarningIndicates a potentially hazardous situationor improper use that could result in seriouspersonal injuries or death.CautionIndicates a potentially hazardous situationor improper use which, if not avoided, mayresult in minor or moderate injury.NoteIndicates a potentially hazardous situationor improper use which, if not avoided, mayresult in appreciable material, financialand environmental damageInformation about use that helps the userto employ the product in a technicallycorrect and efficient way.Action required; this symbol indicates thatyou need to perform a specific action orseries of actions.X1.3Required toolsAllen keys: Size 2.5 for installing accessories (dovetail interface) Size 3 for optimizing the balance of the optics carrier Size 4 for handle holder Size 8 for balancing the swing armProvided brake knob2M320 Ref. 10734261 / Version 02
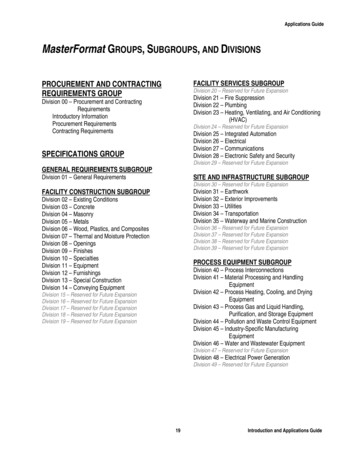
Product identification2Product identificationThe model and serial numbers of your product are located on the identification label at the bottom of the horizontal arm.X Enter this data in your user manual and always refer to it when you contact us or the service workshop regarding any questions you mayhave.TypeSerial no.M320 Ref. 10734261 / Version 023
Safety notes3Safety notes3.4The Leica M320 surgical microscope is state-of-the-art technology.Nevertheless, hazards can arise during operation. Always follow theinstructions in this user manual, and in particular the safety notes.3.1XIntended useX The Leica M320 surgical microscope is an optical instrument forimproving the visibility of objects through magnification andillumination. It can be applied for observation anddocumentation and for human and veterinary medicaltreatment. The Leica M320 surgical microscope is subject to specialprecautionary measures for electromagnetic compatibility. Portable and mobile as well as stationary RF communicationsequipment can have a negative effect on the reliability of theLeica M320 surgical microscope's functionality. The Leica M320 is intended for professional use only.3.2XXXXXXIndications for use The Leica M320 surgical microscope is suitable for surgicalapplications such as ENT and dental sugeries in hospitals, clinicsor other human medical institutions. The Leica M320 surgical microscope may only be used in closedrooms and must be placed on a solid floor or mounted to theceiling. This User Manual is intended for physicians, nurses and othermedical and technical staff who prepare, operate or maintainthe device after appropriate training. It is the duty of the deviceowner / operator to train and brief all the operating personnel.3.3XContraindicationsNot for use in ophthalmology.XXXXXXXXXXXXX4Information for the personresponsible for the instrumentThe surgical microscope may be used by qualified and trainedusers only, with all covers fitted.Only use the surgical microscope if it is free of defects.Operate the system only with all equipment in its properposition (e.g. all covers fitted, doors closed).Regularly check to make sure the users are complying withsafety requirements.Provide comprehensive instructions and explain the warningmessages.Assign and monitor responsibilities for commissioning,operating and maintenance.Use the surgical microscope in proper condition only.Do not place the drape too close to the instrument, as otherwiseit can overheat and shut off.Inform your Leica representative or Leica Microsystems(Schweiz) AG immediately if you detect a product defect thatcould potentially cause injury or harm.Only the following accessories may be used with the surgicalmicroscope.Leica Microsystems accessories described in this user manual.Other accessories, provided that these have been expresslyapproved by Leica as being technically safe in the context.Use original accessories or approved Leica accessories only.Use only high-quality HDMI cables with a maximum length of10 m.Use only monitors approved for medical purposes or equippedwith an isolating transformer.Modifications or repairs may be carried out by authorizedtrained personnel only.Use only original Leica parts in maintenance work.After maintenance or technical modifications, readjust theinstrument in accordance with our technical specifications.If the instrument is modified by or maintenance has beenperformed by unauthorized personnel, if the equipment isimproperly maintained or if the instrument has been operatedimproperly, Leica disclaims all liability.The owner or operator shall be held liable for the function of thesystem if the system has been assembled incorrectly byindividuals who do not belong to Leica Microsystems (Schweiz)AG.The influence on other devices by the Leica M320 surgicalmicroscope has been tested in a ccordance with EN 60601-1-2.The system passed the emissions and immunity test. Thestandard preventive measures and safety regulations pertainingto electromagnetic and other radiation have to be observed.Only the supplied power cord may be used.M320 Ref. 10734261 / Version 02
Safety notesXXXXXXThe power cord must have a protective conductor and must beundamaged.Use of accessories and cables other than those specified orprovided by the manufacturer of this equipment could result inincreased electromagnetic emissions or decreasedelectromagnetic immunity of this equipment and result inimproper operation.The Leica M320 surgical microscope may be used only in closedrooms and must be placed on a solid floor.Portable RF communications equipment (including peripheralssuch as antenna cables and external antennas) should be usedno closer than 30 cm (12 inches) to any part of the Leica M320,including cables specified by the manufacturer. Otherwise,degradation of the performance of this equipment could result.Like any other instrument in the operating theater, this systemmay fail. Leica Microsystems (Schweiz) AG thereforerecommends that a backup system be kept available during theoperation.Additional equipment connected to medical electricalequipment must comply with the respective IEC or ISOstandards (e.g. IEC 60950 or IEC 62368 for data processingequipment). Furthermore all configurations shall comply withthe requirements for medical electrical systems (see clause 16of the latest valid version of IEC 60601-1). Anybody connectingadditional equipment to medical electrical equipmentconfigures a medical system and is therefore responsible thatthe system complies with the requirements for medicalelectrical systems. If in doubt, consult your local representativeor the technical service department.3.5User qualificationsThe Leica M320 surgical microscrope may be used only byphysicians and medical assistance personnel with appropriatequalifications who have been instructed in the use of theinstrument. Specific training is not required.3.6XXXXXXXXXXXXXXXDirections for the user of theinstrumentFollow the user Manual.Follow the instructions given by your employer regarding theorganization of work and safety at work.Do not modify the surgical microscope.Danger of tilting of the floor stand! When moving the floorstand, fold up the swing arm as described above and tightenthe articulation brakes.Risk of injury from moving parts! Assemble and balance theaccessories before the operation. Do not install it above thefield of operation.Risk of injury from rolling of the floor stand! Always push themicroscope to move it; never pull it. Do not roll it over anyone’sfeet. Do not roll over cables lying on the floor. Lock the footbrakes during the operation, and never move the device duringoperation.Do not shine lights in anyone’s eyes.Do not switch off/on the surgical microscope during surgery.Do not unplug the system during surgery.Do not cover up the ventilation slot of the optics carrier.Before an extended period of non-use, remove the battery fromthe remote control.To avoid the risk of electric shock, this equipment must only beconnected to a supply mains with protective earth.All parts of the M320 shall not be serviced or maintained whilein use with a patient.Lamps shall not be changed while in use with a patient.Only use the surgery microscope if it is free of defects.NOTEUsing accessories or cables other than those specified here or asapproved by the manufacturer of the Leica M320 surgicalmicroscope can lead to elevated electromagnetic emissions orreduced interference resistance.The Leica M320 surgical microscope may not be used in directproximity of other devices. If it is necessary to operate it in thevicinity of other instruments, the instrument should be monitoredto ensure that it functions properly in this arrangement.M320 Ref. 10734261 / Version 025
Safety notes3.7Dangers of useWARNINGRisk of death from electrical shock!X Connect the microscope to a grounded socket only.WARNINGDanger of injury due to: Uncontrolled lateral movement of the arm system, Tilting of the stand, Trapping of feet in lightweight shoes beneath the casingof the base. Abrupt braking of the surgical microscope at a thresholdthat cannot be crossed.X For transportation, always move the Leica M320 surgicalmicroscope into the transport position.X Never move the stand while the unit is extended.X Never roll the stand or OP equipment over the cableslying on the floor.X Always push the Leica M320 surgical microscope; neverpull it.WARNINGRisk of injury from the binocular tube falling down!X Tighten the clamping screw securely.WARNINGDanger of retinal damage!X Do not shine lights in anyone’s eyes.WARNINGDo not use for ophthalmology.6M320 Ref. 10734261 / Version 02
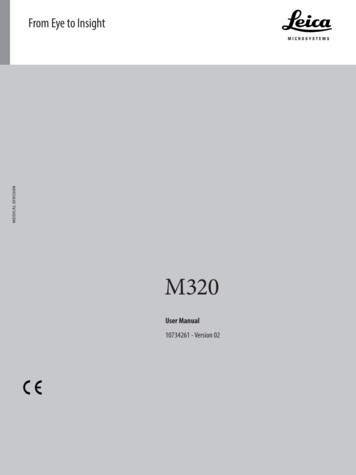
Signs and labels4Signs and labels31, 8111212, 4, 5, 7,11, 14, 69,101314, 6M320 Ref. 10734261 / Version 027
Signs and labels12Tilting dangerTrained personnel labelOnly to be operatedby trained personnelUtilisation réservée àun personnel formé3Max. load for optics carrier4Type labelLeica Microsystems (Schweiz) AGMax Schmidheiny-Strasse 201CH-9435 HeerbruggMODELLEICA M320 LW12/ TP12/ TC12/ F12100 V - 240 V50 - 60 Hz100 VA2x T6.3 AH 250 VLeica Microsystems (Schweiz) AGMax Schmidheiny-Strasse 201CH-9435 HeerbruggMODELLEICA M320 F12/ W12/ C12/ FP12100 V - 240 V50 - 60 Hz100 VA2x T6.3 AH 250 VMedical device56Mandatory label - read the user manual carefully before operating theproduct. Web address for electronic version of the user manual. 788 UDI Label MET label(only USA and Canada) Presecription device (USA Only)M320 Ref. 10734261 / Version 02
Signs and labels9INMETRO label(only Brazil)OCP 00041011ANVISA Registration number(only Brazil) Grounding label(only USA and Canada) 12System weight label (F12)125 KG13Transport position(F12 floor stand)14Fabrication labelaPrefix numberbLeica system article no.cSerial numberdIncremental number starting at 1 for each batcheJ year (2 digits)fMM month (2 digits)gTT day (2 digits)hProduction starting dateREFSNM320 Ref. 10734261 / Version 029
Design5Design5.1Stands6Table stand with terminal(TC12)7Wall stand (LW12)8Table stand with plate (TP12)To assemble the stand, note the installation instructionsprovided.1Rolling floor stand (F12),long swing armReference model in current usermanual2Rolling floor stand, short swingarm3Wall stand (W12)4Ceiling mount (C12)5Floor stand/baseplate (FP12)10M320 Ref. 10734261 / Version 02
Design5.212Swing arm and horizontal arm5.3Swing arm and horizontal armIntegrated tilt switchMove the swing arm upwards.Light switches offautomatically.Optics carrierCaps for magnification changer are steam- or gassterilizable.1Magnification changer,both sides, increments:6.4, 10, 16, 25, 40 2Illumination control for illumination intensity.3Filter and diaphragm controlsfor white light, orange filterand spot illumination.4Counterweight for balancingwhen many accessories areused.The integrated tilt switch is not available for models TC12,TP12 and LW12.M320 Ref. 10734261 / Version 0211
Design5.4Microscope carrier5.5Two different versions are available.12Brake knobs/articulation brakes1Articulation brake2Lever for locking the verticalposition.3Joint for balancing4Articulation brake5Articulation brake6Tilt brakeInclinedUprightUpright installation is not possible for models TC12, TP12and LW1212M320 Ref. 10734261 / Version 02
Design78Rotary brake(inclined version)5.6Connections1Brake knob for setting the articulation brakes2Main switchArticulation brake(LW12, TP12, TC12)3Power socketM320 Ref. 10734261 / Version 02Port for HDMI/USB cable13
Functions6Functions6.1Illumination6.2With a balanced surgical microscope Leica M320 F12 you can movethe optics in any position without it tilting or falling.The illumination of the surgical microscope M320 consists of 2 LEDs.It is located in the optics carrier.123414Balancing system1Remove the screw.2Remove the side cover.3Remove the screws.4Set the desired position.Four different positions can beset.5Fasten the screws.6Refit the side cover.Switch on the main switch.White LED illumination on theoptics carrier lights up.Illumination control forillumination intensity.Filter and diaphragm controlsfor white light, orange filterand spot illumination.M320 Ref. 10734261 / Version 02
Functions7Fasten the screw.8Turn the lever for locking thevertical position.9Adjust the balancing joint tothe weight using an Allen key(size 8).6.3Footbrakes123Footbrakes are attached to eachof the four wheels on the stand.The wheel is engaged andreleased with the footbrakeengage/release lever (1).X Press the footbrake engage/release lever down (3):X The footbrake is engaged.X Lift the footbrake engage/release lever (2):X The footbrake is released.M320 Ref. 10734261 / Version 0215
Preperation before surgery7Preperation before surgery7.1Transportation6XFold the swing arm together.Tighten the articulationbrake.7XCompare the position of theswing arm with the attachedsign.8XUnplug the power cable.CAUTIONRisk of injury from outward movement of swinging arm!X Do not shine lights in anyone’s eyes.1XPlace swing arm in ahorizontal position.2XTighten the brake knob forlocking the vertical position.3XTurn the optics/microscopecarrier towards the outside.NOTE4XPossible damage of the cable!Always pull the plug, never thecable.Tighten the articulationbrake.9516XOpen the articulation brake.M320 Ref. 10734261 / Version 02XRelease the footbrakes.
Preperation before surgery10XPush the microscope to theinstallation location and position it.CAUTIONRisk of injury to feet!X Always push theinstrument to moveit; never pull it.11XTighten the footbrakes.CAUTIONDanger of microscoperolling away on its own!X Tighten thefootbrakes.M320 Ref. 10734261 / Version 0217
Preperation before surgery7.2Installing the accessoriesCAUTIONRisk of injury from downward movement of the swing arm!X Before installing accessories, tighten the articulationbrakes, see 7.1, "Transportation"7.4Handles7.4.1Installing and removing the front handleNOTEInstall the front handle b efore the rest of the accessoriesGray handle sleeves are steam- or gas-sterilizable.White handle sleeves can be disinfected.Installing the accessories, for example, ErgonOptic Dent.Install any other accessories in a similar manner.1XUnscrew the clampingscrew.1XScrew on the handle sleeveholder.2XPush the accessory into thedovetail interface.2XInsert until the handlesleeve clicks into place.3XTighten the clamping screw.3XPush the knob and releasethe handle sleeve.7.3Documentation outputC-mount port for commerciallyavailable video camera18M320 Ref. 10734261 / Version 02
Preperation before surgery7.4.2127.5Installing the side handlesXXScrew the handle apart.Improves ergonomics at certain working positions: Turningrange 45 with 180 binocular tube.ErgonOptic Dent:Optical extension for morecomfortable work.X For installation, see 7.2,"Installing the accessories".Remove cover with key.7.63XX45XXErgonOptic DentScrew open the bottom holder for the handle.Handle tilt is individually adjustable.ErgoWedgeThe ErgoWedge gives a b inocular with a fixed angle avariable viewing angle of 5 to 25 .1ErgoWedge.2Ideal in combination with 45 inclined binocular tube.X For installation, see 7.2,"Installing the accessories"Refit the handle sleeveholder.Insert until the handlesleeve clicks into place.M320 Ref. 10734261 / Version 0219
Preperation before surgery7.7Objectives7.9Fixed and fine objectives available in various focal lengths.1XInstalling the binocular tubePossible binocular tubes: binocular tube 5 - 25 inclined binocular tube binocular tube 180 , variable straight binocular tube variable binocular tube 30 - 150 inclined binocular tube 45 binocular tube 10 - 50 , type II, Ultra Low IIIRemove the cover from theoptics carrier.NOTE2XScrew in the objective.XFor installation, see 7.2, "Installing the accessories".7.10 Eyepieces37.8XPossible eyepieces: 10 eyepiece, standard (aside from with straight tube12.5 ) 10 eyepiece with crosshair graticule for easier imagecentering 12.5 eyepiece, shows image with similar magnificationto that on the screenTurn the fine focusingobjective for fine focus.1XSet the eyepiece in place.2XTighten the rotary ring.Protective glassThe protective glass is used to protect the objective.The glass is steam- or gas-sterilizable.1Fine focusing objective:The nose points forward.2Fixed objective:The nose points 90 towardsthe left or right.20M320 Ref. 10734261 / Version 02
Preperation before surgery7.11 Adapters7.12 Positioning at the operating tableNOTE7.12.1 Positioning optionsThe microscope is not balanced.X To prevent it from tipping over, tighten the a rticulation brakes.1XInstall the stereo adapter.XX2XFit the beam splitter.For 50/50 % or 70/30 %observation.3XInstall the stereoattachment for secondobserver on the left side.4XFit the binocular tubes.5XTurn the white ring to alignthe cutout for the assistant.Carefully move the surgical microscope at the column to theoperating table and position it for the forth coming operation.Tighten the footbrakes.NOTEXFor installation, see 7.2, "Installing the accessories".M320 Ref. 10734261 / Version 0221
Preperation before surgery7.13 Mounting sterile components7.14 Installing the drapeCAUTIONCAUTIONDanger of infection!X Avoid touching the sterile components.X Allow sufficient free space.Do not install the sterile components until shortlybefore the operation.Handle sleeves and caps for the magnification changer aresteam and gas-sterilizable.X Sterilize the handle sleeves and caps after use.Danger of overheating!X Do not wrap the drapearound the microscopetoo tightly. Thedistance between themicroscope and drapeshould be 20 cm.X1XInsert until the handlesleeve clicks into place.7.15 Balancing the swing armFor general preparation see chapter 6.2, "Balancing system". Alsocheck the movement of the swing arm before positioning themicroscope over the patient.7.16 Adjusting the interpupillarydistance2XAttach the caps.3XAttach protective glass onobjective. The noise pointsforwards (fine focusobjectives) or 90 to theleft/right (fixed objectives).X7.17 Checking the illuminationXXX22Look into the eyepieces.Depending on the model,move the tube manually orusing the drive knob until acircular field is visible.Turn the rotary knob fromzero to maximum brightness.For the general preparation see chapter 6.1,"Illumination".Also check the brightness and filters before positioningthe microscope above the patient.M320 Ref. 10734261 / Version 02
Preperation before surgery7.18 Changing the accessories of thesurgical microscope andbalancing the swing arm7.19 Adjusting the parfocality withcamera and monitorParfocal means that the sharpness remains constant overthe entire magnification range.X Adjust the diopter settings for both eyes separately andaccurately.WARNINGRisk of injury!X Before re-equipping always lock the swing arm.XWhen changing accessories ensure to balance the swingarm again.1XPlace a piece of paper withwriting on it under the objective.2XMaximum magnification(40 ).3XBring the writing on thesheet of paper into sharpfocus on the monitor.4XWithout looking into theeyepieces, set the minimummagnification (6.4 ).The image on the monitormust remain sharp!5XTurn the dioptric correctionon the eyepieces to " 5".M320 Ref. 10734261 / Version 0223
Preperation before surgery678XXXLook into the eyepieces.Rotate each eyepieceindividually clockwise, inthe "–5" direction, untileach eye sees the writing insharp focus.Set maximummagnification(40 ).7.20 Adjusting the parfocality withoutcamera and monitorParfocal means that the sharpness remains constant overthe entire magnification range.X Adjust the diopter settings for both eyes separately andaccurately.Personal diopeter setting known:XSet dioptric correction oneyepieces.Bring the writing on thesheet into focus.Personal diopeter setting unknown:9X1XAdjust the dioptric settingat the eyepiece to 0.2XPlace a piece of paper withwriting on it under the objective.3XSet maximum magnification(40 ).4XBring the writing on thesheet of paper into focus.Turn out the eyecups to thedesired distance.The writing should now remain sharp when you change themagnification.X If it does not, repeat the p rocedure.24M320 Ref. 10734261 / Version 02
Preperation before surgery567XXXWithout looking into the eyepieces, set the minimummagnification (6.4 ).7.21 Check the remote control andcameraXPress on the remote controlor on the video camera tocapture still images.A signal tone sounds.XPress on the remote controlor on the video camera toinitiate video recordings.A signal tone sounds.XTo end the video recording,press on the remote controlor on the video camera.A signal tone sounds.Turn the dioptric correctionon the eyepieces to " 5".Look into the eyepieces.Rotate each eyepieceindividually clockwise, inthe "–5" direction, untileach eye sees the writing insharp focus.8XSet maximum magnification(40 ).9XTurn out the eyecups to thedesired distance.The writing should now remain sharp when you change themagnification.X If it does not, repeat the p rocedure.M320 Ref. 10734261 / Version 0225
Preperation before surgery7.22 Checklist before surgeryX 26Ensure the following prior to positioning the surgicalmicroscope above the patient.Footbrakes tightenedProper fixation of all parts and accessoriesProper positioning at the operating tableSterile components and drape installedIllumination working properlyRemote control and camera working properlyM320 Ref. 10734261 / Version 02
Operation8Operation8.1Starting up4XScrew in the cover of thehorizontal arm and tightenit.5XConnect the HDMI cable toa suitable monitor orscreen.6XConnect the USB cable(optional) to the computer.7XConnect the power cable.8XSwitch on the main switch.9XWhite LED illumination onthe optics carrier lights up.WARNINGRisk of death from electric shock!X Connect the microscope to a grounded socket only.CAUTIONAdditional equipment connected to medical electricalequipment must comply with the respective IEC or ISOstandards (e.g. IEC 60950 or IEC62368 for data processingequipment).The length of the HDMI cable must not exceed 10 m.X Use only high-quality HDMI cables.HDMI cables are available from Leica.Use only monitors approved for medical purposes orequipped with an isolating transformer. Isolatingtransformers are available from Leica.1XRemove cover of the horizontal arm.2XPlug the power cable intothe horizontal arm andfasten it using cable ties.3XPlug the HDMI cable andUSB cable (optional) intothe horizontal arm andfasten it using cable ties.M320 Ref. 10734261 / Version 0227
Operation8.2Adjusting the design LEDilluminator8.3Adjusting the working distance1XCoarse focus by raising andlowering the microscope.2XFine focus via optional fine focusing objective.There are five different dimming levels.12XXSwitch on the main switch.Remove cover of horizontalarm.XIf the fine focus objective fails, adjust the focusmanually by moving the optics carrier up and down.NOTE3XUsing a ball-point pen orsimilar object, press theswitch until the desireddimming level is reached.4XScrew in the cover of thehorizontal arm and tightenit.28Manual emergency functions are available for focus.X Brakes could be overcome with muscle power.M320 Ref. 10734261 / Version 02
Operation8.41Adjusting the illumination8.5Re-equipping during operationWARNINGWARNINGDanger of retinal damage!X Do not shine lights in anyone's eyes.XXBefore re-equipping during the operation, first swingthe microscope away from the operating field and lockthe swing arm.Set the desired illuminance.WARNINGX2XSelect the desired filter or diaphragm function:White lightOrange filterSpot illuminationIn case of an illumination cooling fan failure an acousticalarm appears (short beep every 5 seconds, lasting for5 minutes).After re-equipping, always re-balance the microscopeon the swing arm.In case of a thermistor on the 2 LED array reaches 85 C anacoustic alarm appears (2 short beeps every 5 seconds) andafter 5 minutes of alarm the main illumination of the
The Leica M320 surgical microscope is state-of-the-art technology. Nevertheless, hazards can arise during operation. Always follow the instructions in this user manual, and in particular the safety notes. 3.1 Intended use The Leica M320 surgical microscope is an optical instrument