Transcription
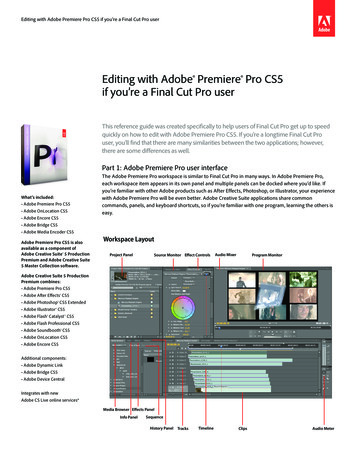
6Editing with Adobe Premiere Pro CS5 if you’re a Final Cut Pro userEditing with Adobe Premiere Pro CS5if you’re a Final Cut Pro userThis reference guide was created specifically to help users of Final Cut Pro get up to speedquickly on how to edit with Adobe Premiere Pro CS5. If you’re a longtime Final Cut Prouser, you’ll find that there are many similarities between the two applications; however,there are some differences as well.Part 1: Adobe Premiere Pro user interfaceWhat’s included: Adobe Premiere Pro CS5 Adobe OnLocation CS5 Adobe Encore CS5 Adobe Bridge CS5 Adobe Media Encoder CS5Adobe Premiere Pro CS5 is alsoavailable as a component ofAdobe Creative Suite 5 ProductionPremium and Adobe Creative Suite5 Master Collection software.The Adobe Premiere Pro workspace is similar to Final Cut Pro in many ways. In Adobe Premiere Pro,each workspace item appears in its own panel and multiple panels can be docked where you’d like. Ifyou’re familiar with other Adobe products such as After Effects, Photoshop, or Illustrator, your experiencewith Adobe Premiere Pro will be even better. Adobe Creative Suite applications share commoncommands, panels, and keyboard shortcuts, so if you’re familiar with one program, learning the others iseasy.Workspace LayoutProject PanelSource Monitor Effect ControlsAudio MixerProgram MonitorAdobe Creative Suite 5 ProductionPremium combines: Adobe Premiere Pro CS5 Adobe After Effects CS5 Adobe Photoshop CS5 Extended Adobe Illustrator CS5 Adobe Flash Catalyst CS5 Adobe Flash Professional CS5 Adobe Soundbooth CS5 Adobe OnLocation CS5 Adobe Encore CS5Additional components: Adobe Dynamic Link Adobe Bridge CS5 Adobe Device CentralIntegrates with newAdobe CS Live online services*Media Browser Effects PanelInfo PanelSequenceHistory Panel TracksTimelineClipsAudio Meter
Timeline panelLight gray highlight indicates patchingToggle waveform displayShow keyframesTrack keyframe controlsToggle track output Toggle sync lock Toggle track lockAudio master metersEditing tools Timeline: The timeline is where you’ll do most of your editing using sequences. A singleTimeline panel appears in a frame in the lower central portion of the screen when you firstlaunch Adobe Premiere Pro, open any of its default workspaces, or create a project. You canremove all sequences from a Timeline panel, or add multiple sequences to it, each appearingas a tab within that Timeline panel. You can also open multiple Timeline panels, each withinits own frame, with each containing any number of sequences. Tracks: A sequence may contain several video and audio tracks. When you add a clip to asequence, you need to specify which track or tracks it should occupy. You can target one ormore tracks of both the audio and video varieties. The way you specify target tracks dependson the editing method you use.Source monitorTabbed panelsClip nameStep backGo to previous markerPlay/stop toggleStep forwardGo to next markerSet unnumbered markerSet Out pointSet In pointCurrent timecodeIn-to-Out durationor clip durationSafe marginsOutputGo to In pointGo to Out pointPlay In to OutJogOverlayInsertLoopShuttleEditing with Adobe Premiere Pro CS5 if you’re a Final Cut Pro user2
Program monitorMost controlsare the sameas those in theSource monitor, withthese exceptions:Trim monitorExtractLift Monitors: Within the user interface, the Source Monitor is on the left. You use the SourceMonitor to view and trim the raw clips you want to add to a sequence. To place a clip in theSource Monitor, double-click it in the Project panel. The Program Monitor is to the right of theSource Monitor and plays back the sequence of clips that you are assembling. Project panel: This is where you retain your links to your project’s video clips, audio files,graphics, images, and sequences. You can use bins/folders to organize your assets. Media Browser: The Media Browser gives you quick access to all your assets while you edit.Use the Media Browser to import clips copied from video storage media such as P2 cards, SxScards, XDCAM disks, and DVDs. When you import an asset, Adobe Premiere Pro leaves it in itscurrent location, and creates a clip in the Project panel that points to it. By default, AdobePremiere Pro writes XMP files to the directory where the media files are located, but you canturn off this behavior in Preferences. Effects panel: Standard effects are listed in the Effects panel and are organized into two mainbins: Video Effects and Audio Effects. Within each bin, Adobe Premiere Pro lists effects bytype in nested bins. Effects are organized as Presets, Audio Effects, Audio Transitions, VideoEffects, and Video Transitions. Audio Mixer: The Audio Mixer tab allows you to adjust settings while listening to audio tracksand viewing video tracks. Each Audio Mixer track corresponds to a track in the timeline of theactive sequence and displays the timeline audio tracks in an audio console layout. Each trackis labeled near the top of the Audio Mixer, and you can rename a track by double‑clicking itsname. You can also use the Audio Mixer to record audio directly into a sequence’s tracks. Effect Controls panel: You can use the Effect Controls panel to change settings for a transitionyou placed in a sequence. Settings vary from transition to transition. Click the Effect Controlstab, and then click any clip in the Timeline to display that clip’s effect parameters in the EffectControls panel.Tool panel and keyboard shortcutsSelection tool (V)Ripple Edit tool (B)Razor tool (C)Pen tool (P)Track Select tool (A)Rolling Edit tool (N)Rate Stretch tool (X)Slip tool (Y)Slide tool (U)Zoom tool (Z)Hand tool (H) Tools panel: The Tools panel contains a number of tools for editing sequences in a Timelinepanel. When you select a tool, the pointer changes shape according to the selection. Info panel: The Info panel displays several data about a selected item, and timecode information for clips under the current-time indicator in the Timeline.Editing with Adobe Premiere Pro CS5 if you’re a Final Cut Pro user3
History panel: The History panel tracks up to 32 steps you take in your production and letsyou back up to different states of your editing process. When you back up to a previouscondition, all steps that came after that point are also undone.Part 2: Creating a project and customizing your workspaceIt’s easy to get a project started in Adobe Premiere Pro.1. Launch Adobe Premiere Pro. A Welcome screen allows you to create a new project, browse toa previous project, or select from a list of recent projects.2. Click New Project to open the New Project dialog box. Note that the General tab in the NewProject dialog box is similar to the Audio/Video preferences window or Easy Setup dialog boxin Final Cut Pro.3. Leave Title Safe Area, Action Safe Area, and Video and Audio Display Format as the defaultsettings. In the Capture Format pull-down menu, select a format to capture if you’re capturingfrom tape. If not capturing from tape, choose your desired compression type (DV/DVCPRO,XDCAM or Apple ProRes among many others), audio sample size, rate, and source.5. Name your project at the bottom of the dialog box, and then browse to a folder where youwant your project information saved. Don’t click OK yet.6. Select the Scratch Disks tab. This tab will be familiar to Final Cut Pro users; however, AdobePremiere Pro gives you more control over the actual placement of your files. Instead of havingmultiple projects with multiple folders inside a Scratch Disks folder, Adobe Premiere Pro allowsyou to create your own folder structure, which makes it easier to move and archive media.7. Using each of the four Browse buttons, browse to the folders where you want to store thecaptured media and previews, click Choose, and then click OK.8. The New Sequence dialog box appears. This behavior is a bit different than that of Final Cut Probecause you are asked to start a new sequence before going to the editing interface. If youprefer, you can simply click Cancel in this dialog box and get started as you would in Final CutPro.If you choose not to create a new sequence at this stage, you can work on other aspects of theproject such as importing, capturing, and organizing the footage, and then create a new sequencewhen you’re ready to start editing. Adobe Premiere Pro can mix formats in sequences and canusually play these sequences back without rendering. However, these mixed-format sequences willneed to be rendered before output, so it is best to designate the format that matches whicheverformat has the most footage.To start a new sequence:1. Choose File New Sequence (Command N). This brings up the same dialog box thatfollowed the New Project dialog box.2. Select a video format from the Available Presets list on the left, just as you would select aSequence Preset from the Audio/Video Settings in Final Cut Pro. Each preset has a full description displayed to the right. Revise the settings shown in the description using the General tab,which is similar to the General tab in the Sequence Settings dialog box of Final Cut Pro.3. Adobe Premiere Pro allows you to preset the number of audio and video tracks that you startwith and whether the audio will be mastered as mono, stereo, or 5.1. (You can revise thenumber of tracks and mastering options later if you wish.)4. Click Save Preset to save this as a custom preset for one-touch recall on later projects. Nameyour preset and click OK.5. Name your sequence and click OK.Editing with Adobe Premiere Pro CS5 if you’re a Final Cut Pro user4
How to customize and save sequence settingsAdobe Premiere Pro has many different native editing sequence presets, including presets for DSLRand RED cameras. Each time you click the New Sequence button, you typically pick from the list ofavailable options. But, what if, for example, you want to edit natively in a different resolution, framerate, or compression format? You can create your own custom sequence preset to match exactlywhat you need.In this example, we’re going to create a preset for Apple ProRes422. This will enable native editingof Apple ProRes files, and creation of ProRes previews. This is specific to the Mac platform, andrequires FCP installed on the same system.To do this, simply:1. Choose File New Sequence2. Go to the General Tab at the top of the new Sequence box.3. Change the Editing mode from a specific editing mode to “Desktop.”4. Change the TimeBase to match the frame rate you wish to edit in5. Change the Video and Audio settings to also match the settings required for your project.6. Under Video Previews, change the Preview File Format to QuickTime (Desktop)7. Change the Codec to Apple ProRes 422.8. Click the Save Preset button, and name your new preset. This preset will now be available infuture projects.Customizing your workspaceAs you know from Final Cut Pro, customizing your workspace to fit your personal style andworkflow can really increase productivity. The default workspace in Adobe Premiere Pro containsgroups of panels (such as Project, Metadata, and Timeline) and you can customize a workspace byarranging panels in the layout that best suits your working style. As you rearrange panels, the otherpanels resize automatically to fit the window.More information aboutcustom workspaces is available inthe online Help for Adobe PremierePro. Choose Help Adobe PremierePro Help and search for Dock, Group,or Float Panels.You can create and save several custom workspaces for different tasks—for example, one forediting and one for previewing. When creating workspaces, Adobe Premiere Pro offers moreconfiguration options than Final Cut Pro. It also enables you to take any window or panel tofull-screen size simply by pressing the tilde key.Audio, Color Correction, Editing, Effects, and Metalogging workspaces are already defined whenyou first launch Adobe Premiere Pro. However, you can customize these named workspaces tobest fit your work habits—or create new workspaces for other tasks. (The ability to group panelswithin a frame means that you can create customized workspaces that are even more flexible thanthose in Final Cut Pro.)To customize your workspace:Select your desired workspace from the Window Workspace submenu at any time. You can alsochoose Premiere Pro Preferences and edit other settings in the Preferences dialog box thatappears. This is similar to User Preferences in Final Cut Pro. There are 14 tabs of information thatyou can customize.Editing with Adobe Premiere Pro CS5 if you’re a Final Cut Pro user5
Part 3: Capturing and importingThere are a variety of ways to import footage into Adobe Premiere Pro. A third-party capture cardis required for all but firewire-based decks/cameras. Adobe Premiere Pro supports many of thesame capture cards and boxes as Final Cut Pro so you likely will not need to invest in new hardwareto use Adobe Premiere Pro.Capturing from tapeThe Capture panel in Adobe Premiere Pro is very similar to the Capture window in Final Cut Pro.To capture from tape:1. Choose File Capture, or press F5.2. Select the Settings tab. In the Device Control section of the tab, select a brand and type ofmachine or camera that you want to control from the Options menu. This provides the bestquality control over your FireWire camera or deck. Common cameras and decks are oftenrecognized over the FireWire connection and will automatically be selected.3. (optional) Revise the settings for your capture locations using the Settings tab.The Adobe Premiere Pro user interface for capturing is similar to that in Final Cut Pro. The Capturewindow includes a primary area for display of the content being captured. Logging and Settingscontrols are offered in tabs to the right of that display.There are several possible methods for capturing footage: To capture on-the-fly, click the record button near the bottom of the Capture window, orpress G. You can name and describe the clip just as you would in Final Cut Pro. To stopcapture, click Stop, or press S or the Escape key as you would in Final Cut Pro. To capture clips “In to Out,” set Ins and Outs with the Set In and Set Out buttons, or press I tomark an inpoint and O to mark an outpoint. Then capture the clip by clicking In/Out in theCapture section of the Logging tab. To capture an entire tape, rewind the tape using the on-camera controls or the rewind buttonin Adobe Premiere Pro, and then click Tape in the Capture section of the Logging tab. If youselect the Scene Detect checkbox before you begin capturing an entire tape, it will subclip thetape based on camera breaks.Adobe Premiere Pro has a huge advantage over Final Cut Pro when it comes to footage that wascaptured on-the-fly in the Capture panel. Adobe Premiere Pro can name these clips after they’vebeen captured. In Final Cut Pro, renaming clips requires forcing the media file to match the newname.Importing footage from tapeless (file-based) camerasIn Adobe Premiere Pro, you can import and edit clips from nearly any file-based media directlyincluding P2, AVCHD, XDCAM, AVCCAM, DPX, and AVC-Intra as well as DSLR and RED cameraswithout transcoding or rewrapping. You can begin viewing and editing straight from the cards, butit is more efficient to copy their contents to a hard disk before importing. This also improvesplayback performance, and, the importing of clips doesn’t actually move or copy them. If the filesaren’t moved from the card or optical media to a hard drive, they will go offline if the card oroptical media are removed from the system.Locate and open footage easilywith the Media Browser panel,which lets you drag and dropfiles to the Project panel,preview them in the SourceMonitor, or add them to asequence in the Timeline. Noticehow P2 clips can be viewed asvideo clips or as a group of filefolders.Editing with Adobe Premiere Pro CS5 if you’re a Final Cut Pro user6
There are three main ways to import files into Adobe Premiere Pro. Two of the methods—using theFile Import command and drag and drop from the Finder—are identical to those in Final Cut Pro.The others method is via the Media Browser panel which is the most effective way to find tapelessmedia in Adobe Premiere Pro because it can actually see the camera clips without having to importthem into your system. The Media Browser is part of the editing interface and allows you to see allthe media on the drives and cards connected to your computer.To import media from these cameras:1. Choose Window Media Browser or press Shift 8.2. Select the type of media you want to see in the View pull-down menu. The media browser willsee and play the media files themselves instead of wading through a convoluted file anddirectory structure.For details on how to work with a specific camera and its format, check out the video productionworkflow guides available online: Using Adobe Premiere Pro CS5 with Canon Digital Video Cameras Using Adobe Premiere Pro CS5 with tapeless Sony XDCAM content Using Adobe Premiere Pro CS5 with RED Digital Cinema content CS5 Production Premium end-to-end editing workflows with Panasonic AVCCAM cameras CS5 Production Premium end-to-end workflows for Panasonic P2 and P2HD camerasImporting from Adobe OnLocation CS5Another powerful way to ingest media is to use Adobe OnLocation CS5 software (included withAdobe Premiere Pro CS5, as well as with Adobe Creative Suite 5 Production Premium and MasterCollection). Adobe OnLocation allows you to live capture DV, HDV, or DVCPRO footage directlyfrom the camera to your computer hard drive through Firewire. It also allows you to get all thebenefits of real-time, on-set logging when working with tapeless cameras too.Audio level meters help you keep track of your audiosignal so it doesn’t distort, and pop alerts identify whensudden surges occur that are too short to register onmeters.The Waveform Monitor operates inYUV or RGB color spaces, so you canevaluate brightness (luminance) andsaturation levels.The Vectorscope displays the amountof color in the video signal for either thefull frame or for a single horizontal linewithin a frame.The Field Monitor displays DV, HDV,and DVCPRO natively, so unlike yourcamera’s viewfinder or LCD screen, theField Monitor displays videoexactly as it is recorded.Comment markers are displayed inthe Field Monitor timeline.The new Timestamp button tellsOnLocation when the selected shotis being recorded, whether or not thecamera is connected to OnLocation.When tapeless media is imported,OnLocation automatically matches theinformation to the recorded clips.The Shot List in the Project panel lets you keep track oflocations, In and Out point timecode, and other vitalinformation, comment on clips, describe and catalog eachshot, indicate camera moves, and automatically captureinformation coming from the camera.The Media Browser panel displays the contents of yourcomputer drives. The Media Browser understands thestandard Panasonic P2 and Sony XDCAM directory structure,so when you browse to a P2 directory, the Media Browserdisplays only the importable shots/takes.Editing with Adobe Premiere Pro CS5 if you’re a Final Cut Pro user7
Adobe OnLocation provides a host of monitoring tools, such as waveform monitors, vectorscopes,VU meters, and high-quality display options. These monitoring options help to ensure that youfootage is captured at the highest possible quality by allowing the camera operator or director ofphotography to achieve proper audio and video levels. Footage captured with Adobe OnLocationstores camera’s metadata, as well as metadata you add while you shoot the footage. These clipsare immediately available for editing in Adobe Premiere Pro without the need to re-capture fromtape.OnLocation can even be used as a pre-production tool. Pre-load it with information about shotsyou plan to record and link that metadata to the actual shots as they are captured during the shoot.All of the pre-production metadata is stored with the recorded clip and is passed on throughoutthe post-production process.Adobe OnLocation supports both AVI and QuickTime recording file formats on a Windowsplatform. It supports only the QuickTime format on a Mac OS.OnLocation can immediately play back footage you record to your hard drive. This eliminates theneed to rewind your camera’s tape to check footage and the possibility of damaging or recordingover footage. After recording to the hard drive, you can mark your best takes in the field—whenthe performances and judgements are fresh. The marked footage exports as metadata and flowsdirectly to the editor when imported into Adobe Premiere Pro.Footage recorded in OnLocation can be assigned to a specific folder on your drive. It is wise tocreate a location that will be easy to find and is on a hard-drive of sufficient speed to record andanalyzing tapeless footage in Adobe OnLocation.Analyzing tapeless camera footage in Adobe OnLocationIn addition to using the powerful logging tools in Adobe OnLocation with tapeless cameras, youcan use the comprehensive software waveform monitor and vectorscope as well as the audio VUMeters to identify image and audio problems during live recording to hard disk. And you can usethat same alert system to analyze imported files by quickly scanning your footage for audio pops,clipping, and video overbrights.To analyze imported footage for audio pops, clipping, and video overbrights:1. In the Project panel, double-click on a clip and load it into the Field Monitor.2. Choose Project Generate Alerts And Audio Peaks For Selected Clips. The thumbnail and textfor selected clip changes to indicate it is being analyzed.3. When the analysis is complete, the thumbnail returns to normal. Click the Play button in theField Monitor panel or press the spacebar to play the clip.Notice that audio plays back as you play, scrub, or step through clips. The results of the analysis aredisplayed along with the audio waveform in the Field Monitor. In the image below, the dark area onthe left indicates the portion of the clip defined by In and Out points set in the Field Monitor.The yellow tick marks that appear above and below the centerline of the audio waveform displayare audio popping alerts. They identify sudden surges in sound that aren’t loud enough to causeaudio clipping, but are likely to create unpleasant and possibly unusable audio. A plosive sound atthe beginning or end of a word is a common source of such pops.When video brightness exceeds a specified level, area, and duration, video alerts appear as broadwhite bands in the waveform. Similarly, when sound exceeds the amplitude range of the currentaudio bit depth, audio clipping alerts appear as red tick marks above and below the centerline ofthe audio waveform. Brief audio clipping may not be audible on location, but it produces distortionthat can cause problems when editing. The audio alerts above the centerline are for the leftchannel; alerts below are for the right.Editing with Adobe Premiere Pro CS5 if you’re a Final Cut Pro user8
Importing/exporting images, graphics and special effectsMany of the special effects and graphics you will be importing in Adobe Premiere Pro will havebeen created with other Adobe software such as Photoshop, Illustrator or After Effects. There is anadvantage to using Adobe Premiere Pro when working with multiple Adobe applications becauseof its flexibility. For example, when you wish to import specific layers from a Photoshop file, AdobePremiere Pro gives you a variety of ways to do so and retains Photoshop blending modes.To import a layered Photoshop file into Adobe Premiere Pro:1.Choose File Import.2.Browse to a multi-layered Photoshop file.3.Select a file and then click Import, or double-click the file. Thisopens the Import Layered File dialog box. The Import As menu givesyou four options:Merge All Layers: Creates a single flattened file from all layerMerge Layers: Flattens only the layers that you select in the Import Asdialog boxIndividual Layers: Imports only the specific layers you select in a bin,with each layer as its own source.Control how Photoshop files lookwhen imported into Adobe PremierePro. Preview all layers, choose whichlayers to import, and then choosehow to import the layers—asindividual layers, merged, or as asequence.Sequence: Imports selected layers as a separate clip, but creates asequence with the layers stacked into a sequence that you can then cutin to your master sequence.4. Choose an option, and then click OK to import the chosen layers.You can also import native Adobe Illustrator files directly into Adobe Premiere Pro. Vector art willbe rasterized in Adobe Premiere Pro, and empty areas will be converted into an alpha channel.Importing/exporting via Adobe Dynamic LinkThere are numerous timesaving editing benefits when editing with Adobe Premiere Pro, but one ofthe greatest advantages over Final Cut Pro is its tight integration with the other productioncomponents of Creative Suite 5 Production Premium.Using Dynamic Link in Adobe Premiere Pro, you can send sequences to Encore CS5 to createBlu-ray Discs and searchable web pages that contain rich media content without intermediaterendering. When you install Adobe Premiere Pro as a component of Production Premium, DynamicLink is expanded to include After Effects as well.With Dynamic Link, eliminateintermediate rendering when makingchanges to assets — whether editinga sequence of clips in Adobe PremierePro, changing a composition in AfterEffects, or refining a project in Encore.Adobe Premiere Pro and After Effects integration saves you time with the ability to drag and dropor copy and paste clips from one application to another. When you export an Adobe Premiere Proproject to After Effects, bins, edits, markers, keyframed effects, nested sequences, transitions, andmore are preserved. Dynamic Link lets you use sequences from Adobe Premiere Pro as layers inAfter Effects compositions without rendering. Any changes you make to the sequence in AdobePremiere Pro are automatically reflected in your After Effects comps. You can also use DynamicLink to send After Effects compositions to an Adobe Premiere Pro project, where the comps lookand act just like any other clip. However, when you make changes in After Effects, they’reautomatically reflected in the Adobe Premiere Pro sequence. Similarly, you can dynamically linkAfter Effects compositions to Encore projects.To build an effect in After Effects based on a segment in the timeline:1. Select the segment and choose File Dynamic Link Replace With After Effects Composition.This will launch After Effects and create a composition with the segment’s video as the baselayer of the composition.2. Add any effects and additional media to the segment in After Effects. When you’re done, savethe effect and return to Adobe Premiere Pro. It is not necessary to render the effect in AfterEffects. The composition will appear in Adobe Premiere Pro with no further linking, exporting,or importing. Eventually, the effect will need to be rendered before export, but you can playand scrub through most effects done with Dynamic Link without rendering.Editing with Adobe Premiere Pro CS5 if you’re a Final Cut Pro user9
Part 4: Transferring Final Cut Pro projects into Adobe Premiere ProMoving media and sequences between tools made by different companies in complex productionpipelines often requires format conversion, specialized plug-ins, tedious workarounds, or a lot ofmanual work to recreate elements that don’t survive the transfer process. Interoperability betweenAdobe Premiere Pro and Final Cut Pro, as well as between Adobe Premiere Pro and Avid NLEs suchas Media Composer, means you can share files and timelines without conversion or rendering,preserving commonly used effects and transitions, saving valuable production time. In addition toimporting projects from Final Cut Pro, in Adobe Premiere Pro CS5 you can export a project as aFinal Cut Pro XML file (File Export Final Cut XML) as well as an AAF file for Avid NLEs.To import a Final Cut Pro sequence into Adobe Premiere Pro:1. In Final Cut Pro, select a sequence and click File Export XML.2. In the Export XML dialog box, select Apple XML Interchange format version 5. (Version 4 willalso work for older versions of Final Cut Pro.) Then click OK.3. Name your exported sequence, browse to a location to save it, and then click Save.4. In Adobe Premiere Pro, create a new project from the Welcome screen by clicking the NewProject button, or choose File New Project (Option Command N).5. Click OK. The New Sequence Dialog box will appear.6. Click Cancel. (This cancels the creation of a new blank sequence.)7. In Adobe Premiere Pro, choose File Import. In the dialog box, browse to the XML file generated by Final Cut Pro, and click Import. Adobe Premiere Pro will import the sequence and allnecessary source media. An Import progress bar appears, but it may take a minute or longerbefore you will see evidence that anything ishappening. During this apparent pause, AdobePremiere Pro is creating a translation report.When the report is complete, another dialogbox advises you to check the report forpossible conversion issues.Select any of the clips in the timeline by clicking on them. Press Shift 5 to put focus on the EffectsControls panel where information about the effects and transitions applied to each clip isdisplayed. The Translation Report provides details, such as when effects such as color correctionhad to be approximated.If Adobe Premiere Pro and Final Cut Pro are running on the same system, all media should link upautomatically. If, however, you are moving from one computer to another, Adobe Premiere Pro willprompt you for the location of the source media. If moving from a Mac to a PC, be aware thatcertain QuickTime codecs have not been released for the PC, and the source media in thoseformats will not play on the PC. This includes, for example, QuickTime files that use
Editing with Adobe Premiere Pro CS5 if you’re a Final Cut Pro user 4 History panel: The History panel tracks up to 32 steps you take in your production and lets you back up to different states of your editing process. When you back up to a previous conditi