Transcription
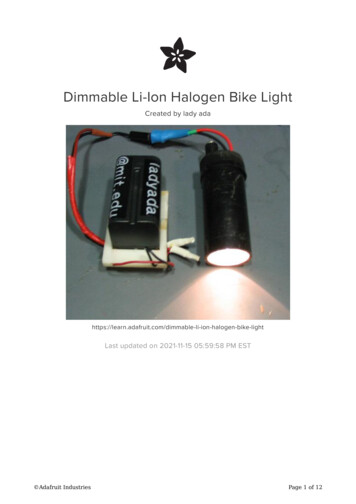
Dimmable Li-Ion Halogen Bike LightCreated by lady gen-bike-lightLast updated on 2021-11-15 05:59:58 PM EST Adafruit IndustriesPage 1 of 12
Table of ContentsOverview3 Dimmable Li-Ion Halogen Bike Light LiIon vs. Other battery types Halogens vs. Other lamp types344Parts5Circuitry5Housing & Retainer7Final Assembly9 Schematics12 Adafruit IndustriesPage 2 of 12
OverviewDimmable Li-Ion Halogen Bike LightBiking in the winter, or at night, is dangerous without a front light. A good front-light isessential, not only for being seen, but to see the road. LED lamps will not illuminatethe road, and they can be too dim for cars to see you (1W or better LEDs are quitenice as headlamps.) I offer here a simple (but high-quality) design to build your own 5or 10W halogen lamp, which runs off of a rechargeable 7.2V or 7.4V Lithium Ionbattery pack.Assembled light, with 10W halogen, and 3.5Ah 7.2V lithium ion battery pack (the nicebattery holder was custom made for another project). Adafruit IndustriesPage 3 of 12
LiIon vs. Other battery typesLiIon are extremely light and small, much lighter/smaller than NiCads, NiMH and forsure Lead Acids. They can handle a couple hundred recharge cycles, are readilyavailable (unlike LiPolymer) and work in cold weather. Another nice thing is theirvoltage starts at 8V and quickly drops to 7.2V, then stays there for most of the life,before dropping slowly to 6V. This means that overvolting your 6V lamp is really easy.The bad thing is that you may not notice that the lamp is dimming before it abruptlyturns off due to the internal undervoltage fuse.Li-Ions are a little more delicate than most batteries and must not be over orundervoltaged. I use prepackaged batteries with protection circuitry inside. I wouldhesitate to use bare-back cells, as fires suck. Regardless, Li-Ions dislike giving burstcharges, so you can't just connect your lamp to a battery with a resistor (orpotentiometer) in series, as halogens will current-spike (5A? 10A?) if voltagecontrolled. Therefore you must use a current-control scheme as presented here.You can buy Sony InfoLithium/Camcorder batteries (such as the NP-F550/F750/F950formfactor) off of EBay (https://adafru.it/c7y) for cheap, you can connect to them withmini banana plugs. (Or by soldering directly if you are really really quick and haveeverything pre-tinned, I don't advocate it unless you're safe!)Halogens vs. Other lamp typesThere isn't really any other reasonably priced options available right now, 5W luxeons(https://adafru.it/c7A) are 50 and the white ones don't last more than a couplehundred hours. They are more efficient than the MR-11's I use, but the best is really togo with an MR-16 10W if possible. I had trouble finding a 6V MR-16 bulb, so I stuckwith MR-11. Most 'professional' bike systems use MR-11's because they are small andunobtrusive.Bulb 5W Luxeon 6W MR-11 10W MR-11 10W MR-16 Efficiency (lum/W) 24 13.5 19 40Output (lumens) 120 80 190 400You can overvolt by turning up the pot, for up to 10% overvolting (5% over-current),which will give you 40% more lumens but give you only 1/3 the bulb life. For moreinformation about overvolting see page 8 of the GE Halogen Guide (https://adafru.it/Cco).These bulbs are available from Atlanta Light Bulb (https://adafru.it/c7E) for 6 each,make sure to get the right voltage, wattage, and with a coverglass. Adafruit IndustriesPage 4 of 12
PartsThere are a few parts necessary, but all of them are pretty easy to get.Part Name Use Cost Where to FindHalogen Lamp light src 6 Lighting store/OnlineMR-11 Socket for lamp 6 Lighting store/Online Halogen Torchiere housing 0 In trashSolid Core/Stranded Wire Wiring circuitry & Battery 0- 5 Phone wire and thin stereohookup is fine Perfboard circuit substrate 4 RadioShack, etc LiIon Battery power src 20- 60 EBay, electronics storeThe rest are electronic components, all available from DigiKey (https://adafru.it/c8b).Part Name Part Number Cost (each)Rail-to-rail opamp LMC6482IN-ND 2.05 PowerP-FET IRF9Z30-ND 1.28 5.1 Zener 1N5231BDICT-ND 0.36 10K Pot w/Switch270X232A103B1B1 3.48 0.1ohm 1/2W sense resistor* 605HR100-ND 0.42 MiniBanana plugs J457-ND 1.42 DC Jack (for battery connection) CP-102A-ND 0.38 DCPlug (for battery connection) CP-002A-ND 0.38 Various resistors Search website 0.10* If you're using a 10W or less bulb, 1/2W is ok. Otherwise, 1W is best.CircuitryIf you plan to build the housing out of halogen lamp tube (35mm I.D.) I would suggestgetting a piece of perfboard, perforated prototyping board and cutting it into a circlethat will fit inside the tube, then soldering all the parts. This requires a little bit offoresight, and attention as it's hard to remeber what pin is what. Adafruit IndustriesPage 5 of 12
The opamp is in the center, with the sense resistor and FET pointing down, thepotentiometer has 5 wires because it has a built in switch.Download the schematic from the download page. Look at it and place all the piecesbefore soldering anything! Place the 8-DIP opamp first, about center, then place theFET, on the perimeter so that the heat sink will press against the housing, then placeall the resistors. Remember that the 0.1 ohm resistor must be precise in value and1/2W or 1W (at least) otherwise known as a 'sense resistor.' In the pictures, the whiteceramic tablet is the resistor, and the metal sheet is the heatsink for the FET.Preferably, the potentiometer and on/off switch should be in the same package. Makesure the pot is linear taper, not log/audio taper.Use solid-core wire when making jumper-wires on the board, and stranded for wiresthat go to the pot/switch/lamp. Adafruit IndustriesPage 6 of 12
The other side of the circuit board, showing the heat sink, and the large senseresistor. Also, the lamp socket is visible in the top lefthand corner.To connect to the lamp, you can either (carefully) solder directly, or get a socket. Thelamp should last a really really long time (1,000hrs at least) so there's nothingparticularly wrong with connecting directly to the lamp. Just make sure you can stillassemble it (read the housing assembly instructions since a ring needs to go betweenthe board and lamp).I didn't include a fuse, but you may want to. (A proper LiIon battery is current limitedanyways, which is why the whole system is current-controlled.)Use heat-shrink liberally when necessary, not electrical tape. Electrical tape doesn'thold as well.Plug in the lamp and give power to the system, verify that it works, there should be a 150mV drop across the resistor, and a voltage that is 32 times that on pin 7 of the opamp. There should be 5V at pin 2. Turning the pot should dim/brighten the lamp.(Hopefully)Housing & RetainerFind a thrown-out/broken torchiere halogen lamp, the kind that are 7ft tall and breakall the time. This should be trivial, as they are cheaper to replace than repair. Check Adafruit IndustriesPage 7 of 12
that the I.D is 35mm (1.4"). Cut a piece that is between 3" and 3.5" long that includes aset of threads. Also take one or two of the interconnect threaded pieces.One end of the housing should have a full set of threads, the two rings are visible inthe background.Cut the interconnect so that you have two rings with three threads (or one with fourand one with two). Debur/file everything. Thread one of the rings in all the way in,then place the lamp in so that the ring holds it and thread the other piece in, verifythat they are the correct size. Adafruit IndustriesPage 8 of 12
One of the filed rings inside the housing.You can put a gasket in if you'd like, to make it more waterproof.To cap the other end, find a plastic jug cap that is 1.5" diameter. These are surprisinglycommon, and I got mine off of a thrown out motor oil container. Cut the threads outwith a dremel or knife. Drill a hole and mount the potentiometer. Drill another hole tolet the two battery connect wires through.Final AssemblyTo assemble, push the circuit board in, using the heat sink to hold the board in place(the heat sink presses against the sides of the housing). Adafruit IndustriesPage 9 of 12
Push the cap onto the end of the housing.Then thread the inner ring, plug the lamp into the socket (or solder it in). Adafruit IndustriesPage 10 of 12
Then thread on the last ring.If you don't think you'll open it again, you might want to put a drop of threadlock orsuperglue, to keep it from unscrewing. Ducttape the cap, and hotglue/epoxy the holewhere the battery wires emerge. Adafruit IndustriesPage 11 of 12
I soldered on a DC jack onto the end and shrink wrapped it all.Schematics As an Eagle (https://adafru.it/c3Y) schematic (https://adafru.it/cnq) fileOr just click on the image below to get the embiggened BMP Adafruit IndustriesPage 12 of 12
These bulbs are available from Atlanta Light Bulb (https://adafru.it/c7E) for 6 each, make sure to get the right voltage, wattage, and with a coverglass. Bulb 5W Luxeon 6W MR-11 10W