Transcription
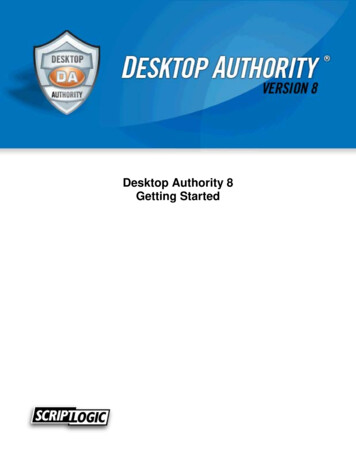
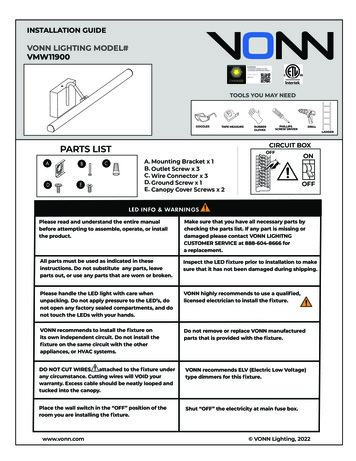
INSTALLATION GUIDEVONN LIGHTING MODEL#VMW11900TOOLS YOU MAY NEEDGOGGLESTAPE MEASUREBDECDRILLLADDERCIRCUIT BOXPARTS LISTAPHILLIPSSCREW DRIVERRUBBERGLOVESOFFA. Mounting Bracket x 1B. Outlet Screw x 3C. Wire Connector x 3D. Ground Screw x 1E. Canopy Cover Screws x 2ONOFFLEDLED INFOINFO && WARNINGSWARNINGSPlease read and understand the entire manualbefore attempting to assemble, operate, or installthe product.Make sure that you have all necessary parts bychecking the parts list. If any part is missing ordamaged please contact VONN LIGHITNGCUSTOMER SERVICE at 888-604-8666 fora replacement.All parts must be used as indicated in theseinstructions. Do not substitute any parts, leaveparts out, or use any parts that are worn or broken.Inspect the LED fixture prior to installation to makesure that it has not been damaged during shipping.Please handle the LED light with care whenunpacking. Do not apply pressure to the LED’s, donot open any factory sealed compartments, and donot touch the LEDs with your hands.VONN highly recommends to use a qualified,licensed electrician to install the fixture.VONN recommends to install the fixture onits own independent circuit. Do not install thefixture on the same circuit with the otherappliances, or HVAC systems.Do not remove or replace VONN manufacturedparts that is provided with the fixture.DO NOT CUT WIRESattached to the fixture underany circumstance. Cutting wires will VOID yourwarranty. Excess cable should be neatly looped andtucked into the canopy.VONN recommends ELV (Electric Low Voltage)type dimmers for this fixture.Place the wall switch in the “OFF” position of theroom you are installing the fixture.Shut “OFF” the electricity at main fuse box.www.vonn.com VONN Lighting, 2022
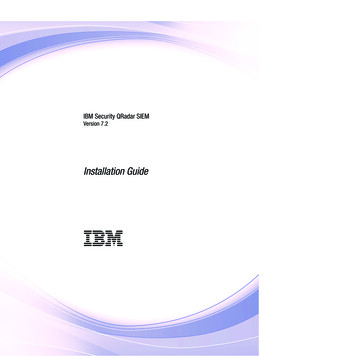
Fixture DiagramE Canopy Cover ScrewsA Mounting BracketB Outlet ScrewD Ground ScrewC Wire Connectorwww.vonn.com VONN Lighting, 2022
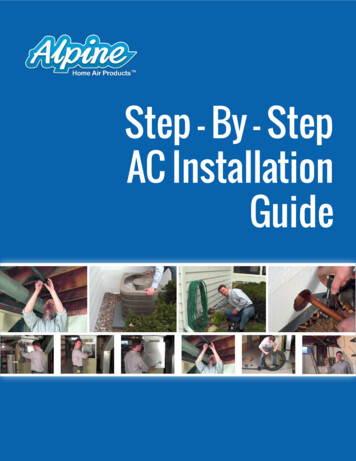
Step 1. Install Mounting BracketWallA Mounting BracketBStep 2. Connect WiresOutlet ScrewWallA Mounting BracketD Ground ScrewSupply Wires:Connect Black (Line Wire) from fixture to Black (Hot Wire)from outlet box.Connect White (Neutral Wire) from fixture to White (NeutralWire) from outlet box.Ground Wires:Connect Bare Copper (Ground Wire) from fixture to Green orBare Copper (Ground Wire) from outlet box.Twist wires together clockwise and secure with wire connector (C).Installer Tip (2): If ground wire is not available in outlet box,then secure Bare Copper (Ground Wire) from fixture toground screw (D) on mounting bracket (A).C WireConnectorInstaller Tip (3): It is recommended that two installers are required to install thefixture. One installer to hold the fixture, and the second installer to connect thewires.www.vonn.com VONN Lighting, 2022
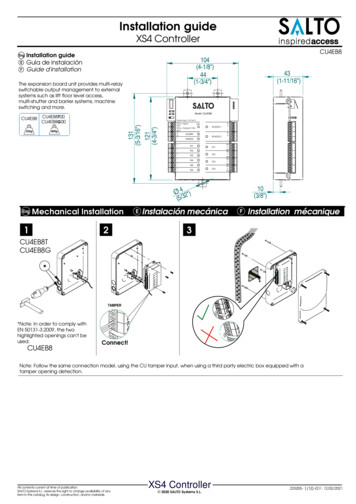
Step 3. Mount FixtureE Canopy Cover ScrewsWallStep 4. Turn Power ONTurn electricity “ON” at main fuse box.Place the recommended ELV type dimmer switch in the “ON” position to test the fixture.Circuit BoxONONOFFwww.vonn.com VONN Lighting, 2022
GUIDE D’INSTALLATIONNO. DU MODÈLE VONN LIGHTINGVMW11900OUTILS DONT VOUS POURRIEZ AVOIR BESOINLUNETTESMETRE RUBANBDECTOURNEVISCRUCIFORME DETYPE PHILLIPSPERCEUSEECHELLETABLEAU ÉLECTRIQUELISTE DES PIÈCESAGANTSISOLANTSÉTEINTA. Support de montage x 1B. Vis pour prise x 3C. Connecteur de fils x 3D. Vis de terre x 1E. Vis de couvercle x 2ALLUMÉÉTEINTLED& WARNINGSINFORMATIONSETINFOAVERTISSEMENTSDU LUMINAIRE À DELVeuillez lire et comprendre tout le manuel avantd’essayer d’assembler, utiliser ou installer leproduit.Assurez-vous que vous disposez de tous lescomposants requis en vérifiant la liste decomposants. Si un composant est manquant ouendommagé, veuillez contacter le SERVICE À LACLIENTÈLE au 888-604-8666 pour bénéficier d’unremplacement.Tous les composants seront utilisés conformémentà ces instructions. Ne remplacez aucun composant,ne laissez aucun composant de côté, et n’utilisezaucun composant usé ou endommagé.Vérifiez le luminaire à DEL avant l’installation pourvous assurer qu’il n’a pas été endommagé pendantle transport.Veuillez manipuler le luminaire à DELsoigneusement lors du désemballage. N’appliquezpas de pression sur les DEL, n’ouvrez pas lescompartiments scellés en usine et ne touchez pasles DEL avec vos mains.VONN vous recommande fortement d’appeleraux services d’un électricien qualifié et agréépour installer le luminaire.VONN vous recommande d’installer le luminaire surson propre circuit indépendant. N’installez pas leluminaire sur le même circuit que pour les autresappareils, ou pour les systèmes CVCA.N’enlevez et ne remplacez pas les composantsfabriqués par VONN qui sont fournis avecle luminaire.NE COUPEZ PAS LES FILSattachés au luminairesous aucun prétexte. Le fait de couper les filsANNULE votre garantie. Le câble en excès seramis en boucle et replié dans le couvercle.VONN recommande les variateurs du type ELV(équipement basse tension) pour ce luminaire.Mettez le commutateur mural dans la position« DÉSACTIVÉ » dans la chambre où vous allezinstaller le luminaire.Coupez l’alimentation électrique au boîtierde fusibles.www.vonn.com VONN Lighting, 2022
Schéma du luminaireE Vis de couvercleA Support de montageB Vis pour priseD Vis de terreC Connecteur de filswww.vonn.com VONN Lighting, 2022
Étape 1. Installation du support de montageMurA Support de montageBÉtape 2. Connexion des filsVis pour priseMurA Support de montageD Vis de terreFils d’alimentation:Connectez le fil noir (Phase) du luminaire au fil noir(Phase) du boîtier de sortie.Connectez le fil blanc (Neutre) du luminaire au fil blanc(Neutre) du boîtier de sortie.Fils de terre:Connectez le fil de cuivre nu (Terre) du luminaire au fil vert oude cuivre nu (Terre) du boîtier de sortie.Tordez les fils ensemble en sens horaire et fixez avec leconnecte-ur pour fils (C).Conseil pour installateurs (2): Si le fil de terre n’est pas disponibledans le boîtier de sortie, fixez le fil de cuivre nu (Terre) du luminaireà la vis de terre (D) sur le support de montage (A).C Connecteur de filsConseil pour installateurs (3): Un nombre de deux installateurs est recommandépour installer le luminaire. Un installateur pour soutenir le luminaire et ledeuxième pour connecter les fils.www.vonn.com VONN Lighting, 2022
Étape 3. Installation du luminaireE Vis de couvercleMurÉtape 4. BRANCHEZ l’alimentationMettez l’alimentation sur « ALLUMÉ » au boîtier principal de fusibles.Mettez le variateur de type ELV recommandé en position « ALLUMÉ » pour tester le luminaire.Tableau électriqueALLUMÉALLUMÉÉTEINTwww.vonn.com VONN Lighting, 2022
A B C D E INFORMATIONS ET AVERTISSEMENTS DU LUMINAIRE À DELLED INFO & WARNINGS Veuillez lire et comprendre