Transcription
ChargePoint Home Flex16A-50A Flexible Amperage ChargerInstallation GuideATTENTION:Installers, pleaseread this guidethoroughly.Return the guideto the owner afterinstallation.
Important Safety InstructionsSAVE THESE INSTRUCTIONSWARNING: This manual contains important instructions for Home Flex.When using electric products, always follow basic precautions, includingthe following.1. Read and follow all warnings and instructions before installing andoperating the ChargePoint charging station. Install and operate only asinstructed. Failure to do so may lead to death, injury, or property damage,and will void the Limited Warranty.2. Only use licensed professionals to install your ChargePoint chargingstation and adhere to all national and local building codes and standards.Before installing the ChargePoint charging station, consult with a licensedcontractor, such as a licensed electrician, and use a trained installationexpert to ensure compliance with local building and electrical codes andstandards, climate conditions, safety standards, and all applicable codesand ordinances. Inspect the charging station for proper installation beforeuse.3. Always ground the ChargePoint charging station. Failure to groundthe charging station can lead to risk of electrocution or fire. The chargingstation must be connected to a grounded, metal, permanent wiringsystem, or an equipment grounding conductor shall be run with circuitconductors and connected to the equipment grounding terminal or leadon the Electric Vehicle Supply Equipment (EVSE). Connections to theEVSE shall comply with all applicable codes and ordinances.4. Install the ChargePoint charging station using a ChargePointapproved method. Failure to install on a surface that can support theweight of the charging station can result in death, personal injury, orproperty damage. Inspect the charging station for proper installationbefore use.5. This charging station is not suitable for use in hazardous locations. Donot install Home Flex near flammable, explosive, or combustible materials.6. This device should be supervised when used around children.7. Do not put fingers into the electric vehicle connector.8. Do not use this product if the flexible input power cable or EV chargingcable is frayed, has broken insulation, or any other signs of damage. CallChargePoint customer support immediately at 1.888.758.4389.9. Do not use this product if the enclosure or the EV connector is broken,cracked, open, or shows any other indication of damage. CallChargePoint customer support immediately at 1.888.758.4389.10. Use 90 C wire copper conductors only.11. Do not operate Home Flex in temperatures outside its operatingrange. For charging stations set to 16-48 A, the range is -40 F to 122 F(-40 C to 50 C). For charging stations set to 50 A, the range is -40 to113 F (-40 to 45 C).2 chargepoint.com
Other than the charging cable, Home Flex contains no field serviceable parts. Donot attempt to repair or service any other part of the unit yourself. If the unitrequires servicing, contact ChargePoint, Inc. Ensure that Home Flex charging cable is positioned so it is not stepped on,tripped over, or subjected to damage or stress. Do not close a garage door onthe charging cable.Important: Under no circumstances will compliance with the informationin this manual relieve the user of his/her responsibility to comply with allapplicable codes or safety standards. This document describes the mostcommonly used installation and mounting scenarios. If situations arise inwhich it is not possible to perform an installation following the proceduresprovided in this document, contact ChargePoint, Inc. ChargePoint, Inc. isnot responsible for any damages that may occur resulting from custominstallations that are not described in this document or for any failure toadhere to installation recommendations.Product DisposalChargePoint Home Flex is electronic and therefore may not bedisposed of as part of unsorted domestic waste. Inquire with localauthorities regarding proper disposal. Product materials arerecyclable as marked.No Accuracy GuaranteeCommercially reasonable efforts were made to ensure that the specifications andother information in this manual are accurate and complete at the time of itspublication. However, the specifications and other information in this manual aresubject to change at any time without prior notice.Copyright and Trademarks 2013-2019 ChargePoint, Inc. All rights reserved. This material is protected by thecopyright laws of the United States and other countries. It may not be modified,reproduced or distributed without the prior, express written consent of ChargePoint,Inc. CHARGEPOINT is a U.S. and European Union registered trademark and servicemark of ChargePoint, Inc. and cannot be used without the prior written consent ofChargePoint.CAN ICES-3 (A)/NMB-3 (A)chargepoint.com 3
4 chargepoint.com
Table of ContentsVerify Contents . 7Gather Tools . 8Plan the Location . 9Wire the Circuit .11Mount the Charging Station .11Install the Charging Cable . 15Complete the Installation . 17Questions? . 17Limited Warranty . 18chargepoint.com 5
6 chargepoint.com
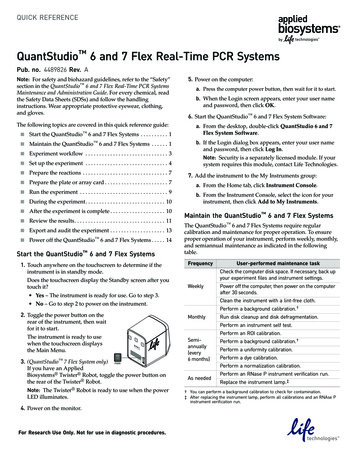
Verify ContentsCAUTION: The ChargePoint Home Flex charging station must beinstalled by a licensed electrician. If you do not know where to findone, refer to the ChargePoint Home Flex Quick Start Guide orchargepoint.com/homeinstall for help.Check the box to ensure you have the Quick Start guide, this installationguide, and these parts:a. Charging station (with attached input power cable)b. Faceplate (pre-installed on charging station)c. Installation templated. Charging cable with cable clipe. Wire cover (pre-installed on charging station)f. 10 mm (3/8 in) driver bitg. 4 mm (3/16 in) drill bith. Three 6 mm (1/4 in) x 51 mm (2 in) lag screwsdabcefghNote: If you are missing any of these parts, please call 1-888-758-4389.chargepoint.com 7
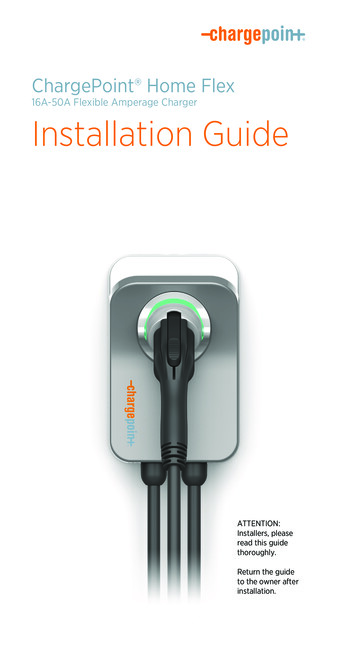
Gather ToolsYou also need:a. One NEMA 6-50 outlet, NEMA 14-50 outlet, or supplies to install ahardwired circuit.b. Tapec. Pencild. Stud findere. Levelf. Drillg. Coinabc8 chargepoint.comfdeg
Plan the LocationBefore beginning work, check the site for appropriate mounting location andelectrical capacity.1.Ensure the homeowner has chosenan installation location that allowsthe charging cable to reach the car'scharging port while still providingslack. Ensure there is a stud availableat the desired location for mountingthe charging station. Ensure there is WiFi signal available.Note: Outdoor installation is an option, but requires an outdoor-rated,weather-resistant electrical outlet or hardwired installation.WARNING: In areas with frequent thunderstorms, add surge protection atthe service panel for all circuits. Ensure all power and ground connections,especially those at the breaker and bus bar, are clean and tight. Remove alloxide from all conductors and terminals before connecting wiring.2. Determine the desired charging amperage with the homeowner. HomeFlex can be installed at a variety of amperages. Choose based on theavailability of space or electrical capacity in the panel, the desired speedof charging, and whether the homeowner prefers a hardwired or plug-ininstallation.CAUTION: Home Flex is a continuous load device. The circuit mustbe rated for 125% of the maximum load.Circuit RatingMax LoadEstimated Range per HourPlug-inHardwire50 A40 A30 miles/48 kmyesyes40 A32 A25 miles/40 kmyesyes30 A24 A18 miles/29 kmnoyes20 A16 A12 miles/19 kmnoyesImportant: In Canada, a plug-in installation is only allowed with a 50amp circuit.Home Flex can also be wired for higher amperages. Consult allapplicable codes for breaker and wire sizing requirements. The field-chargepoint.com 9
wiring terminal is rated to 105 C and accepts a maximum of 16 mm2 (6AWG) wire.Circuit RatingMax LoadEstimated Range per HourPlug-inHardwire80 A50 A37 miles/60 kmnoyes70 A50 A37 miles/60 kmnoyes60 A48 A36 miles/58 kmnoyes3. Determine the plug type purchased by thehomeowner. It is either a NEMA 6-50 or 14-50 typeplug.4. Determine if the desired circuit rating requires a14-506-50hardwired circuit.5. Ensure the electrical panel supports a 240 V dedicated circuit with anew, dedicated, two-pole circuit breaker. For plug-in installation, use a GFCI circuit breaker. For a hardwired installation, use a non-GFCI circuit breaker.6. For plug-in installations, the NEMAoutlet should be located 500-660 mm(20-26 in) from the ground adjacent tothe stud where the charging station willbe mounted.Note: The input power cable is 300 mm(12 in) long (as per the National ElectricCode for EV chargers). Ensure the outletis installed close enough to the stud forthe input power cable to plug in.7.Follow all applicable codes andordinances and pull a permit forcompleting the electrical work asrequired.10 chargepoint.com300 mm(12 in)500-600 mm(20-26 in)
Wire the CircuitDANGER: RISK OF SHOCK. Turn off the circuit breaker to the 240 Voutlet. Do not restore power to the outlet until installation iscomplete. Failure to follow these instructions could result in shockor electrocution.1.Install a plug-in or hardwired circuit: For a 40 or 50 amp plug-in installation, wire the circuit with theappropriate 6-50 or 14-50 outlet. Install the outlet with the groundfacing up. For a hardwired installation, provide a listed conduit with wiring to thebottom or rear 19 mm (3/4 in) knockout for AC input. Seal the unusedknockout with the plug provided. Return the original input powercable to the box.2. Affix the label with the appropriate rating to the circuit in the panel.3. Turn off power to the circuit at the panel before proceeding.Mount the Charging StationNote: For Hardwired Installation, proceed to page 13.Plug-In Installation1.Remove the faceplate and the wire cover from the charging station. Setthem aside.2. Mark the center of the stud with a lineapproximately 1000-1100 mm (39-43 in) above thefinished floor.chargepoint.com 11
3. To find the charging station’s ideal mounting height, plug the chargingstation's input power cable into the outlet.DANGER: If the front status light turns on when the charging stationis plugged in, the circuit is not off. STOP IMMEDIATELY. Unplug thecharging station and turn off the power to the outlet at the circuitbreaker until the installation is complete.4. Place the charging station againstthe wall. Line up the chargingstation’s two mounting holes withthe marked stud line.Note: Ensure the input power cablehas a slight curve, and is notstretched. 5. Ensure the charging station is level.Mark the two lower mounting holes.6. Unplug the charging station.7.Line up the lower mounting holes on theinstallation template with the marks you made.Tape the template to the wall.8. Mark the top mounting hole on the wall with theinstallation template.9. Remove the template from the wall.10. Drill the three mounting holes with the includeddrill bit.11. Use the driver bit to drive a lag screw into thetop-most mounting hole, leaving a 3 mm(1/8 in) gap to hang the charging station on.Keep the remaining two screws for later use.12. Hang the charging station on the protrudingscrew using the notch on the back of thecharging station.12 chargepoint.com(1) 2” screw
Note: Do not plug in the charging station yet.13. Drive the remaining two lag screws intothe bottom mounting holes to secure thecharging station. Be careful not to damagethe electrical wires.Note: Ensure the input wire does not makecontact with the screw.14. Proceed to the Install the Charging Cablesection on page 15.Hardwired Installation1.Remove the faceplate and the wire cover from the charging station. Setthem aside.2. Remove the cable clip and lift the white levers on the field-wiringterminal block to remove the input power cable.3. Mark the center of the stud with a line between 1000-1100 mm (39-43 in) above the finished floor.4. Hold the station against the wall stud, with the top ofthe station approximately 1270 mm (50 in) aboveground level.5. Ensure the charging station is level. Mark the two lowermounting holes.6. Line up the lower mounting holes on the installationtemplate with the marks you made. Tape thetemplate to the wall.7.Mark the top mounting hole on the wall with theinstallation template.8. Remove the template from the wall.9. Drill the three mounting holes with the included drillbit.chargepoint.com 13
10. Use the driver bit to drive a lag screw intothe top-most mounting hole, leaving a 3 mm(1/8 in) gap to hang the charging station on.Keep the remaining two screws for later use.(1) 2” screw11. Hang the charging station on the protrudingscrew using the notch on the back of the chargingstation.Side view12. Drive the remaining two lag screwsinto the bottom mounting holes tosecure the charging station.13. Insert the exposed wires from thehardwire circuit installation into thecorresponding holes, pushing thecables up until the silver conductorsare no longer visible.Note: If mounting on an exterior walland bringing power through the rear knockout, apply sealant around therear knockout to prevent water ingress.14. Bring power through the bottom orrear knockout.15. Ensure the service wiring can easilyreach the connectors on the chargingstation’s input terminal block.16. Strip each wire 12 mm (1/2 in).17. Ensure the white levers on the terminalblock are open. Fully insert the wiresinto the connectors on the left side ofthe terminal block with the ground wire in the center.18. Press the three levers down until they snap into place.Note: The white levers are a pinch point. Be careful of fingers while handlingthem.14 chargepoint.com
Install the Charging Cable1.Remove the cable clip from the wireend of the cable, but do not discard it.2. Fold the wire ends and insert theminto the bottom hole of the chargingstation.3. Match the green wire to the ground onthe left terminal of the output block.4. Insert the exposed wires into thecorresponding holes, pushing thecables up until the silver conductorsare no longer visible.5. Snap the white levers all the way downon each wire.Note: The white levers are a pinch point. Becareful of fingers while handling them.6. Insert the 4-pin plug into the connector tothe right of the output supply wiring.7.While pushing the cable up, slide thecable clip into the slot. This secures thecable and acts as strain relief.chargepoint.com 15
8. Place the wire cover over the exposedwiring. Use a coin to lock the wirecover in place.Note: To avoid damage to the wirecover, do not use a screwdriver.9. Apply the rating label to match thecircuit feeding the charging station onthe bottom of the station over thedefault rating displayed.10. Snap the faceplate onto the chargingstation.16 chargepoint.com
Complete the Installation1.Extend the cable to its full length to remove any kinks or tension.2. Drape the charging cable over the topof the charging station and dock theconnector in its holster.3. Ensure labels specifying circuitamperage are applied to the bottom ofthe charging station and to the circuitin the electrical panel.4. Restore power to the circuit at theelectrical panel.5. Plug the charging station into theoutlet (if applicable).6. Watch to ensure that the front statuslight glows yellow, then blinks white.7.Give the Quick Start Guide, the drill bit,the driver bit, and this InstallationGuide to the homeowner.8. Return all packaging materials to thebox and give the box to the homeowner.9. Advise the homeowner that the charging station is ready for activationvia the mobile application.10. Tell the homeowner the final amperage of the circuit and the expectedcharging rate available after activation. (Refer to the table in the Plan theLocation section.)Important: The Quick Start Guide contains information that theowner needs to activate their charging station. Without activation,the charging station charge current is limited to 16 amps.Questions? chargepoint.com/homeinstall U.S. and Canada toll-free: 1-888-758-4389 (24 hours)chargepoint.com 17
Limited WarrantyLimited Warranty for ChargePoint Home Electric Vehicle charging stationOur PromiseThis Limited Warranty for ChargePoint Home Electric Vehicle charging station (“Warranty”)applies to you, the original purchaser of a new CHARGEPOINT HOME charging station (the“charging station”) from CHARGEPOINT solely for use by you at your residence. This warrantyis not transferrable and is valid for purchasers located in the U.S.A. and Canada only.LIMITED THREE-YEAR PARTS EXCHANGE WARRANTY: Subject to the exclusions fromWarranty coverage set forth below, CHARGEPOINT warrants that, when used under normaloperating conditions, your charging station will be free from any defects in materials orworkmanship for a period (the “Warranty Period”) of three (3) years from the date of originalpurchase. If, during the Warranty Period, your charging station becomes defective in breachof the Warranty, CHARGEPOINT will, upon written notice of the defect received during theWarranty Period, either repair or replace, at CHARGEPOINT’s election, the charging station.The Warranty covers both parts and factory labor necessary to repair your charging station,but does not include any on-site labor costs related to un-installing or reinstalling the repairedor replacement charging station.Follow These Easy Steps to Obtain Warranty Service1.If at any time during the term of your Warranty you believe you have a defectivecharging station, contact Customer Service at 1.888.758.4389 orsupport@chargepoint.com and request a Return Material Authorization (“RMA”) numberfrom ChargePoint.2. In connection with your RMA request, you will be asked for each of the following: A detailed description of the problems you are experiencing with the chargingstation; The model number and serial number of the charging station; Proof of purchase; and Shipping information.3. If ChargePoint determines that the defect appears to be covered by your Warranty andyour Warranty is still in effect you will be provided a Returned Material Authorizationnumber (RMA number) to reference when returning the defective charging station forrepair or replacement.4. Ship the defective charging station to CHARGEPOINT and reference the RMA number inthe shipping documentation. The charging station must be returned in its originalshipping container or in another shipping container designed to prevent damage to thecharging station.5. If your charging station is covered by your Warranty, CHARGEPOINT will either repair orreplace the defective charging station at no charge to you and ship the repaired orreplaced charging station back to you at CHARGEPOINT’s expense.Important1.You are responsible for the proper installation and maintenance of the charging stationincluding the un-installing of any defective charging station and the installation of therepaired or replacement charging station returned to you.18 chargepoint.com
2. Any service or repairs beyond the scope of the Warranty above will be performed uponcustomer approval at CHARGEPOINT’s then prevailing labor rates and other applicablecharges.3. Any charging station that is found by CHARGEPOINT to be out-of-warranty or otherwiseineligible for warranty service will be returned, repaired or replaced upon your approvalat CHARGEPOINT’s standard charges at your expense.4. Please read carefully through the detailed descriptions of the WARRANTY, theEXCLUSIONS FROM LIMITED PRODUCT WARRANTY, and the LIMITATIONS ONWARRANTY AND LIABILITY on the following pages to assure that your charging stationis eligible for warranty service without additional cost to you.Replacement Parts Or Charging StationsYou acknowledge that replacement parts or charging stations provided by CHARGEPOINTunder the Warranty may be remanufactured or reconditioned parts or charging stations or, ifthe exact charging station is no longer manufactured by CHARGEPOINT, a charging stationwith substantially similar functionality (“Replacement Products”). All replaced parts, whetherunder warranty or not, become the property of CHARGEPOINT.Any replacement parts or charging station so furnished will be warranted for the remainder ofthe original Warranty Period or ninety days from the date of delivery of such replacementparts or charging station, whichever is later. Should CHARGEPOINT be unable to repair orreplace your charging station, CHARGEPOINT will refund the purchase price of the chargingstation to you.Exclusions from Limited Product WarrantyIMPORTANT: The Warranty on your charging stations shall not apply to defects or servicerepairs resulting from the following: Improper site preparation or maintenance, improper installation, cosmetic damage suchas scratches and dents, or normal aging. Abuse, vandalism, damage or other problems caused by accidents, misuse or negligence(including but not limited to physical damage from being struck by a vehicle), or use ofthe charging station in a way other than as specified in the applicable CHARGEPOINTdocumentation. Damage to the charging station caused by software, interfacing, parts, supplies or anyother product not supplied by CHARGEPOINT. Installation, alteration, disassembly, modification, or relocation of the charging stationthat was not approved in writing or by ChargePoint or performed by ChargePoint or by alicensed electrician pursuant to this guide. Damage as a result of extreme power surge, extreme electromagnetic field or any acts ofnature. Any other causes beyond the control of CHARGEPOINT.IN ADDITION: The Warranty on your charging station shall not apply if the originalidentification markings (for example, serial numbers and trademarks) have been defaced,altered or removed or if the charging station is used or installed for any purpose other than foruse at a single family residence.CHARGEPOINT SPECIFICALLY DOES NOT WARRANT THAT ANY CHARGEPOINT SERVICESWILL BE ERROR FREE OR WILL OPERATE WITHOUT INTERRUPTION.chargepoint.com 19
Limitations on Warranty and LiabilityNO AGENT OF CHARGEPOINT IS AUTHORIZED TO ALTER OR EXCEED THE WARRANTYOBLIGATIONS OF CHARGEPOINT. THE REMEDIES IN THIS LIMITED PRODUCT WARRANTYARE YOUR SOLE AND EXCLUSIVE REMEDIES. CHARGEPOINT MAKES NO OTHER EXPRESSOR IMPLIED WARRANTIES OTHER THAN THE WARRANTY SET FORTH ABOVE. ALL OTHERWARRANTIES, INCLUDING WITHOUT LIMITATION ANY WARRANTY OF DESIGN,MERCHANTABILITY, FITNESS FOR A PARTICULAR PURPOSE (EVEN IF CHARGEPOINT HASBEEN INFORMED OF SUCH PURPOSE) OR AGAINST INFRINGEMENT, ARE EXCLUDED TO THEEXTENT PERMITTED BY LAW. IF ANY IMPLIED WARRANTY CANNOT BE DISCLAIMED UNDERAPPLICABLE LAW, SUCH IMPLIED WARRANTY SHALL BE LIMITED IN DURATION TO THEWARRANTY PERIOD DESCRIBED ABOVE. NO WARRANTIES APPLY AFTER EXPIRATION OFTHE WARRANTY PERIOD.Some states or jurisdictions do not allow the exclusion of express or implied warranties orlimitations on how long an implied warranty lasts, so the above limitation may not apply toyou.CHARGEPOINT IS NOT LIABLE FOR ANY INDIRECT, INCIDENTAL, SPECIAL, PUNITIVE ORCONSEQUENTIAL DAMAGES, INCLUDING WITHOUT LIMITATION LOST PROFITS, LOSTBUSINESS, LOST DATA, LOSS OF USE, OR COST OF COVER INCURRED BY YOU ARISING OUTOF OR RELATED TO YOUR PURCHASE OR USE OF, OR INABILITY TO USE, THE CHARGINGSTATION, UNDER ANY THEORY OF LIABILITY, WHETHER IN AN ACTION IN CONTRACT,STRICT LIABILITY, TORT (INCLUDING NEGLIGENCE) OR OTHER LEGAL OR EQUITABLETHEORY, EVEN IF CHARGEPOINT KNEW OR SHOULD HAVE KNOWN OF THE POSSIBILITY OFSUCH DAMAGES. IN ANY EVENT, THE CUMULATIVE LIABILITY OF CHARGEPOINT FOR ALLCLAIMS WHATSOEVER RELATED TO THE CHARGING STATION WILL NOT EXCEED THEPRICE YOU PAID FOR THE CHARGING STATION. THE LIMITATIONS SET FORTH HEREIN AREINTENDED TO LIMIT THE LIABILITY OF CHARGEPOINT AND SHALL APPLYNOTWITHSTANDING ANY FAILURE OF ESSENTIAL PURPOSE OF ANY LIMITED REMEDY.Some states or jurisdictions do not allow the exclusion or limitation of incidental orconsequential damages, so the above limitation or exclusion may not apply to you.Additional InformationThis Warranty shall be governed by and construed in accordance with the laws of the State ofCalifornia, U.S.A., exclusive of its conflict of laws principles. The U.N. Convention on Contractsfor the International Sale of Goods shall not apply.This Warranty is the entire and exclusive agreement between you and CHARGEPOINT withrespect to its subject matter, and any modification or waiver of any provision of this statementis not effective unless expressly set forth in writing by an authorized representative ofCHARGEPOINT.chargepoint.com/support75-001336-01 r5
Ensure the electrical panel supports a 240 V dedicated circuit with a new, dedicated, two-pole circuit breaker. For plug-in installation, use a GFCI circuit breaker. For a hardwired installation, use a non-GFCI circuit breaker. 6. For plug-in installations, the NEMA outlet should be