Transcription
Arduino Light ThereminStep by step introduction!based on Arduino Starter Kit, Project 06http://www.arduino.cc/starterKitworkshop for The MILL @ UIdaho Librarycc-by-sa 2016
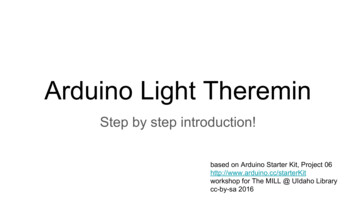
For this workshop you will need: Arduino UNO and usb cablea few basic electronic components, as found in most Arduino starter kits: abreadboard, some jumper wires, a piezo, a 10k resistor, and a photoresistor.Arduino Software IDE installed on a computer,https://www.arduino.cc/en/Main/Softwareor use Codebender on Chromebook, https://codebender.cc/Plus the sketches to program the theremin, which can bedownloaded from Github:1.2.3.download the ZIP package from the hing/archive/master.zipunzip the file ("arduinoTeaching-master.zip")move the contents of the unzipped folder to your Arduino directory (found inDocuments).
Start with these parts from an Arduino Starter Kit:UNO, breadboard, jumper wires, piezo, 10k resistor, and photoresistor.
Arduino UNOThis is your Microcontroller!Arduino is an easy to use prototyping board basedon open-source hardware and software.Microchip: ATmega328P (8-bit, 16MHz)Pins: 14 digital output/input, 6 analog inputSimple programming ageRemember, Have Fun!
Split - no connection acrossSolderlessBreadboardRow - connectshorizontallyMakes it easy to create circuits withoutsoldering!Each pin hole on the Rails isconnected vertically.Each hole in the Rows is connectedhorizontally.A Split runs down the middle dividingthe board in two.Rail - connects vertically
Connect the Piezopiezo is the annoying little buzzer that will give us sound!
1. Gently insert the pins of your Piezo into row one and five.
2. Connect row one tothe Ground (-) railwith a wire jumper.(i.e. piezo to GND)
3. Connect row five toPin 8 on the UNO usinga wire jumper.(i.e piezo to digital pin)
Connect the Photoresistorthe photoresistor is the sensor that will control our musical instrument
4. Insert the pins from thephotoresistor in rowstwentyfive and twentyeight.
5. Connect row twentyfiveto the Power ( ) rail with ajumper wire.(i.e. photoresistor to 5V)
6. Use 10k resistor toconnect row twentyeight toGround (-) rail.(i.e. photoresistor to GND)
7. Connect rowtwentyeight to Pin A0 onthe UNO.(i.e. photoresistor toanalog input)
Connect the Powerthe circuit needs electricity, 5V is provided by the UNO
9. Connect theGround (-) railto a GND pinon the UNOwith a powerjumper wire.10. Connectthe Power ( )rail to the 5VPin on theUNO with apower jumperwire.
Circuitcomplete!
Load the SketchUNO is programmed in the Arduino ageand loaded to the board using the Arduino IDE,https://www.arduino.cc/en/Main/Software
1. Open theArduino Software(IDE).IDE Integrated DevelopmentEnvironment an applicationthat allows you to edit/writecode, compile it, and send it toArduino devices.
2. Connect yourUNO.Connect the UNO to yourcomputer using the USB cable.Some LEDs on the board shouldlight up, and the board shouldautomatically be detected.To make sure the IDE knowswhich board to use, in the Toolsmenu: under Board, selectArduino/Genuino Uno under Port, select the onethat says "Uno"
3. Open thesketch.Sketches are programs writtenusing the Arduino IDE. Each issaved in its own folder and hasthe extension .ino.Choose File then Open tonavigate to the sketch you wantto load, for example"lightThereminBasic.ino".
4. Upload thesketch.Click the Upload button (a rightarrow) and the IDE will compilethe code, then send it to theconnected Arduino board.If there are any errors, amessage will appear in theterminal at the bottom.
5. Edit!In the text editor window, trychanging a few things at thebottom of the loop, such as: range of pitchtone lengthloop delayThere are lots of comments inthe code (marked by //) toexplain what each line is doing.Try loading one of the otherlightTheremin examples!(they all work with the samecircuit setup)
Arduino ResourcesOfficial Arduino site, https://www.arduino.cc/ get Arduino IDE. purchase official kits. learning and reference materials. watch Arduino Starter Kit videos, https://www.youtube.com/playlist?list PLT6rF I5kknPf2qlVFlvH47qHvqvzkkndCodebender, https://codebender.cc/ online Arduino code editor that works with Chromebook / Android16 Hertz, http://www.16hertz.com/ cheaper non-official kits. great graphic novel style intro book, bit.ly/16hzguideAdafruit, https://www.adafruit.com/ good source for purchasing electronics, including specialized Arduino based boards and accessories. lots of projects and learning resources.Sketches used in this workshop, https://github.com/evanwill/arduinoTeaching
For this workshop you will need: Arduino UNO and usb cable a few basic electronic components, as found in most Arduino starter kits: a breadboard, some ju