Transcription
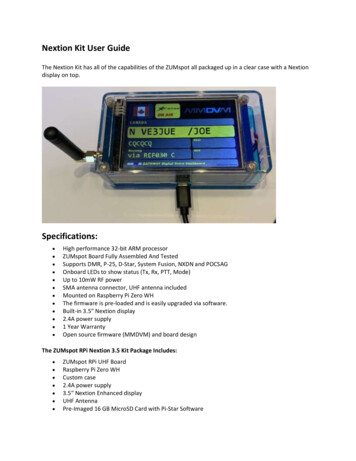
Nextion Kit User GuideThe Nextion Kit has all of the capabilities of the ZUMspot all packaged up in a clear case with a Nextiondisplay on top.Specifications: High performance 32-bit ARM processorZUMspot Board Fully Assembled And TestedSupports DMR, P-25, D-Star, System Fusion, NXDN and POCSAGOnboard LEDs to show status (Tx, Rx, PTT, Mode)Up to 10mW RF powerSMA antenna connector, UHF antenna includedMounted on Raspberry Pi Zero WHThe firmware is pre-loaded and is easily upgraded via software.Built-in 3.5" Nextion display2.4A power supply1 Year WarrantyOpen source firmware (MMDVM) and board designThe ZUMspot RPi Nextion 3.5 Kit Package Includes: ZUMspot RPi UHF BoardRaspberry Pi Zero WHCustom case2.4A power supply3.5" Nextion Enhanced displayUHF AntennaPre-Imaged 16 GB MicroSD Card with Pi-Star Software
Setup: Make sure the SD card is installed in the Raspberry Pi Zero WHInstall the antenna into the RF connector. There is an opening on the side which is where theantenna is connected.Powering up: Plug in the USB micro power cable to your Nextion Kit. Then plug the cable into the wall adapterand insert that into an AC outlet.If the Nextion Kit doesn’t power up, then press the switch on the cable and it should power upnow.
Setup Pi-Star:Configure display type: In the “MMDVMHost Configuration” sectionMake sure “MMDVM display Type” is set to “Nextion”Make sure “Port” is set to “Modem”Make sure “Nextion Layout” is set to “ON7LDS L3”
Wi-Fi: Power up the Nextion Kit.After 3 minutes, scan for Wi-Fi access points from your phone or laptop. One should appear withthe name “Pi-Star-Setup”Connect to it. When asked for the Wi-Fi password type in: raspberryAfter 3 minutes, go to your web browser (Chrome, Firefox, etc.) and connect to the website:http://pi-star (for Windows, Linux and Android deviceshttp://pi-star.local (for OS X and iOS devices)You should see this page.Go to Configuration You will be asked to put in the default username which is “pi-star” and the defaultpassword which is “raspberry”
Select “Configure Wi-Fi” and then click on “Scan for Networks (10 secs)”
Select your Wi-Fi SSID and enter your password.Click on “Save (and connect)” to save the Wi-Fi configuration Reboot your Nextion Kit
Configuration: Change the Node Callsign to your own, set the “Radio Frequency” to match your radio andmake sure the “Radio/Modem Type” is set to “ZUMspot - Raspberry Pi Hat (GPIO)”, set the“System Time Zone” to your time zone, and set the “Dashboard Language” to the language youprefer. Click “Apply Changes” when you are done
Configuration (example to enable D-Star): Now you can turn on D-Star by selecting the “D-Star Mode” switch and clicking “Apply Changes”
Finished:Once you have completed the Pi-Star configuration you can start using the Nextion Kit to connect toDSTAR, DMR and other networks.There is more information on configuring and using Pi-Star in this aying with Pi-Star.pdfSupport:MMDVM groups.io group:https://groups.io/g/OpenDVPi-Star support forum:https://forum.pistar.uk/Pi-Star Facebook support ar Wiki:http://wiki.pistar.ukZUM Radio Facebook 450/
Mounted on Raspberry Pi Zero WH The firmware is pre-loaded and is easily upgraded via software. Built-in 3.5" Nextion display 2.4A power supply 1 Year Warranty Open source firmware (MMDVM) and board design The ZUMspot RPi Nextion 3.5 Kit Package Includes: ZUMspot RPi UH