Transcription
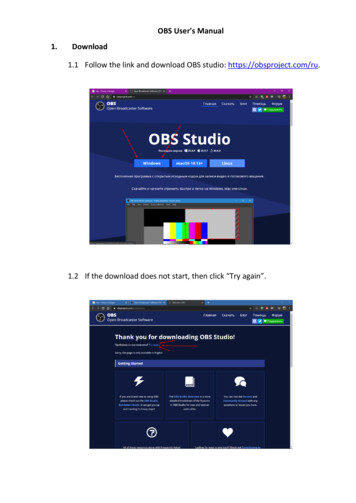
OBS User's Manual1.Download1.1 Follow the link and download OBS studio: https://obsproject.com/ru.1.2 If the download does not start, then click “Try again”.
2.Installation2.1 After downloading, run the installer.
2.2 After installation, close the window by clicking the “Finish” button andOBS will open automatically. A program shortcut will appear on thedesktop.
3.Settings of OBS3.1 After launch, we will have an OBS window with a proposal toautomatically configure the program.3.2 Select a video recording and click on the desired item 2, then selectfurther.
3.3 Leave the default settings and click next.3.4 Click on “Apply Settings”.
3.5 OBS window appears.3.6 Next, you need to change the video recording format. Choose settings.
3.7 Section “Output”.3.8 Choose in format “mp4”.
3.9 In the encoder “Software (x264)”.3.10 Click “Apply”, then “ok”.
4.Creating scenes and sources4.2 Let's move on to scenes and sources settings.Scenes are small rooms with sources installed in them (video, picture,sound, monitor screen, etc.). These rooms may differ from each other.4.3 To add a new scene, click plus and enter the name of our scene. (Thenumber of scenes can reach more than a hundred, do as much as youneed).4.4 The work area to be recorded on video / broadcast is the black part ofthe program.
4.5 To add a source, click the plus in the sources section. And we select thesource we need, for example, a webcam or other device for capturingvideo. ” - video capture device - fill in the name / select an existingsource - “ok”
4.6 In the settings, select the camera and click “ok”.An area with our camera appears on the scene.
4.7 Which size and position can be adjusted, move the edges of the areaand move this area.4.8 If you want to stretch the source area to the entire work area, press thekey combination “CTRL S”.
4.9 Sources can be as many as needed. Add, for example, another desktopentry. “ ” - screen capture - fill in the name / select an existing source “ok” After that, a window with source settings appears. Select thescreen - click “ok”.
4.10 In this case, it turned out that the camera is under the screen. Just clickon the source and move it up or click on the source and thecorresponding button where we want to move the source (up / down).4.11 Get desktop images with a camera mounted on top.
5.Microphone setup5.1 If you want to turn off the sound source or switch the microphone, usethe “Audio Mixer” panel.We work with the strip “Mic / Aux”.5.2 To turn off, click on the speaker icon, to adjust, move the slider.
5.4 If you want to switch the microphone, press the gear.5.5 Select Properties
5.6 Choose the device that we need and click “ok”.
1.Start video recording6.1 To start the video, click on the appropriate buttons.6.2 To stop on the stop buttons, or to pause.Recorded materials are saved along the way:“C:\Users\”User name” \Videos”или“С:\Users\” User name ” \Видео”
3. Settings of OBS 3.1 After launch, we will have an OBS window with a proposal to automatically configure the program. 3.2 Select a vid