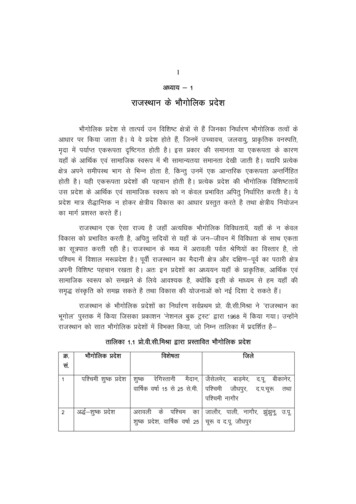
Transcription
User’s GuideThe ESA/ESO/NASAPhotoshop FITS Liberatorv.2
ColophonThis User’s Guide was written by Robert Hurt and Lars Lindberg Christensen.The team behind the ESA/ESO/NASA Photoshop FITS Liberator:Project Lead:Lars Lindberg Christensen (lars@eso.org)Development Lead:Lars Holm NielsenCore Functionality:Kaspar K. NielsenEngine and GUI:Teis JohansenScientific support:Robert HurtTechnical support and testing:Robert Hurt, Zolt Levay, Bob Fosbury and RichardHookAcknowledgementsFITS is an abbreviation for Flexible Image Transport System. FITS has been a standardsince 1982 and is recognized by the International Astronomical Union.The ESA/ESO/NASA Photoshop FITS Liberator uses NASA’s CFITSIO library, TinyXML andT-Rex.Adobe and Photoshop are either registered trademarks or trademarks of AdobeSystems Incorporated in the United States and/or other countries.We kindly ask users to acknowledge the use of this plug-in in publicly accessibleproducts (web, articles, books etc.) with the following statement: "This image wascreated with the help of the ESA/ESO/NASA Photoshop FITS Liberator".Cover:This image is a composite of black and white images from the Digitized Sky Survey 2 taken with the PalomarObservatory's 48-inch (1.2-metre) Samuel Oschin Telescope as a part of the second National GeographicPalomar Observatory Sky Survey (POSS II). The images were recorded on two glass photographic plates - onesensitive to red light and the other to blue and then digitised. In order to produce the colour image seen herea total of 62 different frames were processed by the Italian amateur astronomer Davide De Martin, 31 foreach colour band, taken from 4 different plates dating between 1990 and 1993. The original file is 14,264 x15,429 pixels with a resolution of about 1 arc-seconds per pixel. The image covers an area of sky larger than4 x 4.3 (for comparison, the full moon is about 0.5 in diameter).Credit: Davide De Martin (http://www.skyfactory.org/) & Digitized Sky Survey 2.
The ESA/ESO/NASA Photoshop FITS Liberator User’s Guide3Table of Contents1234567Introduction to the FITS Liberator.4Installation of the FITS Liberator .82.1Windows Installation .92.2Mac OSX Installation .9Using the FITS Liberator. 113.1A Cookbook Example . 123.2Basics . 123.3Stretched Images. 133.4Scaling Images for Better Stretches . 153.5Entering Metadata . 163.6Making Colour Composites. 18Advanced User’s Guide . 204.1Tabs . 234.2Tools. 234.3Preview Window. 234.4Histogram Window. 244.5Image Data. 244.6Image Statistics. 244.7Scaling and Stretch (Advanced) . 254.8Channels . 274.9Undefined Values . 274.10 Other Settings . 274.11 More about Metadata . 284.12 FITS Header . 324.13 Usage Notes & Version Compatibility. 32Index. 33Appendix A: Metadata Tags Description . 356.1Identity Metadata . 356.2Curation Metadata. 356.3General Content Metadata . 366.4Observation Metadata . 376.5Image Processing Metadata . 39Appendix B: Photoshop XML example. 41
The ESA/ESO/NASA Photoshop FITS Liberator User’s Guide1 Introduction to the FITS LiberatorThis image of the star-forming region NGC 346 was composed in FITS Liberator from two individualexposures taken through a V filter (555 nm, shown in blue) and a near-infrared filter (814 nm, shown inred).Credit: NASA/ESA Hubble Space Telescope/Zolt Levay.4
The ESA/ESO/NASA Photoshop FITS Liberator User’s Guide5The release of version 2 of the popular ESA/ESO/NASA Photoshop FITS Liberator imageprocessing software means that it is now easier and faster than ever before to createcolour images using raw observations from a range of telescopes, including theNASA/ESA Hubble Space Telescope, NASA’s Spitzer Space Telescope, ESO’s Very LargeTelescope and ESA’s XMM-Newton telescope.Version 1 of the ESA/ESO/NASA Photoshop FITS Liberator was completed in July 2004by imaging scientists at The European Space Agency, the European SouthernObservatory and NASA. FITS stands for Flexible Image Transport System. This single fileformat archives nearly all images of stars, nebulae and galaxies produced by majortelescopes around the world. Before July 2004, this file format was only accessible to avery few people besides scientists working with highly specialised image processingtools.Since the release of v.1 in July 2004, more than 50,000 laypeople, educators andamateur astronomers have started using the Liberator. The FITS Liberator has alsobecome the industry standard for professional imaging scientists at the EuropeanSpace Agency, the European Southern Observatory and NASA.Using version 2 of the FITS Liberator stunning images such as the iconic Hubble image“Pillars of Creation” (Figure 1) can be created in a matter of minutes. Version 2 hasbeen improved in several areas, notably:o FITS images with up to 4 billion greyscales can be processed (32 bit support).o FITS images with up to 500 million pixels or more can be processed (100 timeslarger than standard images from a digital camera).o an improved user interface and a re-designed order of operations to simplifythe overall process – for example the plug-in now remembers previous settings.o new options for advanced scaling and stretching to fine tune images foroptimal results.o a whole section dedicated to inputting metadata, i.e. information about theimage and what it shows. Metadata will be an important tool for future effortsto make archives of ‘pretty pictures’ more accessible.o user access to a text version of the original FITS header.
The ESA/ESO/NASA Photoshop FITS Liberator User’s Guide6Figure 1 Version 2 of the FITS Liberator makes it even easier to create stunning images. The iconic Hubbleimage “Pillars of Creation”, seen here, can be created in a matter of minutes. The three-colour dataset used tocreate this image can be downloaded from:http://www.spacetelescope.org/projects/fits liberator/eagledata.html.The advantages of using FITS Liberator over professional image processing tools are indicated in the righthand image: 1. Added detail in the shadows. 2. Increased gamut (colour space, more nuances) 3. Slightlybetter noise characteristics. 4. Easier access to advanced cosmetic cleaning tools as demonstrated by theremoved ghosts.Employing an easy-to-use interactive interface (Figure 2) that shows each change tothe processed image, Liberator preserves the many greyscales in the originalobservations to create better images by providing added detail in the shadows and anincreased gamut (colour space) in the finished colour images.Figure 2 The Liberator’s Graphical User Interface Credit: ESA. ESO & NASA. A more detailed overview can beseen in Figure 10.
The ESA/ESO/NASA Photoshop FITS Liberator User’s Guide7The first stage of producing spectacular images is handled by the Processing Tab of theLiberator’s Graphical User Interface which consists of the following elements (numbersrefer to items in figure 2):1. Preview window2. Histogram3. Tools4. Statistics5. Advanced tools for Scaling and StretchThe simple working procedure after opening a FITS image, is to study it in the Previewwindow, adjust the black- and white levels (6) to give a reasonable contrast, and thenset the input range that scales the image by clicking the Auto Scale Button (7). Nowdifferent values of the Scaled Peak Level can be tested to change the scale of the imageto fit better with one of the possible Stretch functions (8).A complete overview of all the controls in the Liberator can be found in Chapter 4.
The ESA/ESO/NASA Photoshop FITS Liberator User’s Guide2 Installation of the FITS LiberatorFigure 3 The Carina Nebula is located in the southern portion of our Milky Way galaxy, 10,000 light-yearsfrom Earth. This colossal cloud of gas and dust stretches across 200 light-years of space. Though it isdominated by Eta Carinae, it also houses the star's slightly less massive siblings, in addition to the youngergeneration of stars.This image was taken by the infrared array camera on Spitzer. It is a four-colour FITS Liberator composite ofinvisible light, showing emissions from wavelengths of 3.6 microns (blue), 4.5 microns (green), 5.8 microns(orange), and 8.0 microns (red).Credit: NASA Spitzer Space Telescope/Robert Hurt8
The ESA/ESO/NASA Photoshop FITS Liberator User’s Guide2.19Windows InstallationFITS Liberator can be installed on Windows either by using a setup programme ormanually. In both cases, a local administrator must install the plug-in. By default, allusers on Windows XP machines are local administrators.2.1.1 Installing with the Setup programmeThe recommended way of installing the FITS Liberator on Windows is to use the setupprogram. This will install all the necessary files and optionally register FITS files withPhotoshop.2.1.2 Manual installationTo perform a manual installation, download the manual installation package andextract the files to a directory. Next, move the files into the correct locations in the filesystem. Please be aware that if you are using a localised version of Photoshop thefolder names may also be localised.FileLocation and exampleFitsLiberator.8bi{Program Files}\{Photoshop}\{Plug-Ins}\{File Formats}e.g.:C:\Program Files\Adobe\Adobe Photoshop CS2\Plug-Ins\FileFormatscfitsio.dll{Program Files}\{Photoshop}\e.g.:C:\Program Files\Adobe\Adobe Photoshop CS2VR1.xmp,VR2.xmp,VR3.xmp,VR4.xmp, VR5.xmp{Program Files}\{Common Files}\Adobe\XMP\ Custom File InfoPanelse.g.:C:\Program Files\Common Files\Adobe\XMP\Custom File InfoPanelsIf there is an additional plug-ins folder, the FitsLiberator.8bi file can be placed in thatfolder.2.2Mac OSX InstallationIMPORTANT INFORMATION FOR VERSION 1 USERS:Uninstall version 1 of the ESA/ESO/NASA Photoshop FITS Liberator before installingversion 2. This is essential. Do this by deleting the file named FitsFormat in the AdobePhotoshop CS2 folder. This folder is most likely named /Applications/Adobe PhotoshopCS2, or similar for other versions of Photoshop.The installation of FITS Liberator on a Mac system is a simple drag-and-drop operation:1. Drag the plug-in file (FitsLiberator2) from the disk image to the local AdobePhotoshop plug-in folder. This folder is most likely /Applications/AdobePhotoshop CS2/Plug-Ins, or similar for other versions of Photoshop. Be awarethat the folder name may differ on localised versions of Adobe Photoshop. Ifthere is an additional plug-ins folder, the FitsLiberator2 file can be placed inthat folder.2. Drag the Colour composite Action file from the disk image to the local AdobePhotoshop Actions folder. This folder is most likely /Applications/AdobePhotoshop CS2/Presets/Photoshop Actions .
The ESA/ESO/NASA Photoshop FITS Liberator User’s Guide3.10“Eject” and discard the disk image.When first accessed within Photoshop, the FITSLiberator2 will automatically install thefiles VR1.xmp, VR2.xmp.VR5.xmp into the Adobe Application Support directory. If theaccount from which it is run has administrator privileges they will be installed in/Library/Application Support/Adobe/XMP/Custom File Info Panels (making themavailable to all user accounts). Otherwise they will be installed in/Users/{USERNAME}/Library/Application Support/Adobe/XMP/Custom File Info Panels(available only to specified users).
The ESA/ESO/NASA Photoshop FITS Liberator User’s Guide113 Using the FITS LiberatorFigure 4 This image is a composite made with the FITS Liberator from black and white images taken with thePalomar Observatory's 48-inch (1.2-metre) Samuel Oschin Telescope as a part of the second NationalGeographic Palomar Observatory Sky Survey (POSS II). The images were recorded on two glass photographicplates - one sensitive to red light and the other to blue light and later digitised. In order to produce the colourimage seen here, a total of 66 different frames were processed, 33 for each colour band, coming from 8different plates taken between 1988 and 1997. The original file is 17,067x13,508 pixels with a resolution ofabout 1 arc-seconds per pixel. The image shows an area of sky extending over 4.7 x 3.8 (for comparison, thefull moon is about 0.5 in diameter).Credit: Davide De Martin (http://www.skyfactory.org/) & Digitized Sky Survey 2.
The ESA/ESO/NASA Photoshop FITS Liberator User’s Guide3.112A Cookbook ExampleBelow is a simple step-by-step example for how to import a FITS file into Photoshopusing a specific FITS file from the examples on the FITS Liberator web page. Thenumbers refer to Figure 10:1. Go to the example data sets on the FITS Liberator web page:http://www.spacetelescope.org/projects/fits liberator/datasets.html2. Download a data set.3. Open the images one by one in FITS Liberator.4. Set White and Black levels (15, 16) to give a good contrast without too muchblack and over saturated areas.5. Click Auto Scaling (52).6. Try different Stretch functions (46) to enhance the fainter parts of the image.7. Click OK.The rest of the work needed to construct a beautiful image is described in Section 3.6.The basic steps for this are:1. Copy the layers together in Photoshop2. Colorise the layers3. Use adjustment layers to finalise the image3.2BasicsIn the usual sequence of processing an image it typically takes on the following fourdifferent names:1. Input image: The reduced, cleaned image from the astronomicalprocessing2. Scaled image 1 : The input image scaled up or down so as to let the pixelvalues fall in the range where the Stretch function works best. If the inputimage contains, for instance, pixel values in the range [5:50,000], the Scaledimage might be chosen to contain pixel values from [0:100] to fit betterwith a logarithmic Stretch function.3. Stretched image: The Scaled image transformed by the stretch function,for instance a logarithmic Stretch.4. Output image: The image that arrives in Photoshop for further processing.This is qualitatively the same as the Stretched image, but is scaled to thedesired bit depth in Photoshop (e.g. 16 bit: [0, 65535])Note that the FITS Liberator defines Logarithm as Log log 10(Scaled image 1) forconsistent behaviour around the background or zero level.1Defined as Scaled image ScaledBackgroundLevel (ScaledPeakLevel –ScaledBackgroundLevel) * (Input Image – BackgroundLevel) / (PeakLevel – BackgroundLevel)
The ESA/ESO/NASA Photoshop FITS Liberator User’s Guide13Figure 5: Example histograms for the four different images created during a typical workflow process: a)Input image, b) Scaled image, c) Stretched image (here with a Logarithmic Stretch function) and d) Outputimage (in Photoshop).3.3Stretched ImagesMany astronomical images have a very high dynamic range, or many greyscales. Thismeans that the brightest areas of interest may be many thousands (or even millions) oftimes brighter than the faintest structures in the image.
The ESA/ESO/NASA Photoshop FITS Liberator User’s Guide14Figure 6 Astronomical images contain many more greyscales than can be viewed on a computer monitor orprinted. In the image to the left a ‘normal’ or linear representation of the image is shown. To the right theeffect of a non-linear scaling, a logarithmic scaling, is shown. By using non-linear scaling it is possible toenhance some greyscales in the image more than and so to make faint details visible without saturating thebrighter parts of the image.However, on a computer screen, one only can see 256 levels of brightness (8 bitgreyscale). If the original high dynamic range image is imported directly intoPhotoshop using simple linear Scaling, either the detail in the fainter structures is lostin the black background, or the brightest objects over-saturate (or burn in).Photoshop can partially compensate for this by applying Levels or Curvestransformations after the FITS image has been imported. However, an image that hasbeen reduced to 8 bit greyscales can only be adjusted a little bit before it begins toposterize, obscuring low-level features. Even extreme curve adjustments cannot bringout the faintest detail in some of these images.For this reason, the FITS Liberator has an advanced Scaling and Stretch section thatoffers many options for compressing this dynamic range before the data sets areimported. The Stretch Function pop-up lists a variety of mathematical functions thatare useful for this task, including log, square root, cube root, and inverse hyperbolicsine (ASinH). These functions mimic the operation of the human eye, which canaccommodate to perceive dramatically different levels of brightness simultaneously.To see how these stretch functions work, try opening a FITS file with high dynamicrange. Images of galaxies are a good starting point for this experiment since theircentral bulges are many orders of magnitude brighter than their faint arms. Make surethat all of the Mark Pixels options (63-65) are selected on the right side of the window.These will highlight any areas that have been clipped due to the Levels setting (15, 16).Now, drag the white level slider (15) until all the green masked pixels havedisappeared. The faintest parts of the image will probably have faded to black.Now choose Sqrt() from the Stretch Function pop-up (46). The preview image (10)should update after a moment to show an increase in brightness in the fainter areas.This should also be evident in the histogram window (14) as the distribution shifts,with the fainter areas on the left shifting more to the right. However, the clipped black(blue pixels) and white (green pixels) levels will remain the same. Switch back andforth a few times between Linear and Sqrt() to see the effect on the image.Next try CubeRoot(). The fainter parts of the image should get even brighter. In fact,each function will stretch the image in a slightly different way. The choice of the beststretch function really depends on the aesthetic and scientific needs for each image.The FITS Liberator offers a wide variety of options to give the user flexibility.
The ESA/ESO/NASA Photoshop FITS Liberator User’s Guide3.415Scaling Images for Better StretchesThe Stretch functions in the FITS Liberator are simple mathematical functions thatprovide the best overall results for data. But some mathematical functions behavedifferently 2 when operating on images with pixel values between 0 and 1, for example,than they do on images with pixel values between 0 and 10000. For this reason, theLiberator offers a set of Scaling controls that can be used to change, or scale, the pixelvalues in an image.Since the FITS Liberator user will probably have no control over how the FITS imageswere originally produced, the plug-in allows the minimum and maximum brightnesslevels (Background and Peak levels, 47 and 48) and the Scaling level (with the ScaledPeak level, 49) to be set by hand. These numeric fields under Scaling and Stretch(Advanced) include:oooBackground level (the numeric value of the noise level in the image, 47)Peak level (the numeric value of the brightest sources of interest, 48)Scaled Peak level (the desired value for the brightest sources after Scaling, 49)To Scale an image quickly, click Auto Scaling (52) and experiment with different valuesof the Scaled Peak level and different Stretch functions.In the image (Figure 7) below the effect of different Stretch functions and differentvalues of the Scaled Peak level are illustrated.2Note that the Linear(), Sqrt(), and CubeRoot() Stretch functions are not affected by scaling.
The ESA/ESO/NASA Photoshop FITS Liberator User’s Guide16Figure 7 The range of available FITS Liberator stretch functions are shown here. The top two rows show allthe stretch functions, in approximate order of their effect. Image scaling is constant for all of these, with thewhite level of the galaxy nucleus set to 10.0. The bottom row shows the effect of changing the peak scalingwhile using the Log() function. Note that this single function allows for a continuously variable enhancementof faint structure. All of the stretch functions (except Linear(), Sqrt(), and CubeRoot()) will show similar resultswhen varying this parameter.3.5Entering MetadataMetadata can be summarised as “information about the data”. Image metadataincludes information about what is in the image and where the telescope was pointedamong other things. Version 2 of the FITS Liberator can now tag an image with a fullset of metadata, some of which is extracted directly from the FITS header while the restis entered by the user. The metadata is saved within the image file itself and can beread by anyone who later opens the image in Photoshop or another metadata-awareprogram.The screenshots below (Figure 8) show an example. The user either fills in themetadata fields directly or by choosing from a dropdown list. Some fields retain thevalues from the last opened image.
The ESA/ESO/NASA Photoshop FITS Liberator User’s Guide17Figure 8 An example of the type of information that is typically entered in the FITS Liberator metadata fields.The steps needed to attach metadata to images are:1. Open the image in Liberator.2. Liberator transfers any relevant FITS keywords that are present in the FITSheader.
The ESA/ESO/NASA Photoshop FITS Liberator User’s Guide183.4.5.6.7.8.Liberator retains some standard Metadata info from the previous session.The user fills out any remaining fields.User clicks OK.Liberator fills out the image processing fields.The same procedure is repeated for 2 or more other exposuresUsing the ( currently non-existent) "Concatenator" tool 3 :o Three (or more) exposures are merged into a layered file (possibly evenwith the right adjustment layers such as the Colour Composite action),ando Three (or more) sets of metadata are concatenated.o This tool could be a Photoshop Script or perhaps an Automatic plug-in.The XMP data will then approximately correspond to the example inAppendix B.9. The user completes the image, adds optional comments to the CreationNotesand fills in the Coverage.Spectral.ImageColormap.10. The user saves the image as a tiff file.Since the final image will probably have been rotated and cropped during step 9 above,the coordinate info from the FITS header will no longer be correct. This can be correctedby the following procedure:11. The user opens the STScI WCSTool together with the original FITS file with thehighest S/N.12. The user clicks to connect the same stars in the two images.13. The tool overwrites the coordinate keywords in the XMP data14. The tiff file is saved again.Metadata entered through FITS Liberator is also accessible and can be edited withPhotoshop’s File File Info dialog box. If the VR1.xmp, VR2.xmp, etc. files have beenproperly installed (see section 2 for install locations), this dialog will show five newsections (such as “Astro Identity”) that display the same metadata fields. Photoshopalso offers many useful features for entering Metadata in this interface, includingrecent histories for each field, and user-definable templates for entire sections.Consult the Photoshop documentation for more information on these features.3.6Making Colour CompositesThe basic principles for making colour composites are:o Copy the layers together in Photoshopo Colorise the layerso Use adjustment layers to finalise the imageA colour composite image is created by assembling two or more greyscale images ofthe same object taken in different colours, or wavelengths, of light. These may be fromthe visible part of the spectrum or beyond.An example Photoshop Action (Colour composte.atn) is supplied on the FITS Liberatordownload page:http://www.spacetelescope.org/projects/fits liberator/download v2.htmland can be used to speed up the process. The file should be saved in the local Actionsdirectory, e.g. /Applications/Adobe Photoshop CS/Presets/Photoshop Actions).3We are currently working on the issue of how to combine metadata from three or moredifferent exposures once they have been imported into Photoshop.
The ESA/ESO/NASA Photoshop FITS Liberator User’s Guide19To load the Action: In the Action Window (Window - Action) select Load Actions - Colour composite.atn (the small arrow in the upper right corner). A series of newcommands will appear in the local Actions palette.This action acts on three (aligned) greyscale exposures of the same object inPhotoshop. Open three images using the FITS Liberator and copy the three files intothree layers of the same file. First select the layer that should appear as blue in the finalimage and play the "Blue Layer" part of the Action. Answer "Don't Merge", if thatquestion comes. Repeat for the red and green layers. For more information on creatingcolour composites consult the tutorial at:http://www.spacetelescope.org/projects/fits liberator/stepbystep.html
The ESA/ESO/NASA Photoshop FITS Liberator User’s Guide4 Advanced User’s GuideFigure 9 The Horsehead Nebula made from Digitized Sky Survey 2.Davide De Martin (http://www.skyfactory.org/) & Digitized Sky Survey 220
The ESA/ESO/NASA Photoshop FITS Liberator User’s Guide21In this section, we provide more in-depth information about the many differentoptions that FITS Liberator v.2 provides. To give the full overview we will first list all thecomponents in the Graphical User Interface.Figure 10 FITS Liberator screen shot with all tools and functions marked. These are described below. Notethat the Image statistics can be shown for either the Scaled version of the image (as here) or for the Stretchedversion of the image. The numbers 36-40 are therefore absent.Tabs1.2.3.Tools4.5.6.7.8.9.Processing TabMetadata TabFITS Header TabPreview image and import settingsMetadata inputFITS Header informationMove ToolZoom ToolBlack level PickerWhite level PickerBackground level PickerPeak level PickerMove tool (v)Zoom tool (z)Black level Picker tool (s)White level Picker tool (w)Background Picker tool (b)Peak level Picker tool (p)Preview Window10. Preview Window11. Minus Button12. Plus Button13. Zoom Popup8-bit representation of the imageDecrease zoom factorIncrease zoom factorChoose a zoom factorHistogram Window14. Histogram Window15. Black level Slider16. White level Slider17. Black level Text Field18. White level Text Field19. Black level Button Up20. Black level Button Down21. White level Button Up22. White level Button DownShows the distribution of greyscales in the imageDrag to change the black levelDrag to change the white levelBlack levelWhite levelIncrease the black levelDecrease the black levelIncrease the white levelDecrease the black level
The ESA/ESO/NASA Photoshop FITS Liberator User’s GuideImage Data23. Image/Plane Selector24. X-coordinate25. Y-coordinate26. Input value27. Stretched value28. Scaled value29. Width30. HeightChange image and/or planeX-coordinateY-coordinat
Photoshop CS2 folder. This folder is most likely named /Applications/Adobe Photoshop CS2, or similar for other versions of Photoshop. The installation of FITS Liberator on a Mac system is a simple drag-and-drop operation: 1. Drag the plug-in file (FitsLiberator2) from the disk image to t