Transcription
Flexo Tools for AdobePhotoshopUser Guide
Flexo Tools for Adobe PhotoshopContents1. Copyright Notice. 42. Installing the Flexo Tools. 63. Flexo Tools Setup.73.1 Starting a Trial.73.1.1 Starting a Trial On-line.83.1.2 Starting a Trial Off-line: Creating a Trial Request.93.1.3 Starting a Trial Off-line: Loading a Trial Response.113.2 Activating your Software.123.2.1 Activating On-line. 133.2.2 Activating Off-line: Creating an Activation Request. 143.2.3 Activating Off-line: Loading an Activation Response.173.3 Using the License Manager.183.4 Choosing a DeskPack Folder. 194. Where to find the Flexo Tools.205. ViewX Layers. 225.1 Working with viewX Layers. 235.1.1 Creating viewX Layers.235.1.2 Deleting viewX Layers. 245.1.3 Using the viewX Layers. 255.2 ViewX Flexo Plate Preview layer.255.3 ViewX Flexo Print Preview layer. 265.4 ViewX TAC Preview layer.276. The FlexoClean Filter.297. The FlexoFix Filter. 328. Viewer. 348.1 Welcome to Viewer. 348.2 Define Press Settings.348.3 The Viewer window. 348.3.1 Navigating in the Preview. 358.3.2 Separation visibility.358.3.3 Measure Ink Densities. 368.3.4 Quality Control.379. Press Settings.409.1 Making new Press Settings. 409.2 Viewing, Editing and Removing Press Settings.42ii
Contents9.3 About High Precision Percentages. 42iii
1Flexo Tools for Adobe Photoshop1. Copyright Notice Copyright 2012 Esko Software BVBA, Gent, BelgiumAll rights reserved. This material, information and instructions for use contained herein are theproperty of Esko Software BVBA. The material, information and instructions are provided on an AS ISbasis without warranty of any kind. There are no warranties granted or extended by this document.Furthermore Esko Software BVBA does not warrant, guarantee or make any representationsregarding the use, or the results of the use of the software or the information contained herein. EskoSoftware BVBA shall not be liable for any direct, indirect, consequential or incidental damages arisingout of the use or inability to use the software or the information contained herein.The information contained herein is subject to change without notice. Revisions may be issued fromtime to time to advise of such changes and/or additions.No part of this document may be reproduced, stored in a data base or retrieval system, or published,in any form or in any way, electronically, mechanically, by print, photoprint, microfilm or any othermeans without prior written permission from Esko Software BVBA.This document supersedes all previous dated versions. PANTONE , PantoneLIVE and other Pantone trademarks are the property of Pantone LLC. All othertrademarks or registered trademarks are the property of their respective owners. Pantone is a whollyowned subsidiary of X-Rite, Incorporated. Pantone LLC, 2012. All rights reserved.This software is based in part on the work of the Independent JPEG Group.Portions of this software are copyright 1996-2002 The FreeType Project (www.freetype.org). Allrights reserved.Portions of this software are copyright 2006 Feeling Software, copyright 2005-2006 Autodesk MediaEntertainment.Portions of this software are copyright 1998-2003 Daniel Veillard. All rights reserved.Portions of this software are copyright 1999-2006 The Botan Project. All rights reserved.Part of the software embedded in this product is gSOAP software. Portions created by gSOAP areCopyright 2001-2004 Robert A. van Engelen, Genivia inc. All rights reserved.Portions of this software are copyright 1998-2008 The OpenSSL Project and 1995-1998 EricYoung (eay@cryptsoft.com). All rights reserved.This product includes software developed by the Apache Software Foundation (http://www.apache.org/).Adobe, the Adobe logo, Acrobat, the Acrobat logo, Adobe Creative Suite, Illustrator, InDesign, PDF,Photoshop, PostScript, XMP and the Powered by XMP logo are either registered trademarks ortrademarks of Adobe Systems Incorporated in the United States and/or other countries.Microsoft and the Microsoft logo are registered trademarks of Microsoft Corporation in the UnitedStates and other countries.SolidWorks is a registered trademark of SolidWorks Corporation.Portions of this software are owned by Spatial Corp. 1986 2003. All Rights Reserved.JDF and the JDF logo are trademarks of the CIP4 Organisation. Copyright 2001 The InternationalCooperation for the Integration of Processes in Prepress, Press and Postpress (CIP4). All rightsreserved.4
Flexo Tools for Adobe PhotoshopThe Esko software contains the RSA Data Security, Inc. MD5 Message-Digest Algorithm.Java and all Java-based trademarks and logos are trademarks or registered trademarks of SunMicrosystems in the U.S. and other countries.Part of this software uses technology by BestTM Color Technology (EFI). EFI and Bestcolor areregistered trademarks of Electronics For Imaging GmbH in the U.S. Patent and Trademark Office.Contains PowerNest library Copyrighted and Licensed by Alma, 2005 – 2007.All other product names are trademarks or registered trademarks of their respective owners.Correspondence regarding this publication should be forwarded to:Esko Software BVBAKortrijksesteenweg 1095B – 9051 Gentinfo.eur@esko.com51
2Flexo Tools for Adobe Photoshop2. Installing the Flexo Tools Open the Photoshop.mpkg package on the installation disk and follow the instructions onscreen.This will install the Flexo Tools in your Adobe Photoshop Plug-Ins folder and the LicenseManager in your Applications folder.6
Flexo Tools for Adobe Photoshop3. Flexo Tools Setup1. After installing the Flexo Tools, launch Photoshop and go to File Automate Flexo ToolsSetup.2. You have two licensing options for the Flexo Tools. You can either: Start a 30 days trial (see Starting a Trial), Activate your license, if you have one (see Activating your Software).Note: If you already have activated your license but want to modify or deactivate it, use theLicense Manager. See Using the License Manager.3. Choose a DeskPack Folder. See Choosing a DeskPack Folder.3.1 Starting a Trial1. In the Flexo Tools Setup dialog, click the Start Trial. button.This opens the Start Trial Assistant.2. Click Continue.3. Choose to either: Start a trial on-line or Start a trial off-line.73
3Flexo Tools for Adobe Photoshop3.1.1 Starting a Trial On-line1. In the Start Trial Assistant, choose Start a trial on-line.2. Fill in your EskoArtwork Account Name and Password.Note: If you don’t have an EskoArtwork Account, click the Create a new EskoArtwork Accountlink to create one.8
Flexo Tools for Adobe Photoshop3. Click Continue.This starts a 30 days trial for the Flexo Tools.Note: You can see the number of trial days remaining in the Flexo Tools Setup dialog and in theLicense Manager.3.1.2 Starting a Trial Off-line: Creating a Trial Request1. In the Start Trial Assistant, choose Start a trial off-line.2. Choose Step 1: Create a trial request.3. Fill in your EskoArtwork Account Name.Note: If you don’t have an EskoArtwork Account, go to http://www.esko.com/licensing/createaccount to create one.4. Save the trial request file created automatically using the Save As. button.93
3Flexo Tools for Adobe Photoshop5. Click Continue then Done.6. Go to http://www.esko.com/licensing/activation, select the Manual Product Activation option andclick Continue.7. Browse to the Flexo Tools ActivationRequest.xml file you saved earlier.10
Flexo Tools for Adobe PhotoshopNote: Your browser needs to accept cookies. To set this in Safari, go to Safari Preferences Security and choose Always for the Accept cookies option.8. Fill in your EskoArtwork Account Name and Password and click Continue.This shows a trial product key for the Flexo Tools.9. Click Continue to download a response.xml file.3.1.3 Starting a Trial Off-line: Loading a Trial Response1. In Photoshop, go back to File Automate Flexo Tools Setup. and click Start Trial.2. In the Start Trial Assistant, choose Start a trial off-line.3. Choose Step 2: Load a trial response.113
3Flexo Tools for Adobe Photoshop4. Browse to the response.xml file you downloaded earlier.5. Click Continue then Close.This starts a 30 days trial for the Flexo Tools.Note: You can see the number of trial days remaining in the Flexo Tools Setup dialog and in theLicense Manager.3.2 Activating your SoftwareYou need a permanent product key to activate your Flexo Tools.1. In the Flexo Tools Setup dialog, click the Activate. button.This opens the Activate License Assistant.2. Click Continue.3. Choose either: On-line activation or Off-line activation.12
Flexo Tools for Adobe Photoshop3.2.1 Activating On-line1. In the Activate License Assistant, choose On-line activation.2. Fill in your Product Key.3. Fill in your EskoArtwork Account Name and Password.133
3Flexo Tools for Adobe PhotoshopNote: If you don’t have an EskoArtwork Account, click the Create a new EskoArtwork Accountlink to create one.4. Click Continue.You can now use the Flexo Tools.3.2.2 Activating Off-line: Creating an Activation Request1. In the Activate License Assistant, choose Off-line activation.2. Choose Step 1: Create an activation request.14
Flexo Tools for Adobe Photoshop3. Enter your Product Key.4. Fill in your EskoArtwork Account Name.Note: If you don’t have an EskoArtwork Account, go to http://www.esko.com/licensing/createaccount to create one.5. Save the activation request file created automatically using the Save As. button.153
3Flexo Tools for Adobe Photoshop6. Click Continue then Done.7. Go to http://www.esko.com/licensing/activation, select the Manual Product Activation option andclick Continue.8. Browse to the Flexo Tools ActivationRequest.xml file you saved earlier.16
Flexo Tools for Adobe PhotoshopNote: Your browser needs to accept cookies. To set this in Safari, go to Safari Preferences Security and choose Always for the Accept cookies option.9. Fill in your EskoArtwork Account Name and Password and click Continue.This shows your product key for the Flexo Tools.10.Click Continue to download a response.xml file.3.2.3 Activating Off-line: Loading an Activation Response1. In Photoshop, go back to File Automate Flexo Tools Setup. and click Activate.2. In the Activate License Assistant, choose Off-line activation.3. Choose Step 2: Load an activation response.173
3Flexo Tools for Adobe Photoshop4. Browse to the response.xml file you downloaded earlier.5. Click Continue then Close.You can now use the Flexo Tools.3.3 Using the License Manager To open the License Manager: In Photoshop, go to File Automate Flexo Tools Setup. and click License Manager. Go to your Applications folder and double-click EskoArtwork Local LicenseManager.app. With the License Manager, you can: Activate your license, if you have one, using the Activate License Assistant (see Activatingyour Software). Deactivate your license, for example if you want to transfer it to another computer. Repair one or several license, if they happen to be broken. Save a Licenses Report (that can be useful in case your computer crashes or is stolen).18
Flexo Tools for Adobe PhotoshopFor more information on deactivating or repairing licenses, and saving a Licenses Report, pleasesee the Using the EskoArtwork Server License Manager user guide.3.4 Choosing a DeskPack FolderBefore you can work with any of the Flexo Tools, you need to specify a DeskPack Folder. This folderis used internally by the Flexo Tools to store settings. Use the Choose. button to select an existing folder or to create a new one to use as DeskPackFolder.Note:If you are running several copies of the Flexo Tools on a network, we recommend that you usethe same DeskPack Folder for all copies. With this setup, all Flexo Tools can use the same PressSettings.If you also have DeskPack products on Adobe Illustrator , we suggest that you use the DeskPackContainer as DeskPack Folder.193
4Flexo Tools for Adobe Photoshop4. Where to find the Flexo Tools1. Open a CMYK image in Photoshop.2. Go to File Automate , and you will see the Flexo Tools:20
Flexo Tools for Adobe PhotoshopUse the Press Settings. to store technical parameters of the output process (RIP, platemaking,press, inks and substrate). Having all Flexo Tools use the same Press Settings guarantees aconsistent retouching workflow.Use the viewX Layers. to visualize certain print characteristics, to help you detect possibleprinting problems.Use the Viewer to get a very accurate separation viewer. See Viewer on page 34See Press Settings and ViewX Layers for more information.Note:You can find other Flexo Tools in the Filter DeskPack menu.Use the FlexoClean. filter to clean up the separations and prevent scattered dots or holes onthe plate.Use the FlexoFix. filter to improve the printing quality of images on a flexographic press.For more information, see The FlexoClean Filter and The FlexoFix Filter.214
5Flexo Tools for Adobe Photoshop5. ViewX LayersViewX Layers are Photoshop layer-sets, created by the Flexo Tools. You can find them under File Automate . They can help you visualize certain print-characteristics. This makes it easier to detectpossible printing problems.There are three ViewX Layer sets, each serving a different purpose:1. Flexo Plate Preview: shows a single separation as a processed flexo-plate. This makes it easy tosee where there will be dots and where there will be no dots in the highlights. (ViewX Flexo PlatePreview layer on page 25.)2. Flexo Print Preview: shows the effect of highlight dot gain on a composite image. Shows thedesaturation and tonal jumps in the image due to the dot gain of the first dot. (ViewX Flexo PrintPreview layer on page 26.)3. TAC Preview: shows where the sum of densities exceeds the TAC limitation of the printingsubstrate. (ViewX TAC Preview layer on page 27.)Please refer to Working with viewX Layers on page 23.After you created one or more viewX layers, you can easily show and hide the effect by showingand hiding the viewX layer.Caution: When flattening the file when one of the viewX layers is visible, the adjustment will be calculatedinto the separations. This is probably not the intention. Make sure to toggle the viewX layersinvisible prior to flattening or saving to a flat file-format (Esko-Graphics CT, EPS, . ). The visible viewX layer will affect the number of the densitometer in the Info palette. To measurethe real densities, hide the viewX layer. viewX layers are adjustment layers. Photoshop does not support adjustment layers on multichannel images. That's why the viewX layers are only available on composite CMYK images.The Viewer is an alternative way to check printing characteristics and measure pixels, without thelimitations mentioned above. The Viewer is explained here: Viewer on page 34. For more specific22
Flexo Tools for Adobe Photoshopinfo on the Flexo Print or Flexo Plate preview in the Viewer, you can go directly to Quality Controlon page 375.1 Working with viewX Layers5.1.1 Creating viewX LayersTo create viewX layers, go to File Menu Automate viewX Layers . A dialog pops up:Press: shows the list of all press-configurations. See Press Settings on page 40 on how to editthese configurations.Flexo Plate Preview Layer: toggle this on if you want a Flexo Plate Preview layer. When the selectedpress has no first dot setting, this checkbox is disabled. (More on ViewX Flexo Plate Preview layeron page 25).Plate Color: pick the plate color that is to be used for the preview. This is strictly a visual setting.Just pick the one you like.Flexo Print Preview layer: toggle this on if you want a Flexo Print Preview Layer. When the selectedpress has no highlight dot gain settings, this checkbox is disabled. (More on ViewX Flexo PrintPreview layer on page 26).TAC Preview layer: toggle this on if you want a TAC Preview layer. (More on ViewX TAC Previewlayer on page 27).235
5Flexo Tools for Adobe PhotoshopHighlight when TAC is above x %. Areas in the image will be highlighted if the local sum of densitiesis higher than the value you select here. If there is a TAC-limit set for the selected press, that valuewill be shown by a marker on the scale. You're free to use a different setting for the visualization.A little marker indicates the TAC limit specified in the selected press settings. See Press Settingson page 40.Press OK to create or modify the viewX layers. The different layer sets will be created.Tip:The content of the viewX layers are controlled by Flexo Tools. So after creating the viewX layers, westrongly recommend to close them in the Layers palette.5.1.2 Deleting viewX LayersTo delete one or more of the viewX layers, go to File Menu Automation viewX Layers. andtoggle off the layers you no longer need. Another way to quickly delete all viewX layers, is by hiding24
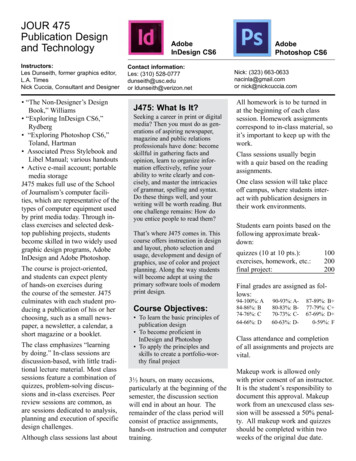
Flexo Tools for Adobe Photoshopthe viewX layers and using the Photoshop functions Delete Hidden Layers or Flatten Image.You canalso drag the viewX layers to the trash button.5.1.3 Using the viewX LayersViewX layers work much like regular Photoshop adjustment layers: when toggled visible, anadjustment layer applies an effect on all underlying visible layers. The other layers are not reallychanged, only the visualization and the densitometer measurements are affected.Caution:Make sure the viewX layers are not visible when you merge layers. When regular layers are mergedor flattened together with adjustment layers, the adjustments are calculated into the result. This canalso happen when changing the image mode or saving to an unlayered file.Caution:The color values in the Info palette are incorrect when the viewX layers are visible.ViewX layers are not completely like Photoshop's adjustment layers: viewX layers cannot be selectedor changed since they are managed by Flexo Tools and created with the 'viewX layers.' option. Youcan only hide/show them. There can only be one viewX layer visible at a time.The Viewer is an alternative way to check printing characteristics and measure pixels, without thelimitations mentioned above. The Viewer is explained here: . For more specific info on the Flexo Printor Flexo Plate preview in the Viewer, you can go directly to5.2 ViewX Flexo Plate Preview layerThis viewX layer shows the selected channel as a processed flexo plate.With the flexo plate preview, areas on the plate with dots can be easily distinguished from the areaswithout dots. There can only be one channel selected when this viewX layer is visible.The Flexo Plate Preview Layer will use the first dot percentage from the Press Settings on page40. Pixels with a percentage lower than the first dot percentage will be shown as areas without255
5Flexo Tools for Adobe Photoshopdots. Pixels with a percentage equal or higher than the first dot percentage will be shown as areaswith dots.5.3 ViewX Flexo Print Preview layerThis viewX layer shows the effect of highlight dot gain on the image.This effect is equivalent with curve adjustment. To determine this curve, the Flexo Print Preview Layerwill use the first dot and the highlight dot gain settings from the selected press. Going from lightto dark, the Print Preview layer will display percentages below the first dot percentage as 0%. Thefirst dot percentage will be shown darker (using the First Dot prints As value). Towards the midtonesthis darkening effect will fade out until the Range value. Percentage larger than Range, are displayedunchanged.See also: Press Settings on page 40.26
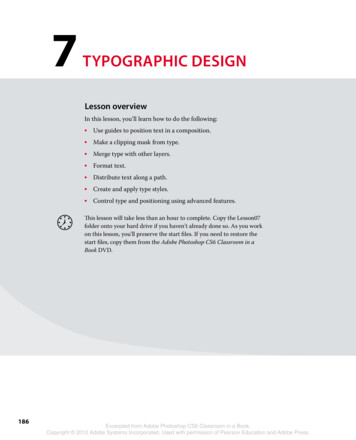
Flexo Tools for Adobe Photoshop5.4 ViewX TAC Preview layerThis viewX layer clearly highlights the areas in the image where the sum of the densities exceeds thetotal area coverage limit of the printing substrate.This limit-value is chosen when Creating viewX Layers on page 23.275
5Flexo Tools for Adobe Photoshop28
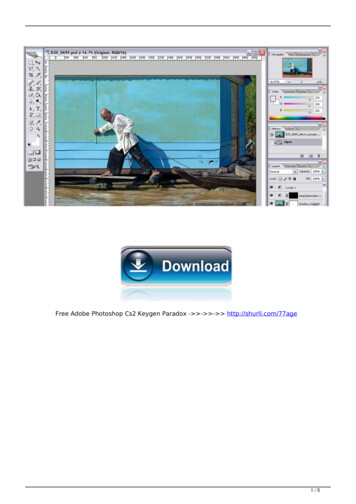
Flexo Tools for Adobe Photoshop6. The FlexoClean FilterThe FlexoClean filter is an image filter that prevents scattered dots or holes on the plate by cleaningup the separations. You can run the filter on one or on all CMYK channels. All selected channels willbe cleaned (independently from each other). Multi-channel images can also be cleaned, but then youhave to filter the channels one at a time.To open the filter, choose Filter Menu DeskPack FlexoClean.A dialog will pop up:296
6Flexo Tools for Adobe PhotoshopOn the right hand side are the filter parameters. Pressing OK (or hitting the enter key) will apply thefilter on the current Photoshop selection. Pressing Cancel (or hitting the escape key) will close thedialog. On the left hand side of the dialog there is the possibility to compare the original image witha preview of the filter.Press: Shows the list of all press-configurations. See Press Settings on how to edit theseconfigurations.The first dot percentage value from the selected press will be used by the filter todetermine where there will be dots on the plate. The filter will also make sure that all highlightpercentages below the first dot percentage are pulled down to 0% or pulled up to the first dotpercentage.Cut off Highlights Below: Normally the plate making process will cut off the highlights below theFirst Dot Percentage (see Making new Press Settings). With this slider however you can influencethis cut-off point for this image: All pixels with a percentage below this value will be set to 0% sothat they will definitely not generate dots on the plate. If you choose a value of 0%, the highlightswill not be cut-off at all and the plate will have dots everywhere.Remove Scattered Spots: When this toggle in on, the filter will scan the selected channels one byone, looking for groups of pixels that will end up as an isolated dot or group of dots on the plate.When such a group of pixels is found the filter will replace it by 0% pixels.Radius: Spots will only be removed if they are smaller than the given radius.Maximum Density: Spots will only be removed if the darkest pixel of the spot is not darker thanthis given value.Fill Holes: When this toggle is on, the filter will scan the selected channels one by one, looking forgroups of pixels that will end up as an area without dots completely surrounded by dots. When sucha group of pixels is found, and it is not too big, it will be replaced by pixels that yield the smalleststable dot, filling the hole. Radius: Holes will only be filled if they are smaller than or equal to thegiven radius.30
Flexo Tools for Adobe PhotoshopPreview Area: On the left, there is a big preview area, where a preview of the filter's result isshown.Use the Plus and minus buttons below to change the zoom. Click and drag in the previewimage to pan and show a different part. Just click and hold in the preview image to see the originalimage. This can be used to compare the filter's result with the original image.Channel: Choose which channel(s) to view in the preview area. This only affects the visualization inthe preview area, not the effect of the filter.Preview: The image in the preview area can be shown with one of the viewX visualization modes: Image (default): No visualization mode, the preview (and original image) is shown with normalPhotoshop visualization. Flexo Plate Preview: The image in the preview area is shown as a flexo plate. The effect is thesame as with the ViewX Flexo Plate Preview layer on page 25. Flexo Print Preview: The image in the preview area is shown with extra dot gain in the highlights.The effect is the same as with the ViewX Flexo Print Preview layer on page 26.Color Values: use the mouse pointer in the filter's preview area to measure the color values. Thefirst column are the original values, the second column are the values after the filter will be applied(see About High Precision Percentages on page 42).Note:The selected preview mode will always affect the preview areas display. So when you click insidethe preview area, the original image will also be displayed with the selected preview mode.316
7Flexo Tools for Adobe Photoshop7. The FlexoFix FilterThe FlexoFix filter is an automatic way to improve the printing quality of an image on a flexographicpress.To start the FlexoFix filter, choose FlexoFix from the DeskPack submenu of the Filter menu. This willopen a dialog:On the right hand side are the filter parameters. Press OK (or hit the Enter key) to apply the filter onthe current Photoshop selection. Pressing Cancel (or hit the Escape key) to close the dialog.Press: Shows the list of all press-configurations. See Press Settings on page 40 on how to editthese configurations.Channel Actions: For each selected channel, there is a list of possible actions to choose from. Forregular CMYK images (with a 'skeleton' Black channel), the default actions will give you the bestresults.For composite selection: Save Detail and Saturation: this means that the filter will raise all percentages above the first dotpercentage and will compensate for the dot gain in the highlights. This compensation is done ina context-sensitive way to ensure that the detail and contrast
Flexo Tools for Adobe Photoshop 19 For more information on deactivating or repairing licenses, and saving a Licenses Report, please see the Using the EskoArtwork Server License Manager user guide. 3.4 Choosing a DeskPack Folder Before you can work with any of the Flexo