Transcription
Installing and Configuring WindowsServer 2016 (Hands-on Guide)Copyright 2016 K. G. MarkAll rights reserved.
ContentsCopyrightAbout This BookAudience and Candidates PrerequisitesDisclaimerVirtual MachinesPreparing Virtual MachinesTask 1: Installing VMware Workstation on the Host MachineTask 2: Installing and Configuring the DC1 Virtual MachineTask 2.1: Configuring the DC1 Virtual MachineTask 2.2: Promoting the DC1 Virtual Machine as a Domain ControllerTask 3: Installing and Configuring the SERVER1 Virtual MachineTask 4: Installing and Configuring the CLIENT1 Virtual MachineTask 5: Installing and Configuring the ROUTER Virtual MachineTask 6: Creating and Configuring the SERVER2 Virtual MachineTask 7: Creating Snapshots of Virtual MachinesTask 8: Working with the Windows Server 2016 Desktop ExperienceExercise 1: Installing and Configuring Windows Server 2012 R2 Core MachineTask 1: Installing Windows Server 2012 R2 Core Machine.Task 2: Configuring the Windows Server 2016 Core Machine.Task 3: Adding CORE1 to DomainExercise 2: Managing Servers RemotelyTask 1: Creating and Managing the Server GroupTask 2: Deploying Roles and Features on CORE1 MachineTask 3: Managing Services on the CORE1 MachineExercise 3: Using Windows PowerShell to Manage ServersTask 1: Using the Windows PowerShell to Connect Remotely to Servers and ViewInformationTask 2: Using Windows PowerShell to Manage Roles and Features RemotelyExercise 04: Installing and Configuring Domain Controllers
Task 1: Adding the AD DS Role on a Member ServerTask 2: Configuring SERVER1 Server as a Domain ControllerTask 3: Configuring SERVER1 as a Global Catalog ServerExercise 5: Installing a Domain Controller by Using IFMTask 1: Generating a IFM Data FileTask 2: Adding the AD DS Role to the Member ServerTask 3: Configuring SERVER1 as a New Domain Controller Using the IFM DataFileExercise 6: Managing Organizational Units and Groups in AD DSTask 1: Managing Organizational Units and GroupsTask 2: Delegating the PermissionsTask 3: Configuring Home Folders for User AccountsTask 4: Testing and Verifying the Home Folders and Delegated PermissionsTask 5: Resetting the Computer AccountsTask 6: Examining the Behavior when a User Logins on Client.Task 7: Rejoining the Domain to Reconnect the Computer AccountExercise 7: Using Windows PowerShell to Create User Accounts and GroupsTask 1: Creating a User Account Using Windows PowerShellTask 2: Creating Groups Using Windows PowerShellTask 3: Exporting User Accounts Using the ldifde ToolExercise 8: Installing and Configuring the DHCP Server RoleTask 1: Installing the DHCP Server RoleTask 2: Configuring the DHCP ScopeTask 3: Configuring DHCP ClientTask 4: Configuring DHCP ReservationExercise 9: Installing and Configuring DNSTask 1: Configuring SERVER1 as a Domain Controller without Installing the DNSServer RoleTask 2: Creating and Configuring the Myzone.local Zone on DC1Task 3: Adding the DNS Server Role on the SERVER1Task 4: Verifying Replication of the mcsalab.local ZoneTask 5: Configuring DNS Forwarder
Task 6: Managing the DNS Cache10: Implementing LAN RoutingTask 1: Installing the LAN Routing Feature on ROUTERTask 2: Configuring the LAN Routing Service on ROUTERTask 3: Testing the Connectivity between DC1 and SERVER2 ServersExercise 11: Configuring IPv6 AddressingTask 1: Disabling IPv6 Address on DC1Task 2: Disabling IPv4 Address on SERVER2Task 3: Configuring an IPv6 Network on ROUTERTask 4: Verifying IPv6 Address on SERVER2Exercise 12: Installing and Configuring Disk StorageTask 1: Adding New Virtual Disks to DC1Task 2: Initializing the Added DisksTask 3: Creating and Formatting Simple VolumesTask 4: Shrinking the VolumesTask 5: Extending the VolumesExercise 13: Configuring a Redundant Storage SpaceTask 1: Creating a Storage PoolTask 2: Creating a Mirrored Virtual DiskTask 3: Creating a File in to Mirrored Volume1Task 4: Removing a Physical DriveTask 5: Verifying the File AvailabilityExercise 14: Implementing File SharingTask 1: Creating the Folder Structure for the New ShareTask 2: Configuring NTFS Permissions on the Folder StructureTask 3: Sharing the FolderTask 4: Accessing the Shared FolderTask 5: Enabling Access-based EnumerationTask 6: Testing the Access-based Enumeration ConfigurationExercise 15: Implementing Shadow CopiesTask 1: Configuring Shadow Copies
Task 2: Recovering a Deleted File Using Shadow CopyExercise 16: Implementing Network PrintingTask 1: Installing the Print and Document Services Server RoleTask 2: Installing a New PrinterTask 3: Configuring Printer PoolingTask 4: Connecting a Printer on a ClientExercise 17: Implementing Group Policy ObjectsTask 1: Creating a New GPOTask 2: Configuring the Internet Explorer GPOTask 3: Creating a Domain User to Test the GPOTask 4: Testing the Internet Explorer GPOTask 5: Configuring Security Filtering to Exempt a User from the Internet ExplorerGPOTask 6: Testing the Internet Explorer GPOExercise 18: Implementing AppLocker and Firewall Using Group PolicyTask 1: Restricting an Application Using AppLockerTask 2: Configuring Windows Firewall Rules Using Group Policy
CopyrightThe author holds all the rights of publishing and reproducing to this book. The content ofthis book cannot be reproduced or copied in any form or by any means or reproducedwithout the prior written permission of the author.
About This BookThis book contains the virtual lab setup guide and the lab exercises for installing andconfiguring Windows Server 2016. You can create the virtual lab infrastructure on yourown system and you can easily perform all the lab exercises mentioned in this book.Candidate having the basic knowledge of Windows operating systems and networkingfundamentals can perform all the lab exercises without (or least) the need of a trainer orfaculty. This book mainly covers the initial implementation and configuration of coreservices, such as AD DS, networking services.
Audience and Candidates PrerequisitesThis book is intended for the candidates who have basic operating system knowledge, andwant to gain the hands-on practice skills and knowledge necessary to implement the coreinfrastructure services. In addition, this book is also helpful for the candidate who arelooking for certification in the Windows Server 2016 platform.The candidates should have the basic knowledge of the networking fundamentals,Windows-based operating systems, and virtualization platforms to perform the hands-onpractices.
DisclaimerWe made almost every effort to avoid errors or omissions in this guide. However, errorsmay slink in. Any mistake, error or discrepancy noted by the readers are requested to sharewith us, which will be highly appreciable. The contents and images in this guide couldinclude technical inaccuracies or typographical errors. Author(s) or publisher makes norepresentations about the accuracy of the information contained in the guide.
Virtual MachinesThe virtual machines that will be used throughout this book are listed in the followingtable.S. No.VM NameOperating System1DC1Windows Server 20162SERVER1Windows Server 20163CLIENT1Windows 8.1/104ROUTERWindows Server 20165SERVER2Windows Server 2016To prepare the virtual machines mentioned in the preceding table, you need ISO images.You can download the evaluation ISO images (Windows Server 2016 (Technical Preview)and Windows 8.1/10) from the Microsoft download center.To perform the step by step lab exercises, download the ISO images and place them underthe D:\ISOs folder on the host machine. You can setup the virtual lab infrastructure on theVMware or Hyper-V platform.Each virtual machine will act as a separate machine with the unique GUID, SID, and IPaddress. The following table lists the IP addresses and roles of the respective VMs.S.No.VMNameIP AddressRole1DC110.0.0.100Domain controller ofthe mcsalab.localdomain.2SERVER110.0.0.101Member server ofthe mcsalab.localdomain.3CLIENT110.0.0.102Client machine of
the Router server toperform the 68.0.2Workgroup server inthe external subnet.
Preparing Virtual MachinesTo create the virtual machines, you need to perform the following tasks on the hostmachine:1.2.3.4.5.6.Install VMware Workstation or Player.Install and configure the DC1 virtual machineInstall and configure the SERVER1 virtual machineInstall and configure the CLIENT1 virtual machineInstall and configure the ROUTER virtual machineInstall and configure the SERVER2 virtual machine
Task 1: Installing VMware Workstation on the HostMachineTo Install VMware Workstation or VMware Player, first you need to download it. Once itis downloaded, just double-click the setup file, and follow the simple steps to complete theinstallation process.
Task 2: Installing and Configuring the DC1 Virtual MachineTo install and configure the DC1 virtual machine, you need to perform the followingsteps:1.2.3.Make sure that the VMware console is active.Select File and then select New Virtual Machine.On the New Virtual Machine Wizard, click Next.4.On the Guest Operating System Installation page, select the Installer discimage file (iso): radio button, browse the location of the Server 2016 ISO imagefile, and then click Next.
5.Note: If you use the VMware platform that automatically detects the version ofthe Windows server, you may asked to set the following settings:Product keyOperating system editionAdministrator passwordOtherwise, you may skip it.6.On the Select a Guest Operating System page, select the highest supportedversion of Windows server (in this case Windows Server 2012 but it will stillsupport Windows Server 2016), and then click Next.
7.8.9.On the Name and Virtual Machine page, type DC1 in the Virtual machinename field.In the Location field, navigate the location where you want to save the virtualmachine, such as H:\VMs\2k16\DC1, and then click Next.On the Specify Disk Capacity page, select Store virtual disk as a single file,optionally you can also set the disk size as well, and then click Next.
10. On the Ready to Create Virtual Machine page, click Customize Hardware.11. On the Hardware window, select Network Adapter in the left pane. Select theHost only radio button, and then click Close.12.13.14.Click Finish.On the VMware console, power on the DC1 virtual machine.On the Windows Setup page, click Next, and then click Install Now.
15.On the Select the operating system you want to install page, select theWindows Server 2016 Desktop Experience, and then click Next.16.On the License terms page, select the I accept the license terms check box,and then click Next.On the Which type of installation do you want page, select the Customoption, and then click Next.On the Where do you want to install Windows page, click Next.17.18.
19. The Installation process will begin, after 10-15 minutes the Customize settingsscreen will display.20.Set Administrator password as Password@123.Task 2.1: Configuring the DC1 Virtual Machine1.2.Sign in to DC1 with the Administrator account.Open the System Properties (sysdm.cpl) and set the computer name as DC1.3.Restart and sign in to the system with the Administrator account. After sometime, the Server Manager console will display.Open the Run dialog box, type ncpa.cpl, and then press Enter.Select and right-click the active network adapter, and then select Properties.Set the following TCP/IP settings:4.5.6.
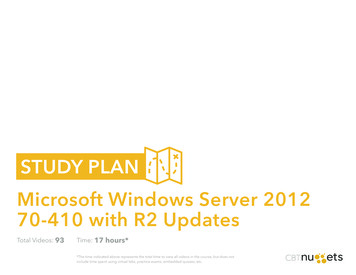
IP address: 10.0.0.100.Subnet mask: 255.0.0.0.Default gateway: 10.0.0.1.Preferred DNS server: 10.0.0.100.7.Close the Network Connections console.Task 2.2: Promoting the DC1 Virtual Machine as a DomainControllerTo promote the DC1 virtual machine as a domain controller, you need to perform thefollowing steps:1.2.3.4.5.6.Open the Server Manager console.Click the Add roles and features link.On the Before you begin page, click Next.On the Select installation type page, click Next.On the Select destination server page, click Next.On the Select server roles page, select the Active Directory Domain Servicescheck box, as shown in the following figure.
7.8.9.10.11.12.Accept the default selections through rest of the wizard and complete theinstallation process.Click Close, once the installation succeeds on DC1.On the Server Manager console, click the Notifications icon.Click the Promote this server to a domain controller link, as shown in thefollowing figure.On the Deployment Configuration page, select the Add a new forest radiobutton.In the Root domain name text box, type mcsalab.local, as shown in thefollowing figure, and then click Next.
13.On the Domain Controller Options page, make sure that the Domain NameSystem (DNS) server check box is selected, as shown in the following figure.14. In the Password and Confirm password text boxes, type the Password@123,and then click Next.15.On the DNS Options page and then click Next.16.On the Additional Options page, click Next.17. On the Paths page, as shown in the following figure, review the default locationfor the AD DS database file, and then click Next.
18.On the Review Options page, click Next.19. On the Prerequisites Check page, as shown in the following figure, review theprerequisites, and then click Install.20.21.After some time, the system will restart automatically, sign in to DC1 with theMCSALAB\Administrator account.Do not shut down the DC1 virtual machine.
Task 3: Installing and Configuring the SERVER1 VirtualMachineTo install and configure the SERVER1 virtual machine, you can follow the simple stepsas you used to install and configure the DC1 virtual machine.1.2.3.4.5.6.7.8.During the installing SERVER1 virtual machine, make sure that you use thefollowing settings and options:Virtual machine name: SERVER1.Operating system version: Windows Server 2016.Memory: 2048 MBHard disk size: 50 GBNetwork Adapter: Host only (click Customize Hardware before clicking theFinish button.)Password: Password@123Once you installed the SERVER1 virtual machine with the preceding settings,configure the following TCP/IP settings:IP address: 10.0.0.101Subnet mask: 255.0.0.0Default gateway: 10.0.0.1Preferred DNS server: 10.0.0.100Once you configured the preceding TCP/IP settings, open the System Propertiesdialog box and click Change.On the Computer Name/Domain Changes dialog box, in the Computer nametext box, type SERVER1.Select the Domain radio button, in the Member of section, and then typemcsalab.local, and then click OK.On the Windows Security dialog box, provide the credentials of the DC1 server,and restart the SERVER1 virtual machine.Sign in to SERVER1 with the Administrator account.Shut down the SERVER1 virtual machine.
Task 4: Installing and Configuring the CLIENT1 VirtualMachineTo install and configure the CLIENT1 virtual machine, you can follow the simple steps asyou used to install and configure the DC1 virtual machine.1.2.3.4.5.6.7.8.During the installing CLIENT1 virtual machine, make sure that you use thefollowing settings and options:Virtual machine name: CLIENT1.Operating system version: Windows 8.1/10.Memory: 1024 MBHard disk size: 50 GBNetwork Adapter: Host only (click Customize Hardware before clicking theFinish button.)Password: Password@123Once you installed the CLIENT1 virtual machine with the preceding settings,configure the following TCP/IP settings:IP address: 10.0.0.102Subnet mask: 255.0.0.0Default gateway: 10.0.0.1Preferred DNS server: 10.0.0.100Once you configured the preceding TCP/IP settings, open the SystemProperties dialog box, and click Change.On the Computer Name/Domain Changes dialog box, in the Computer nametext box, type CLIENT1.Select the Domain radio button in the Member of section, type mcsalab.local,and then click OK.On the Windows Security dialog box, provide the credentials of the DC1 server,and restart the CLIENT1 virtual machine.Sign in to CLIENT1 with the Administrator account.Shut down the CLIENT1 virtual machine.
Task 5: Installing and Configuring the ROUTER VirtualMachineTo install and configure the ROUTER virtual machine, you can follow the simple steps asyou used to install and configure the DC1 virtual machine.1.2.3.4.During the creating ROUTER virtual machine, make sure that you use thefollowing settings and options:Virtual machine name: ROUTER.Operating system version: Windows Server 2016.Memory: 1024 MBHard disk size: 50 GBNetwork Adapter: Host onlyOnce you created the ROUTER virtual machine with the preceding settings,select the ROUTER virtual machine, click Edit virtual machine settings, asshown in the following figure.On the Virtual Machine Settings dialog box, click Add.On the Add Hardware Wizard, select Network Adapter, and then click Next.
5.On the Network Adapter Type page, select VMnet2 under the Custom option.6.7.8.Click Finish and then click OK button.Power on the ROUTER virtual machine.Follow the simple steps to install the ROUTER virtul machine. UsePassword@123 as Administrator password.Once you installed the ROUTER virtual machine with the preceding settings,configure the following TCP/IP settings on the first network adapter (connectedto the Host only network):IP address: 10.0.0.1Subnet mask: 255.0.0.09.
Preferred DNS server: 10.0.0.10010.Configure the following TCP/IP settings on the second network adapter(connected to the VMnet2 network):IP address: 192.168.0.1Subnet mask: 255.255.255.011.Once you configured the preceding TCP/IP settings, open the SystemProperties dialog box, set the computer name as ROUTER, and restart theROUTER virtual machine.Open the Command Prompt window, type ping 10.0.0.100, and then pressEnter.You should be able to communicate (ping) with the DC1 server.12.13.Note: If you are unable to communicate with the DC1 server, you may need to interchangethe TCP/IP settings of the network adapters.14.Do not shut down the ROUTER virtual machine.
Task 6: Creating and Configuring the SERVER2 VirtualMachineTo install and configure the SERVER2 virtual machine, you can follow the simple stepsas you used to install and configure the DC1 virtual machine.1.2.3.4.5.1.During the installing SERVER2 virtual machine, make sure that you use thefollowing settings and options:Virtual machine name: SERVER2.Operating system version: Windows Server 2016.Memory: 1024 MBHard disk size: 50 GBNetwork Adapter: VMnet2Password: Password@123Once you installed the SERVER2 virtual machine with the preceding settings,configure the following TCP/IP settings:IP address: 192.168.0.2Subnet mask: 255.255.255.0Default gateway: 192.168.0.1Preferred DNS server: 10.0.0.100Once you configured the preceding TCP/IP settings, open the SystemProperties dialog box, set the computer name as SERVER2, and restart theSERVER2 virtual machine.Sign in to SERVER2 with the Administrator account.Shut down the SERVER2 virtual machine.Shut down the DC1 virtual machine.
Task 7: Creating Snapshots of Virtual MachinesOnce you installed and configured all the virtual machines, you need to create thesnapshots/checkpoints for each virtual machine. Snapshot will help you to revert a virtualmachine to its previously used state (at the point when you had created it).To create a snapshot, you need to perform the following tasks:1.Make sure that the all virtual machines are turned off.2. Select and right-click any virtual machine, select Snapshot, and then select Takesnapshot. After few seconds, the snapshot will be created.3.Using the preceding method, create snapshots of all the virtual machines.
Task 8: Working with Windows Server 2016 DesktopExperienceGUI interface of Windows Server 2016 is almost has similar functions as used in windowsServer 2012 R2. However, there are some new feature have been added to make the userexperience more interesting. Some of the basic GUI features are:Start buttonTask ManagerTask ViewStart button1.Sign in to DC1 and click the Start button. It will show you the various options,such as Server Manager, Settings, PowerShell, and Calculator that can beaccessed directly.2.If you right-click the Start button, it will show you few more options, as shownin the following figure.
Task ManagerThe Task Manager in Windows Server 2016 is much similar to the Task Manager that hasbeen used in Windows Server 2012 R2.
Task ViewTask View allows you to view and switch between different active windows. This featurewas not available in Windows Server 2012 R2.
Task 9: What’s New in Windows Server 2016?In Windows Server 2016, there are many new roles and features have been added. Someof the major new roles and features are:Host Guardian ServiceMultipoint ServicesWindows Server Essentials ExperienceSetup and Boot Event CollectionsSMB Bandwidth LimitWindows Biometric FrameworkBitLocker Network UnlockHost Guardian ServiceThe Host Guardian Service (HGS) is a server role introduced in Windows Server 2016. Itprovides the Attestation and Key Protection services that allow Guarded Hosts to runshielded virtual machines. The Attestation service validates guarded host identity andconfiguration. The Key Protection service allows transport keys to enable guarded hosts tounlock and run shielded virtual machines.Multipoint ServicesIt allows multiple users to simultaneously share one computer and each user has their ownindependent and familiar Windows experience.Windows Server Essentials ExperienceThis is a role service that sets up the IT infrastructure and offers powerful functions, suchas “PC backups” that helps organizations’ to protect data, and “Remote Web Access” thathelps access business information from anywhere, virtually. It also helps you to simplyand rapidly connect to cloud-based applications and services to extend the functionality ofthe servers.Setup and Boot Event CollectionsIt is a feature that enables the collection and logging of setup and boot events from othercomputers on the network.SMB Bandwidth LimitThis feature provides a mechanism to track SMB traffic per category and allows you tolimit the amount of traffic allowed for a given category. It is commonly used to limit thebandwidth used by live migration over SMB.Windows Biometric Framework
This feature allows fingerprint devices to be used to identify and verify identities and tosign in to Windows.BitLocker Network UnlockThis feature enables a network-based key protector to be used to automatically unlockBitLocker-protected operating system drives in domain-joined computers, when thecomputer is restarted.
Exercise 1: Installing and Configuring Windows Server 2012R2 Core MachineIn this exercise, you will install and configure a Windows Server 2012 R2 core machine.The installation process for the server core option and full GUI option is almost identical.However, server core option requires less hardware resources and it is more secure thanthe full GUI option. In this exercise, you will use the following virtual machines:DC1CORE1To install and configure the Windows Server 2012 R2 core machine, you need to performthe following tasks:Task 1: Installing Windows Server 2012 R2 Core Machine.1.2.Create a virtual machine with the following settings:During the creating the virtual machine, make sure that you use the followingsettings and options:Virtual machine name: CORE1.Operating system version: Windows Server 2016.Memory: 512 MBHard disk size: 20 GBNetwork Adapter: Host onlyPassword: Password@1233.4.5.6.Once the virtual machine is created, power on the CORE1 virtual machine.After some time, the Windows Setup screen will display.Click Next and then click Install now.If the Activate Windows screen is displayed, click I don’t have a product keylink.
7.On the Select the operating system you want to install page, select WindowsServer 2016 Technical Preview 4, and then click Next.8. On the License terms page, select the I accept the license terms check box, andthen click Next.9.On the Which type of installation do you want? page, click Custom: InstallWindows only (advanced), as shown in the following figure.
10.On the Where do you want to install Windows? page, click Next.11.The installation process will start.12. After some time, the sign in screen will display, and you will be asked to changethe Administrator password.13.Set the Administrator password as Password@123.Task 2: Configuring the Windows Server 2016 CoreMachine.To configure the Windows Server 2016 core machine, you need to perform the followingsteps:1.2.Sign in to CORE1 with the Administrator account.On the Command Prompt window, type sconfig.cmd, and then press Enter.The Server Configuration options will display, as shown in the followingfigure.
3.4.5.6.To change the system Date and Time, type 9, and then press Enter.On the Date and Time dialog box, as shown in the following figure, clickChange time zone.Select the desired time zone, and then click OK.In the Date and Time dialog box, click Change Date and Time, and verify thedate and time, and then click OK.7. On the Command Prompt window, type 8, and then press Enter to configureNetwork Settings.8. Type the index number (in our example it is 10) of the network adapter, as shownin the following figure, and then press Enter.
9.On the Network Adapter Settings page, type 1, to set the Network AdapterAddress, as shown in the following figure, and then press Enter.10. To set static IP address, type S, as shown in the following figure, and then pressEnter.11. At the Enter static IP address: prompt, type 10.0.0.103, and then press Enter.12.At the Enter subnet mask: prompt, accept the default value, and then pressEnter.13. At the Enter default gateway: prompt, type 10.0.0.1, and then press Enter, asshown in the following figure.
14. On the Network Adapter Settings option, type 2, to configure the DNS serveraddress, and then press Enter.15.At the Enter new preferred DNS server prompt, type 10.0.0.100, and thenpress Enter.16. On the Network Settings message box, as shown in the following figure, clickOK.17.Press Enter to not configure an alternate DNS server address.18. At the Select option: prompt, type 4, and then press Enter to return to the mainmenu.19.At the Enter number to select an option: prompt, type 15, and then pressEnter to exit the sconfig.cmd utility.20. On the Command Prompt window, type ping dc1.mcsalab.local to verify theconnectivity between DC1 and CORE1.Task 3: Adding CORE1 to Domain1.2.3.On the Command Prompt window, type sconfig.cmd, and then press Enter.At the Enter number to select an option: prompt, type 2, and then press Enter.At the Enter a new computer name: prompt, type CORE1, and then pressEnter.
4.On the Restart dialog box, click Yes.5.6.7.The system will restart and after some time the Sign in screen will display.Sign in to CORE1 with the Administrator account.On the Command Prompt window, type hostname, and then press Enter toverify the computer’s name.On the Command Prompt window, type sconfig.cmd, and then press Enter.Type 1 to change the Domain/Workgroup settings, and then press Enter.Type D to join a domain, and then press Enter.At the Name of domain to join prompt, type mcsalab.local, and then pressEnter.At the Specify an authorized domain\user prompt, type Administrator, andthen press Enter.At the Type the password associated with the domain user prompt, typePassword@123, and then press Enter.At the Change Computer Name message box, as shown in the followingfigure, click No.8.9.10.11.12.13.14.15. On the Restart dialog box, click Yes. The system will restart. After some time,the sign in screen will display.16.Sign in to CORE1 with the MCSALAB\Administrator account.
Results: After completing this exercise, you will have configured a Windows Server 2016server core machine.Do not turn off or shut down the DC1 and/or CORE1 virtual machine(s) as these virtualmachines will be required to perform the next exercise.
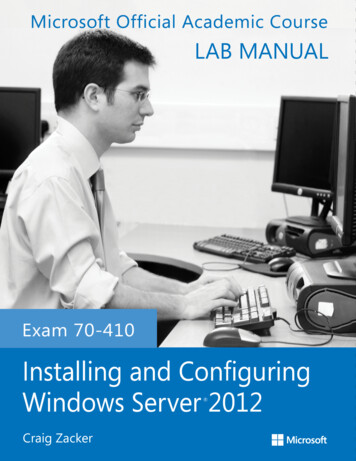
Exercise 2: Managing Servers RemotelyIn this exercise, you will manage the server core machine from the remote location. Inaddition, you will also deploy roles and features on the server core machine. Further, youwill manage the services on the server core machine.Before starting to perform this exercise, make sure that the DC1 and CORE1 virtualmachines are running, and you have not reverted them in the previous exercise.Task 1: Creating and Managing the Server Group1.2.3.4.5.6.7.Sign in to DC1 with the MCSALAB\Administrator account.On the Server Manager console, make sure that Dashboard is selected in theleft pane, and then click Create a server group.On the Create Server Group dialog box, click the Active Directory tab, andthen click Find Now.In the Server group name text box, select the CORE1 and SERVER1 servers,and then add CORE1 and SERVER1 to the server group.In the Server group name text box, type ServerGroup1, as shown in thefollowing figure.Click OK to close the Create Server Group dialog box.On the Server Manager console, select ServerGroup1 in the left pane. Verifythat the both servers are listed in the Servers pane, as shown in the followingfigure.
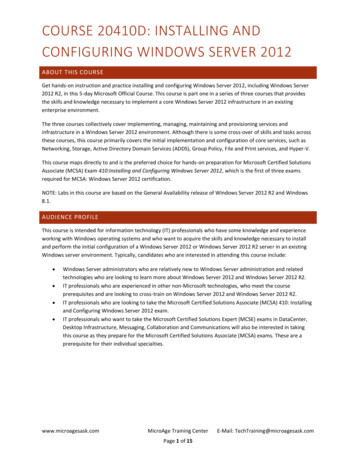
Task 2: Deploying Roles and Features on CORE1 Machine1.2.3.Sign in to DC1 with the MCSALAB\Administrator account.On the Server Manager console, click ServerGroup1 in the left pane.Scroll to the top of the pane, select and right-click CORE1, and then select AddRoles and Features, as shown in the following figure.4.5.6.On the Add Roles and Features Wizard, click Next.On the Select installation type page, click Next.On the Select destination server page, make sure that CORE1.mcsalab.local isselected, as shown in the following figure, and then click Next.
7.On the Select server roles page, select the DHCP Server check box, as shownin the following figure, and then click Next.8.On the Add Roles and Features dialog box, click Next.9.Click Next, until the Confirm install selections page is displayed.10. On the Confirm installation selections page, select the Restart the destinationserver automatically if required check box, as shown in the
the Windows server, you may asked to set the following settings: Product key Operating system edition Administrator password Otherwise, you may skip it. 6. On the Select a Guest Operating System page, select the highest supported version of Windows server (in this case Windows Server 2012 but it will still su