Transcription
HP BladeSystem Onboard AdministratorUser GuideVersion 2.10Part Number 416216-006November 2007 (Sixth Edition)
Copyright 2006, 2007 Hewlett-Packard Development Company, L.P.The information contained herein is subject to change without notice. The only warranties for HP products and services are set forth in the expresswarranty statements accompanying such products and services. Nothing herein should be construed as constituting an additional warranty. HPshall not be liable for technical or editorial errors or omissions contained herein.Confidential computer software. Valid license from HP required for possession, use or copying. Consistent with FAR 12.211 and 12.212,Commercial Computer Software, Computer Software Documentation, and Technical Data for Commercial Items are licensed to the U.S.Government under vendor’s standard commercial license.Microsoft, Windows, and Windows NT are U.S. registered trademarks of Microsoft Corporation. Windows Server 2003 is a U.S. trademark ofMicrosoft Corporation. Java is a trademark of Sun Microsystems.Audience assumptionsThis document is for the person who installs, administers, and troubleshoots servers and storage systems. HP assumes you are qualified in theservicing of computer equipment and trained in recognizing hazards in products with hazardous energy levels.
ContentsIntroduction . 7Overview . 7Access requirements . 7Running Onboard Administrator for the first time . 8Signing in to the Onboard Administrator GUI . 9Running the setup wizard . 10Using online help . 11Changing enclosure and device configurations . 11Recovering the administrator password . 11Flash disaster recovery. 12HP BladeSystem c7000 Enclosure hardware installation. 13Installing Onboard Administrator modules . 13Onboard Administrator cabling . 14HP BladeSystem Insight Display . 16HP BladeSystem c7000 Insight Display components. 16HP BladeSystem c3000 Insight Display components. 17Insight Display overview. 17Accessing the HP BladeSystem c3000 Insight Display . 18Running the Insight Display installation steps . 19Navigating the Insight Display . 24Health Summary screen. 25Enclosure Settings screen . 26Enclosure Info screen . 27Blade or Port Info screen . 28Turn Enclosure UID On/Off screen. 29View User Note screen. 31Chat Mode screen . 31Insight Display errors . 32Power errors . 32Cooling errors. 32Location errors . 32Configuration errors. 33Device failure errors. 33First Time Setup Wizard . 34Before you begin. 34Enclosure Selection screen. 35Configuration Management screen . 37Rack and Enclosure Settings screen. 39Administrator Account Setup screen . 41Local User Accounts screen. 42Enclosure Bay IP Addressing . 43Directory Services Configuration screen . 46Onboard Administrator Network Settings screen . 48Enclosure SNMP Settings screen. 50Contents3
Power Management screen . 51Finish. 53Navigating Onboard Administrator . 54Navigation overview . 54Tree view . 54Graphical view navigation . 57Rack View. 60Rack View screen . 60Topology modes . 61Rack Topology tab . 62Rack Power and Thermal tab . 64Rack Firmware Summary tab . 65Configuring the HP BladeSystem c7000 enclosure and enclosure devices . 66Viewing the status screens . 66Enclosure settings . 67Selecting enclosures. 67Enclosure Settings screen . 67AlertMail . 70Date and Time . 72Network Access . 74SNMP Settings . 75Enclosure Virtual Buttons tab . 77Configuration Scripts . 77FRU Summary . 78Active to Standby . 80DVD Drive . 81Device Summary . 82Reset Factory Defaults . 82Managing enclosures . 83Powering off the enclosure . 83Linking enclosures. 83Managing multiple enclosures . 83Onboard Administrator Module . 85Active Onboard Administrator screen. 85Active Onboard Administrator Virtual Buttons tab . 86TCP/IP Settings screen . 87Information tab. 89Certificate Request tab . 90Certificate Upload tab. 92Firmware update . 93System log. 94Standby Onboard Administrator module . 97Standby Onboard Administrator Virtual Buttons tab . 98Standby Certificate Request tab. 98Standby Certificate Upload tab . 100Device bays. 100Device Bay Overview screen. 100Device Bay Status tab . 102Server blade information tab. 107Boot Options tab . 109Device Bay Status screen . 110Contents4
IML Log tab. 110Storage blades. 111Interconnect bays . 115Interconnect Bay Summary screen. 115Interconnect Bay screen. 116Interconnect Bay Virtual Buttons . 117Interconnect Bay Port Mapping screen. 118Enclosure power management . 119Power Supplies . 119Power Management settings . 119Setting power management options . 121Power management planning. 123Enclosure Power Meter. 124Enclosure Power Meter Table view. 126Enclosure DVD/CD-ROM Drive . 127DVD/CD-ROM Drives . 127Interactive installation and configuration of DVD/CD-ROM drive . 128Unattended OS deployment . 135Ad-hoc access to DVD-based media for application installation or data import . 140Updating blade firmware with HP Smart Update Manager . 140Fans and cooling management . 141Fan management and settings . 141Fan Zones . 145Thermal monitoring. 146c7000 Fan location rules. 151c3000 Fan location rules. 153Managing users . 153Users/Authentication . 153Signed-in users. 153User roles and privilege levels. 154User accounts . 155Directory Settings screen . 157Directory Groups screen . 158Uploading a Certificate . 159SSH Administration. 160HP SIM integration . 160Edit Local User Certificate Information tab. 161c3000 Fan location rules . 162Two-Factor Authentication. 162Two-Factor Authentication Certificate Information tab . 163Two-Factor Authentication Certificate Upload tab. 163Virtual Connect Manager . 163iLO 2 Integration . 164Port mapping . 165Port mapping explained . 165Mapping half-height c3000 enclosures . 167Mapping full-height c3000 enclosures . 169Using the command line interface . 171Command line overview. 171Using the serial connection . 172Setting up Onboard Administrator using serial connection . 172Contents5
Using configuration scripts . 173Configuration scripts. 173Troubleshooting . 175Onboard Administrator error messages. 175Onboard Administrator factory default settings. 181Enabling LDAP Directory Services Authentication to Microsoft Active Directory. 182Certificate Services . 182Preparing the directory. 182Uploading the DC Certificate (optional). 183Creating directory groups. 185Testing the directory login solution . 187Troubleshooting LDAP on Onboard Administrator . 188Technical support. 190Before you contact HP. 190HP contact information . 190Acronyms and abbreviations. 191Index. 194Contents6
IntroductionOverviewHP BladeSystem Onboard Administrator is the enclosure management processor, subsystem, andfirmware base used to support the HP BladeSystem c7000 and all the managed devices contained withinthe enclosure.Onboard Administrator provides a single point from which to perform basic management tasks on serverblades or switches within the enclosure. Utilizing this hardwired knowledge, Onboard Administratorperforms initial configuration steps for the enclosure, allow for run-time management and configuration ofthe enclosure components, and informs you of problems within the enclosure through email, SNMP, or theInsight Display.HP recommends that you read the HP BladeSystem c7000 Enclosure User Guide before moving on to HPBladeSystem Onboard Administrator setup. Reading this guide in order ensures that you will obtain anoverall understanding of the HP BladeSystem Onboard Administrator and that you properly complete theinitial setup to facilitate proper functioning of the Onboard Administrator.Access requirementsTo access HP BladeSystem Onboard Administrator, you need the Onboard Administrator IP address anda compatible web browser. Access to the application must be through HTTPS (HTTP exchanged over anSSL-encrypted session).The HP BladeSystem Onboard Administrator web interface requires an XSLT enabled browser withsupport for JavaScript 1.3 or the equivalent.The following browsers are officially supported. Other browsers can run the application, but are notsupported. Microsoft Internet Explorer 6.0. Mozilla Firefox 1.5.The following browser settings must be enabled before running the application: ActiveX (for Microsoft Internet Explorer) Cookies JavaScriptIf you receive a notice that your browser does not have the required functionality, be sure that yourbrowser settings meet the preceding requirements and see the "Recovering Lost Administrator Password"section in this guide.Introduction7
Running Onboard Administrator for the first timeIt is considered best practice to power up the enclosure and Onboard Administrator first and then addblades to the enclosure incrementally. Powering up the enclosure with server blades and storage bladesalready in the device bays can result in an increased startup time of 5 to 7 minutes.In setting up an HP BladeSystem enclosure for the first time, ensure that you have done the following:1.Power up the enclosure. The Enclosure Settings screen appears on the Insight Display. Use the InsightDisplay to configure the c7000 enclosure ("Configuring the HP BladeSystem c7000 enclosure andenclosure devices" on page 66).2.On this Enclosure Settings screen, you can configure several settings. However, at a minimum, an IPaddress for the active Onboard Administrator Ethernet port can be obtained automatically by usinga DHCP service on your network or alternately by configuring a static IP address using the InsightDisplay keys.If you are not using DHCP, you must configure each Onboard Administrator IP address and then allthe individual device and interconnect module management IP addresses.Preferred Method: Configure each Onboard Administrator static IP address using the Insight Display.Then Enable Enclosure Bay IP addresses for the Device Bays and Interconnect Bays using OnboardAdministrator GUI First Time Setup Wizard.Alternate method: If you do not want to use Enclosure Bay IP addressing, you must connect to eachserver blade’s front SUV port (using the SUV cable shipped with every enclosure) and configure theiLO IP address manually during BIOS POST. For the Interconnect Modules that contain managementprocessors (typically switches), use a serial interface (through the Onboard Administrator CLI orexternal connection, depending on the individual switch design). After changing IP addresses andsettings, all switches in the interconnect bay must be restarted using the Onboard Administrator GUIvirtual power buttons. See the EBIPA section later in this guide for more information.a. Complete Insight Display enclosure settings.b. Record the user name and password from the tag attached to each HP Onboard Administrator,and note which Onboard Administrator bay contains the active Onboard Administrator.3.Using the IP address for active Onboard Administrator that you configured in step 2, sign in to theactive HP Onboard Administrator using a PC on your network with a browser.4.Run the First Time Setup Wizard (on page 34).An alternate method to setting up HP BladeSystem Onboard Administrator for the first time is to use aserial connection ("Setting up Onboard Administrator using serial connection" on page 172).Introduction8
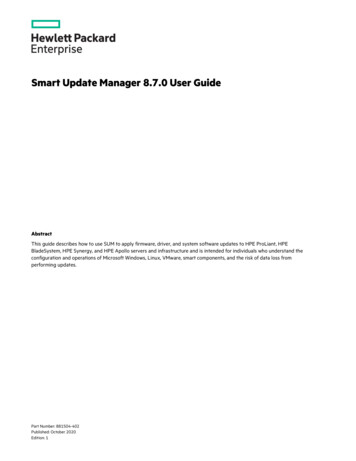
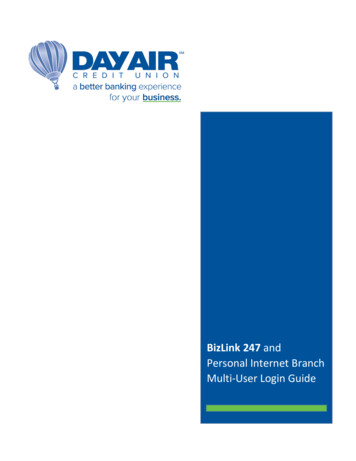
Signing in to the Onboard Administrator GUISigning in to Onboard AdministratorEnter the user name and initial administration password for your HP BladeSystem Onboard Administratoraccount found on the tag attached to the Onboard Administrator.If you have problems signing in, it could be for one of the following reasons: You are not entering the information correctly. Passwords are case sensitive. The account information you are entering has not been set up for HP BladeSystem OnboardAdministrator. The user name you are entering has been deleted, disabled, or locked out. The password for the account must be changed. You are attempting to sign in from an IP address that is not valid for the specified account. The password for the Administrator account has been forgotten or lost. To reset the Administratorpassword, see Recovering the administrator password section later in this guide.If you continue to have problem
Record the user name and password from the tag attached to each HP Onboard Administrator, and note which Onboard Administrator bay contains the active Onboard Administrator. 3. Using the IP address for active Onboard Administrator that you configured in step 2, sign in to the active HP On