Transcription
INTRODUCTION TO MICROSOFT WORD 2010University of OsloThe Faculty of Law
I
Table of Contents1ABOUT THIS GUIDE12OVERVIEW22.1User interface2.1.1Where are my menus and toolbars?242.1.1.1Learn about the Ribon52.1.1.2Dialog Box Launcher62.1.1.3Minimize the ribbon72.1.2Introducing Backstage82.1.2.1Where is Print Preview?102.1.2.2What happened to Tools / Options112.1.3Customize the Quick Access Toolbar2.1.3.1Add a command to the Quick Access Toolbar12122.1.4Do keyboard shortcuts still work?132.1.5Introducing KeyTips142.23Save as PDFBASIC FUNCTIONS15173.1Paste options173.2Undo, redo, or repeat an action183.2.1Undo the last action or actions that you made183.2.2Redo actions that you undid193.2.3Repeat the last action193.3Check spelling and grammar203.3.1How automatic spelling checking works213.3.2How automatic grammar checking works223.3.3Turn on or off automatic spelling and grammar checking233.4Save a document in Word253.5Print a document27II
4FUNCTIONS FOR EFFECTIVE WRITING4.1Styles29294.1.1Using styles304.1.2Editing styles334.2AutoCorrect354.2.1Understand the AutoCorrect list354.2.2Add a text entry to the AutoCorrect list364.2.3Add a text entry to the AutoCorrect list during a spelling check384.3Count the number of words in a document394.3.1Count the words as you type394.3.2Count the words in a selection or selections394.3.3Include text in footnotes, endnotes and text in boxes in the word count414.4Insert a page break424.4.1Insert a manual page break424.4.2Prevent page breaks in the middle of a paragraph434.4.3Prevent page breaks between paragraphs454.4.4Specify a page break before a paragraph454.4.5Prevent page breaks in a table row454.5Footnotes474.5.1Footnotes and endnotes474.5.2Insert a footnote or an endnote484.5.3Delete a footnote495OTHER USEFUL FEATURES5.1Table of contents50505.1.1Mark entries by using built-in heading styles505.1.2Update the table of contents515.2Navigation pane5.2.1See the document structure52545.2.1.1View thumbnail images of pages545.2.1.2Browse by headings55III
1About this guideThis is a guide that targets the task of writing a Master Thesis at the Faculty of Law,University of Oslo. This guide is based on Microsoft Word 2010, the illustrations usedare taken from Microsoft Word 2010.Juritekets primary task is to offer students IT-support at the Faculty of Law, questionsregarding the regulations for the Master Thesis can be directed to the InformationCentre.Tips and feedback can be sent to aleksander.lorentzen@jus.uio.no or tojuriteket@jus.uio.noAleksander LorentzenJuriteketOslo, 16.08. 20111
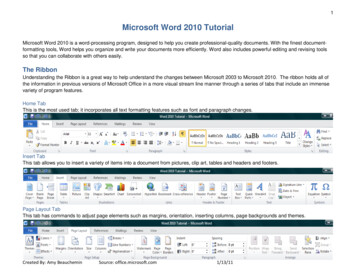
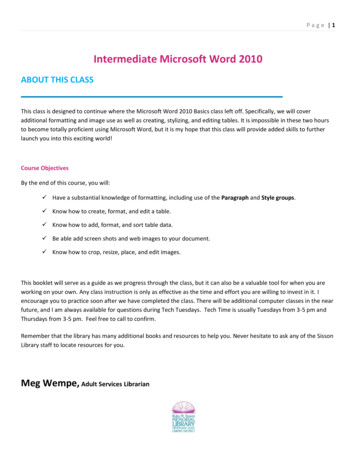
2Overview2.1User interfaceThe menu bar with menus and submenus are gone. These have been replaced with aribbon of commands that change with the type of tasks you are performing.12345Figure 1.2
Figure 2.3
2.1.1 Where are my menus and toolbars?In Word 2010, a wide band spans the top of the main program window. This is theribbon, and it replaces the old menus and toolbars. Each tab on the ribbon has differentbuttons and commands that are organized into ribbon groups.When you open Word 2010, the ribbon’s Home tab is displayed. This tab containsmany of the most frequently used commands in Word. For example, the first thingyou’ll see on the left side of the tab is the Clipboard group, with the commands toPaste, Cut, and Copy, as well as the Format Painter.Figure 3.Next, in the Font group, you’ll find commands to make text bold or italic, followed bythe Paragraph group with the commands to align text to the left, right, or center, and tocreate bulleted and numbered lists.The ribbon adjusts its appearance to fit your computer’s screen size and resolution. Onsmaller screens, some ribbon groups may display only their group name, not theircommands. In that case, simply click the small arrow on the group button to reveal thecommands.4
2.1.1.1 Learn about the RibonThe new Ribbon, a component of the Office Fluent user interface, groups your tools bytask, and the commands you use most frequently are close at hand. In Word 2010, youcan even customize the Ribbon so that the commands you use often are all together.132Figure 4.1) Tabs are designed to be task-oriented.2) Groups within each tab break a task into subtasks.3) Command buttons in each group carry out a command or display a menu ofcommands.5
2.1.1.2 Dialog Box LauncherThe small arrow, called the Dialog Box Launcher, in the lower-right corner of agroup, points to more detailed or advanced options available for the commands in thegroup. Click the arrow to open a dialog box or a task pane where you can work with theavailable options.Figure 5.6
2.1.1.3 Minimize the ribbonThe ribbon is designed to help you quickly find the commands that you need tocomplete a task. Commands are organized in logical groups that are collected togetherunder tabs. Each tab relates to a type of activity, such as writing or laying out a page. Toreduce screen clutter, some tabs, known as contextual tabs, are shown only when theyare needed. When the ribbon is minimized, you see only the tabs.Figure 6.To minimize the ribbon, click Minimize the Ribbon. The Minimize the Ribbonbutton is in the upper-right corner of the program window.7
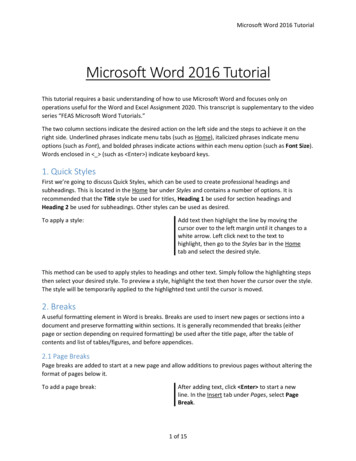
2.1.2 Introducing BackstageThe Ribbon contains the set of commands for working in a document, while theMicrosoft Office Backstage view is the set of commands you use to do things to adocument.Open a document, and click the File tab to see the Backstage viewFigure 7.The Backstage view is where you manage your documents and related data about them— create, save, and send documents, inspect documents for hidden metadata orpersonal information, set options such as turning on or off AutoComplete suggestions,and more.Figure 8.8
When you click the File tab, you see many of the same basic commands that you sawwhen you clicked the Microsoft Office Button or on the File menu in earlier releasesof Microsoft Office. You'll find Open, Save, and Print, as well as a new Backstageview tab called Save & Send, which offers multiple options for sharing and sendingdocuments.TIP: To quickly return to your document from the Backstage view, click theHome tab, or press ESC on your keyboard.Figure 9.9
2.1.2.1 Where is Print Preview?In Word 2010, Print Preview no longer appears in a separate window. Look for it inBackstage view alongside other useful print-related settings.Figure 10.Click the File tab, and then click Print. The right side of the window shows a previewof how the current document will look when printed.You can use the left side of the window to fine-tune your preferences — for example, tochange the orientation from Portrait to Landscape, to change the paper size, or to selectthe option to print the current page only instead of the entire document.If you want to set additional print options, click the Page Setup link under the printingoptions, or click the Page Layout tab on the ribbon to close Backstage view and displayother options.10
2.1.2.2 What happened to Tools / OptionsLooking for the Word program settings that let you control things like whether Wordchecks for spelling and grammar errors as you type, or whether Word automaticallyformats as you type (for example, by replacing two hyphens with an em-dash)?Click the File tab, and then click Options. This opens the Word Options dialog box,where you can customize your Word settings and preferences.Figure 11.Some settings in the Word Options dialog box apply only to Word. But somepreferences (for example, the color scheme) will apply to all other Microsoft Office2010 programs that you have installed.11
2.1.3 Customize the Quick Access ToolbarThe Quick Access Toolbar is a customizable toolbar that contains a set of commandsthat are independent of the tab on the ribbon that is currently displayed. You can movethe Quick Access Toolbar from one of the two possible locations, and you can addbuttons that represent commands to the Quick Access Toolbar.Figure 12.2.1.3.1 Add a command to the Quick Access Toolbar1) On the ribbon, click the appropriate tab or group to display the command that youwant to add to the Quick Access Toolbar.2) Right-click the command, and then click Add to Quick Access Toolbar on theshortcut menu.Figure 13.12
2.1.4 Do keyboard shortcuts still work?Keyboard shortcuts from Word 2003 are still available in Word 2010. If you know ashortcut sequence, go ahead and type it. For example, CTRL C still copies selectedinformation to the Clipboard, CTRL S still saves changes to the current document, andALT F8 still opens the Macros dialog box.Many of the old ALT menu accelerators still work in Word 2010. For example, pressingALT, T, O in succession opens the Word Options dialog box (formerly Tools Options). Similarly, pressing ALT, I, P, C opens the Clip Art pane (formerly Insert Picture), and so on.Figure 14.13
2.1.5 Introducing KeyTipsWord 2010 provides shortcuts for the ribbon, called KeyTips, so you can quicklyperform tasks without using your mouse.Figure 15.To make KeyTips appear on the ribbon, press the ALT key.Next, to switch to a tab on the ribbon using your keyboard, press the key of the letterdisplayed under that tab. In the example shown above, you would press N to open theInsert tab, P to open the Page Layout tab, S to open the References tab, and so on.Once you’ve switched to a ribbon tab in this way, all available KeyTips for that tabappear on the screen. You can then finish the sequence by pressing the final key for thecommand you want to use.To go back one level while in a sequence, press the ESC key. Doing so multiple timesin a row cancels KeyTips mode.14
2.2Save as PDFTo keep your file’s format when you share your files with other people or print yourfiles by using commercial methods, you can use Microsoft Office 2010 programs tosave files as PDFs without needing additional software or add-ins.Use PDF format when you want a file that: Looks the same on most computers. Has a small file size. Complies with an industry format.How to1) Click the File tab.2) Click Save As.3) In the File Name box, enter a name for the file, if you haven't already.4) In the Save as type list, click PDF (*.pdf).5) If you want the file to open in the selected format after saving, select the Open fileafter publishing check box.6) If the document requires high print quality, click Standard (publishing online andprinting).7) If the file size is more important than print quality, click Minimum size(publishing online).8) Click Options to set the page to be printed, to choose whether markup should beprinted, and to select output options. Click OK when finished.9) Click Save.15
Figure 16.16
33.1Basic functionsPaste optionsWhen you paste content, the Paste Options button provides different options,depending on the source program of the content.17
3.2Undo, redo, or repeat an actionYou can undo, redo or repoeat many actions in Word 2010.3.2.1 Undo the last action or actions that you madeTo undo an action, do one or more of the following: Click Undo Keyboard shortcut Press CTRL Z on the Quick Access Toolbar.Figure 17.To undo several actions at the same time, click the arrow next to Undo, select theactions in the list that you want to undo, and then click the list.Figure 18.All of the actions that you selected are undone or reversed.Some actions can't be undone, such as clicking commands on the File tab or saving afile. If you can't undo an action, the Undo command changes to Can't Undo.18
3.2.2 Redo actions that you undidTo redo an action that you undid, do one or more of the following: Click Redo Keyboard shortcut Press CTRL Y on the Quick Access Toolbar.3.2.3 Repeat the last actionBy default, the Repeat commandis available on the Quick Access Toolbar afteryou do some action in Word. If you can't repeat the last action, the Repeat commandchanges to Can't Repeat.To repeat an action that you did, do one or more of the following: Click Repeat Keyboard shortcut Press CTRL Y on the Quick Access Toolbar.19
3.3Check spelling and grammar1) On the Review tab, in the Proofing group, click Spelling & Grammar.Tip! You can access this command quickly by adding it to the Quick AccessToolbar by right-clicking the Spelling & Grammar button, and then clickingAdd to Quick Access Toolbar on the shortcut menu.2) If the program finds spelling mistakes, a dialog box or task pane appears with thefirst misspelled word found by the spelling checker.3) After you resolve each misspelled word, the program flags the next misspelled wordso that you can decide what you want to do.4) After the program finishes flagging the spelling mistakes, it shows you the grammarmistakes. For each mistake, click an option in the Spelling and Grammar dialogbox.Figure 19.20
3.3.1 How automatic spelling checking worksWhen you check the spelling automatically as you type, you can be more confident thatyou won't have to correct many spelling mistakes. Your Microsoft Office program canflag misspelled words as you work so that you can easily locate them, as in thefollowing example.You can right-click the misspelled word to see suggested corrections.Depending on the Microsoft Office program that you are using, right-clicking a wordcan give you other options, such as adding the word to your custom dictionary.21
3.3.2 How automatic grammar checking worksAfter you turn on automatic grammar checking, Word and Outlook flag the potentialgrammar and style mistakes as you work in Word documents and in opened Outlookitems (except Notes), as shown in the following example.You can right-click the mistake to see more options.On the shortcut menu, a suggested correction might appear. You can also choose toignore the error or click About This Sentence to see why the program considers thetext to be a mistake.22
3.3.3 Turn on or off automatic spelling and grammar checking1) Click the File tab.Figure 20.2) Under Help, click Options, and then click Proofing.3) To turn on or off automatic spelling checking and automatic grammar checking forthe currently open document, do the following:a. Under Exceptions for, click Name of currently open file.b. Select or clear the Hide spelling errors in this document only and Hidegrammar errors in this document only check boxes.4) To turn on or off automatic spelling checking and automatic grammar checking forall documents that you create from now on, do the following:a. Under Exceptions for, click All New Documents.b. Select or clear the Hide spelling errors in this document only and Hidegrammar errors in this document only check boxes.23
Figure 21.24
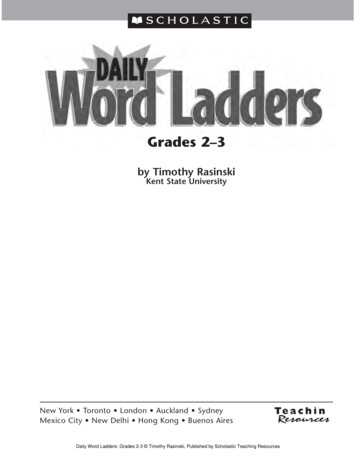
3.4Save a document in WordYou can use the Save and Save As commands to store your work, and you can adjustthe settings that Microsoft Word uses to save your documents. CTRL S (same as:)1Figure 22.Give the document a name, and remember to save a place where you can find it again.finish by pressing the Save button, see Figure 22.25
123Figure 23.1) Document location on your computer.2) Choose where you want to save the document.3) Name of the document and file format.26
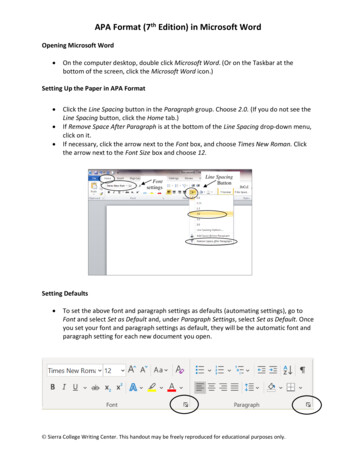
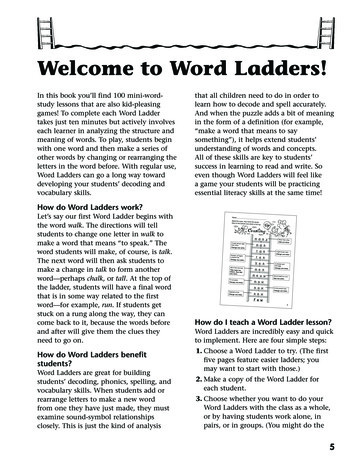
3.5Print a documentThe Print tab in the Backstage view is the place to go to make sure you are printingwhat you want.Figure 24.1) Clicking the File tab displays the Backstage view.2) Click the Print tab to print a document, change print-related settings, and toautomatically display a preview of your document.3) Click the Print button to print your document.4) This dropdown shows the currently selected printer. Clicking the dropdown willdisplay other available printers.5) These dropdown menus show currently selected Settings. Rather than just showingyou the name of a feature, these dropdown menus show you what the status of afeature is and describes it. This can help you figure out if you want to change thesetting from what you have.27
Follow these steps to print a document:1) Click the File tab, and then click Print.2) The properties for your default printer automatically appear in the first section.When the properties for your printer and document appear the way that you wantthem to, click Print to print the document.28
4Functions for effective writing4.1StylesMicrosoft Word 2010 makes it easy to use styles without having to know much aboutthem.Instead of using direct formatting, use styles to format your document so you canquickly and easily apply a set of formatting choices consistently throughout yourdocument.A style is a set of formatting characteristics, such as font name, size, color, paragraphalignment and spacing. Some styles even include borders and shading.One of the great things about using a word processor is that you can create documentsthat look professionally typeset. Headings are in a font that contrasts with body text. Paragraphs are separated with just enough white space. Elements such as bulleted lists are indented. Emphasized text is in a contrasting color. The document may even include special elements such as a table of contents.29
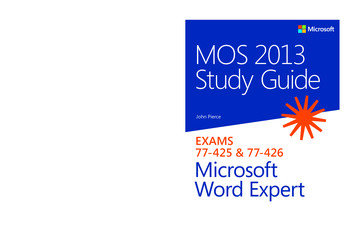
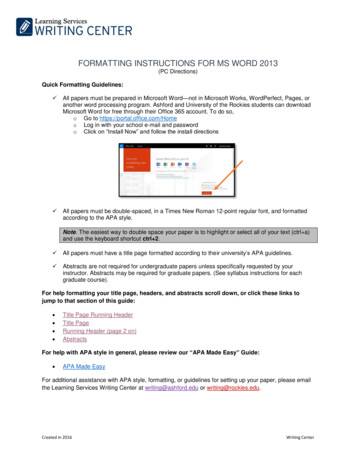
4.1.1 Using stylesFor example, instead of taking three separate steps to format your heading as 16-point,bold, Cambria, you can achieve the same result in one step by applying the built-inHeading 1 style. You do not need to remember the characteristics of the Heading 1style. For each heading in your document, you just click in the heading (you don't evenneed to select all the text), and then click Heading 1 in the gallery of styles.If you decide that you want subheadings, you can use the built-in Heading 2 style,which was designed to look good with the Heading 1 style.Figure 25.1) The Quick Styles that you see in the gallery of styles are designed to work together.For example, the Heading 2 Quick Style is designed to look subordinate to theHeading 1 Quick Style.2) The body text of your document is automatically formatted with the Normal QuickStyle.3) Quick Styles can be applied to paragraphs, but you can also apply them toindividual words and characters. For example, you can emphasize a phrase byapplying the Emphasis Quick Style.4) When you format text as part of a list, each item in the list is automaticallyformatted with the List Paragraph Quick Style.If you later decide that you want headings to have a different look, you can change theHeading 1 and Heading 2 styles, and Word automatically updates all instances of themin the document. You can also apply a different Quick Style set or a different theme tochange the look of the headings without making changes to the styles.30
Character, paragraph, and linked styles appear in the Styles group on the Home tab.You can quickly apply a style from the gallery of styles. To see more information abouteach style, click the Styles Dialog Box Launcher.Figure 26The Styles task pane opens.Figure 27.31
Then simply highlight the text you wish to format, then choose the right style. Themaster template is set up with the following styles for chapter headings:Figure 28.32
4.1.2 Editing stylesClick on the arrow to the right of the Style you want to edit (1), and then select (2)Modify (see Figure 29).12Figure 29.This will bring up a dialog box where you can edit the style (see Figure 30).33
12Figure 30: Flere formateringsmuligheter.1) Here are the most common formatting options such as font type.2) If you would like more formatting options, click on Format and you will see amenu with more formatting options.34
4.2AutoCorrectYou can use the AutoCorrect feature to correct typos and misspelled words, as well asto insert symbols and other pieces of text. AutoCorrect is set up by default with a list oftypical misspellings and symbols, but you can modify the list that AutoCorrect uses.AutoCorrect can also correct a misspelled word if the word is similar to a word in themain spelling checker dictionary.Text included in hyperlinks is not automatically corrected.4.2.1 Understand the AutoCorrect listYou can use the AutoCorrect feature to do the following: Automatically detect and correct typos and misspelled wordsFor example, if you type teh plus a space, AutoCorrect replaces what you typedwith the. Or if you type This is theh ouse plus a space, AutoCorrect replaces whatyou typed with This is the house. Quickly insert symbolsFor example, type (c) to insert . If the list of built-in AutoCorrect entries doesn'tcontain the symbols that you want, you can add entries. Quickly insert any long piece of textFor example, if you need to repeatedly enter a phrase such as return oninvestment, you can set up the program to automatically enter this phrase when youtype roi.35
4.2.2 Add a text entry to the AutoCorrect list1) Click the File tab and then, under Help, click Options.2) Click Proofing.3) Click AutoCorrect Options.23Figure 31.4) On the AutoCorrect tab, make sure the Replace text as you type check box isselected.5) In the Replace box, type a word or phrase that you often mistype or misspell — forexample, type usualy.6) In the With box, type the correct spelling of the word — for example, type usually.7) Click Add.8) Click OK.36
45678Figure 32.37
4.2.3 Add a text entry to the AutoCorrect list during a spelling checkIf you enable automatic spelling checking, in some Office programs you can right-clicka word that you typically misspell and add it directly to the AutoCorrect list.1) Right-click a word that has a wavy red underline.2) A list of corrections for the misspelled word appears.3) Point to AutoCorrect on the shortcut menu.4) If the menu shows the correct spelling of the word, click it. You are finished withthis task. If not corrected, continue to the next step.5) Click AutoCorrect Options.6) On the AutoCorrect tab, in the Replace box, type the word or phrase that youmisspelled or mistyped — for example, type usualy.7) In the With box, type the correct spelling of the word — for example, type usually.8) Click Add.Figure 33.38
4.3Count the number of words in a documentMicrosoft Word counts the number of words in a document while you type. Word canalso count the following: Pages Paragraphs Lines Characters, either including or excluding the spaces4.3.1 Count the words as you typeWhen you type in a document, Word automatically counts the number of pages andwords in your document and displays them on the status bar at the bottom of theworkspace (see Figure 34).Figure 34.4.3.2 Count the words in a selection or selectionsYou can count the number of words in a selection or selections, rather than all of thewords in a document. The selections don't need to be next to each other for you to countthem (see Figure 35).Figure 35.39
Select the text that you want to count.The status bar displays the number of words in the selection. For example, 100/1440means that the selection accounts for 100 words of the total number of words in thedocument, 1,440.TIP! To count the words in multiple text boxes, press and hold CTRL whileyou select the text in each text box that you want to count. The word countautomatically adds the total number of selected words in the text boxes.You can also use Word Count located in the Review tab (see Figure 56).Figure 36.40
4.3.3 Include text in footnotes, endnotes and text in boxes in the word count1) On the Review tab, in the Proofing group, click Word Count.2) In the Word Count dialog box, select the Include textboxes, footnotes andendnotes check box.Figure 37.41
4.4Insert a page breakWord automatically inserts a page break when you reach the end of a page.If you want the page to break in a different place, you can insert a manual page break.Or you can set up rules for Word to follow so that the automatic page breaks are placedwhere you want them. This is especially helpful if you are working in a long document.4.4.1 Insert a manual page break1) Click where you want to start a new page.2) On the Insert tab, in the Pages group, click Page Break (see Figure 38).Figure 38.42
4.4.2 Prevent page breaks in the middle of a paragraph1) Select the paragraph that you want to prevent from breaking onto two pages.2) On the Page Layout tab, click the Paragraph Dialog Box Launcher, and thenclick the Line and Page Breaks tab.3) Select the Keep lines together check box2Figure 39.43
34Figure 40.44
4.4.3 Prevent page breaks between paragraphs1) Select the paragraphs that you want to keep together on a single page.2) On the Page Layout tab, click the Paragraph Dialog Box Launcher, and thenclick the Line and Page Breaks tab.3) Select the Keep with next check box.4.4.4 Specify a page break before a paragraph1) Click the paragraph that you want to follow the page break.2) On the Page Layout tab, click the Paragraph Dialog Box Launcher, and thenclick the Line and Page Breaks tab.3) Select the Page break before check box.4.4.5 Prevent page breaks in a table row1) Click the row in the table that you don't want to break. Select the entire table if youdon't want the table to break across pages.2) On the Table Tools tab, click Layout.3) In the Table group, click Properties.4) Click the Row tab, and the clear the Allow row to break across pages check box.45
21Figure 41.34Figure 42.46
4.5FootnotesFootnotes and endnotes are used in printed documents to explain, comment on, orprovide references for text in a document. You might use footnotes for detailedcomments and endnotes for citation of sources.4.5.1 Footnotes and endnotesA footnote or an endnote consists of two linked parts — the note reference markand the corresponding note text.Figure 43.1) Footnote and endnote reference marks2) Separator line3) Footnote text4) Endnote text47
4.5.2 Insert a footnote or an endnoteMicrosoft Word automatically numbers footnotes and endnotes for you. You can use asingle numbering scheme throughout a document, or you can use different numberingschemes within each section in a document.Commands for inserting and editing footnotes and endnotes can be found on theReferences tab in the Footnotes group.123Figure 44.1) Insert Footnote2) Insert Endnote3) Footnote & Endnote Dialog Box48
4.5.3 Delete a footnoteWhen you want to delete a note, you work with the note reference mark in thedocument window, not the text in the note.In the document, select the note reference mark of the footnote or endnote that you wantto delete, and then press DELETE.Figure 45.If you delete an automatically numbered note reference mark, Word renumbers thenotes in the new order.49
5Other useful features5.1Table of contentsOn page two in the master template is inserted into a table of contents. When you applystyles throughout your document, Word 2010 will automatically create a TOC based onyour headers.You create a table of contents by applying heading styles — for example, Heading 1,Heading 2, and Heading 3 — to the text that you want to include in the table ofcontents. Microsoft Word searches for those headings and then inserts the table ofcontents into your document.When you create a table of contents this way, you can automatically update it if youmake changes in your document.5.1.1 Mark entries by using built-in heading styles1) Select the text that you want to appear in the table of contents.2) On the Home tab, in the Styles group, click the style that you want.Figure 46.50
5.1.2 Update the table of contentsIf you added or removed headings or other table of contents entries in your document,you can quickly update the table of contents.1) On the References tab, in the Table of Contents group, click Update Table.12Figure 47.2) Click Update page numbers only or Update entire table (Figure 48).Figure 48.51
5.2Navigation paneLooking for text or a table in your document? The new Navigation pane can help youfind text, tables, graphics, comments, footnotes or endnotes, and equations.You can also get a quick look at the structure of your document, and you can change thestructure by dragging headings inside the Navigation pane.To get the navigation pane in Word 2010, select the Navigation Pane in the Showgroup in the View tab (see Figure 49).12Figure 49.52
In Word 2010 you can do the following with the Navigaton pane: Move between headings in your document by clicking on the parts of the documentmap. Collapse levels of the outline to hide nested headings, so you can work easily withthe map even in deeply structured and complicated long documents. Type text into the search box to find your place instantly. Drag and drop headings within your document to rearrange the structure. You canalso delete, cut, or copy headings and their content. Easily promote or demote a given heading, or a heading and all of its nestedheadings, up or down within the hierarchy. Add new headings to your document to build a basic outline or insert new headingswithout having to scroll around in the document. Stay aware of the content being edited by others by browsing the headings thatcontain a co-authoring indicator. See thumbnails of all the pages in your document and click on them to movethrough your document.53
5.2.1 See the document structureIn the Navigation pane, you can view thumbnail images of the document pages or youcan browse through your document by its headings. To browse by headings, be sure toapply heading styles.5.2.1.1 View thumbnail images of pages1) On the View tab, in the Show group, select the Navigation Pane check box.2) In the Navigation pane, click the Browse the pages in your document tab (seeFigure 50).12Figure 50.54
5.2.1.2 Browse by headings1) On the View tab, in the Show group, select the Navigation Pane check box.2) In the Navigation pane, click the Browse the headings in your document tab.12Figure 51.To go to a heading in your document, click the heading.To show or hide the subheadings under a heading, click the triangle next to the heading.55
buttons that represent commands to the Quick Access Toolbar. Figure 12. 2.1.3.1 Add a command to the Quick Access Toolbar 1) On the ribbon, click the appropriate tab or group to display the command that you want to add to the Quick Access Toolbar. 2) Right-click the command, and then click Add to Quick