Transcription
JEWELRYMAKINGfor the beginning craftsmanGRETA PACKwith illustrations byMARY L. DAVIS
PrefaceJEWELRY MAKING FOR THEBEGINNING CRAFTSMANis a work manual for children who wish to make jewelry of silverand other metals. It will introduce them to the skills and processesof an ancient and honorable craft which has unlimited possibilities.An interesting feature of this type of craft work is that fromthe beginning, with a few essential tools, materials, and simpleworking drawings, one can learn to make really wearable jewelry.As in any craft, practice is necessary in order to acquire the workmanship which will give good results. To this end the processesused are repeated many times.The projects in this book are not given in order of difficulty, butthose which combine similar decorative processes have beengrouped together.For best use of space, directions for the processes have not beenrepeated, but reference pages may be found with each project.It will be noted that a number of the articles are made of unitswhich can be combined in various ways to make new designs. Thetransition from these projects to independent planning can beaccomplished by experimenting with units of metal which vary insize, shape and texture until a good workable design has beenarranged. Then the sequence of the processes will be determinedand the working plan made. In this way, the beginner will buildup a knowledge of the craft which will inspire him to do morefinished work.
ContentsMETALS1Copper — Brass — Silver — Iron — TinTOOLS3THE BASIC PROCESSES8Sawing, 8 — Piercing, 10 — Filing, 12— Soldering,14— Cleaning, Polishing, and Finishing, 16DECORATIVE PROCESSES17Wire Work, 17 — Wire Twisting, 18 — Making aRound Wire Coil, 20 — Making a Flat Wire Coil, 22— Making Disks and Domes, 40 — Cutting Disks,40 — Punching Domes, 40JEWELRY MAKINGBARRETTESBarrette with Flat Coils of Wire, 38Bowknot Barrette of Metal, 51BRACELETSBracelet of Twisted Wire and Flat Coils, 37Bracelet Band with Dangles of Flat Coils and Beads,39Bracelet of Twisted Wire and Domes, 46Bracelet Chain of Round Rings and Shaped Unitswith Stone Charms, 25BROOCHESButterfly Brooch of Copper and Brass with TaperedCoil, 54Butterfly Brooch of Silver with Crimped Edge andTapered Coil, 55BUCKLE AND BUTTONSBuckle and Buttons of Domes, 45ix24
CHAINSChain of Round Rings, 24Chain of Shaped Units and Round Rings, 26Chain of Metal Strips and Round Rings, 31Chain of Onyx Beads and Coiled Units, 33Chain of Oval Links with Center Twist, 43Chain of Tubes, Wire Units and Round Rings, 56Chain of Onyx Beads Linked with Round Rings, 57CHARMSCharm with Identification Initial, 27Charms Mounted with Stones, 28, 29Charm for Good Luck, 30NECKLACESNecklace of Flat Coiled Units Linked with RoundRings, 35Necklace of Disks and Domes Linked with OvalRing with Center Twist, 42PENDANTSPendant Cross of Tubing, Dome and Units, withChain of Metal Strips and Round Rings, 31Pendant of Onyx with Chain of Shaped Units andOnyx Beads, 32Pendant with Metal Cup and Stone held by Cordand Beads, 50Pendant Foliated Cross of Tubing, Dome and WireUnits, with Chain of Tubing, Wire Units andRound Rings, 56RINGSRing of Flat Coils, 34Ring with Flat Coil, Dome and Bead, 47Ring with Oblong Flat Stone, 52Ring with Stone Irregular in Shape, 53SCARF HOLDERSScarf Holder of Twisted Wire and Flat Coils, 36Scarf Holder of Raised Metal, Domes and Wire, 44SLIDESlide for Sport Tie of Metal with Stone, and TaperedCoils, 48DESIGNING59SOURCES OF SUPPLY65IN DE X67
MetalsSeveral inexpensive metals, both in sheet and wire form, can beused to make interesting jewelry. For the beginner, copper andbrass are recommended because of their low cost, but even advanced jewelers who work almost exclusively in sterling silver frequently use copper and brass for variety and color.As far as construction is concerned, all the metals named can beused interchangeably for the jewelry included in this book. Whenthe beginning craftsman becomes more skillful he may want towork more often in sterling silver which, although it costs a littlemore, is a fine adaptable metal.The different metals vary in hardness. Annealing is a heatingprocess which is given to the metal to make it soft and pliable.Most of the metals used for the following projects may be purchased annealed. If the metal has to be annealed, lay it on a screenand hot plate until the heat turns it a glowing red, then set it asideto cool or plunge it into water for quick cooling. Use only annealed sheet and wire for the following -projects.COPPER is used in its pure metallic state. Its reddish-browncolor gives it a warm outdoor quality. Cold rolled and annealed sheet is smooth and easy to work. It can be polishedand lacquered for a permanent finish.BRASS is an alloy of copper and zinc, harder than copper. Itis gold in color. It takes a high polish and is lacquered topreserve the luster.STERLING SILVER is an alloy of pure silver and asmall percentage of another metal, usually copper, to hardenit. It is a more precious metal than copper or brass, it is easyto work and can be finished in several different ways; polished for a soft luster, given a high polish, oxidized for depthof color and then polished for highlights.IRON is taken from iron ore and, when treated, is both toughand flexible and can be pulled into wire. The black iron binding wire referred to in this book is used not only to holdpieces together for soldering, but also for a chain of iron unitsheld together with silver links. If lacquered, the iron willnot rust and its dark color and dull texture contrast well withthe other metals used.TIN has the whiteness of silver and is used in many importantalloys, among them being solder. We employ tin only forsolder, in pure state or alloyed with lead.
ToolsEssential tools for the beginner include those here and those onthe following four pages. A variety of articles can be made with asmall set of good tools; in fact, some of the pieces are made withonly two or three of the tools listed. All tools should be keptclean and protected from pressure that may bend or dull them andfrom moisture which will cause corrosion or rust. A good workman takes care of his tools.CARE OF TOOLSKeep the working surface of the steel hammer and steelsurface plate free of scratches and dents by using coarse andfine abrasives depending upon the depth of the dent orscratch.The steel burnisher must be kept well polished andwrapped in chamois skin when not in use.The file and handle come separately. Only the small files,such as the needle files, have a handle as part of the file.The teeth of the files will become dull if allowed to rubagainst each other, or against other steel tools. Clean thefiles with a file brush, and rub the smaller files with a coarsecloth. Files should be put away clean.Gauges are tools to measure the thickness of the metalsheet and the diameter of the wire. Insert the metal sheet orwire in the slot nearest to the thickness of the metal or diameter of the wire and read the gauge number. The gaugenumbers referred to in this book are measured by the Brownand Sharpe Gauge.
Ball pein hammer, for general use, theball end used as a punch to raise the metal.Metal cutting shears,for cutting light weightmetal.Jeweler's saw frame,to hold saw blades whichcome in various sizes inpackages of one dozen.
Hand vise, tohold small workwhile filing, etc.End and side cutting nippers, used tocut wire.Round and squarenose pliers, used tobend and form wire.
Disk cutting and doming toolsDapping die, a metal block withdepressions into which metal canbe dapped into rounded forms.Dapping die cutters, tools withcutting ends, used to cut disks.Dapping die punches, domed steeltools used to raise metal disks inthe dapping die.
Finishing and polishing toolsHand buffs, felt and chamoison wood handles, to buff and polish metal.Steel burnisher, used to smoothand finish metal.Tweezers, used to handlestones and small objects.Scriber, used to mark aninscribed line on metal.Center punch, used to makedepressions in the metal.Dividers, used to inscribecircles and divide lines.
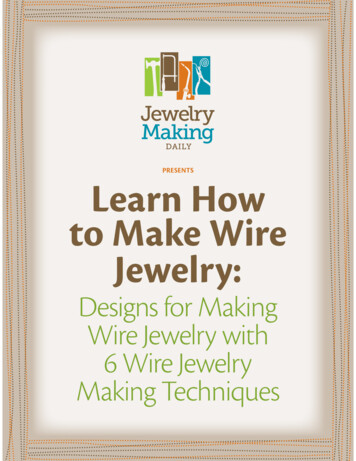
The Basic ProcessesFollowing are the basic processes for all jewelry making.Cleaning and filing keep the metal in condition for sawing andsoldering which are construction processes, and for wire workingwhich is a decorative process. Polishing and lacquering are finishing processes which bring out the technique of construction, and ifwell done, enhance the beauty of the article.SawingSawing with a jeweler's saw blade set in a jeweler's saw frameis used for metals which are too heavy in gauge or too intricate inpattern to be cut with shears. This type of saw can be used forstraight, curved or angular lines which often form the outline andshape of the design. The saw blade comes in several differentsizes. The coarsest used in this book is # I and the finest #0.The thickness of the metal must be greater than the distancebetween the teeth of the blade to prevent the metal from becoming wedged between the teeth, and the saws from bending andbreaking. For example, saw 18 gauge metal with a # 1 saw blade.Transferring the pattern to the metalTransfer the traced pattern with carbon paper and a hardpencil.Scratch the traced design into the metal.Wipe the metal with a damp cloth to remove the carbon lines.Setting the blade in the frameThe worker should be directly in front of the V in the benchpin with the shoulder about 3 inches above the bench top.With the frame in a horizontal position, place the upper armof the frame in the V of the bench pin. Hold and press thehandle against the body and clamp one end of the blade inthe lower jaw. Press the frame, clamp the loose end in theupper jaw. Release the pressure. The blade must be taut.Sawing the patternThe right arm holding the saw frame vertically should bedirectly in front of the bench pin.Use the full length of the blade when sawing straight orcurved lines. For angles use the center of the blade withshort strokes in one place to make a space in which to turnthe blade.8
Place the bladein the lower jaw, teethpointing down toward thehandle and away fromthe frame. Press the armsof the frame toward eachother while inserting theblade in the upper jaw.Saw with a verticalstroke, the blade alwaysperpendicular to themetal.9
PiercingPiercing is the term used when the metal is sawed out leavingan openwork design, or when the background is sawed out leavingthe design in the metal.Transfer the pattern to the metal.Make depressions with the center punch in the sections whichare to be pierced.Insert the twist drill in the chuck of the hand drill and drillholes marked by the punch. Care must be taken in selecting the drill so the size of the hole will not destroy thetraced line of the design.Set the saw blade in the lower jaw of the saw frame.Thread the blade through the drilled hole nearest the centerof the design.Support the metal against the lower jaw of the frame whileinserting the loose end of the blade in the upper jaw ofthe frame.Saw out the section. Follow the directions under sawing.Return the saw frame to the horizontal position.Loosen the blade from the upper jaw, and remove from thepierced section.Insert the end as before through another drilled hole.Repeat as above until the design or the background has beenpierced.Transjerring the pattern, p. 8. Sawing, p. 8.10
11
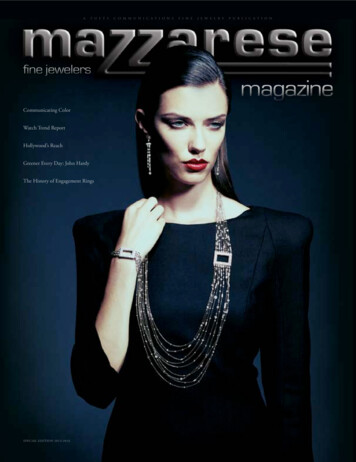
FilingFiling is used to smooth rough edges, to level irregular surfacesand remove excess solder. The files most commonly used forjewelry work are needle files which come in a variety of shapesdesigned for various contours and angles. Large files from four tosix inches in length come with a tang to be fitted into a woodenhandle. These files are used for larger areas or when a greateramount of metal has to be filed away. They can also be used forfinishing an edge as they come in both coarse and smooth cut. It isgood to have an assortment. Only a few are shown on the toolpages.Clean the metal with pumice powder.Place the metal on a steel surface plate.Tap with a mallet to straighten.Rub the file lightly with chalk; this helps to keep the teethfrom becoming filled with metal filings. Hold the metalfirmly. Put the pressure on the forward stroke, remove thepressureon the back stroke to keep the cutting edge of the teethfrom becoming dull. Clean the file at intervals. Removethe burr on the filed edge with a scraper or coarseemery cloth.Cleaning the file, p. 3-12
The work must always be held firmeither in the hand or in a vise orring clamp.The file is pushed inone direction, eitherforward or down, awayfrom the worker.13
SolderingSoldering is a process used to hold metal pieces together byusing another metal or combination of metals which melt and flowat a lower temperature than the metal to be joined.For the following projects soft solder of tin and lead is used.Pure tin is used as solder only with sterling silver, as it is the colorof silver and retains its brilliance. To help the flow of the solderand to keep the metal in condition when heated, a substance calledflux is necessary. The flux referred to in this book is in paste form.An electric soldering iron, or electric plate, will heat the metalenough so the solder will flow on the parts to be joined. Wire orsmall pieces of metal may be soldered with the iron. The electricplate is used for large areas of metal, or that of heavy gauge whichcannot be heated enough with the iron. The metal to be joinedmust be held firmly until it cools.Soldering irons can be obtained in several different types withreplacement tips. The copper tip of the iron must have a thincoating of solder before it can be used. This process is calledtinning.Tinning the ironHeat the iron. Turn off the electric current. File the hot tipuntil it is a bright copper on all surfaces. Reheat the iron. Rubthe hot tip in the flux and solder until a thin coat of soldercovers all surfaces of the tip.Soldering wire joints and small pieces of metalHold the metal pieces firmly together.Pick up the solder with the tip of the iron and place on thejoint. Heat the metal until the solder flows.Sweating a sawed design of metal to a metal backgroundClean and flux one side of the metal sheet from which thedesign is to be sawed. Lay pieces of solder on the fluxedsurface. Place on a screen and hot plate until the solderflows. Spread the solder with a hot iron to form a thin coaton the metal. Rinse in water and dry. Saw the design andfile all edges smooth.Clean and flux the background sheet. Clamp the design tothe sheet and soldered surface down. Place on a screenand hot plate until the solder melts. This is shown when athin light line appears between the two metals. Let coolbefore removing the clamps.Filing, p. 12. Transferring the design, p. 8. Sawing, p. 8.14
15
Cleaning, Polishing andFinishingThe processes of cleaning polishing and finishing, as presented inthis book, are done by hand without the use of acids or motordriven polishing buffs.The condition of the metal to be cleaned determines which toolor abrasive should be used first to remove scratches or other defects. Start with the coarsest tool or abrasive necessary and usein succession others finer than the one just used. When smoothand clean, the metal is ready for polishing. The final steps in finishing a piece of jewelry are very important, for if they are donewell they will add much to the beauty of the article.Use tools and abrasivesin the following sequenceClean the metal with fine pumice powder and water, using asoft cloth for flat surfaces and a brush for recessed parts.This will remove discoloration and will show which of thetools or abrasives should be used first. File in thedirection of a deep scratch, using a long strokewith a coarse file, and continue with finer files. Removeexcess solder with a file, scraper or emery cloth. Removemarks of the file and minor scratches with emerycloth, or scotch stone dipped in water, rubbing in a circularmotion to avoid wearing a groove in the metal. Rub themetal with fine pumice powder and water. Rub a piece offelt, charged with tripoli cake, over the metalsurface (the felt may be mounted on wood and used as ahand buff). Wash in hot soap suds toremove the oil.Polishing and finishingPolish with prepared metal polish for luster.Rub the curved side of the burnisher over the metal until ahigh polish has been obtained. Finish copper andbrass with a thin coat of lacquer.To oxidize sterling silverDip the polished silver in a solution of liver of sulphur (alump about 1/2 inch in diameter dissolved in a quart ofwarm water). When the silver becomes dark rinse in coldwater. Dry the metal and rub with a soft cloth dipped inwhiting or fine pumice powder. Do not lacquer.Filing, p. 12.16
Wire WorkWire may form the foundation of a piece of jewelry, or it maybe applied as a decoration. It is often twisted to add lightness toa design, and can easily be formed into coils or line units of decoration for flat or curved surfaces. Twists and coils of wire can bemade of round, half round, or square wire.Keep the 14 gauge or heavier wire in coils. Wire of a lightergauge may be wound on spools. If kinks occur in the lightergauge wire they can be removed by holding the wire ends firmlyand the length taut while drawing it over the edge of a woodenbench, or block of wood.THE JIGMany of the wire units, coils, and twists shown in this bookwere made on jigs. The word "jig" is a mechanics' term given toa device which is used to guide a tool or a material. A j i g makesthe forming of an article easier during construction and makes thefinished pieces mechanically more perfect. When a design requires duplication of parts, a jig is often used. The one shownhere was made on a block of wood with nails spaced and hammered into the wood, the nail heads sawed off, and the ends madesmooth so the wire units may be formed and removed easily.Wire unit made on ajig and some of theways it can be usedEnds turned under to make slidesfor beltsDrops for necklaces17
Wire twistingOften a design calls for a twist of given length, sometimes a tightor loose twist. To determine the length to cut the wire is important. The gauge of the wire as well as the number of twists thewire is given will determine the length of the finished piece.When round wire is used, two or more lengths are necessary forthe twist. A rope-like effect may be obtained by twisting a singlelength of flat or square wire. All wire should be annealed.Twisting wire 18 gauge or lighterMeasure the amount needed for the twist.Loop the wire length in the center, and insert the twoloose ends through the hole in the spool. Hold the endsin the jaws of a table vise. Insert a small steel rodthrough the loop of wire, and pullthe wire taut. Hold the spool firmly against the rod.Turn the rod to twist the wire.Twisting wire 16 gauge or heavierHold the looped end of the wire in the jaws of the hand vise.Clamp the loose end in the jaws of the table vise. Turn thehand vise to twist the wire.To determine the lengthIn cutting the wire for a definite length of finished twist, thefollowing examples have been given of two round wires ofdifferent gauges and lengths.18 gauge, 26 inches, twisted 50 times, gives 11 1/8, inches18 gauge, 26 inches, twisted 75 times, gives 9 5/8 inches18 gauge, 14 inches, twisted 50 times, gives 5 1/4 inches20 gauge, 14 inches, twisted 50 times, gives 4.7/8 inches18
Twisting fine wireThe wire is annealed.It is held taut whilebeing twisted but willbreak if it is twistedtoo tightly.Twisting heavier wire19
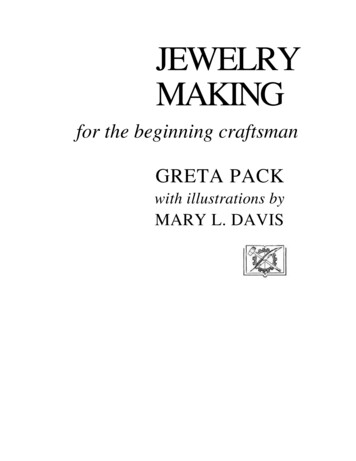
Making a round wire coilCoils of wire can be made on mandrels of various sizes andshapes. The simplest is the coil of round rings made of roundwire. There are many uses for the coil. When sawed into ringsit may be made into a chain. By pulling the wire on both ends tostretch the coil, an open wavy coil results, which may be curvedor bent to follow a line for decoration. The open coil may also beflattened into a decorative band of overlapping rings. A coneshaped coil can be made on a round pointed mandrel (knittingneedle). These may be used for pendants to give movement andinterest to a design and are sometimes used as a fringe for an edge.The jigSelect a round steel mandrel the diameter of the coil desired. Place between two blocks of soft wood parallel withthe grain of the wood.Press the blocks between the jaws of the table vise to form agroove in each block. Remove the mandrel from theblocks, and file a groove at a right angle to the groovemade by the mandrel.Coiling the wirePlace the mandrel between the blocks in the groove lettingthe end extend beyond the blocks about 1/2 inch. Holdthe blocks in the jaws of the table vise tight enough tohold the blocks but loose enough so the mandrel will turnand move out of the groove as the wire is coiled. Make afew coils on the end of the mandrel. Clamp themandrel and coils in the jaws of the hand vise. Hold theloose end of the wire in the filed groove duringthe coiling process to guide the wire and to keep the coileven. Use the hand vise as a handle to turn the mandrelto formthe coil.20
The blocks holding the mandrelare held in the bench vise.The protruding end of the mandrel is held in the handvise, and the coil is formed by turning the hand vise.The wire is held taut and is guided by the left hand.21
Making a flat wire coilA flat coiled unit is usually made of round wire. It may be thefoundation of an article and is often used for decoration, either asa single unit or several combined to make a pattern.The wire ends of the unit may be turned under at right anglesto form staples so that it can be used as a decorative stud onleather or fabric. The unit may hang as a pendant or several maybe linked together to form a chain.The jig14 gauge or heavier metal sheet. Saw a 1 inch disk or larger.Drill a hole in the center of the disk the size of the mandrelwhich determines the size hole in the center of the coil.File a notch in the edge of the hole the size of the wire to beused for the coil.Coiling wire 18 gauge or lighterCut a wire length, and insert the end and mandrel 1/2inchthrough the hole in the disk, and the wire in the notch.Bend the annealed wire around the mandrel, and hold boththe wire and the mandrel in the jaws of the hand vise.Wind the wire to make the coil by turning the vise.Keep the coil flat with the thumb of the left hand whilecoiling. Each ring must touch the ring just made and lieflat on the disk. Place the hand vise in the jaws of thetable vise. Insert theend of the mandrel in the hole of the setting tool. Tap theend of the setting tool to flatten the coil. Repeat thisoperation often to keep the coil flat.Coiling wire 16 gauge or heavierInsert the wire end and mandrel through the hole in thedisk. Hold as described above. Place a hand vise in thejaws of the table vise. Hold the loose end of the wire in theright hand, and windon the disk.The setting toolSaw a short length of hard wood rod (a broom handle). Fileone end smooth and flat and finish with sandpaper. Drill ahole in the center larger in diameter than the mandrel anddeeper than the length of the mandrel.The jig, p. 17. Sawing, p. 8. Drilling, p. 10. Filing, p. 12.22
23
Sawing a coil intolinks for a chainChain of round ringsRound links combined invarious ways for chainsMake a round coil of wire.Insert a wooden core in the coil.Place the coil in the ring clamp.Hold the clamp in the jaws of the table vise.Place a # 1 blade in the saw frame and saw thecoil into rings. Hold a ring on each side ofthe opening withthe pliers. Push the ends beyond each other,then together.SinglechainClose 2/3, the number required. Open 1/3the width of the wire. Hook the open ringthroughthe two closed rings. Close the openring to makean even joint.Making a round wire coil, p. 20. Sawing, p.8.Opening the rings24
Two chains made from wire units,and some pendants to hang fromiron and silver chainthem for necklaces and braceletscopper and silverbracelet withidentification tagsilver braceletwith turquoise matrix dropsbrass and coppergood luck charmsilver or copper dropsilver pendantholding a green stonewith rose quartzonyx dropbound withsilver wireThe construction of these pieces willbe found on the following pages.25
Chain of round rings18 gauge wireDetermine the number of units required for thechain.Cut a 2 1/2 inch length of wire for each unit.Coil the wire once around the end of themandrel.Hold in the jaws of the table vise. Coil thewire length around the mandrel byhand.Remove the coil from the mandrel. Insert a flatsteel tool between the last ring oneach end of the coil to make a space. Turnthe rings at right angles to the coil with squarenose pliers.Link the units together to form the chain.Bring the wire ends to the center of the coilwith round nose pliers.Chain of shaped units18 gauge wirePlace the j i g in the jaws of the table vise. Insert a wire end in the hole X. Bring the wirebetween i and 2. Coil around i. Carry the wireto 2 and make a coil. Pull thewire to make the coil tight. Reverse the positionof the coil so the wire in X is pointing up andpull the end to tighten the coil.Remove the unit from the pegs.Cut the wire ends where they meet thecenter wire. Press between the jawsof the square nose pliers, so they lieflat. Place the unit on 3. Draw ringstogether with the tips of the roundnose pliers.Making a round wire coil, p. 20. Linking,p. 24. The jig, p. 17.26
Identification tag22 gauge copper sheet 2 inches squareTin one side.Saw two 5/8 inch disks.20 gauge silver sheet3/4 of an inchsquareTin one side.Transfer the pattern of the initial to the silver.Saw to pattern.File all edges smooth. Finish with emery cloth. frontback tin(Apply flux to the tinned surface.Place on the untinned side of the copper disk,and hold with cotter pins. Lay on an iron screenwith the initial side downand place on a hot plate until the solder melts.diskslo18 gauge silver wireMake four wire units.Flux the tinned surface of the second disk.Place the four units on the fluxed surface. Meltthe solder with the soldering iron, enough tohold the units in place.Flux the tinned surface of the two disks again.Hold the disks together with cotter pins. Makesure the edges of the disks are even and theinitial is straight with the center loop.All parts heldtogether withcotter pins orsolderingf our w reLay on a screen and hot plate until the soldermelts. This will show in a bright metallic linebetween the joined edges. Let the metal cool beforeremoving from thescreen.Tinning, p. 14. Transferring the fattern, p. 8. Sawing, p. 8.Filing, p. 12. Making wire units, p. 17. Soldering, p. 14.27
To cap a stone26 gauge silver sheetCut and dome a 1/4 inch disk A. The size of thediskdepends upon the stone B.Place the dome on a lead block with the cup up.Punch a hole in the center C. File the roughedge of the hole D.22 gauge silver wireGshape the capMake a loop in a short length of wire E. Insert theends through the hole in the dome F. Spread thewire against the sides of the cup G. Bend the domeslightly oval to fit the stone. Insert adhesive tape inthe loop. Apply liquid cement inside the cup. Bindthe dome to the stone to form a cap H. Remove thetape when the cement is dry. Disk cutting and funching,p. 40. Filing, p. 12.Htofit the stoneTo bind a stoneTwo identical stones with flat base. Apply liquidcement to the base of each. Bind together untildry.22 gauge silver wireMeasure the circumference of the stone. Cut a lengthof wire 1 inch longer than measured. Lay the wirein the groove between the stones. Twist the wirestogether, and make a loop.Mounting a stone with hooksFile a 1/16 inch groove the length of a soft stone.Make a notch on each end of the groove.1/16 inch half round silver wireUse enough for the length of the stone and thehooks. Shape the wire as shown. Cement the wireinto the groove. Bend the ends tomeet the stone.Filing, p. 12.28
Mounting for a stoneof irregular shapeLet the wire follow the outline of the stone.Leave enough space between the stone and wire formovement.Trace the outline of the stone on a sheet of paper.Enlarge the traced outline 1/8 inch A. Measure theoutline of the enlarged pattern. Add 1 3/4 inches forthe working ends and hooks.14 gauge silver wireCut the measured length.Make a loop on one end of the wire B.File the other end of wire to measure 18 gauge.Shape the wire to pattern B.Cut the extending wire and bend the loop as shown.Make a loop on the filed end and bring the loopedends together C and solder D. File edges smooth.Finish with emery cloth. Cap a stone and hook tothe loop. Filing, p. 12. Caff ing a stone, p. 28.Mounting on which tohang a stone18 gauge wire 9 1/2 inchesMake a 1/2 inch coil on each end of the wire. Makea loop in the center. Turn the loop down to forma hook.Flat coil, p. 22.29back
Good luck charm24 gauge copper sheet 2 inches squareTin one side.Trace the design on the untinned side of thesheet. Saw topattern.22 gauge brass 2 inches squareTin one side.Flux the tinned surface of both metals.Hold the metals together with cotter pins.Place on a screen and hot plate until the soldermelts.When cool wash with pumice powder and abrush.Saw the brass sheet even with the copper design.File and emery the edges smooth and even, thenpolish with a burnisher.copper andnickel silver (or brass),Tinning, p. 14. Transferring the pattern, p. 8.Sawing, p. 8. Soldering,]). 14. Filing, p. 12.Burnishing, p. 16.polishedboth pieces tinned on one sideBy following the sameprocedure other andmore personal charmscan be mad30
THE CROSS1/8 inch brass tubingCross and chainof silver and brassSaw A 1 1/2 inches and B 1 inch.Scratch a line y inch from one endof each. File a half round groove in the line.Wire A to B and sweat together.22 gauge silver sheetSaw four 3/4by 1/8 inch strips C.File C 3/8 inch on one end to fit the tube.Cut and dome a 3/8 inch disk D.File the base o
JEWELRY MAKING FOR THE BEGINNING CRAFTSMAN is a work manual for children who wish to make jewelry of silver and other metals. It will introduce them to the skills and processes of an ancient and honorable craft which has unlimited possibilities. An interesting feature of this type of craft work is that from