Transcription
Guide toJewelry MakingTechniques:How to Make Jewelrywith 5 Free Jewelry Projects
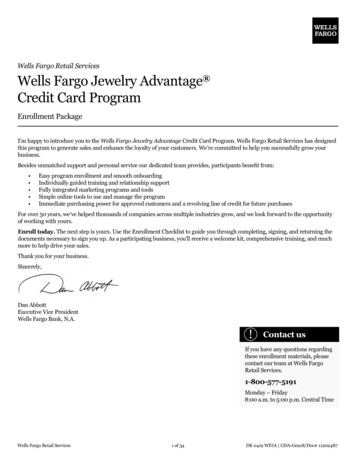
Guide to Jewelry Making Techniques:How to Make Jewelry with 5 Free Jewelry Projectswhimsical whisk earringsTEXTURED SILVER PENDANTBY denise peckBY JACK BERRY6313919ANGLED RED JASPERPENDANTTWO-TONEDTURKISH BRACELETBY LEXI ERICKSONBY JOYCE TROMPWelcome to the creative anddynamic world of DIY jewelry!Nothing is as rewarding as learning howto make your own jewelry and beingable to wear it with pride or make itthe most personal of gifts. Nothingexpresses your own style and personality like a piece of original artisan jewelrythat you designed and made yourself.And nothing is quite as satisfying as theact of making jewelry yourself: fromselecting your design and gathering your tools and materials toarriving at the final cleanup and suddenly holding that beautiful,finished piece in your very own hands.In this carefully selected e-book of jewelry making tutorials,you’ll find a surprisingly broad range of jewelry techniques, styles,materials, and finished pieces to get you started making yourown metal jewelry or introduce you to new ways of approachingdesign. You’ll make bracelets, earrings, and pendants. You’ll makesilver jewelry, gemstone jewelry, and jewelry made entirely fromMETAL CLAY LEAVESBY HADAR JACOBSONjump rings. You’ll learn to use jewelry wire, metal clay, and metalsheet. You’ll learn jewelry making techniques from chain maille,fold forming, microfolding, die forming, to stone setting – plusgreat jewelry making tips! You’ll find jewelry that’s flexible, organic,geometric, and inspiring, so you can make it as shown or take whatyou learn to design jewelry that is uniquely yours.Whether you want to make jewelry to give, sell, wear, or expressyourself, you’ll discover intriguing forms, clever connections, andclear, illustrated jewelry making instructions from experts to guideyou along the way. It’s all in this compact package of jewelry making projects and jewelry making lessons . . . call these jewelry instructions what you will, they’re all there to help you learn how tomake jewelry. So pull out your pliers, warm up your kiln, find yourfiles, set up your torch, and start making your own jewelry today.Merle WhiteEditorial Director, Interweave Jewelry GroupThis premium has been published by Interweave, 201 E. Fourth St., Loveland, CO 80537-5655; (970) 669-7672. Copyright 2011 by Interweave Press LLC, a division of Aspire Media,all rights reserved. The contents of this publication may not be reproduced either in whole or in part without consent of the copyright owner. Interweave Not to be reprinted all rights reservedwww.JewelryMakingDaily.com 2
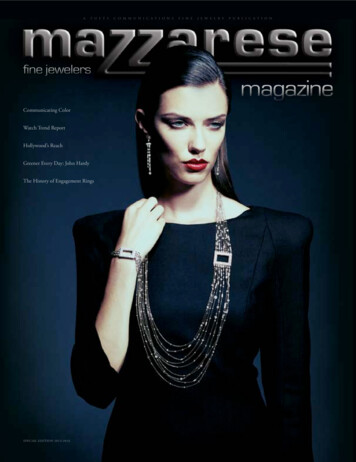
Guide to Jewelry Making Techniques:How to Make Jewelry with 5 Free Jewelry ProjectsAngled RedJasper pendantDesign opportunities froman irregular stoneby Lexi ericksonSkillSsawingmeasuringn solderingnnthere are diamonds, emeralds,rubies . . . the stones of thejeweler. ho-hum. They leave mecold. with the exception of a magnificentpadparadscha (my life’s ambition) orangesapphire or an occasional yellow sapphire,i could do without most faceted stones.but put a fabulous jasper in front of meand watch me do a happy dance.Jaspers come in so many colors andvariations that my imagination runsrampant. This stone was no exception. itssatin finish leaves a softness not usuallyfound on the common red jasper, and ifeel it gives the stone a regal elegance. Theunique cut of the stone left a beautifuledge on the top — which i did not wantto cover with a bezel wire. some differenttype of “bezel” set was needed, so icreated an angled setting as unique as thejasper that inspired it.oRiginAlly puBlisheD in lApiDARy JouRnAl JewelRy ARtist, DeceMBeR 2009Originally published in Lapidary Journal jewelry artist, December 2009Opening phOtO: Jim LawsOnprOJect phOtOs: by the authOrwww.JewelryMakingDaily.com 3www.JewelryMakingDaily.com 3
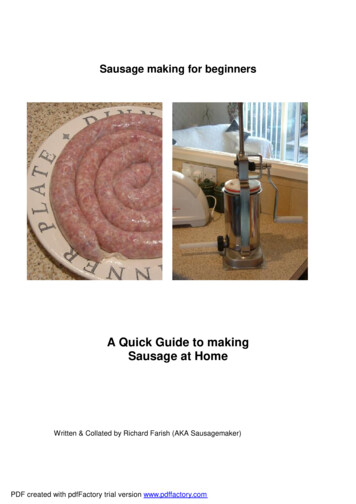
3 free Handcrafted Jewelry ProJectsGuide to Jewelry Making Techniques:How to Make Jewelry with 5 Free Jewelry ProjectsM at e r i a l S1 irregular stone with straight sides,not a bezel cut20 or 22-gauge sterling back plate22-gauge strip of sterling, the heightof the edge of the stone14-gauge round sterling wire: 2”Medium solderEasy solderGraph paperUltra fine Sharpie2-part epoxy glueIf you want a texture on the back plate, annealyour silver to soften it. roll it through the rolling mill with a texture plate, material, or paperto imprint the texture onto the silver.tool Shand tools: saw, saw blades, files,triangular needle file, flat nose pliers,thin jaws, round nose plierssoldering tools: torch andsoldering suppliesFinishing tools: brass brush/soap,M finishing film30 and 9 micron 3-moPtional tools: guillotine shear,rolling mill, texturing paperSourceSMost of the tools and materials forthis project will be available from wellstocked jewelry supply vendors.213Photo 1 I chose a textured watercolor paper,which mimicked the pattern on the stone.n When you anneal, use a dot of paste flux as atemperature indicator. Heat the metal until theflux turns clear, and allow the metal to cool 10-15seconds before quenching. Plunging your 1100ºmetal into the pickle immediately may cause themetal to warp, and also stresses your metal.Photo 3 Cut out back plate.n I have found it easier to get a straight line if I tipIf you are working with geometrics, it isimportant that each edge and line is straight.Outline your stone on graph paper using avery fine tip marker. Align your stone with thelines on the paper so you get accurate sizing.Design your backplate on the graph paper toensure accuracy. A geometric design will revealevery little mistake and off measurement, sotake time to lay out accurately.Photo 2 Transfer pattern to silver, drawing onsilver with ultra fine Sharpie. (The dotted linesmean I allowed space for a design option.)AngleD ReD JAspeR penDAnt bY LExI ErICkSONangled red jasper pendant By lexi ericksonmy saw frame forward to cut a straight line. File asneeded. Hallmark the piece and set aside.4Photo 4 Cut sterling bezel to fit exact heightof side of stone.www.JewelryMakingDaily.com 4www.JewelryMakingDaily.com 4
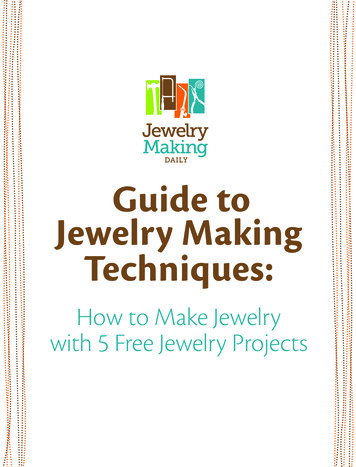
3 free Handcrafted Jewelry ProJectsGuide to Jewelry Making Techniques:How to Make Jewelry with 5 Free Jewelry Projects9nAnguillotine shear is indispensable here. Youmay find it easier to purchase the exact size flatwire, or run round wire through your rolling millto flatten it. It’s very difficult to cut sheet forsterling bezel with a saw.rinse. Using soap and brass brush, vigorouslybrush entire piece, which will leave a soft finish.You may finish with an oxidizer at this point ifyou want a darker finish. Sand as needed.6Mix a 2-part epoxy (I use 330), and put a lightlayer of glue on silver, and then set stone. bevery careful of edges and points on stone. Setaside for recommended time.5Photo 5 Fit bezel around stone, being carefulnot to bend it permanently until you know whereand how it fits specific angles. Measure and fitcarefully, then mark with Sharpie where you willpermanently bend for stone. When it is markedand checked again, score bezel and file out aV shaped groove with a triangular file. This givesyou a crisp and tight bend.7Photo 7 Using a piece of scrap wire or sheet,heat scrap until it balls up.n Since you are heating on a flat surface, oneside will be flattened. Pickle and rinse. Solderball on top front of back plate using easy solder.Pickle and rinse.Using thin jaw pliers, close bezel wire along V,then reopen with your fingers and fit tightlyalong sides of stone. repeat for sides.8n Be careful not to open and close the bezeltoo many times since the V compromises thestrength of the wire.LExI ErICkSON makes jewelry and teaches inColorado. Check out her website and teaching blogat www.lexiericksondesigns.com.Photo 8 Hammer one end of 2” length of14ga wire.Place bezel on back plate and use tiny paillonsof medium solder on inside of bezel. Solderbezel to plate. Pickle and rinse.Draw a bead on other end. Form loop withpliers to form bail.Photo 6 Place stone into bezel to check fit.remove stone. Make any adjustments as needed.Photo 9 Place bail on back of piece, andsolder with easy solder. Quench, pickle andAngleD ReD JAspeR penDAnt bY LExI ErICkSONangled red jasper pendant By lexi ericksonglue?my teacher says jewelers don’t glue!well, sometimes we call it “chemicalbonding” or “liquid prongs.”There is no way for thisparticular stone to stay in thisparticular bezel without glue.The bezel does not completelyencase the stone, nor is there atension setting. unless you knowsome magic, there is no other wayfor a stone like this to stay put.however, gluing a stone on metalor gluing a bezel shut should notbe done on fine art jewelry.www.JewelryMakingDaily.com 5www.JewelryMakingDaily.com 5
Guide to Jewelry Making Techniques:How to Make Jewelry with 5 Free Jewelry ProjectsWhimsical WhisksDenise PeckOriginally published in Easy Wire, 2007www.JewelryMakingDaily.com 6
Guide to Jewelry Making Techniques:How to Make Jewelry with 5 Free Jewelry ProjectsWhimsical Whisks Denise PeckWhimsical WHisksDENISE PECKThe idea for these easy earrings came from a wire bowl Denise purchased at IKEA. Oxidized silver makes them quite striking,but they’d look great in colored wire, too.Materials1 pair of sterling silver 22mm Frenchear wires8" of sterling silver 20-gauge deadsoft or half-hard wireWireworkingToolsWire cuttersRound-nose pliersChain-nose pliersChasing hammerBench blockFinished size: 2 1 2"1: Cut the 20-gauge wire in half. Place the wires on the benchblock and hammer them with the flat end of the hammer untilthey are nearly flat, then texture them with the ball end of thehammer.2: Grip one end of 1 wire with the widest end of thenose of the round-nose pliers, then coil the wire up tothe point of the nose to form a cone, leaving a 1 1 4" tail.Use chain-nose pliers to bend the wire straight up at thetop of the cone, then form a simple loop at the end ofthe wire. Attach the simple loop to one ear wire by opening andclosing the loop as you would a jump ring. Repeat entire step forthe other earring.3: Patinate the earrings with liver of sulfur if desired. RESOURCES: Check your local bead shop. Ear wires and wire: Fire MountainTo form a simple loop, use flat-nose pliersto make a 90 bend at least 1 2" from theend of the wire. Use round-nose pliersto grasp the wire after the bend; roll thepliers toward the bend, but not past it,to preserve the 90 bend. Use your thumb tocontinue the wrap around the nose of the pliers.Trim the wire next to the bend. Open a simpleloop by grasping each side of its opening witha pair of pliers. Don’t pull apart. Instead, twistin opposite directions so that you can open andclose without distorting the shape.To form a wrapped loop, begin with a 90 bendat least 2" from the end of the wire. Use roundnose pliers to form a simple loop with a tailoverlapping the bend. Wrap the tail tightly downthe neck of the wire to create a couple of coils.Trim the excess wire to finish. Make a thicker,heavier-looking wrapped loop by wrapping thewire back up over the coils, toward the loop, andtrimming at the loop.Gems and Beads.Looking for Great Design Ideas?whimsical whisks By denise peckOrder Step by Step Wire Jewelry and takeadvantage of thisRISK-FREE offer today!www.JewelryMakingDaily.com 7Order online atinterweave.com/go/bdsw
Guide to Jewelry Making Techniques:How to Make Jewelry with 5 Free Jewelry ProjectsTechnique:texturetexturetechnique:How to:to:HowOXIDIZINGTo create the appearance of textureby patinating metal (usually fine orsterling silver) with liver of sulfur ineither liquid or chunk form, followthese instructions adapted from KateMcKinnon’s Hot Wire article inBeadwork magazine (June/July 2006).Clean your metal piece with soap andwarm water if it is dirty or oily.Find four glass, stainless steel, orceramic bowls. Fill the first with enoughliver of sulfur solution to cover the pieceof metal: Liver of sulfur in liquid formis ready to use, but can be diluted; dissolve the chunk form in water followingthe manufacturer’s instructions. Fill asecond bowl with very hot water (whichspeeds up the patination process) and athird with cold water (which slows downthe process). Fill the fourth bowl with coldwater mixed with about a tablespoon ofbaking soda (which acts as a neutralizingagent).Use stainless steel tweezers or plastic orwood tongs to dip the metal into the liverof sulfur solution. Rinse in the hot or coldwater. Continue to dip and rinse often togradually build a patina.Lightly sand or brush the piece with abrass or wire brush, sandpaper, very finesteel wool, or other abrasive between dipsto give more depth to the patina—a textured surface picks up more patina than asmooth surface.When you are pleased with the color, dipthe metal into the cold water with baking sodato stop the reaction, then rinse and dry.Brush, sand, or polish the surface for interesting results. If you don’t like the patina, youcan easily remove it by sanding or brushing it.If desired, seal your piece with any sprayfixative meant for metal; unsealed pieceswill age, develop more patina, or becomeshiny with wear.HAMMERINGPounding wire not only creates great texture,but also strengthens metal. To hammer, placeyour wire on a steel bench block. Use the flatend of a chasing hammer to flatten the wire,then use the ball end of the hammer to addtexture.[tips ]WORKING WITHLIVER OF SULFUR Take the following precautions when using liver ofsulfur: keep it away from acids, wear gloves to avoidcontact with the skin, and work in a well-ventilatedarea since the fumes are toxic. Store both liquid and chunk forms of liver of sulfurin tightly sealed light- and air-proof containers.Whimsical Whisks originally published in Easy Wire, 2007. Interweave Press, LLC Not to be reprinted. All rights reservedpublishers of Step by Step Wire Jewelry magazine join the online beading community at BeadingDaily.comVisit the Projec
In this carefully selected e-book of jewelry making tutorials, you’ll find a surprisingly broad range of jewelry techniques, styles, materials, and finished pieces to get you started making your own metal jewelry or introduce you to new ways of approaching design. you’ll make bracelets, earrings, and pendants. you’ll make