Transcription
PRESENTSLearn Howto Make WireJewelry:Designs for MakingWire Jewelry with6 Wire JewelryMaking Techniques
LEARN HOW TO MAKE WIRE JEWELRY:DESIGNS FOR MAKING WIRE JEWELRY WITH6 WIRE JEWELRY MAKING TECHNIQUESSWIRLS & WHIRLSBY PEPPER MENTZWIRE WRAPPEDMALACHITE PENDANTBY DALE “COUGAR”ARMSTRONGCONCERTO NECKLACEBY CINDY WIMMER369121721TIMELESSTURQUOISE &ELEGANT ONYXBY CAROL DEAN NAUKAMFLOATING CRYSTALCUBE NECKLACEBY JOYCE TROMPWelcome to the world of wirejewelry making or wire wrap -simple techniques for combiningwire and other elements intobeautiful jewelry without soldering.Wire wrapped jewelry is a favoriteamong today’s jewelry makerson the go because you only needa few basic wire wrapping tools,your wire, and any gemstones or beads you want to include.Yet wire wrapping techniques are truly classic: pieces of wirewrapped jewelry have even been found at sites from ancient Rome!In Learn How to Make Wire Jewelry: Designs for MakingWire Jewelry with 6 Wire Jewelry Making Techniques,you’ll learn how to use this versatile form of metal to makefunctional wire wrapped loops, decorative wire coils, andhammered wire links -- and how to connect them. You’llfind classic wire wrapping instructions for a gemstonependant, and a tutorial for a stone bead bracelet in a sleekBEADING HEARTPENDANTBY SONJA KISERwire frame with complementary wire weaving and a wirewrapped clasp. Find out how easy it is to make a simple wirebail or a more substantial one with wrapped square wire.You’ll also find instructions for an open chain maille weavethat produces netting, so you can fill it with crystals or othercolorful items of your choice. Plus you’ll see how to form wireinto a special heart shape that you can partially cover with beads.Find complete instructions, tool and material lists, andgreat tips for making two necklaces, two pendants, and twobracelets -- then run with these ideas to create wire jewelrythat is uniquely your own. So get out your pliers, cutters,hammers, and bench blocks, and start making your ownwire jewelry with this great e-book today.Merle WhiteEditorial Director, Interweave Jewelry GroupThis premium has been published by Interweave, 201 E. Fourth St., Loveland, CO 80537-5655; (970) 669-7672. Copyright 2012 by Interweave Press LLC, a division of Aspire Media,all rights reserved. The contents of this publication may not be reproduced either in whole or in part without consent of the copyright owner. INTERWEAVE ŗ NOT TO BE REPRINTED ŗ ALL RIGHTS RESERVEDwww.JewelryMakingDaily.com 2
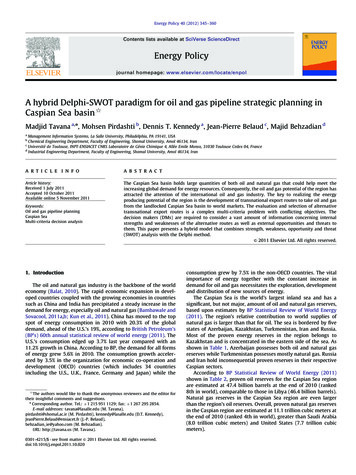
LEARN HOW TO MAKE WIRE JEWELRY:DESIGNS FOR MAKING WIRE JEWELRY WITH6 WIRE JEWELRY MAKING TECHNIQUESPHOTO OF FINISHED PIECE BY JIM LAWSON,ALL OTHER PHOTOS COURTESY OF THE AUTHOR.Swirls & WhirlsM AT E R I A L S16-gauge round dead soft sterling wire, 30"6mm OD jump rings, 510mm OD jump ringConnie Fox Swan Clasp (optional)TOOLSRound nose pliers, chain nose pliers, flatnose pliers, flush cutters, file, anvil or steelbench block, chasing hammerSOURCESSUPPLIES AND WIRE: Monsterslayer,monsterslayer.comHammered link bracelet.BY PEPPER MENTZSKILL LEVELThe inspiration for this piece came from my desire to learn to make my ownindividual pieces to add to my jewelry designs. This piece could easily be embellished with glass beads, or could be wrapped with 28g wire for another look. Youmay also decide that you like the look of the design without the pounded effect. Variationsare limited only by your imagination. Here’s a springboard for creativity.ORIGINALLY PUBLISHED IN STEP BY STEP WIRE JEWELRY, SPRING 2009www.JewelryMakingDaily.com 3
LEARN HOW TO MAKE WIRE JEWELRY:DESIGNS FOR MAKING WIRE JEWELRY WITH6 WIRE JEWELRY MAKING TECHNIQUESone 7" piece of wire for the center swirl.For the center link, use your hands toBring the wire back around the spiral, and1Cut Cut2manipulate3directlytwo 5" pieces for the alternate swirls. Cut twothe wire into a loose spiral form. Whenacross from the first outside loop, make4" pieces for the last swirls. Cut one 5" piece for theclasp. File the ends of all cut wires. Using roundnose pliers, place a small loop at the end of the 7"wire to start the curve.you have made two turns around the center, useround nose pliers to form another loop on the wireas shown.the second link, make a simple loop on one 5 Once you have curved a half circle, bend the4endForof a 5" piece of wire and about 1" down thewire back into itself, forming a smaller bend overwire, curve a large bend.another loop.a loop on the other side. Repeat6StepsEnd4–6withto makea second link.the round nose pliers, within the original circle.Then bend the wire in the opposite direction overthe round nose pliers and around the outside ofthe original curve, ending directly across from thefirst simple loop.a small loop at the endthe wire with flat nose pliers and bend7of theFor4"thewire.thirdKeeplink,theform8it toHoldwire straight for ½". Benda 90º angle. Place the width of the flat noseStep 7 in the opposite direction to9finishRepeatthe link. Make a second link by repeatingthe wire back around the round nose pliers, andback down for another ¾".Steps 7–9.SWIRLS & WHIRLS BY PEPPER MENTZpliers at the bottom of the 90º bend, then makeanother 90º angle with the wire, bending it backtoward the original starting loop. The bottom twoangles should be about 1 3" apart.www.JewelryMakingDaily.com 4
LEARN HOW TO MAKE WIRE JEWELRY:DESIGNS FOR MAKING WIRE JEWELRY WITH6 WIRE JEWELRY MAKING TECHNIQUES1011To make the clasp, use a 5" piece of wire. Form a loop, and spiral the wire, making two rounds. Useflat nose pliers to form a V at the bottom of the spiral, and bend the wire back up at a 50º angle. Continuespiraling around the base. Form a large rounded curve at the top of the wire for the hook. Once the wire is¾ of the way back into the hook’s bend, form the last loop.Hammer the swirled areas of each piecewith a soft mallet, but keep the straight linesun-textured. Attach the pieces together with thesmall rings. Attach the clasp to one end of thebracelet, and the large ring to the other.WIRE TIPSPEPPER MENTZ and herdaughter, Julia Teeters, havejoined to form teetersglass.com with Julia’s husband,Cody. They have started touse sterling wire in many of their designs. Visit theirsite and drop them a line. Pepper can be reachedat pepper mentz@msn.com.! This project uses a variation of Connie Fox’s Swan Clasp. To learn howto make this clasp her way, visit jatayu.com.As! an option, you can sketch the shapes on paper, making it dark andwide, so you can place the wire over the drawing. Manipulate the wireon top of the sketch.! If you desire, make swirls in copper wire first, to figure out the shapesyou want.! An alternate way to work-harden sterling is to tumble all the piecesbefore connecting them to the bracelet.! If you’d like to make a soft curve in the links, hammer each segmentover a round anvil.SWIRLS & WHIRLS BY PEPPER MENTZwww.JewelryMakingDaily.com 5
LEARN HOW TO MAKE WIRE JEWELRY:DESIGNS FOR MAKING WIRE JEWELRY WITH6 WIRE JEWELRY MAKING TECHNIQUESWire Wrapped Malachite PendantA classic technique designed with square Argentium SilverDALE “COUGAR” ARMSTRONGThe beautiful shades of green thatswirl, bend, blossom, and bulls-eye inmalachite almost demand to be setin sterling silver. Because malachite is a coppermineral, however, combining it with sterling is arecipe for tarnish. Although there are chemicaltreatments for jewelry that resist tarnish, theydo not last forever, and as a studio jeweler Itry to remain as much of a purist as I can. Thedevelopment of Argentium Silver has made ita pleasure for me to work with this lovely colorcombination, adding just a touch of gold.Malachite is a very soft and fragile stone,which scratches easily and can be difficult topolish. When I designed the cabochon for thispiece, my husband used a diamond band sawto cut it and then carefully polished it by hand.My plan was to frame it in wire, while preventingpossible scratches on the top, when pulling aregular frame over the stone, or chipping theedge with pliers. Thus I worked it like I do anopal — “off the stone” — forming a cage to goover the top of the cab that resembles the veinsof a leaf.A final note: half-hard Argentium wire can betemperamental; working it too much can causeit to become brittle and break.Opening Photo: JIM LAWSONProject Photos: DALE “COUGAR” ARMSTRONGSKILLS YOU NEED!forming wire bundles! framing a stone with wireM AT E R I A L S A N D TO O L S Y O U N E E DM AT E R I A L S22-gauge square half-hardArgentium wire22-gauge square, softArgentium wire20-gauge half-round, half-hardArgentium wireORIGINALLY PUBLISHED IN LAPIDARY JEWELRY ARTIST, JULY 200924-gauge half-round, half-hard14K gold-filled wireLeaf shaped malachite cabochon1/4" quilter’s tapeUltra fine point markerRulerHAND TOOL S:flat nose pliers, small double barrelbail pliers, angle flush cutters,round nose pliers, pin visewww.JewelryMakingDaily.com 6
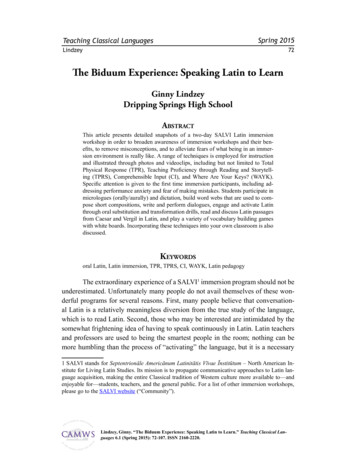
LEARN HOW TO MAKE WIRE JEWELRY:DESIGNS FOR MAKING WIRE JEWELRY WITH6 WIRE JEWELRY MAKING TECHNIQUES12341 Simulating a frame, wrap quilter’s tapearound circumference of cab. Mark beginning,end, and location of the cage wraps." While planning the cage topping, considerthe natural swirls and bulls-eyes of the malachite. I try to enhance the natural materialwith the wired design rather than use thestone to feature the wire.2 Measure and mark centers of both tapeand wire bundle. Line up centers and copymarks from tape to wire bundle." To create the wire bundle, measure thelength of the tape and add 4 /2” to determinethe length of the wires needed for the frame.You will need as many wires as are necessaryto cover the girdle of the stone, plus one. Mycab is 3mm thick, and required a total of four122ga square wires. Use quilter’s tape near theends to secure the bundle. To add stabilityto the bundle while forming it, I used 20gahalf-round, half-hard wire and put one set of 3wraps on each side of the center mark, 1/8" away.Beginning at center, use flat nose pliers3to makeinitial 90º angle, fitting tip of stone.Use your fingers to tease wire around edgeof stone until wire bundle crosses over itself.Use flat nose pliers to bring frame together,leaving about 3mm of negative space tocompensate for internal wrap wire width.Secure with tape.where you intend to break out indi4vidualPlanwiresthat will not only hold stone into5Form “vein cage” by measuring length of cab.Add 2"; this is the length of wires needed. Useas many wires as the number of veins youdesire — in this case 4. Straighten and cutthese wires from 24ga half-round, half-hard.Bundle and tape all of the 24ga wires together.Use outermost wire to wrap bundle together,beginning 1/2" from end and wrapping topoint of first vein. This wrap wire will becomethe first vein." Be sure domed side of wire is facing out andflat side lies on top of wire bundle.5Use wrap wire to branch over cab. Usenext wire in bundle to repeat procedure,continuing until all veins have been formed.frame, but also add life to leaf design.Work Smart: A cushion style mouse pad makes a forgiving work surface whenfitting wire around soft or fragile gemstones and cabochons.WIRE WRAPPED MALACHITE PENDANT BY DALE "COUGAR" ARMSTRONGwww.JewelryMakingDaily.com 7
LEARN HOW TO MAKE WIRE JEWELRY:DESIGNS FOR MAKING WIRE JEWELRY WITH6 WIRE JEWELRY MAKING TECHNIQUES679107Remove stone and using marks for guidance, use flat nose pliers to wrap frame and“vein cage” together.116Reinsert stone into frame and tape “cage”into position. Mark both frame edge andveins where they meet, making sure that flatside of half-round wire lies against cab.8 Use 3" length of 22ga square, half-hard wire810Use 2 rear edge wires and small doublebarrel pliers to form bail. Wrap it in with uncut22ga square wrap wire that began the mainframe binding. Trim and roll bail tails under andbend “vein cage” wire ends at an angle downtoward the front of the stone.to wrap all frame wires together. Make 2 wrapsand then stop. Do not cut this wire. Cleanframe in your chosen jewelry cleaner, and whenUse a pin vise to twist any plain, squareit’s dry, carefully reinsert stone.wires and round nose, chain nose, and flat nosepliers to finish top wires as desired.119 On back of piece, working from center andthen up each side, use flat nose pliers to grasptopmost wire. Make pulls necessary to holdstone in frame.Malachite MattersDALE “COUGAR” ARMSTRONG is aself-described “rockhound” wit h abackground in the fine arts and metalwork prior to making wire jewelry. Sheteaches workshops nationally where sheis known for her wire techniques, knownas “Cougarisms.” Dale lives in southeasternTennessee.!#Due to the fragility of malachite (hardness of 4), mix square wire tempers,using half-hard for the back edge (which will also become the bail wire) andsoft for the front and center of the frame.!#Do not use an ultra-sonic cleaner on this stone. I prefer to use anionic cleaner on all of my jewelry pieces, but never on malachite!WIRE WRAPPED MALACHITE PENDANT BY DALE "COUGAR" ARMSTRONGwww.JewelryMakingDaily.com 8
LEARN HOW TO MAKE WIRE JEWELRY:DESIGNS FOR MAKING WIRE JEWELRY WITH6 WIRE JEWELRY MAKING TECHNIQUESPHOTO OF FINISHED PIECE BY JIM LAWSON,ALL OTHER PHOTOS COURTESY OF THE AUTHOR.Concerto NecklaceCoiled links harmonize with textured lampwork beads.BY CINDY WIMMERSKILL LEVELWhen making wire jewelry, I love using coils and spirals. This necklace designincorporates both of these classic wirework techniques in the scroll links.To highlight your wirework, I recommend oxidizing the finished piece. Thisis a great project to use those ceramic, lampwork, or clay beads you’ve been saving!M AT E R I A L S16-gauge sterling dead soft wire, 4'18-gauge sterling dead soft wire, 26"20-gauge sterling half hard wire,approximately 14'Lampwork round disc focal, 25mm4 lampwork round disc beads, 18mm10 flat sterling spacer beadsJump ring, 6mm ODLiver-of-sulfur (optional)Tumbler (optional)Extra fine steel wool, (optional)TOOL SRound nose pliers, flat nose pliers, flushcutters, 1 8" mandrel, ball point pen,SharpieSOURCESLampwork beads by Moon Stumpp,mixedmediajewelry.comORIGINALLY PUBLISHED IN STEP BY STEP WIRE JEWELRY, SUMMER 2009www.JewelryMakingDaily.com 9
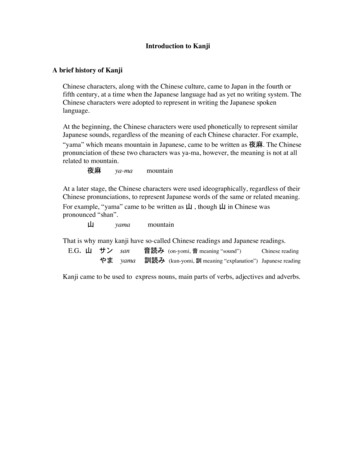
LEARN HOW TO MAKE WIRE JEWELRY:DESIGNS FOR MAKING WIRE JEWELRY WITH6 WIRE JEWELRY MAKING TECHNIQUESa 6½" piece of 16g wire. Mark 2½" from3oneCutapproximately 14' of 20g wire. Coil theCut the coil into seven 1½" segments. Save one1wireCut2end of the wire with a Sharpie. Starting at thearound a mandrel to create a 10½" coil. Worksegment for the clasp.marked point, use round nose pliers to create awrapped loop. Wrap around the base wire once.directly from the spool of wire if you prefer.the tip of the round nose pliers, create aSlide on the coiled segment, and make aWith your fingers, press the coiled wire around4wrapped5smallWith6the spiralsloop. Grasp the loop with flat nose pliers andloop on the opposite end. Wrap aroundto create an S-shaped curve. Make threethe base wire once.spiral the wire inward until it touches the coiledsegment. Repeat on the opposite end.Steps 3–6 to create three more links,7but Repeatmake the orientation of the wrapped loopsmake the clasp, cut 4½" of 16g wire. Make athe wire so that the small loop faces8smallToloop9you,Holdingon one end with the tips of the roundmake a wrapped loop at the top of the coil.in the opposite direction this time, in the mirrorimage.nose pliers. Center the loop. Slide on the remaining1½" coil.CONCERTO NECKLACE BY CINDY WIMMERcoiled links.Form a spiral all the way until it ends on top of thecoil. Press the spiral down slightly.www.JewelryMakingDaily.com 10
LEARN HOW TO MAKE WIRE JEWELRY:DESIGNS FOR MAKING WIRE JEWELRY WITH6 WIRE JEWELRY MAKING TECHNIQUES10Gently press the coil around a ball point pento create the hook.1311With a piece of 16g wire, create a simplefigure eight using the base of the round nose pliers.Lay out the necklace components starting with the focal tab in the center, and alternate the scrolllinks with the lampwork links. Ensure that the coiled links are in a mirror image of each other on both sidesof the necklace. Attach the lampwork discs by making wrapped loops on the ends of their wires. Attachthe jump ring and hook to one end of the necklace, and the figure eight eye to the other side. Oxidize thepiece with liver-of-sulfur, polish with steel wool, and tumble for 45 minutes if you desire.CONCERTO NECKLACE BY CINDY WIMMER12To make lampwork links, take a 5" piece of18g wire (6" for the focal), and string two spacers, alampwork disc, and two more spacers. Be sure toleave enough room on the wire to complete thewrapped loops in the next step. Repeat with theremaining lampwork discs. Make loops on bothsides of each link.CINDY WIMMER lives inVirginia with her husbandand four sons. She has beencreating jewelry for fouryears, specializing in wire design. Cindy finds inspirationfrom the artisan lampwork beads that she loves toincorporate in her jewelry. To contact Cindy, emailcindy@sweetbeadstudio.com or visit her Web .com 11
LEARN HOW TO MAKE WIRE JEWELRY:DESIGNS FOR MAKING WIRE JEWELRY WITH6 WIRE JEWELRY MAKING TECHNIQUESTimeless Turquoise & Elegant OnyxWire wrap and wire weaving — a delicious combination.BY CAROL DEAN NAUKAMSKILL LEVELPHOTO OF FINISHED PIECE BY JIM LAWSON,ALL OTHER PHOTOS COURTESY OF THE AUTHOR.This versatile bracelet, called Timeless Turquoise, incorporates sterling, copper, andrectangular turquoise beads. The beads are outlined in 18g silver and accentuatedwith intricately woven 24g copper. Sophisticated wire wrapping creates the durableclasp as an integral part of the design. Vary the wire gauge and bead selection to transformthis bracelet from subtle feminine elegance to classic masculine style. This project combinesintermediate to advanced techniques.The versatility of this design is demonstrated by a simple change of stones and weavingwire to create Elegant Onyx, or any other design you can imagine.ORIGINALLY PUBLISHED IN STEP BY STEP WIRE JEWELRY, SPRING 2008M AT E R I A L SStones/beads that will accommodate18-gauge wire18-gauge round half hard wire (25")18-gauge half round half hard wire (8")24-gauge round dead soft wire (60")TOOLSChain nose pliers, flat nose pliers, roundnose pliers, flush cutters, ruler, permanentmarker, tapewww.JewelryMakingDaily.com 12
LEARN HOW TO MAKE WIRE JEWELRY:DESIGNS FOR MAKING WIRE JEWELRY WITH6 WIRE JEWELRY MAKING TECHNIQUES18g round half hard wire 25"1long.CutMarkonethepiecewireofwitha permanent marker2 Squeeze the U-turn with flat nose pliers.81 4" from the end. With the tip of the round nosepliers, grip the wire at the mark you just made.Bend the wire to create a U-turn.the wires with the larger part of the4roundGraspnose pliers directly behind the C justthe tip of the U-turn with round nose3pliers,Graspand rotate them approximately 90 to createa C.Pull the wires in the opposite direction aroundthe longer of the two ends of wire 7 "5the bottom6fromMarkjaw to create a hook.the hook tip with a permanent marker. Grasp1created.4the mark with the larger portion of the round nosepliers and create a U-turn to form the eye closure.Tape together the three sections of wire7approximately " from the tip of the hook.34of 18g half round wire. Wrap thisfrom the tip of the hook to the tip8pieceCutof awire4" piece9of theMeasuretightly around the three taped wireseye closure, and mark the center. Feed anworking from the edge of the tape toward the tipof the hook. Cut off any excess half round wire.TIMELESS TURQUOISE & ELEGANT ONYX BY CAROL DEAN NAUKAModd number of stones/beads on the center wirebeing careful to align the center stone/bead overthe marked wire center. Leave approximately 3 16"between each stone/bead and approximately 3 4"at each end.www.JewelryMakingDaily.com 13
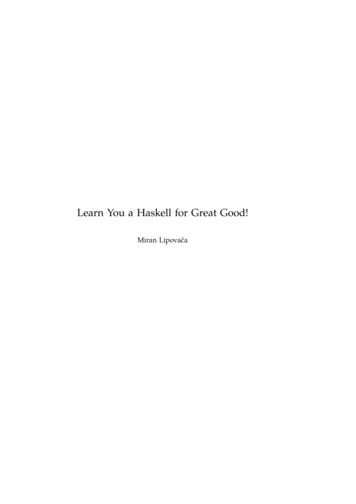
LEARN HOW TO MAKE WIRE JEWELRY:DESIGNS FOR MAKING WIRE JEWELRY WITH6 WIRE JEWELRY MAKING TECHNIQUESbracelet body 63 8"hook5 8"framework 51 8"claspmargin5 8"claspmargin5 8"eyeclosure5 8"32110 Measure the completed hook. In this illustration the hook measures ".58Taping the three wires together makes it easier to accurately mark the wires. Mark the wires " from11the tip of the eye closure as the eye closure edge. Measure from the edge of the wrapped hook to the58mark you just made and note this as the bracelet body. In this illustration, the bracelet body is 63 8".12 On a flat surface, lay your chosen stones/beads end to end with no space in between.Measure the total length of stones/beads andnote this as the stone length. In this illustration, thestone length is 35 8".Subtract the stone length from the bracelet bodyto determine the weaving space. In this illustration,the weaving space is 63 8" – 35 8" 26 8".Multiply the length of each desired space betweeneach stone/bead by the number of spaces andnote the total spacing. In this illustration, totalspacing is 8 x 3 16" 11 2".Subtract the total spacing from the weaving space,and divide by 2. This is the clasp margin. In this illustration, the clasp margin is 26 8" – 11 2" 11 4" 2 5 8".TIMELESS TURQUOISE & ELEGANT ONYX BY CAROL DEAN NAUKAMMark the wires of the hook end for the claspmargin (here, 5 8") Mark the wires of the eye closureend from the eye closure edge for the clasp margin(here, 5 8"). Measure between the two clasp marginmarks and note this as the framework.www.JewelryMakingDaily.com 14
LEARN HOW TO MAKE WIRE JEWELRY:DESIGNS FOR MAKING WIRE JEWELRY WITH6 WIRE JEWELRY MAKING TECHNIQUES32113Remove any tape used to assist in markingthe bracelet sections. Using chain nose pliers, graspeach of the two outside wires at each of the claspmargin marks, and bend the wire slightly.15Pull the 24g round wire from under wire 2over the outer wire closest to your body, wire1. Pullthe length of 24g wire around wire 1 and over wire2 and the tail.17Finish weaving this end’s clasp margin, beingcareful to weave the same number of time as thethe other clasp margin. When all spaces and theclasp margins are woven, pull the 24g wire overwire 2.14Here, illustrations are shown off the bracelet to allow for closer detail. Begin the weaving processwith the hook up and to your left.Using the 24g round wire, make one wrap around the center wire, wire 2, approximately 1 4" from thewrapped end of the hook, and leaving a 1 4" - 1 2" tail. Bend the tail parallel to wire 2.16Pull the 24g wire from over wire 2, under the outer wire furthest from your body, around wire 3, andunder wire 2 and the tail. Continue to weave for the length of the clasp margin. String the first stone/beadonto wire 2. Weave for the length you’ve determined you want between each bead. Add the next stone/bead, pull the wire over wire 2 and then behind the new stone and to the opposite side to begin the nextweave. Repeat the process for each space.18Wrap the 24g wire around wire 2 and overthe last wrap before feeding the end through theeye closure margin weaves. Cut the remaininglength of 24g round wire with flush cutters.TIMELESS TURQUOISE & ELEGANT ONYX BY CAROL DEAN NAUKAM19Grasp and squeeze the three wires of theeye closure end with flat nose pliers about 1 4" fromthe completed weave.www.JewelryMakingDaily.com 15
LEARN HOW TO MAKE WIRE JEWELRY:DESIGNS FOR MAKING WIRE JEWELRY WITH6 WIRE JEWELRY MAKING TECHNIQUESWrap the eye closure using the same20technique as used to wrap the hook in Step 8.21Gently shape the finished bracelet aroundyour wrist, or another form.Shape the eye closure with your flat nose pliers.jewelryLearn 3 newwire linkseto make this fab necklaccapture yourfavorite cabochonin a beautifulwire ringPG. 20IALSPECUALNNA UCTPRODEW!PREVI2012step by step110ALL NEWPRODUCTSYOU MUSTADD TOYOUR STASHPG. 64SStep by Step Wire Jewelry is the onlymmagazine devoted to bringing you the very best in wire!IIn every issue you’l find Expert advice from premier wireaartists, 12–15 original jewelry projects with full-colorsstep-by-step photographs, and the newest wire trendsaand designs.Take advantage of this risk-free offer atinterweave.com/go/bdswThis gorgeousnecklace takesonly 5 minutesto make!LuckyGirlCAROL DEAN NAUKAMretired from Cytology after22 years behind a microscope. Her lifelong passionfor metals was cultivatedwhile working with her dad,Pinkie; and her mother,Shirley, nurtured her insatiable creativity. Sheis a self-taught jewelry artist and is particularlyintrigued by natural stones and wire combinations. Her work is displayed in both Missouriand Texas, and she’ll soon launch her Web sitegritART.net. To reach Carol Dean, please sendan email to cnaukam000@centurytel.net. She’salways happy to talk wire jewelry!If not completely sarisfied, please keep your FREE issue and returnthe bill marked “cancel” and owe nothing.makeInsidae:wardrobeyourselfof wire earringsTIMELESS TURQUOISE & ELEGANT ONYX BY CAROL DEAN NAUKAMORDER TODAY!www.JewelryMakingDaily.com 16
LEARN HOW TO MAKE WIRE JEWELRY:DESIGNS FOR MAKING WIRE JEWELRY WITH6 WIRE JEWELRY MAKING TECHNIQUESFloatingCrystal CubeNecklaceA chain maille weave capturescool crystals.BY JOYCE TROMPSKILL LEVELYOU CAN PUT JUSTABOUT ANYTHINGTHAT WILL FIT INSIDE,DEPENDING ONTHE SIZE AND GAUGEOF THE RINGS.This chain maille weave is calledcaptive inverted round, and is oftenseen with rings in the center insteadof beads. Since it is basically a circularnetting, you can put just about anythingthat will fit inside, depending on the sizeand gauge of the rings. Crystal cubes workwell, because the corners of the cube insidethe circular shape of the chain hold them inplace, creating a “floating” bead.M AT E R I A L S6mm crystal cubes, 426.5mm ID 18-gauge sterling jump rings, 2586.5mm ID 16-gauge sterling jump ring, 11 large sterling S-hookWire or extra jump ring (different coloror size)TOOLSTwo pairs chain nose or bent chainnose pliersPHOTO OF FINISHED PIECE BY JIM LAWSON,ALL OTHER PHOTOS COURTESY OF THE AUTHOR.ORIGINALLY PUBLISHED IN STEP BY STEP WIRE JEWELRY, SPRING 2008www.JewelryMakingDaily.com 17
LEARN HOW TO MAKE WIRE JEWELRY:DESIGNS FOR MAKING WIRE JEWELRY WITH6 WIRE JEWELRY MAKING TECHNIQUESClose six 6.5mm 18g jump rings, and open all1the others.a 2-1-2-1-2 as follows: Place four closed2ringsMakeon one open ring, and close it.of the four rings with another3openPickring,upandtwoplacethe two remaining closedrings on it. Close this ring.With a third open jump ring, pick up two of4the fourrings on the previous single ring, but dobottom two jump rings. Bring5thesePickup,upandtheplacethem on the open ring at thenot close this ring yet.top to make a circle.of chain flat on the table. Make7sureLaythethepairscircleof rings are all facing upward andWith a piece of wire or another ring, (aall three rings are on the wire or ring,8different9twistWhensize or color works best), pick up the topthe wire, or close the ring to hold themoutward in the same direction.ring of each of the pairs from the outside edge.FLOATING CRYSTAL CUBE NECKLACE BY JOYCE TROMPring. Be careful not to twist the chain6as youClosearethebringing the rings up.together.www.JewelryMakingDaily.com 18
LEARN HOW TO MAKE WIRE JEWELRY:DESIGNS FOR MAKING WIRE JEWELRY WITH6 WIRE JEWELRY MAKING TECHNIQUES10Holding this ring between your thumband forefinger, turn the piece over and allow theremaining rings to fall back like flower petals.13Holding these rings in place around thecube, pick up an open ring, and put it through twoof the rings, and close it. This can be a little trickysince while you are closing it, the cube is unsupported on one side.16Place three more rings as you did in theprevious three steps.FLOATING CRYSTAL CUBE NECKLACE BY JOYCE TROMP11Place a crystal cube in the center of the ringsat a bit of an angle.14Bring the unlinked ring back up into place.Put another open ring through it and one of itsneighbors, being careful not to link it through thering you just placed. Close the ring.17Holding the piece between your thumband first two fingers, open the rings out like flowerpetals.12Bring the top-most layer of rings up andaround the cube. They should come togetherclosely.15Put another ring through the third and firstrings, and close.18Place another cube at an angle into thecenter, and bring the rings up around it. ContinueSteps 13–18 until the necklace is complete.www.JewelryMakingDaily.com 19
LEARN HOW TO MAKE WIRE JEWELRY:DESIGNS FOR MAKING WIRE JEWELRY WITH6 WIRE JEWELRY MAKING TECHNIQUES19Once you’ve used all the cubes and broughtthe rings up around the final cube, link two of therings together as done in Step 13. Place the nextopen ring through the next two links as in Step14, and also through the ring you just placed, andclose it.Remove the wire or jump ring from the22opposite end of your necklace, and interlink the20Place another open ring through theremaining two unlinked rings, and the second ringyou placed in Step 19.23Open one side of the S-hook a little wider,and put it through the three linked rings.21Take the 6.5mm 16g ring, and place itthrough these last three linked rings, and close it.24Close that side of the S-hook so the end issnug against the middle.existing three rings.JOYCE TROMP startedsimple beading projectsabout six years ago to giveas gifts. She made herfirst chain maille bracelet,and then was instantly hooked. Since then shecontinues to try new weaves, always lookingfor a challenge, and a way to make it unique.She lives in Santa Barbara, Calif. and can bereached at joymaille@earthlink.net.FLOATING CRYSTAL CUBE NECKLACE BY JOYCE TROMPWIRE TIPA pair of bent nose pliers are the best tools to use when opening and closing a lotof jump rings. Hold them so the tips point straight up to the ceiling, gripping thering on either side of the opening. This way you have good surface area of the jawsholding the ring, but the tips to do not obscure your work.www.JewelryMakingDaily.com 20
LEARN HOW TO MAKE WIRE JEWELRY:DESIGNS FOR MAKING WIRE JEWELRY WITH6 WIRE JEWELRY MAKING TECHN
DESIGNS FOR MAKING WIRE JEWELRY WITH 6 WIRE JEWELRY MAKING TECHNIQUES SWIRLS & WHIRLS BY PEPPER MENTZ www.JewelryMakingDaily.com 5 10 To make the clasp, use a 5" piece of wire. Form a loop, and spiral the wire, making two rounds. Use flat nose pliers to form a V at the bottom of the spiral , and bend the wire back up at a 50º angle. ContinueFile Size: 2MB