Transcription
E-BIKE OWNER’S MANUALTHIS MANUAL CONTAINS IMPORTANT SAFETY INFORMATION.PLEASE READ AND KEEP FOR FUTURE REFERENCE.
Motorized bicycles are new to most riders so in the interest of safe cycling make sure youread, understand, and follow the instructions in this manual.This manual contains important safety, signal words such as DANGER, WARNING,CAUTION, IMPORTANT, and NOTE or NOTICE. These are important signal words tellingyou to pay special attention to that text as rider safety is involved.This symbol will appear in areas of critical rider safety.DANGER and WARNING: Pay special attention to these since failure to do so couldresult in serious injury or death to the rider or others.CAUTION: If not followed these instructions could result in injury or mechanical failure ordamage to the bicycle.NOTE or NOTICE or IMPORTANT: These specify something that is of special interest. Readand pay close attention as your safety and that of your bicycle are involved.IMPORTANT: Read the BEFORE RIDING section and check that all parts are installed andworking as per this manual. If you understand how the bicycle operates, you will get thebest performance. When you read this manual, compare the illustrations to the bicycle.Learn the location of all the controls and parts as well as how they work. KEEP THIS BOOKFOR FUTURE REFERENCE.CAUTION Before you ride the bicycle, check the brakes and other parts of the bike. Makesure all parts are assembled correctly, securely tightened and working properly. Take yourfirst ride in a large, open, level area away from traffic. If you have a problem, call customerservice at 800-451-KENT (5368).Check and read this decal onyour bicycle before each ride:
CONTENTSPREFACE.2-4PARTS IDENTIFICATION CHART.5-6BEFORE RIDING.7-12ASSEMBLING YOUR BIKE.13-28OPERATING PROCEDURES.29-32MONITOR 49-52ELECTRIC BIKE FAQs.53-54LIMITED WARRANTY.55-56IMPORTANT INFORMATION.571
PREFACECongratulations on the purchase of your new bike! With proper assembly and maintenance it willoffer you years of enjoyable riding!IMPORTANT: Carefully read and follow this manual (and any other materials included with this bike)before riding. Please retain this manual for future use. If this bike was purchased for a child, it is theresponsibility of the purchaser to verify the bike has been properly assembled, and that the user hasbeen properly trained and instructed in use of the bike.This manual is provided to assist you and is not intended to be a comprehensive manual covering allaspects of maintaining and repairing your bicycle. The bicycle you have purchased is a complex piece ofequipment that must be properly assembled and maintained in order to be ridden safely. If you have anydoubts about the assembly or your ability to properly assemble and maintain the bicycle. You musthave it assembled and maintained by a professional bicycle mechanic.WARNING: Electric bikes are fun to ride but can be dangerous to use. The user or consumer assumesall risk of personal injuries, damage, or failure of the bicycle or system and all other losses ordamages to themselves and others and to any property arising as a result of using the bicycle.DO NOT DISASSEMBLE, MODIFY OR REPLACE ELECTRICAL PARTS.If you need to change any parts, please consult a professionalbicycle mechanic or conact customer service for additional help.NOTE: YOUR INSURANCE POLICIES MAY NOT PROVIDE COVERAGE FOR ACCIDENTS INVOLVINGTHE USE OF THIS BICYCLE. TO DETERMINE IF COVERAGE IS PROVIDED YOU SHOULD CONTACTYOUR INSURANCE COMPANY OR AGENT.DANGER! Failure to properly assemble and maintain your bicycle could result in seriousinjury or death to the rider.This manual contains important safety, performance and service information. Thepurpose of this Owner’s Manual is to help you use your bike safely in the manner it isintended and allow you to enjoy the benefits it offers for many years to come. Please readit before you take the first ride on your new bicycle, and keep it for reference.If you have any questions or do not understand something, take responsibility for yoursafety and contact Kent customer service at 1-800-451-KENT (5368).ALWAYS WEAR A PROPERLY FITTED HELMET WHEN YOU RIDE YOURBICYCLE. DO NOT RIDE AT NIGHT. AVOID RIDING IN WET CONDITIONS.2
PREFACERESPONSIBILITY OF THE OWNER!IMPORTANT: Reading and following the information and instructions in this manual are essentialto the ability of the owner or any other persons allowed to use this bicycle in order to ride safely.1. It is the responsibility of the owner or in the case of a younger rider the parents of therider to be certain all assembly instructions have been followed, even if the bike has beenassembled by the seller or a professional assembly company.2. Brakes are essential to safety. Be sure they are checked and working properly before eachuse. Remember that any mechanical system changes condition during use and must bemaintained and checked before each use.3. Rules for bicycle use (bicycle laws) vary from location to location so be certain the riderknows and understands the rules that apply to bicycle usage in all areas where the bicycle willbe used. Wearing a helmet, light or reflective clothing, using lights and reflectors are examplesof rules which may exist and which make sense as rider safety precautions at all times.4. Know how to operate the bicycle and all equipment on it before first use and be certainanyone allowed to use the bike knows how to properly and safely use the bike as well.5. There are many different types of bicycles and often these types are designed fordifferent uses. Make sure you know what type unit you have and do not exceed its servicelimitations. Be sure you check and understand the bicycle classifications set in this manual,including size of the unit that is proper for the rider to insure good control during use.Riders who are too small or large may have control problems. Do not overload a unit with arider that is too heavy or too large, and do not attempt to carry extra passengers, packagesor loads on the bicycle. Do not use street bikes for off road riding.6. Your electric bike is water-resistant, but must be properly maintained to preserve thiscondition. Please do not submerge the bicycle or any electric components in water. Waterentering electric components can cause a short circuit and damage the electric componentswith possible injury to the rider and others.7. The battery’s performance can be effected by its environment. Generally speaking, battery’sdischarge performance is better in a higher temperature. Electric power will drop by morethan 1/3 when the temperature is below 32ºF (0ºC). Thus, this e-bike’s riding distance percharge will become shorter in winter or cold areas. It returns to normal / optimal when thetemperature is higher than 68ºF (20ºC).8. Do not put any metal objects in charge hole or battery circuit, it may cause a short circuit,start a fire, or cause an explosion with personal injury or property damage.NOTE: Max weight of rider luggage bike 220lbs/100kg3
PREFACECAUTION: For your safety you must carefully read this manual and follow its instructions.Your bicycle may come with additional instruction sheets that cover features unique to yourbike. Please ensure that you read and become familiar with their contents and retain them withthis manual for future reference. Remember bicycles, in most areas, are subject to the samelaws, rules, and regulations as motor vehicles.Always wear a CPSC approved helmet when riding your bike.Learn and follow local and state traffic use laws.Any major service or adjustments on your bike not covered in this manual should be carriedout by a professional bicycle mechanic. If you wish to make adjustments yourself, this manualcontains important tips on how to do it.CAUTION: Any adjustments you make are entirely at your own risk. Do NOT use your bikefor freestyle and stunt riding, jumping or competitive events. Even if you are riding a mountainbike, you should know that off-road use or any similar activities can be dangerous, and youassume the risk for personal injury, damages or losses incurred from such use. Do not rideyour bike when any part is damaged or not working properly. You must, for your safety andthe safety of other users, consult a professional bicycle mechanic for any questions onrepairs or maintenance.WARNING: As with all mechanical components, the bicycle is subjected to wearand high stresses. Different materials and components react to wear or stressfatigue in different ways. As your bicycle ages, you should inspect it more frequently tolook for deformed, cracked, bent, or loose components. Such conditions may lead tosudden failure. This may possibly cause injuries to the rider. If something is cracked orbroken, do not ride until repairs have been made.NOTE: BEFORE TRANSPORTING THE BIKE AND/OR BATTERY, CALL CUSTOMER SERVICE AT1-800-451-KENT (5368) FOR SPECIFIC DETAILED INSTRUCTIONS.ALWAYS WEAR A HELMET-IT COULD SAVE YOUR LIFE!A properly fitting, CPSC approved, bicycle helmet shouldbe worn at all times when riding your bicycle.The correct helmet should:– be lightweight and comfortable– have good ventilation– cover the forehead and fit correctly– be securely fastened on the riderCORRECTForehead Covered4INCORRECTForehead Exposed
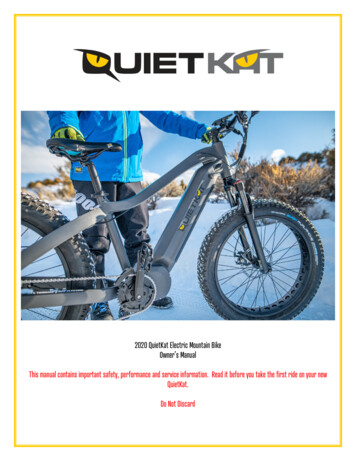
PARTS IDENTIFICATION1. Handlebar2. Handlebar StemCIRCUIT DIAGRAM3. Monitor Display4. Headset5. ForkMOTOR6. Front Brake7. Pedal8. Pedal Crank Arm9. Torque Sensor10. Chain11. Rear Derailleur12. Motor MONITORDISPLAY13. Wheel–14. Tire15. Rear Brake16. Saddle17. Frame18. Battery (inside frame)19. Charging Port (opposite side)20. On/Off SwitchTORQUE SENSORBATTERY31241617141951520131867121098115
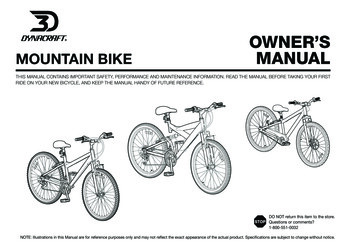
PARTS IDENTIFICATION1. Monitor Display2. HandlebarCIRCUIT DIAGRAM3. Handlebar Stem4. Headset5. ForkMOTOR6. Front Brake7. Pedal8. Pedal Crank Arm9. Torque Sensor10. Chain11. Rear Derailleur12. Motor MONITORDISPLAY13. Wheel–14. Tire15. Rear Brake16. Saddle17. Frame18. Battery (inside frame)19. Charging Port (opposite side)20. On/Off Switch1TORQUE SENSORBATTERY2320164191451513171867101261198
BEFORE RIDING1.WARNING - ON AND OFF ROAD CONDITIONS: The condition of the riding surfaceis very important to your safety. If the surface is wet, or has sand, leaves, small rocks orother loose debris on the surface where you plan to ride, carefully decrease the speed ofthe bicycle and ride with extra caution. It will take a longer time and more distance to stop.Apply the brakes sooner and with less force. Always apply the rear brake first allowing timeand distance for it to take effect. Then follow by cautiously applying the front brake, in orderto maintain control of the bicycle. Rapid front brake application first may cause a front pitchover or fall. Learn to use your brakes properly under controlled conditions until you learnproper braking under all road conditions.2. NOTICE: State and federal regulations require a full set of reflectors. Some state andlocal laws may require that your bike be equipped with a warning device, such as a horn orbell and most states require a light. The manufacturer and many legal authorities DO NOTapprove or encourage riding at night. Vision is quite limited at dawn, dusk and at night forbike riders, motorists and by-standers. If you must ride at night, take extra precautions, usefront and rear lights, wear flashers on your arms, wear light-colored clothing, and plan yourroute to ride in well lighted areas avoiding heavy traffic areas.3. NOTE: Always wear shoes when riding a bicycle and avoid loose fitting clothes. Wear acuff band or trouser clip to keep pants or other loose clothing from getting caught in thechain wheel. Long sleeves, long pants, gloves, eye protection, a CPSC approved helmet,elbow and knee pads are recommended.Helmet use is required by law in many states and is always a good idea for your safety.4. CAUTION: WET WEATHER WARNING: Check your brakes frequently. The ability to stopis critical to your safety. Roads are slippery in wet weather so avoid sharp turns and allowmore distance for stopping. Brakes become less efficient when wet. Leaves, loose gravel andother debris on the road can also lengthen stopping distance. If at all possible, do not ride inwet weather. Vision and control are impaired, creating a greater risk of accidents and injury.5. CAUTION: A bicycle rider’s best defense against accidents is to be alert to road conditionsand traffic in the area. Do not wear anything that restricts your vision or your hearing.6. When riding, ALWAYS WEAR A CPSC APPROVED BIKE HELMET. It may save your life.7. Obey all traffic regulations. Most traffic regulations apply to bike riders as well asautomobile operators. Observe all state and local traffic regulations, signs and signals.Check with your local police station on bicycle licensing and inspection, and where it islegal to ride your bike.7
BEFORE RIDING8. Keep to the RIGHT SIDE of the road. Follow the traffic flow in a straight line close to thecurb. Watch out for opening car doors and cars moving in and out of traffic. Use caution atintersections.9. Never carry passengers. This is dangerous and it makes the bicycle harder to control.Never carry anything that can inhibit your ability to control the bicycle or see the road.10. When riding in pairs or in larger groups, form a single line along the right side of theroad. Set up a sensible distance between riders. Don’t follow too closely.11. Always be alert. Animals or people may dart in front of you. Give pedestrians the rightof-way. Don’t ride too close to pedestrians, and don’t park your bicycle where it can get inthe way of foot/vehicle traffic.12. Be careful at all intersections. Slow down and look both ways before crossing.13. Use hand signals. Always let other drivers and pedestrians know what you are going todo. Signal 100 ft. before turning unless your hand is needed to control the bike.14. WARNING: NIGHT TIME OPERATION: We do NOT recommend riding your bike at night.If you have an emergency that requires you to ride at night you must have proper lights andreflectors. NEVER ride at night without a helmet, taillight, a white front reflector, a red rearreflector, pedal reflectors and white wheel reflectors. You must be able to clearly see thesurface where you are riding and be seen by others.15. Never hitch rides. Never hold onto moving vehicles while riding. Never stunt ride orjump on your bike.16. ON AND OFF ROAD OPERATION: Avoid the following road hazards: drain grates,pot holes, ruts, soft road edges, gravel, leaves (especially when they are wet), unevenpavement, railroad crossings, manhole covers, curbs, speed bumps, puddles, and debris asall have an effect on your riding and may result in loss of control. Adjust your speed and theway you use your brakes if you must ride in such areas.17. If any components becomes loose while riding, (STOP!!) immediately and tighten, orbring to a mechanic for repair.8
BEFORE RIDINGYour new bicycle was assembled and tuned in the factory and then partially disassembledfor shipping. The following instructions will enable you to prepare your bicycle for years ofenjoyable cycling. For more details on inspection, lubrication, maintenance and adjustmentof any area please refer to the relevant sections in this manual. If you have questions aboutyour ability to properly assemble this bicycle, please consult a professional bicyclemechanic before riding.TO AVOID INJURY, THIS PRODUCT MUST BE PROPERLY ASSEMBLEDBEFORE USE. WE STRONGLY RECOMMEND THAT YOU REVIEW THECOMPLETE ASSEMBLY GUIDE AND PERFORM CHECKS SPECIFIED IN THEOWNER’S MANUAL BEFORE RIDING.Tools required for assembly: 5/6mm hex wrench Torque wrench Air pump & tire gauge to inflate tires Bicycle lubricant or grease 6” adjustable wrench Phillips & standard screwdrivers Pliers with cable cutting abilityRECORD SERIAL NUMBEREach bicycle has a serial number stamped into the bottom of the frame (See Illustration).Record this number HERE to keep for future reference.Serial Number LocationThis number can be helpful to reclaim your bike ifBike Shown Upside Downever lost or stolen. THIS INFORMATION IS ONLYAVAILABLE ON THE BIKE ITSELF. There is norecord of your serial number at the storepurchased or with our company. It is yourresponsibility to record this information.###Serial Number:Serial Number9
BEFORE RIDINGJust a minute spent before each ride can significantly improve your safety and theenjoyment of your ride. So, EACH TIME before you ride make a habit of performing thefollowing safety checks: Stand in front of the bicycle facing rearward and hold the front wheel securelybetween your legs. Try to twist the handlebar and verify that they do not move.Then pull the handlebars up, trying to lift the bike. There should be no movement. Try to push the front wheel from side to side and confirm that it feels tight andwill not wobble. Lift the front wheel up by the handlebars and strike the wheeldownward with the heel of your hand to confirm that it is securely attached to thewheel. Spin the front wheel and confirm that it does not wobble or contact the forkor brake pads. Try to lift/push down on and twist the seat to confirm it is tight. Look at the connection of the pedals to the crank arm. You should not see pedalscrew threads and the pedal should feel firm and be parallel to the ground. Apply your brake(s) and make sure they feel firm to the touch, and then spin thewheel(s). Apply the brakes. The brakes should stop the wheel(s). Check to be sure that the fenders and accessories (if equipped) are firmly attachedand will not contact any moving parts. Make sure all reflectors are in position andnot broken.Now, put on your BICYCLE SAFETY HELMET and enjoy your ride. Your safety is well worthjust a minute. Also, be sure to read and follow the warnings and instructions in this manual.10
BEFORE RIDINGCORRECT FRAME SIZING:When selecting a new bicycle, the correct choice of frame size is a very important safetyconsideration. The ideal clearance will vary between types of bicycles and rider preference. Thismakes straddling the frame when off the saddle easier and safer in situations such as suddentraffic stops. Women can use a man’s bicycle to determine the correct size women’s model.1-2”THERE SHOULD BE A CLEARANCE OF NO LESS THAN1-2 INCHES BETWEEN THE GROIN AREA OF THEINTENDED RIDER AND THE TOP TUBE OF THE BICYCLE,WHILE THE RIDER STRADDLES THE BICYCLE WITHBOTH FEET FLAT ON THE GROUND.THE SEAT POST “MINIMUM INSERTION” / “MAXIMUMHEIGHT” MARK SHOULD NOT BE VISIBLE WHEN THESEAT POST IS INSERTED INTO THE SEAT MAST OFTHE BIKE. DO NOT RAISE THE SEAT POST BEYONDTHIS MARK. THE SEAT POST OR FRAME MAY BREAKCAUSING YOU TO LOSE CONTROL AND FALL. ALWAYSCHECK TO MAKE SURE THE SEAT POST ADJUSTINGMECHANISM IS TIGHTENED SECURELY BEFORE RIDING.11
BEFORE RIDINGRIDING POSITION:SADDLE HEIGHTIn order to obtain the most comfortable ridingposition and offer the best possible pedaling, correctsaddle height should not allow leg strain from overextension, and the hips should not rock from side toside when pedaling. While sitting on the bicycle withone pedal at it’s lowest point, place the ball of yourfoot on the pedal. The correct saddle height willallow the knee to be slightly bent in this position.Arms notoverextendedHandlebar stemheightabout thesame asseat heightPedalbottom positionREACHTo obtain maximum comfort, the rider should not over extend his or her reach when riding.There should be a slight bend in the rider’s elbows. Refer to the section regarding seat andseat posts to learn how to adjust the seat post height.12
ASSEMBLING YOUR BIKEPREPARATIONIt is important that you read this owner’s manual before you start to assemble your bicycle.WE RECOMMEND THAT YOU CONSULT A PROFESSIONAL BICYCLE MECHANIC IF YOUHAVE DOUBTS OR CONCERNS AS TO YOUR ABILITY TO PROPERLY ASSEMBLE, REPAIR,OR MAINTAIN YOUR BICYCLE. Remove all parts from the shipping carton. Check to makesure no parts are loose on the bottom of the carton. Carefully remove the front wheel whichis attached to the side of the bicycle for shipping. Carefully remove all other packing materialfrom the bicycle. This includes zip ties, axle caps and material protecting the frame.FRONT WHEEL1. Remove the nuts, washers andwheel retainers from the front wheel.2. Slide the wheel onto the open endsof the fork. Slip an axle retainer onto eachend of the axle, and hook the retainersinto the holes in the fork end. Looselyinstall the washer onto each end of theaxle (serrated end toward the retainer),then install the hex nut. (Note: there maybe a washer head nut in place of thewasher and hex nut).3. Center the wheel in the fork and tightenthe axle nuts securely, alternating from oneside to the other to center the wheel.4. Spin the wheel to make sure that it iscentered in the fork and does not wobble.If the wheel is not centered, loosen the nutsand try again.5. If your bicycle has a quick release mechanism, read and follow the quick releaseinformation on this manual.Torque requirement: 16-20 ft. lbs.13
ASSEMBLING YOUR BIKEQUICK RELEASE FRONT WHEELSome bicycles have wheel axles that incorporate a Quick Release (QR) mechanism. Thisallows easy wheel removal without the need for tools. The mechanism uses a long bolt (calleda skewer) with an Adjusting Nut on one end, and a lever operating a cam-action tensioneron the other. With the quick release lever in the open position, insert the front wheel intothe open ends of the fork. Turn the adjusting nut so that the locking lever is moved to theclosed position with a firm action. At the halfway closed position of the quick release lever,you should start to feel some resistance to this motion. Do not tighten the quick release byusing the quick release lever like a wing nut. If the quick release lever is moved to the closedposition with little or no resistance, clamping strength is insufficient. Move the quick releaselever to the open position, tighten the quick release adjusting nut, and return the quick releaselever to the closed position.CORRECT QUICK RELEASE AXLE SETTING:Quick ReleaseAdjusting Axle (skewer)NutQuickReleaseCam Lever1. To set, turn the lever to the open position so thatthe curved part faces away from the bicycle.2. While holding the lever in one hand, tighten theAdujusting Nut until it stops.3. Pivot the lever toward the closed position. When thelever is halfway closed, there must be firm resistanceto turn it beyond that point. If resistance is not firm,open the lever and tighten the Adjusting Nut in aclockwise direction.WARNING! IF YOU ARE USING A UNIT EQUIPPEDWITH A QUICK RELEASE, ALWAYS MAKE SURE THEQUICK RELEASE LEVER IS SECURELY CLOSED IN ALOCKED POSITION. ALSO BE CERTAIN YOUR QUICKRELEASE LEVER IS ON THE SIDE OPPOSITE TO THEDISC BRAKE IN YOUR UNIT.HubAxleHubSpringClosed PositionOpen Position4. Continue to move the lever all the way to the closedposition so that the curved part of the lever faces thebicycle.5. The Quick Release is open when you are able to read OPEN. Verify the Quick Release isclosed when you are able to read CLOSED.6. Repeat process until quick release lever is securley closed in a locked position.14
ASSEMBLING YOUR BIKEKICKSTANDIf your bike is equipped with a kickstand, pleasefollow the instructions below.1. Place the bicycle in an upright position.2. Remove the top plate from the kickstand.3. From the left side of the bicycle (opposite side fromchainring), place the kickstand in position beneath thetwo rear fork legs.4. Place the top plate, flange down, onto the mounting bolt.5. Replace the washer and nut onto the mounting bolt. Hold the kickstand arm in an upposition aligned with the frame stay, then securely tighten the mounting bolt.6. Leave the leg of the kickstand down so it will support the bicycle during the rest of theassembly process.REAR MOUNT KICKSTANDIf your bike is equipped with a rear mount kickstand,please follow the instructions below:1. Lean the bike against a wall for support, so that theright side (chainring side) is facing the wall and the leftside of the bike is facing out.2. Remove the rear axle nut and washer from the left side rear wheel.3. Slide the kickstand plate onto the axle, so that it is seated againstthe rear dropout.4. Slide the washer and nut back onto the axle and tighten securely.5. Leave the leg of the kickstand down so it will support the bicycle during the rest of theassembly process.WARNING! THE KICKSTAND IS DESIGNED TO SUPPORT THEBICYCLE ONLY, NOT THE BICYCLE AND RIDER.WARNING! Use your kickstand to support the bike when not riding. Allowing yourbike to lay on it’s side can damage the brake levers and cause an usafe ridingcondition and could result in injury to the rider.15
ASSEMBLING YOUR BIKEPEDAL INSTALLATION1. Apply a small amount of grease to the threads of each pedal. Look for the letter “L” or “R”on the side or end of each pedal spindle (picture). Turning the spindle clockwise by hand(Picture), thread the pedal marked “R” into the crank arm on the right (drive) side of thebicycle. Make sure that you are not “cross-threading”, which can strip the threads in the crankarm. If the threads do not turn easily, don’t force them. Back the spindle out and start over.Once the pedal is threaded into the crank arm, tighten the spindle securely to the crank armwith a 15mm open end or an adjustable wrench.2. Turning the spindle counterclockwise by hand, thread the pedal marked “L” into the crankarm on the left side of the bike. Make sure that you are not “cross-threading”, which canstrip the threads in the crank arm. If the threads do not turn easily, don’t force them. Back thespindle out and start over. Once the pedal is threaded into the crank arm, tighten the spindlesecurely to the crank arm with a 15mm open end or an adjustable wrench.WARNING! IMPROPERLY INSTALLED AND TIGHTENED PEDALS CAN WORK LOOSE,DAMAGING THE BICYCLE AND CAUSING POSSIBLE SERIOUS INJURY OR DEATH TO THERIDERTorque Requirement 15-18 ft. lbs.16
ASSEMBLING YOUR BIKEADJUSTABLE STEM1. Remove plastic packaging covering the expanderwedge. Loosen the stem expander bolt, if necessary,so the wedge nut is in line with the stem body.See illustration.2. Insert the stem into the head tube past theminimum insertion line indicated on the stem.WARNING: The handlebar stem must be insertedinto the head tube until the minimum insertionline indicated on the stem is completely covered.Angle Adjustment Screw (6mm)3. Face the handlebar stem forward directly in linewith the front wheel. Make sure the fork is in thecorrect position (facing forward) before tighteningthe expander bolt. See illustration.4. Tighten the expander bolt securely (turning in aclockwise direction). Recommended torque is 20 ft. lbs.5. STEM ANGLE ADJUSTMENT. The stem angle can be adjusted from 90 to 145 degree angle.The adjustment screw is located UNDER the stem extension. You will need a 6mm AllenWrench. Loosen the 6mm Allen Screw. (DO NOT remove the screw. Loosen it only enough toallow angle adjustment.) Adjust to the desired angle and tighten bolt securely. Check the stemfor tightness before riding. WARNING: The assembler is cautionedForkagainstthe danger ofSteerer tubebe alignedabovein overtighteningdamaging the handlebar stem assembly and possible injury toshouldtheriderthe top allen screwbut below the topthe expander bolt and expander wedge.of the stemHANDLEBAR INSTALLATION1. Loosen the stem clamp bolt.2. Insert the handlebar into the stem.3. Tighten the stem clamp bolt securely.4. Check the handlebar for tightness. If you canmove it forward or backward, the clamp bolt is nottight enough.5. Check steering by straddling the front wheel andtrying to turn the handlebar. If you can turn thehandlebar without turning the front wheel. The stem is too loose. Align the handlebar with thefront wheel. Retighten the expander bolt (clockwise).Recommended torque is 15 ft. lbs.17
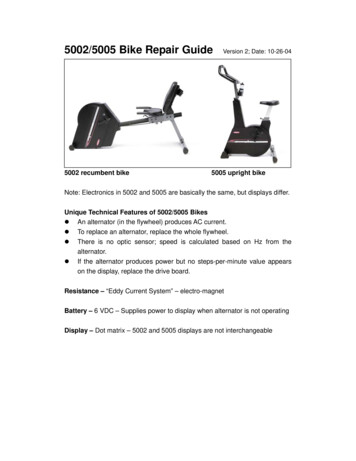
ASSEMBLING YOUR BIKEA-HEAD STEM ASSEMBLYWARNING! ALWAYS TIGHTENFASTENERS TO THE CORRECTTORQUE. BOLTS THAT ARE TOOTIGHT CAN DEFORM. BOLTS THATARE TOO LOOSE CAN MOVE ANDFATIGUE. EITHER MISTAKE CANLEAD TO LOSS OF CONTROL,SERIOUS INJURY OR DEATH. IF YOUDO NOT FEEL COMFORTABLE WITHYOUR SKILLS IN ASSEMBLING ORADJUSTING THE BIKE, PLEASE TAKEIT TO A PROFESSIONAL BIKE MECHANIC.1. Make sure the front fork is facing forward(see illustration).2. Insert the stem onto the fork steerer tube.Align the steerer tube so that it sits ABOVEthe top allen screw, but BELOW the top ofthe stem.3. Tighten the 5mm head set top cap bolt toa torque of 15 ft. lbs. Do Not Overtighten!4. Face the handlebar stem forward directlyin line with the front wheel. Tighten the two5mm allen screws on the handlebar stem toa torque of 7 ft. lbs.18Fork Steerer tubeshould be aligned abovethe top allen screwbut below the topof the stem
ASSEMBLING YOUR BIKESEAT & SEAT POST ASSEMBLY1. Loosen the seat clamp nuts.2. Insert the top portion of the seat post into the seat clamp. Be sure the seat post iscompletely inserted into the seat clamp and butted tightly against the underside of the seat.3. Tighten seat clamp nuts securely.4. Insert the seat post (with seat attached) into the bike frame. Be sure that the seat post isinserted past the minimum insertion line.5. Tighten the seat post binder bolt securely at the desired height.6. Adjust the angle of the seat so that the t
Please retain this manual for future use. If this bike was purchased for a child, it is the responsibility of the purchaser to verify the bike has been properly assembled, and that the user has been properly trained and instructed in use of the bike. This manual is provided to assist you and is not intended t