Transcription
Important: Keep forFuture ReferenceThis manual shows how to ride your newbicycle safely. Even if you have ridden abicycle for years, it is important forEACH person to read Chapter 1 beforeyou ride this bicycle! Parents should speakabout Chapter 1 to a child or person who mightnot understand this manual.This manual also shows you how to do basicmaintenance. Some tasks should only be doneby your dealer, and this manual identifies them.Keep this Manual with the BikeThis manual is considered a part of the bicyclethat you have purchased. If you sell the bike,please make sure this manual is transferred tothe new owner as part of the sale.About the CDThis manual includes a CD (compact disc) thatgives you more comprehensive informationwhile we use less paper for the environment.Please view the CD to see information that isspecific to your bicycle.If you do not have a computer at home, operatethe CD on a computer at school, work, or thepublic library. If your CD does not operate, thesame information is on our web site. The addressfor the web site is on the cover of this manual.Complete the RegistrationBicycle registration is the only record we haveof who owns this bicycle. If it is necessary togive you new instructions, your registrationrecord is very important. Registration andproof of purchase are necessary to make awarranty claim. Choose one of these easyprocedures to complete the registration: On the CD, click the link “Register.” Go to the web address on the cover of thismanual and click on the links.The web site also gives you a link to newinstructions. If you make a decision not tocomplete the registration, make sure you visitthe web site frequently.Meaning of Safety Signs and LanguageIn this manual the Safety Alert symbol, atriangle with an exclamation mark, shows ahazardous situation which, if not avoided, couldcause injury:‘CAUTION’ indicates the possibilityof mild or moderate injury.‘WARNING’ indicates the possibilityof serious injury or death.This manual complies with these standards: ANSI Z535.6 BS 6102 : Part 1: 1992 CEN 14764, 14765, 14766, 14781, 14872 CPSC CFR 1512My bicycle modelMy serial number:Lock key #My dealer:The phone number of my dealer:i
Assembly of Your New BicycleAn Impact can Weaken your BicycleSpecial tools and skills are necessary for theassembly and the first adjustment of yourbicycle. Only your dealer should do this.If you crash or apply force that is higher thanthe limits of your bicycle, you are very likely tocause damage to the bicycle or its parts. If yourbicycle has damage and you crash or load itagain later, the previous impact can cause yourbicycle to break at a much lower load.If You Have QuestionsThere are many models of bicycles with avariety of equipment, so this manual mightcontain some instructions that do not applyto your bicycle. Some illustrations might bedifferent from your bicycle.If you have questions after you read thismanual, speak to your dealer. If you have aquestion or problem that your dealer can notanswer or repair, tell us:Attn: Customer Service801 W. Madison StreetWaterloo, Wisconsin 53594920.478.4678A Word About Bicycles,Accidents, and SafetyA bicycle can be fun when used fortransportation, recreation, exercise, orcompetition. But riding a bicycle can also bedangerous, especially if you try to ride beyondthe limits of your ability or the limits of yourbicycle. The skill of bicycle riders can varygreatly, just like the skill of an automobile driveror a skier. Do not ride in a manner that exceedsyour ability.Each bicycle also has limits because of manyproperties: Design and material of the bicycle Maintenance and use of the bicycle Surface of the road or trail And moreiiA Bicycle Cannot Protect Youin an AccidentBicycles are not designed to withstand everysituation. In a crash or impact, it is not uncommonfor the bicycle to have damage and for you to fall.If you fall, your bicycle can not prevent injury. Carshave bumpers, seat belts, air bags, and crumplezones. Bicycles do not, so even a small crash atslow speed can cause injury or death.Think SafetyAlways “Think Safety” and avoid dangeroussituations, which are usually obvious. But notall dangerous situations are obvious. Many ofthose are shown in this manual; read at leastChapter 1 before you ride.Some of the high-risk stunts and jumps seen inmagazines or videos are very dangerous; evenskilled athletes get severe injuries when theycrash (and they do crash).Changes to Your BicycleCan Make it UnsafeEach and every part of your new bicycles hasbeen carefully chosen and approved. Thesafety of accessory or replacement parts, andespecially how those parts attach and interfacewith other parts of the bicycle, is not alwaysapparent. For this reason, you should onlyreplace parts with original equipment or partsthat are approved. If you are not sure whatparts are approved, ask your dealer.
Table of ContentsChapter 2: MaintenanceA Word About Bicycles, Accidents,and Safety.iiBicycle Type and Use Condition . . 1Chapter 3: AdjustmentChapter 1: Guide to Safe On-and-OffRoad OperationBefore a First Ride. 3Checklist: Check Before Each Ride.4Rules to Ride SafelyKnow and Obey Local Bicycle Laws. 8Look for Cars, Pedestrians,and Other Obstacles. 8Wear a Helmet and Bicycle Clothing. 9Ride Safely in Wet Weather or Wind. 9Make Sure Other People Can See You . 9Think About Safety When You Ride. 9Riding instructionsUse Your Brakes Carefully. 10Change Gears Correctly. 11Use Pedal Systems Carefully. 11Safeguard Your BicyclePrevent Theft of Your Bicycle.12Safely Park Your Bicycle.12Include Repair Items when You Ride.12Only Install Compatible Accessories.12Clean Your Bicycle.13Avoid Incidental Damage to Your Bicycle.13Tools for Bicycle Maintenance.13Maintenance Schedule. 14A Word about Torque et. 18Crankarms. 18Bottom Bracket. 18Pedals. 19Chain. 19Cables. 19Shift-levers. 19Front Derailleur. 20Rear Derailleur.21Internal Gear Systems.22Brakes.22Brake-levers.25Wheels.26Wheel Installation.27Tire Installation.31Suspension.33Accessories.33Training Wheels. 34Chapter 4: LubricationStem.35Seatpost.35Bottom Bracket.35Pedals.35Derailleurs.36Headset.36Brakes and Brake-levers.36Wheels.36Suspension Forks.36Rear Suspension.36Cables.36For more instructions.37iii
Bicycle Type andUse ConditionThere are many types of bicycles. Each bicycletype is made for a specified use, or UseCondition. If your use of a bicycle applies morestress than the limit of its use condition, thiscould cause breakage of the bicycle (or a part ofthe bicycle). Tandem Cruiser with large, 26” tires and swept-backhandlebar Pedelec electric-assist bicycle Weight limit of rider: 275 lbs (125 kg);Tandem: 550 lbs (250 kg);Pedelec: 300 lbs (136 kg)This section shows the Use Condition for differenttypes of bicycles. If you are not sure of what typeof bicycle you have, speak to your dealer.Child BicycleA bicycle made for a child. A child shouldnot ride without the supervision of a parent.Children should not ride near slopes, curbs,stairs, drop-offs, or pools; or areas thatautomobiles use: Maximum saddle height of 680 mm Usually a bicycle with 12”, 16”, or 20” wheels;or a child’s tricycle No quick-release wheel attachment systems Weight limit of rider: 80 lbs (36 kg)Condition 2A bicycle made to ride on Condition 1, plussmooth gravel roads and groomed trails withlow-angle grades where the tires are always onthe ground: Hybrid bicycle with 700c wheels, tires widerthan 28c, and flat handlebars City bicycle: hybrid with special equipmentsuch as fenders or a light Cyclocross bicycle: drop-type handlebar,knobby 700c tires, and cantileveror disc brakes Mountain bike with 24” wheels Weight limit of rider: 300 lbs (136 kg)24” wheel mountain bike: 175 lbs (80 kg)Condition 1A bicycle made to ride on a paved surfacewhere the tires are always on the ground: Road bicycle with drop-type handlebar Triathlon, time trial, or speed bicycle1Chapter 1: Guide to Safe On-and-Off Road Operation
Condition 3Condition 5A bicycle made to ride on Conditions 1 and 2, plusrough trails, small obstacles, and smooth technicalareas, and also areas where tires momentarily arenot on the ground; NOT for jumps.A bicycle made to jump, ride at high speeds,ride aggressively on rougher surfaces, orcomplete jumps on flat surfaces.Any mountain bike that does not have rearsuspension is Condition 3. Any mountainbike with short-travel rear suspension is alsoCondition 3: “Standard,” “race,” or “cross-country” mountainbike with wide, knobby 26” or 29” tires Short-travel rear suspension (3”/75 mm or less) Weight limit of rider: 300 lbs (136 kg)This type of use is very dangerous and putslarge forces on a bicycle. Large forces can applydangerous stress to a frame, fork, or the parts.If you ride in Condition 5 terrain, you shouldpractice safety precautions such as morefrequent bicycle inspections and more frequentreplacement of equipment. You should alsowear comprehensive safety equipment such asa full-face helmet, pads, and body armor. “Freeride” or “jumping” bicycle with heavyduty frames, forks, and components Long-travel rear suspension (7”/178 mm ormore) Weight limit of rider: 300 lbs (136 kg)Condition 4A bicycle made to ride on Conditions 1, 2, and3; plus rough technical areas, obstacles ofmoderate height, and small jumps: “Heavy-duty,” “trail,” or “all-mountain”mountain bike with wide, knobby 26” or 29”tires Medium-travel rear suspension (4”/100 mmor more) Weight limit of rider: 300 lbs (136 kg)WARNING: If your use of a bicycleapplies more stress than the UseCondition for which it is intended, thebicycle or its parts can have damageor break. A bicycle that has damagecould decrease your control and causeyou to fall. Do not ride in UseConditions that apply more stressthan the limits of the bicycle. If youare not sure of the limits of thebicycle, speak to your dealer.Chapter 1: Guide to Safe On-and-Off Road Operation2
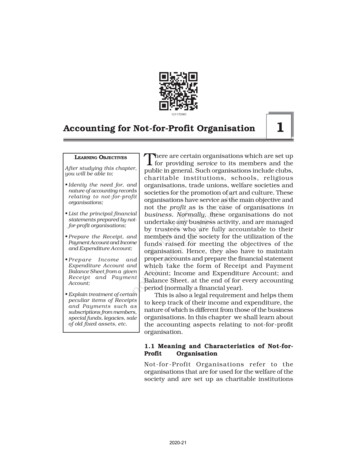
Chapter 1: Guide toSafe On-and-Off RoadOperationIf your bicycle does not operate as necessary,or if different parts are necessary for the safeoperation of your bicycle, speak to your dealer.Before a First RideThe power of bicycle brakes changes with the UseCondition of the bicycle. If you think it is necessaryfor your bicycle to have more—or less—power tostop, speak to your dealer about brake adjustmentsor other brake options for your bicycle.Make Sure Your Bicycle is the Correct SizeYour dealer will help you find a bicyclethat has the correct dimensions for yourbody. There should be at least 1” (25 mm)clearance between the top tube and youwhen you stand over your bicycle (Figure 1).For a mountain bicycle, we recommend 2-3”(50-75 mm) clearance.You can adjust the saddle and handlebar to offerthe best comfort and performance. Before youmake these adjustments, refer to Chapter 3.AFigure 1:Minimum standoverheightA 1” (25mm) for mostbicycles2-3” (50-75mm) formountain bicyclesKnow How Your Bicycle OperatesThe properties of your bicycle, if not usedcorrectly, can decrease your control of the bicycle.Before you ride fast or in conditions that are aproblem, learn the operation and performanceof all the mechanisms of your bicycle, especiallybrakes and steering components. As an example,“aero-bars” can make steering and brakingdifficult. Practice the use of your bicycle at slowerspeeds in a flat, empty parking area. Repeat thisstep after any change to your bicycle.3Learn the Power of Your BrakesWARNING: If you do not use thebrake system correctly or you applytoo much force with the front-wheelbrake, the brakes could decrease yourcontrol and cause you to fall. Practiceto correctly apply your brakes asshown in this manual.Prevent Toe-clip OverlapSome modern, high-performance bicycles,especially smaller sizes, use a short-wheelbasedesign with the front wheel close to the pedals.Increasing the distance between the frontwheel and pedals could place the handlebartoo far away or make the steering unwieldy. Onbicycles where this distance is short, when thehandlebar is turned during very slow speedsyour foot or toe-clips could overlap or touch thefront wheel or fender (Figure 2).This overlap is affected by the size of your feet,the length of the crankarms, and the pedalsyou choose. At usual speeds, the handlebardoes not turn sufficiently for overlap to occur.When you ride slowly, do not pedal when thehandlebar is turned.WARNING: If your foot or toe-cliptouches the front wheel or fender,toe-clip overlap could decrease yourcontrol and cause you to fall. Do notpedal when you turn at slow speed.Chapter 1: Guide to Safe On-and-Off Road Operation
FIGURE 2:Toe-clip overlapChecklist: Check Before Each RideThis is not a full maintenance program.Examine the Frame and ForkBefore and after each ride, examine all of yourbicycle for signs of fatigue stress: Dents Cracks Scratches Deformation Discoloration Unusual noisesIf Your Frame or Fork has a Problem,Stop Your BicycleFrame problems are not common, but as anexample, some riders could get a “shimmy” or“harmonic oscillation” or “frame wobble” atsome speeds. If you get a shimmy or any otherproblem, decrease your speed immediately anddo not ride the bicycle. Transport your bicycledirectly to a dealer for inspection and repair.WARNING: A frame or fork problemcould decrease your control and causeyou to fall. If your bicycle gets ashimmy or any other problem,decrease your speed immediately.Transport your bicycle to your dealerfor inspection and repair.Examine Your Bicycle Before Each RideThe checklist that follows shows critical areasfor you to examine. If a part of your bicycledoes not have the correct function, use theinstructions in this manual to repair yourbicycle or transport your bicycle to your dealerfor repair. Do not ride a bicycle with a part thatis damaged; replace the part.WARNING: A bicycle that does notoperate correctly can decrease yourcontrol and cause you to fall. Fullyexamine all of your bicycle beforeeach ride, and do not ride your bicycleuntil you correct any problem.Bicycles are not indestructible, and their partswill not last forever. If your use of a bicycleincreases the forces on it through hard riding,difficult conditions, or increased mileage, youshould replace your bicycle or its parts morefrequently than riders who ride less or ridesmoothly and carefully. The safe life of a partis determined by its construction, materials,use, maintenance, rider weight, speed, terrain,maintenance, and environment (humidity,salinity, temperature, etc.)—so it is not possibleto give an accurate timetable for replacement.If you are not sure if you should replace a part,speak to your dealer.A major impact is anything that causes youto fall from your bike. It is not uncommon ina major impact for the bicycle or its parts tohave damage. A minor impact, where you hit anobstacle without falling from your bike, can stillplace high stresses on your bicycle. After anyimpact, if your bicycle behaves in an unusualmanner or you hear a noise, immediately stopthe bicycle and identify the problem. Alwaysinspect the bicycle thoroughly before riding thebicycle again.In some cases, a lighter frame or parthas a longer life than heavier ones. Butbetter maintenance, more frequentinspections, and more frequent replacementare necessary for light-weight, highperformance bicycles and parts.Chapter 1: Guide to Safe On-and-Off Road Operation4
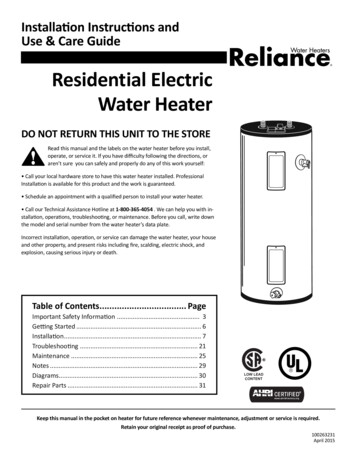
Carbon Fiber CompositeCarbon Fiber TestPound for pound, carbon fiber is stronger thatsteel or aluminum. But it behaves differentlywhen it is overloaded in an accident or impact.An overloaded metal part will bend or deformbefore it breaks, showing evidence of the load(Figure 3). An overloaded carbon fiber part willnot bend or deform, so a damaged carbon part(with reduced strength due to the damage)may look normal—even after the same loadthat bent the metal part. But when the sum ofthe forces finally exceeds the strength limit ofthe carbon fiber, the carbon fiber part breaks, itdoes not bend (Figure 3).This section tells you how to examine carbonfiber parts. A movie on the owner’s manual CD(also on our web site) shows the tap test.In an accident or impact that does not breakthe carbon fiber, the carbon fiber could haveinternal or hidden damage but appear normal.If that occurs, please carefully read theseinstructions and examine the carbon fiber.These tests are not conclusive: If you are notsure a part is safe, replace it.We offer a generous crash replacement program.If you crash your carbon bicycle or part, visit yourdealer to learn more about this program.FIGURE 3:Overloaded forks: The metal fork onthe left bent whenoverloaded The carbon fiber forkon the right failed atmuch higher load, butseparated5WARNING: A carbon fiber part thathas damage can break suddenly,causing serious injury or death.Carbon fiber can conceal damage froman impact or crash. If you suspect yourbicycle has had an impact or crash,immediately stop the bicycle. Replacethe part before riding, or take thebicycle to your dealer for service.To examine for surface problems1. Clean the part fully with a moist cloth.2. Look carefully for problems: Scratches or gouges Discoloration Cracks Loose fibers Other surface imperfectionsTo examine for a change of rigidity (flex test)Do not ride, but use the part in the usualmanner while someone carefully examinesthe part for movement or unusual noise. As anexample, sit on the saddle while someone looksfor unusual flex that would indicate a problem.To examine for delamination (tap test)1. Clean the part fully with a moist cloth.2. With a coin, tap near the possible damage.3. Listen carefully for variations in sound. Tap onthe part where it is in good condition (or usea part that is almost the same). Compare thesound. Anything unusual, especially a hollowsound, indicates a problem.Chapter 1: Guide to Safe On-and-Off Road Operation
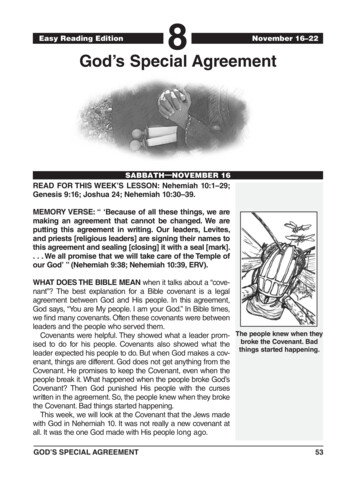
Examine the WheelsMake sure the wheels are straight. Turn the wheeland examine the rim when it goes through thebrake-pads or the frame. The rim should notwobble up and down or from side to side.Make sure the wheels are attached correctly.Lift your bicycle and hit the top of the tire(Figure 4) with a solid blow. The wheel shouldnot come off, be loose, or move from side toside. More tests are given in Chapter 3.Your bicycle may use one or more systems toattach the wheels to the frame: threaded axlenuts, a lever-actuated quick-release mechanism(Figure 5), or a thru-axle. For instructions aboutadjustment and closure of the wheel attachmentdevices on your bicycle, see Chapter 3.WARNING: A wheel attachmentdevice that is not correctly adjustedand closed can allow the wheel to beloose or come off, decrease yourcontrol, and cause you to fall. Makesure the wheels are correctly attachedbefore you ride your bicycle.FIGURE 4:Test for loose conditionExamine the tire inflation. Inflate the tires tothe air pressure recommended on the sidewallof the tire.Examine the BrakesUse the inspection instructions for the type ofbrakes on your bicycle:WARNING: A brake system that hasdamage or is not adjusted correctlycould decrease your control and causeyou to fall. Make a full inspection ofthe brakes before each ride. If yourbrakes do not operate correctly, donot ride your bicycle. Adjust thebrakes or transport your bicycle toyour dealer for repair.Hand-Rim Brake: a cable connects a hand leverto the brake. The lever causes the brake-padsto apply pressure to the rim.Pull the brake-lever to make sure the brakemoves freely and stops your bicycle. If the brakelever can be pulled to the handlebar, the brake istoo loose. When the brakes are not applied, thebrake-pads should be 1 to 2 mm from the rim. Ifthe brake-pads are too near the rim, the brake istoo tight. The brake-pads should be in alignmentwith the rim surface (Figure 6).112FIGURE 5:Wheel quick-release1. Adjustment nut2. Lever234Chapter 1: Guide to Safe On-and-Off Road OperationFIGURE 6:Brake pad alignment1. Brake-pad in alignmentwith rim surface2. Pad and rim should beparallel3. Direction that the rimturns4. 0.5-1.0 mm toe-in6
Disc Brake: a cable or hydraulic hose connectsa hand lever to the brake. The lever causes thebrake to apply pressure to a disc attached tothe wheel hub.CAUTION: A disc brake and discgets very hot during use and couldburn skin. Also, the disc edges can besharp and could cut skin. Do not touchthe disc or disc brake when the discturns or when it is hot.Pull the brake-lever to make sure the brakemoves freely and stops your bicycle. If the brakelever can be pulled to the handlebar, the brake istoo loose. When the brakes are not applied, thebrake-pads should be 0.25-0.75 mm away fromthe disc. If the pads are too near the disc, thebrake is not in alignment or it is too tight.Internal Hub Brake: a cable connects thebrake-lever to a mechanism in the hub.WARNING: An internal hub brakegets very hot during use and couldburn skin. Do not touch the hub orcooling fins when hot.Figure 7:Test for chain tensionExamine the Handlebar and StemMake sure the stem is in alignment with the frontwheel and correctly attached to the fork andhandlebar. To examine the attachment to thefork, try to turn the handlebar from side to sidewhile you hold the front wheel between yourknees (Figure 8). To examine the connectionof the handlebar, try to twist it in the stem. Thehandlebar should not move or be loose. Makesure that no cables are pulled or caught on yourbicycle when you turn the handlebar.Make sure the handlebar plugs are correctly putinto the two ends of the handlebar.Figure 8:Function test for thehandlebar and stemIf more than 5/8” (15 mm) of brake-levermovement is necessary to stop your bicycle,the brake is too loose. If less than 7 mm oflever movement stops your bicycle, the brakesare too tight.Coaster Brake: when you move the pedals tothe rear, the brake engages.The brake should engage before the crankarmsturn 60 degrees (1/6 turn). The chain operatesthe brake, so make sure the chain can not comeoff. There should be between 1/4-1/2” (6-12mm) total vertical movement of the chain(Figure 7).7Examine the Saddle and SeatpostMake sure the saddle is correctly attached. Tryto turn the saddle and seatpost in the frame,and try to move the front of the saddle up anddown. The saddle should not move or be loose.Chapter 1: Guide to Safe On-and-Off Road Operation
Examine the SuspensionAdjust your suspension for your use, andmake sure that no suspension component can“bottom-out,” or be fully compressed.Examine the Lights and ReflectorsMake sure the lights operate correctly andthat batteries are charged. If the lights use adynamo, make sure the dynamo is mountedcorrectly and all attachment hardware is tight.Make sure all reflectors are clean and in theircorrect position.Some countries, areas. or governments havespecific requirements for lights, such as colors ortypes. Check before traveling with your bicycle.WARNING: A bicycle withoutcorrect lights and reflectors might bedifficult for other people to see, andyou might not be able to see. If youcan not see, or other people can notsee you, you could have an accident.Use a front light, a rear light, andreflectors when you ride in lowvisibility conditions.Rules to Ride SafelyKnow and Obey Local Bicycle LawsMost state and local areas have special lawsfor bicycle riders, and you should obey thelaws. The necessary items such as lights andreflectors change between areas. To learnwhat is necessary, speak to the local bicycleclubs or your Department of Transportation(or the equivalent).These are some of the more important rules forwhen you ride: Use correct hand signals. Ride one at a time when you ride with otherbicycle riders. Ride on the correct side of the road; Do notride in the opposite direction of traffic. Ride defensively; be prepared for allsituations. A bicycle rider is hard to see, andmany drivers do not know the rights andspecial considerations of a bicycle rider.Look for Cars, Pedestrians,and Other ObstaclesLook for potholes, drain grates, soft or lowshoulders, and other deviations which couldcause an impact to your wheels or cause thewheels to slide. When you go across railroadtracks or drain grates, ride carefully at a 90 angle (Figure 9). If you are not sure of thesurface conditions, walk with your bicycle.FIGURE 9:Ride across tracks safelyat a 90 angle9045Chapter 1: Guide to Safe On-and-Off Road Operation8
If a car suddenly moves into your lane orsomeone opens the door of a parked car, youcould be in a bad accident. Attach a horn or bellto your bicycle. Use it to tell other people thatyou are near.Wear a Helmet and Bicycle ClothingWear a helmet that complies with CPSC or CEsafety standards (Figure 10); it can prevent injury.Remove your helmet when you are not on yourbicycle; if the helmet is caught, you could choke.Wear bicycle clothing, eye protection, andgloves. Do not wear clothing that is loose; itcould get caught in the chain or the wheels.Also wear light, bright, and reflective clothing tomake you more easy to see, especially at night.FIGURE 10:Wear a bicycle helmetwhen you rideRide Safely in Wet Weather or WindNo brakes stop as effectively in wet weather asthey do in dry weather. Even with brakes thatare correctly adjusted and serviced, more leverpressure and longer distances are necessary tostop in wet weather.Wet weather causes decreased traction. Theroad surface can become slippery and ordinaryobjects can become treacherous, such aswet leaves, painted crosswalks, or manholecovers. When wet surfaces freeze, traction isdecreased further. Strong winds can make abicycle turn without your control.9When you ride in wet weather, a wet tire cancause a malfunction of a dynamo (generatorlight). Do not ride in wet weather when visibilityis decreased.WARNING: Wet or inclementweather can make a bicycle difficult tocontrol. Decrease your speed and useextra caution, or use other types oftransportation.Make Sure Other People Can See YouYour bicycle has a full set of reflectors. Makesure the reflectors are clean and in the correctposition. As useful as these reflectors are, theydo not help your vision. They do not make youeasy to see unless light is pointed at them. Youshould see and be seen. If you ride at dusk, atnight, or in low-visibility conditions, speak toyour dealer to find equipment or materials tohelp your vision and make you more easy to see.WARNING: When you ride inlow-visibility conditions such as fog,dusk, or night, you might be difficultto see, which could lead to a collision.Use a front light and rear light whenyou ride in conditions with low light orlow visibility.Think About Safety When You RideYou can prevent many bicycle accidents if youthink about safety. Here are some examples: Do not ride ‘no hands.’ Do not ride with loose objects attached tothe handlebar or other part of your bicycle. Do not ride while intoxicated or while you usemedications which can make you drowsy. Do not ‘ride double.’ Ride carefully when off-road. Ride only onthe trails. Do not ride over rocks, branches,or depressions. When you ride near aChapter 1: Guide to Safe On-and-Off Road Operation
descent, decrease your speed, move yourweight low and to the rear, and use the rearbrake more th
by your dealer, and this manual identifies them. Keep this Manual with the Bike This manual is considered a part of the bicycle that you have purchased. If you sell the bike, please make sure this manual is transferred to the new owner as part of the sale. About the CD This