Transcription
MicrosoftOffice 2013User Guide
Microsoft Office 2013Office 2013 and Skype for BusinessOffice 2013Your new computer, laptop, or virtual desktop includes Microsoft Office 2013. To assist with the transition from Office2010 to Office 2013, documentation has been made available on the Statewide Learning Management System (SLMS).To access the material, go to https://nyslearn.ny.gov/, login to the site, and search for “Make the Switch.”What is Office 365?Microsoft Office 365 is a subscription-based office software and services suite hosted online in the cloud which offersaccess to various services and software built around the Microsoft Office platform.What is the cloud?The “cloud" can be described as a metaphor for the Internet. Applications and services hosted in the cloud are allaccessible via the Internet and the data stored is held in a remote location. As such, cloud-based applications andservices can be accessed from anywhere in the world using a multitude of devices such as desktop computers, laptops,tablets, and other mobile devices.What can Office 365 do for you?It will make your job easier. Office 365 diminishes digital overload by providing “one-stop” shopping. It brings all yourcollaboration resources into a single screen on desktop and mobile devices, so you can focus on your work, efficiently andeffectively. Office 365 is intuitive and easy to learn.Revised: June 2016Page 1 of 63
Microsoft Office 2013Office 2013 and Skype for BusinessTraditional Capabilities with New Collaborative FunctionalityOffice 365 includes the traditional Microsoft Office Suite of Word, Excel, PowerPoint, and Outlook – but now providescollaborative capabilities. For example, using Office 365, multiple people can edit the same document at once, in realtime. An Office web app lets you know if colleagues are working on the same file. In this way, you can collaborate onimportant files without overwriting another team member’s changes or losing an important change.New Features and BenefitsRecent features of Office 365 that provide immediate value:Clutter is an email filtering option that allows you to focus on priority email. It is similar to an anti-spam filter as itmoves less important email (based on your reading habits) into a 'Clutter' folder, where they can be ignored or reviewedlater. Mail going into the folder may include messages from mailing lists.Groups Collaboration is a shared workspace for email, conversations, files, and calendar events where groupmembers can conveniently collaborate and quickly get stuff done. A person joining a group can communicate using thegroup's mailbox and can share documents.Delve displays your most relevant content without having to remember where it was saved. Users can quickly finddocuments from the previous day, get quick access to the people you are most connected with in the organization, andunderstand what’s trending in the organization.Moving from Lync to Skype for Business as the name suggests, Skype for Business has the look and feel ofSkype, with tools like Instant Messaging and online meetings. It brings the simplicity of allowing business users to easilycommunicate with each other.OneNote is a note-taking app that syncs across all of your devices. OneNote can accomplish a great variety of tasks,such as bulleted lists, keeping screenshots, documenting important parts of emails, etc.Outlook Web Application (OWA) allows access to your enterprise e-mail, calendar, and contacts from any device withan Internet connection and a web browser. Instead of using Outlook on your local computer, you simply log into youremail via a web app to check your e-mail. The experience is very similar to other web e-mail services.Revised: June 2016Page 2 of 63
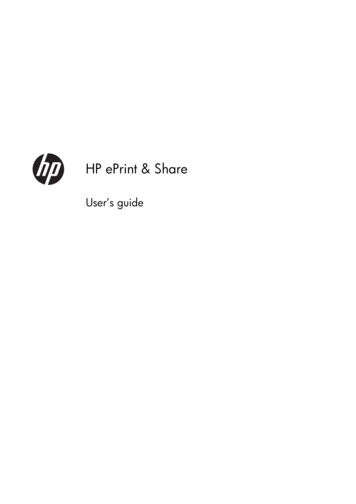
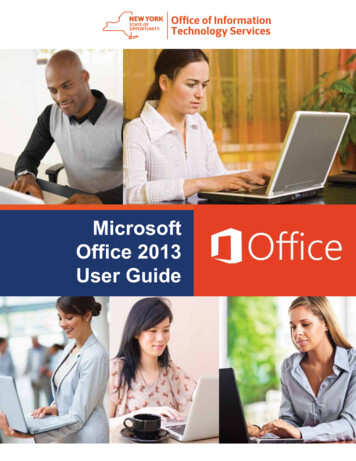
Quick Start GuideMicrosoft Access 2013 looks different from previous versions, so we createdthis guide to help you minimize the learning curve.Change the screen size or close a databaseClick the Access icon to resize or move the screen or to closethe database.Use Controls from the Quick Access ToolbarYou can quickly add or change controls on a form or report by clicking the tools icon when theform or report is open in Design or Layout view.File managementOpen, close, print, share, save asprevious versions, as a template,and encrypt or compact andrepair the database.Filter objectsType a keyword into the Searchbox to filter objects in thedatabase.Status barDisplays information about thecurrent view.Get helpClick the question mark to find helpcontent.Hide the ribbonClick the up-arrow to hide theRibbon but keep the tabs in view.Dialog box launchersIf you see this iconnext to any group ofribbon commands, youcan click it to see a boxwith more options.Open a dialog box launcherClick it to use the additionalavailable features for the group.Views buttonsClick on icons to switch betweenavailable views for the currentobject.Page 3 of 63
What can I find on theAccount tab?Where did the Back Upoption go?Click File Account in Access 2013 to manage your user information, change thebackground or theme, view and add available web services, display information aboutyour Office products, and manage your product subscriptions.It’s always a good idea to back up your important data. To do this in Access 2013,click File Save As. Then, under Save Database As Advanced, click Back UpDatabase.Page 4 of 63
Things you might be looking forUse the list below to find some of the more common tools and commands in Access 2013.To.Click.And then look in the.Open, close, create, save, print, publish, or manage your databaseFileBackstage view (click the links in the left pane).View objects, cut, copy or paste data, format text, add a totals rowor find dataHomeViews, Clipboard, Sort & Filter, Records, and Text Formatting groups.Add application parts, tables, queries, forms, reports, or macrosCreateTemplates, Tables, Queries, Forms, Reports, and Macros & Codegroups.Bring in files or send data or link to external sourcesExternalDataImport & Link and Export groups.Compact and repair a database, work with Visual Basic code, macros,relationships, and analyze or move data to SharePointDatabaseToolsTools, Macro, Relationships, Analyze, and Move Data groups.View and use the objects in the databaseNavigationPaneAll Access Objects group.Correct file problems or add a password to a databaseFileInfo, Compact & Repair, and Encrypt with Password groups.Create an Access appFileNew, Custom web app, or web templates options.Page 5 of 63
What happened to thePivot Chart feature?You can’t create pivot charts or tables in Access 2013, but you can import themfrom Excel and other applications and then add them with the Chart control.What is an Access app?Access apps are like web databases that you can use to view and share your datain the cloud. With Access apps, you’ll have secure, centralized data storage andmanagement options.With Access 2013, you can easily create and modify the design of an app. Getstarted with an app template or create your own custom web app.Long Text is the new MemoIf you are looking for the Memo data type for longer text fields, try the Long Textdata type instead.Template names that begin with the word “Desktop“ will create a client database.To create Access apps, use any template that’s marked with a globe icon.Page 6 of 63
How to work with peoplewho don’t yet have Access 2013Here are some things to keep in mind when sharing or exchanging files withpeople who are using an older version of Access.In Access 2013 What happens?What should I do?You open a database filethat was created withAccess 2007.You can use Access 2013 to open and use files that were created inAccess 2007. However, you will not be able to view or use featureslike Pivot Tables or conditional formatting.Import just the tables and then reapply formats in Access 2013.You save your databaseas an Access 2007 file.You will be able to open and use the database.Nothing.You save your databaseas an Access 2010 file.Access 2007 and 2010 use the same file format. If you publishedan Access 2010 web database and open it in Access 2013, you willonly be able to view it; you will not be able to modify it.If you published an Access 2010 database as a web database andwant to later change it to an Access app, import the data intoa custom web app.Page 7 of 63
What’s on the Info tab?From any open database, click File Info.Can I convert my Access database into an Access app?Though Access apps are also used for tracking data, you cannot convert a desktopdatabase into an Access app or vice versa. However, you can use data from a desktop database in an Access app.Click New Custom web app Create a table from an existing data source.Compact & Repair Database can prevent and fix database problems or compactfiles to save space.Files saved in Access 2007 or in a newer format are already encrypted, but you canadd an optional password to further secure your data by clicking Encrypt withPassword.Clicking View and edit database properties displays information about objectsin the database, revision tracking, and database size. You can also change thedatabase title, author, company, and hyperlink information from the Summary tabfound here.Page 8 of 63
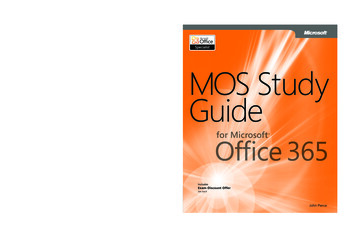
Quick Start GuideMicrosoft Excel 2013 looks different from previous versions, so we createdthis guide to help you minimize the learning curve.Add commands to the Quick Access ToolbarKeep favorite commands and buttons visible, even when you hidethe ribbon.Explore commands on the ribbonEach ribbon tab has groups, and each group has a setof related commands.Show or hide the ribbonClick Ribbon Display Options or press Ctrl F1 to hide or showthe ribbon.Manage filesOpen, save, print and share yourfiles. Also change options andaccount settings in this view.Get visual cuesWatch for action buttons thatappear in the sheet and animations that show data changes.Create sheetsStart with one sheet and addmore sheets as needed.Access other tabsMore tabs appear on the ribbonwhen you need them, like chartor PivotTable tabs.Show shortcut menusGet in the habit of right-clickingyour sheet, chart, or PivotTable data.Excel will show you commands thatare relevant for your data.Open a dialog boxClick the launcher icon to showmore options for a group.Show Key TipsIf you’d rather use the keyboard,press Alt to show keys that let youaccess commands on the ribbon.And yes — the keyboard shortcutsyou’ve used before will still work.Change viewsWork faster in the right view.Choose Normal, Page Layout,or Page Break Preview.Zoom in or outDrag the zoom slider to changethe zoom level.Page 9 of 63
How to get startedwith Excel 2013If you’ve been using Excel 2007 or 2010 and are familiar with the ribbon, you’ll wantto know what changed in Excel 2013. If you’ve been using Excel 2003, you’ll want toknow where to find the Excel 2003 commands and toolbar buttons on the ribbon.Explore the ribbonIf you’ve used the ribbon in an earlier version of Excel, you’ll notice a few changes.The Insert tab has new buttons to help you create charts and PivotTables. There’salso a new Filters group with buttons for creating slicers and timelines.We have many free resources to help you learn Excel 2013, including online training.Just click the question mark in the top-right corner above the ribbon to open Excel Help.Other tabs appear when you’re working on certain things like charts andPivotTables. Those tabs have also changed to make things easier to find.Page 10 of 63
Things you might be looking forUse the list below to find some of the more common tools and commands in Excel 2013.To.Click.And then look in the.Create, open, save, print, share, or export files, or change optionsFileBackstage view (click the commands in the left pane).Format, insert, delete, edit or find data in cells, columns, and rowsHomeNumber, Styles, Cells, and Editing groups.Create tables, charts, sparklines, reports, slicers, and hyperlinksInsertTables, Charts, Sparklines, Filters, and Links groups.Set page margins, page breaks, print areas, or sheet optionsPage LayoutPage Setup, Scale to Fit, and Sheet Options groups.Find functions, define names, or troubleshoot formulasFormulasFunction Library, Defined Names, and Formula Auditing groups.Import or connect to data, sort and filter data, validate data, flash fillvalues, or perform a what-if analysisDataGet External Data, Connections, Sort & Filter, and Data Tools groups.Check spelling, review and revise, and protect a sheet or workbookReviewProofing, Comments, and Changes groups.Change workbook views, arrange windows, freeze panes, andrecord macrosViewWorkbook Views, Window, and Macros groups.Page 11 of 63
Apply features withoutthe ribbonBetter access to chart featuresIn Excel 2013, we’ve placed some frequently used but hard to find commands andbuttons within easy reach.Excel 2013 gives you these options right next to the chart. Just click the ChartElements, Chart Styles, or Chart Filters buttons to fine-tune your chart.Creating a recommended chart is great way to get started, but you’ll still want tocustomize the style and show the exact data you need to make it your own.When you select data on your worksheet, the Quick Analysis button appears. Itgives you quick access to many useful features you may not have been aware of,and lets you preview them on your data before you make them stick.When entering data, you might notice that Excel fills values automatically as itdetects a pattern. You’ll get the Flash Fill Options button to make further decisions.Page 12 of 63
How to work with peoplewho don’t yet have Excel 2013Here are some of the things to keep in mind when sharing or exchanging fileswith people who are using an older version of Excel.In Excel 2013What happens?What should I do?You open a workbookthat was created withExcel 97-2003.Excel opens the workbook in compatibility mode and keeps it inExcel 97-2003 file format (*.xls).Keep working in compatibility mode if you’re sharing the workbookwith people who don’t have Excel 2013.When you save the workbook, Excel will tell you about compatibilityissues if you’ve used new features that aren’t supported in earlierversions of Excel.If you’re not sharing the workbook, convert it to the Excel 2007-2013file format (*.xlsx) to take advantage of all new Excel 2013 features(click File Info Convert).You save your workbookas an Excel 2013 file.Excel saves the workbook in the Excel 2007-2013 file format (*.xlsx)so you can take advantage of all new Excel 2013 features .If you plan to share this workbook with people who use an earlierversion of Excel, check the workbook for compatibility issues (clickFile Info Check for Issues).You can then see the issues and resolve them before you share theworkbook.You save your workbookas an Excel 97-2003 file.Excel automatically checks the file for compatibility issues andshows them for any new Excel 2013 feature you used.Assess any compatibility issues and resolve them before you sharethe workbook.Page 13 of 63
Find advanced featuresTo record an occasional macro, you can use the Macros button on the View tab.But if you plan to routinely create or edit macros and forms, or use XML or VBAsolutions, you’ll want to add the Developer tab to the ribbon.You can select it on the Customize tab of the Excel Options dialog box (clickFile Options Customize Ribbon).Enable add-ins that comewith ExcelExcel 2013 comes with several add-in programs that let you do some advanceddata analysis. There are common Excel add-ins, such as the Analysis ToolPak or theSolver add-in.Enabling add-ins adds them to the ribbon. Just select them in the Manage box onthe Add-ins tab of the Excel Options dialog box (click File Options Add-ins),and then click Go.The Developer tab appears on the ribbon to the right of the View tab.If you have a Professional Plus version of Office, you’ll also have some new add-ins,such as the Inquire, PowerPivot for Excel 2013, or Power View add-in. The PowerView add-in even has a designated button on the Insert tab. Clicking that buttonthe first time enables the add-in.Page 14 of 63
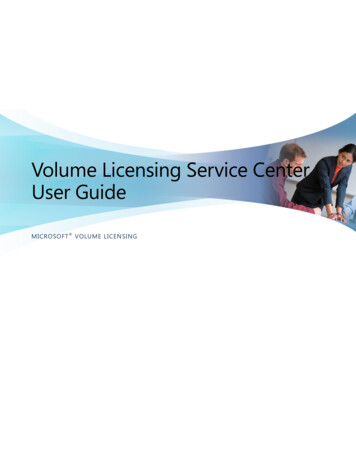
Quick Start GuideMicrosoft OneNote 2013 looks different from previous versions, so we createdthis guide to help you minimize the learning curve.Switch between touch and mouseIf you’re using OneNote on a Touch device, you can add thisswitch to the Quick Access Toolbar.Display or hide the ribbonClick any ribbon tab to display its commands. To keepit open, click the small pin icon near the lower right.View or switch between online accountsClick your account ID to change settings or switchaccounts.Manage filesOpen, create, share, and printyour notes. You can also changeyour account settings here.Find your notesUse the Search box to findanything in your notebooks, orpress Ctrl E.Show notebooksClick the notebook icon to seeall of your open notebooks.Create pagesClick Add Page to insert a newpage.Show note containersMouse over any text to show itscontainer. Grab the top bar tomove it around.View a full pageClick the double arrow for FullPage View.Tag important informationPrioritize and organize noteswith instantly searchable tags.Handwrite, draw, and sketchTake notes in your own handwriting on a Touch-capable PC.Page 15 of 63
Keep your notes in the cloudIf you’re brand-new to OneNote, you’ll be asked to connect to the cloud, whereOneNote will create your first notebook. You can use your Microsoft account (forexample, MSN, Hotmail, or Messenger) to use with OneNote. If you don’t alreadyhave an account, you can create one for free.Keeping your notebooks in the cloud means you can access them from justabout anywhere, such as any other computers you use, your phone, a tablet, oreven a Web browser.What happenedto the Share tab?If you’re upgrading to OneNote 2013 from an older version, you probably haveat least one notebook stored on your computer. You can easily move these notesonline so you can access them from anywhere. Click File Share to begin.OneDrive is the best and easiest option for your personal notes. If you’re workingin an organization that uses SharePoint to collaborate online, you can click theAdd a Place button on this screen to set up your existing SharePoint account.Any OneNote notebooks that you store online are kept private unless you giveother people permission to view the folders in which your notebooks are stored.Page 16 of 63
Things you might be looking forUse the list below to find some of the more common tools and commands in OneNote 2013.To.Click.And then look in the.Open, create, share, convert, export, send, or print notesFileBackstage view (click the commands in the left pane).Apply formatting to text, apply note tags, and email a notebook pageHomeBasic Text, Styles, Tags, and Email groups.Insert tables, pictures, links, files, audio and video clips,or apply page templatesInsertTables, Files, Images, Links, Recording, and Pages groups.Draw sketches or shapes, takes notes in your own handwriting, customize pens,rotate objects, or convert ink to textDrawTools, Shapes, and Edit groups.Mark notes and read or unread, find notes by author, view page versionsand history, or empty the Notebook Recycle BinHistoryUnread, Authors, and History groups.Check spelling, do online research, translate text, protect noteswith a password,or take linked notesReviewSpelling, Language, Section, and Notes groups.Maximize screen space, turn rule lines and page titles on or off, set pagemargins, zoom the page, or create Quick NotesViewViews, Page Setup, Zoom, and Window groups.Page 17 of 63
Save time with templatesWhere is the Save button?OneNote templates can give the pages in your notebook a consistent look byapplying colorful, decorative backgrounds. Templates can also save you timeby adding functional content to pages, such as to-do lists, calendars andplanners, and forms that you can fill out or customize.OneNote doesn’t have a Save command because it automatically saves everythingas you work — no matter how small or large the changes. This lets you think aboutyour thoughts and ideas instead of your computer files.Export notes wheneveryou need toIf you need to send a snapshot of a notes page (or a section or an entire notebook)to someone who doesn’t have OneNote, you can easily export a static snapshot ofsuch notes by clicking File Export and then selecting the format you want.You can browse through the built-incollection of templates by clickingInsert Page Templates.In the Templates task pane, click toexpand any of the categories, and thenclick each template name to view it.When you’ve found a template you like,you can begin taking notes on its page.You can customize any of the built-intemplates to suit your needs, or download more free templates by visiting theOneNote website on Office.com.If you like, you can even create your veryown template designs from any of yournotebook pages.Page 18 of 63
Capture anythingwith Screen ClippingsMeet the newSend to OneNoteAn easy way to bring stuff intoOneNote is to insert a screenclipping, which lets you captureanything on your computerscreen so you can keep it aspart of your notes.On your keyboard, hold the Windows key and then press the N key to launchthe redesigned Send to OneNote tool, which makes it easier than ever to importrandom information from other programs and files into your notes.Start by bringing into view whatever you want to capture — for example, a travelitinerary in Internet Explorer or a chart in an Excel spreadsheet.Switch to OneNote and then click Insert Screen Clipping. As soon as the screendims and OneNote disappears, drag a selection over what you want to capture.When you release the mouse button, a picture of the screen region you selected issent to OneNote, where you can move or resize the picture exactly how you want itto appear in your notes.Here, you can create a screen clipping without switching between apps, importentire web pages or documents to your notes, or create quick sticky notes thatautomatically become part of your notebook.You can click the command buttons in the Send to OneNote tool, or usethe additional keyboard shortcuts that are shown in parentheses next toevery command (for example, press S to take a screen clipping).Using the Send to OneNote tool is optional, which means you can keep itrunning while you’re in the middle of a research project and then turn it offagain when you don’t need it.Page 19 of 63
How to work with peoplewho don’t have OneNote 2013Here are some things to keep in mind when sharing or exchanging fileswith people who are using an older version of OneNote.In OneNote 2013.What happens?What should I do?You open a notebookthat was createdwith OneNote 2007.The notebook opens in OneNote 2013, but you’ll see the words[Compatibility Mode] on the title bar. This tells you that thenotebook is currently saved in the older file format, which doesn’trecognize newer features like math equations, linked notes,multi-level subpages, versioning, and the Notebook Recycle Bin.Before converting an older notebook to the newest file format,consider if you need to collaborate with people who are still usingOneNote 2007. If the answer is yes, you should continue workingin Compatibility Mode.If you want to use all of the available features that OneNote 2013offers, you’ll need to convert the notebook to the newest file format.If no one you share notes with is using OneNote 2007, it’s best toconvert the notebook to the newest format. To do this, click File Info, and then click the Settings button for the notebook you wantto convert. Click Properties, and then click Convert to 2010-2013.You open a notebookthat was createdwith OneNote 2010.The notebook opens in OneNote 2013 without any featurelimitations.No file format conversion is needed. Notebooks created in theOneNote 2010 and OneNote 2013 formats can be shared and usedtogether without any conversion.You convert yournotebook to theOneNote 2007 format.Downgrading a notebook to OneNote 2007 turns off the newerfeatures that are available in OneNote 2013 (including mathequations, linked notes, multi-level subpages, versioning, andthe Notebook Recycle Bin), but doing so makes the notebookcompatible for sharing with other people who are still usingOneNote 2007.After converting a notebook from OneNote 2013 to the olderOneNote 2007 format, be sure to inspect the pages where youmight have used newer features like math equations, linked notes,and multi-level subpages. Content that was created by newerfeatures may not be visible or editable when the notebook isdowngraded to the OneNote 2007 format.Page 20 of 63
Quick Start GuideMicrosoft Outlook 2013 looks different from previous versions, so we createdthis guide to help you minimize the learning curve.Make it yoursCustomize Outlook. Choose different color schemes and differentbackgrounds, and synchronize them with your other computers.Backstage viewClick the File tab to open theBackstage view, where you addaccount and change settings.SearchYou can search a folder, subfolders, even other mailboxes.Manage message tasks in the Message ListCategorize, Flag, or Delete messages right where they live—in theMessage List.Do more in the To-Do BarThe To-Do Bar displays the datenavigator, your appointments,people, and your task list.Reply from the reading paneReply and Forward right fromthe reading pane. Write a replyin the reading pane, too.PeekSee a quick view of your Calendar, People, and Tasks. Even seeupcoming appointments.People paneSee details about everyone inthe To, From, or Cc lines foreach message.Page 21 of 63
First things first:Add your accountBefore you can send or receive messages, you have to connect your email account.If your company uses Microsoft Exchange, Outlook 2013 will attempt to set up youremail account for you.If you use Internet-based email (such as Hotmail, Gmail, or Yahoo!), enter your name,email address, and password to set up your account.Change the Office ThemeWe’ve redesigned Office 2013 to provide a clean, uncluttered experience — likea blank piece of paper. If you want to see the different areas of Outlook moredistinctly, you can change the Office Theme.Use your File Office Account settings to change the Office 2013 color schemefor all of your computers, or use the Outlook Options to change the color schemeon just this computer. You can choose from White, Light Gray, or Dark Gray.Page 22 of 63
Things you might be looking forUse the list below to find some of the more common tools and commands in Outlook 2013.To.Click.And then look in the.Apply stationery or backgrounds to a messageFileClick File Options Mail Stationery and Fonts. On the PersonalStationery tab, click Theme.Send automatic replies when you’re out of the officeFileUnder Account Information, click Automatic Replies Sendautomatic replies, and then choose your options (this feature requiresa Microsoft Exchange Server account).Insert a picture or clip artInsertFrom a new mail message, click Illustrations, and then click one ofthe following: Pictures, Online Picture, Shapes, Smart Art, Chart,or Screenshot.Manage email messages by assigning rulesHomeIn Mail view, click Move Rules.Insert a symbol or special characterInsertFrom a new mail message, click Symbols Symbol.Add holidays to your calendarFileClick Options Calendar. Under Calendar options, click Add Holidays.Share a calendarHomeFrom the Calendar view, in the Share group, click E-mail Calendar Share Calendar (this feature requires a Microsoft Exchange Serveraccount), or Publish Online.Page 23 of 63
Mail isn’t the half of itCommunication is important, but your time is important, too. Outlook 2013 hasupdated how you manage your time, your people, and your tasks.Schedule a Lync MeetingMeet face-to-face or save yourself a trip by meeting onlinewith Lync 2013.View other people’s calendarsQuickly see the best times toschedule a meeting with others.Plan for the weatherGlance at the forecast for your city and up to four others. When youplan an out-of-town meeting, you’ll know what to pack.PeekMouse over a meeting or anappointment to see its details.Page 24 of 63
Create an email signatureTo create a new email signature, do the following:1. Click File Options Mail. Under Compose messages, click Signatures.2. In the E-mail Signature tab, click New, and then type a name for the signature.3. In the Edit signature box, type the text that you want to include in the signature,then use the built-in tools to format it.Automatically add a signatureto messagesTo automatically add a signature to new email messages, do the following:1. F rom any view, click File Options Mail. Under Compose messages,click Signatures.2. Under Choose default signature, choose the signature to add to NewMessages. If you want, choose a different signature for Replies/forwards.3. To manually add a signature to a new message, from a new message, on theMessage tab, in the Include group, click Signature, and then click the signaturethat you want.If you’ve already created a signature, you can copy it from one of your sentmessages and then paste it here.Page 25 of 63
Quick Start GuideMicrosoft PowerPoint 2013 looks different from previous versions, so we createdthis guide to help you minimize the learning curve.Find what you needClick any tab on the ribbon to display its buttonsand commands.Manage your presentationsClick the File tab to open,save, print, and manageyour presentations.Show the content you wantSwitch views or show or hidenotes and comments.Use contextual tabsSome ribbon tabs appear only when you need them. For example, when you insert or select a picture,the Picture Tools Format tab appears.See more optionsClick this arrow to see more options in adialog box.Get helpClick here or press F1.Need more space?Click here or press CTRL F1 tohide or show the ribbon.Use the Format paneUse this handy pane to applyformatting
Microsoft Office 2013. Traditional Capabilities with New Collaborative Functionality . Office 365 includes the tradit. ional Microsoft Office Suite of Word, Excel, PowerPoint, and Outlook – but now provides collaborative capabilities. For example, using Office 365, multiple people can edit the same document at once, in real-time.