Transcription
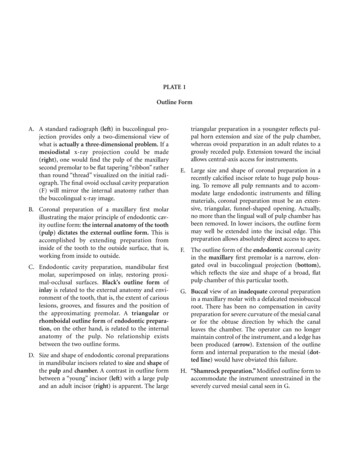
PLATE 1Outline FormA. A standard radiograph (left) in buccolingual projection provides only a two-dimensional view ofwhat is actually a three-dimensional problem. If amesiodistal x-ray projection could be made(right), one would find the pulp of the maxillarysecond premolar to be flat tapering “ribbon” ratherthan round “thread” visualized on the initial radiograph. The final ovoid occlusal cavity preparation(F) will mirror the internal anatomy rather thanthe buccolingual x-ray image.B. Coronal preparation of a maxillary first molarillustrating the major principle of endodontic cavity outline form: the internal anatomy of the tooth(pulp) dictates the external outline form. This isaccomplished by extending preparation frominside of the tooth to the outside surface, that is,working from inside to outside.C. Endodontic cavity preparation, mandibular firstmolar, superimposed on inlay, restoring proximal-occlusal surfaces. Black’s outline form ofinlay is related to the external anatomy and environment of the tooth, that is, the extent of cariouslesions, grooves, and fissures and the position ofthe approximating premolar. A triangular orrhomboidal outline form of endodontic preparation, on the other hand, is related to the internalanatomy of the pulp. No relationship existsbetween the two outline forms.D. Size and shape of endodontic coronal preparationsin mandibular incisors related to size and shape ofthe pulp and chamber. A contrast in outline formbetween a “young” incisor (left) with a large pulpand an adult incisor (right) is apparent. The largetriangular preparation in a youngster reflects pulpal horn extension and size of the pulp chamber,whereas ovoid preparation in an adult relates to agrossly receded pulp. Extension toward the incisalallows central-axis access for instruments.E. Large size and shape of coronal preparation in arecently calcified incisor relate to huge pulp housing. To remove all pulp remnants and to accommodate large endodontic instruments and fillingmaterials, coronal preparation must be an extensive, triangular, funnel-shaped opening. Actually,no more than the lingual wall of pulp chamber hasbeen removed. In lower incisors, the outline formmay well be extended into the incisal edge. Thispreparation allows absolutely direct access to apex.F. The outline form of the endodontic coronal cavityin the maxillary first premolar is a narrow, elongated oval in buccolingual projection (bottom),which reflects the size and shape of a broad, flatpulp chamber of this particular tooth.G. Buccal view of an inadequate coronal preparationin a maxillary molar with a defalcated mesiobuccalroot. There has been no compensation in cavitypreparation for severe curvature of the mesial canalor for the obtuse direction by which the canalleaves the chamber. The operator can no longermaintain control of the instrument, and a ledge hasbeen produced (arrow). Extension of the outlineform and internal preparation to the mesial (dotted line) would have obviated this failure.H. “Shamrock preparation.” Modified outline form toaccommodate the instrument unrestrained in theseverely curved mesial canal seen in G.
PLATE 1
PLATE 2Convenience FormA. Obstructed access to mesial canals in a mandibularfirst molar. The overhanging roof of the pulp chamber misdirects the instrument mesially, with resulting ledge formation in the canal. It is virtuallyimpossible to see and difficult to locate mesial canalorifices each time the instrument is introduced.B. Internal cavity preparation. Removing the roofcompletely from the pulp chamber will bring canalorifices into view and allow immediate access toeach orifice. Using a round bur and working fromthe inside out will accomplish this end.C. Final finish of the convenience form is completedwith a fissure bur, diamond point, or non–end-cutting batt bur. The entire cavity slopes toward themesial direction of approach, which greatly simplifies instrument placement.D. Unobstructed access to canal orifices. The mesialwall has been sloped to mesial for the approach tothe mandibular molar is from the mesial. The tip ofthe instrument follows down the mesial wall ateach corner of the triangular preparation and literally “falls” into orifices. After the position of eachorifice has been determined, the mouth mirrormay be laid aside.The distal wall of preparation also slopes to themesial and is easily entered from the mesialapproach.E. Direct access to apical foramen. Extensive removalof coronal tooth structure is necessary to allowcomplete freedom of endodontic instruments inthe coronal cavity and direct access to the apicalcanal. This is especially true when the root is severely curved or leaves the chamber at an obtuse angle.Walls are generally reduced with burs or long, thindiamond points (see B and C above) and withendodontic files, Gates-Glidden drills, or orificeopeners. Burs are rarely used in the floor or immediate orifice area. In the event that a second canal issuspected in the mesiobuccal root of the maxillarymolar, the cavity outline would be extended in bothof these directions to broaden the search.Depending on the technique used to fill the canal,the outline form may also be expanded somewhatto accommodate pluggers used in obturation.F. The complete authority of the enlarging instrument is maintained when all intervening toothstructure is removed and the instrument is controlled by the clinician’s fingers on the handle ofthe instrument and the tip of the instrument is freein the lumen of the canal.G. Complete authority of enlarging instrument. Ifthe lateral wall of the cavity has not been sufficiently extended and the pulpal horn portion ofthe orifice still remains in the wall, the orifice willhave the appearance of a tiny “mouse hole.” Thislateral wall will then impinge on enlarging theinstrument and will dictate the direction of theinstrument tip. The operator will have lost controlof the instrument and the situation.H. By extending the lateral wall of the cavity, thusremoving all intervening dentin from the orifice,the “mouse hole” in the wall will be eliminated andthe orifice will appear completely in the floor. Nowthe enlarging instrument will stand free of thewalls, and the operator will regain control of theinstrument (see F above).
PLATE 2
PLATE 3Endodontic Preparation of Maxillary Anterior TeethA. Entrance is always gained through the lingual surface of all anterior teeth. Initial penetration ismade in the exact center of the lingual surface atthe position marked “X.” A common error is tobegin the cavity too far gingivally.B. Initial entrance is prepared with a round-pointtapering fissure bur in an accelerated-speed contra-angle handpiece with air coolant, operated at aright angle to the long axis of the tooth. Onlyenamel is penetrated at this time. Do not force thebur; allow it to cut its own way.C. Convenience extension toward the incisal continues the initial penetrating cavity preparation.Maintain the point of the bur in the central cavityand rotate the handpiece toward the incisal so thatthe bur parallels the long axis of the tooth. Enameland dentin are beveled toward the incisal.Entrance into the pulp chamber should not bemade with an accelerated-speed instrument. Lackof tactile sensation with these instruments precludes their use inside the tooth.D. The preliminary cavity outline is funneled andfanned incisally with a fissure bur. Enamel has ashort bevel toward the incisal, and a “nest” is prepared in the dentin to receive the round bur to beused for penetration.E. A surgical-length No. 2 or 4 round bur in aslow-speed contra-angle handpiece is used to penetrate the pulp chamber. If the pulp has greatlyreceded, a No. 2 round bur is used for initial penetration. Take advantage of convenience extensiontoward the incisal to allow for the shaft of the penetrating bur, operated nearly parallel to the longaxis of the tooth.F. Working from inside the chamber to outside, around bur is used to remove the lingual and labialwalls of the pulp chamber. The resulting cavity issmooth, continuous, and flowing from cavity margin to canal orifice.G. After the outline form is completed, the surgicallength bur is carefully passed into the canal.Working from inside to outside, the lingual “shoulder” is removed to give continuous, smooth-flowingpreparation. Often a long, tapering diamond pointwill better remove the lingual “shoulder.”H. Occasionally, a No. 1 or 2 round bur must be usedlaterally and incisally to eliminate pulpal horndebris and bacteria. This also prevents future discoloration.I.Final preparation relates to the internal anatomyof the chamber and canal. In a “young” tooth witha large pulp, the outline form reflects a large triangular internal anatomy—an extensive cavity thatallows thorough cleansing of the chamber as wellas passage of large instruments and filling materials needed to prepare and fill a large canal. Cavityextension toward the incisal allows greater access tothe midline of the canal.J.Cavity preparations in “adult” teeth, with thechamber obturated with secondary dentin, areovoid in shape. Preparation funnels down to theorifice of the canal. The further the pulp has receded, the more difficult it is to reach to this depthwith a round bur. Therefore, when the radiographreveals advanced pulpal recession, convenienceextension must be advanced further incisally toallow the bur shaft and instruments to operate inthe central axis.K. Final preparation with the reamer in place. Theinstrument shaft clears the incisal cavity marginand reduced lingual “shoulder,” allowing an unrestrained approach to the apical third of the canal.The instrument remains under the complete control of the clinician. An optimal, round, taperedcavity may be prepared in the apical third, tailoredto the requirements of round, tapered filling materials to follow. The remaining ovoid part of thecanal is cleaned and shaped by circumferential filing or Gates-Glidden drills.
PLATE 3
PLATE 4Maxillary Central IncisorPulp Anatomy and Coronal PreparationA. Lingual view of a recently calcified incisor with alarge pulp. A radiograph will reveal1. extent of the pulp horns2. mesiodistal width of the pulp3. apical-distal curvature (8% of the time)4. 2-degree mesial-axial inclination of the toothThese factors seen in the radiograph are borne inmind when preparation is begun.B. Distal view of the same tooth demonstratingdetails not apparent in the radiograph:1. presence of a lingual “shoulder” at the pointwhere the chamber and canal join2. broad labiolingual extent of the pulp3. 29-degree lingual-axial angulation of the toothThe operator must recognize thata. the lingual “shoulder” must be removed with atapered diamond point to allow better accessto the canal.b. these “unseen” factors affect the size, shape,and inclination of final preparation.C. Cross-sections at three levels: 1, cervical; 2, midroot; and 3, apical third:1. Cervical level: the pulp is enormous in a youngtooth, wider in the mesiodistal dimension.Débridement in this area is accomplished byextensive perimeter filing.2. Midroot level: the canal continues ovoid andrequires perimeter filing and multiple pointfilling.3. Apical third level: the canal, generally round inshape, is enlarged by reshaping the cavity intoa round tapered preparation. Preparation terminates at the cementodentinal junction, 0.5to 1.0 mm from the radiographic apex. Anunusually large apical third canal is more ovoidin shape, must be prepared with perimeter filing rather than reaming, and must be obturated with multiple points or warm gutta-percha.D. Large, triangular, funnel-shaped coronal preparation is necessary to adequately débride the chamber of all pulp remnants. (The pulp is “ghosted” inthe background.) Note the beveled extensiontoward the incisal that will carry the preparationlabially and thus nearer the central axis. Incisalextension allows better access for large instrumentsand filling materials used in the apical third canal.E. Lingual view of an adult incisor with extensive secondary dentin formation.A radiograph will reveal1. full pulpal recession2. apparently straight canal3. 2-degree mesial-axial inclination of the toothF. Distal view of the same tooth demonstratingdetails not apparent in the radiograph:1. narrow labiolingual width of pulp2. reduced size of the lingual shoulder3. apical-labial curvature (9% of the time)4. 29-degree lingual-axial angulation of the toothThe operator must recognize thata. a small canal orifice is difficult to find.b. apical-labial curvature, not usually seen radiographically, can be determined by exploration with a fine curved file and mesially oriented radiographs.c. axial inclination of the root calls for carefulorientation and alignment of the bur to prevent “gouging.”G. Cross-sections at three levels: 1, cervical; 2, midroot; and 3, apical third:1. Cervical level: the canal, only slightly ovoid,becomes progressively more round.2. Midroot level: the canal varies from slightlyovoid to round.3. Apical third level: the canal is generally roundin the older patient.H. Ovoid, funnel-shaped coronal preparation provides adequate access to the root canal. The pulpchamber, obturated by secondary dentin, need notbe extended for coronal débridement. “Adult” cavity preparation is narrow in the mesiodistal widthbut is almost as extensive in the incisogingivaldirection as preparation in a young tooth. Thisbeveled incisal extension carries preparation nearer the central axis, allowing better access to thecurved apical third.
PLATE 4Maxillary Central IncisorsLength of toothAverage LengthMaximum LengthMinimum LengthRangeCanal23.3 mm25.6 mm21.0 mm4.6 mmOne canal100%Lateral canalsApical ramifications23%13%Root curvatureStraightDistal CurveMesial Curve*Labial Curve*Lingual Curve75%8%4%9%4%*Not apparent in radiograph
PLATE 5Maxillary Lateral IncisorPulp Anatomy and Coronal PreparationA. Lingual view of a recently calcified incisor with alarge pulp. A radiograph will reveal1. extent of the pulp horns2. mesiodistal width of the pulp3. apical-distal curvature (53% of the time)4. 16-degree mesial-axial inclination of the toothFactors seen in the radiograph are borne in mindwhen preparation is begun.B. Distal view of the same tooth demonstratingdetails not apparent in the radiograph:1. presence of a lingual “shoulder” at the pointwhere the chamber and canal join2. broad labiolingual extent of the pulp3. 29-degree lingual-axial angulation of toothThe operator must recognize thata. the lingual “shoulder” must be removed with atapered diamond point to allow better accessto the canal.b. these “unseen” factors will affect the size,shape, and inclination of final preparation.C. Cross-sections at three levels: 1, cervical; 2, midroot; and 3, apical third:1. Cervical level: the pulp is large in a youngtooth and wider in the labiolingual dimension.Débridement in this area is accomplished byextensive perimeter filing.2. Midroot level: the canal continues ovoid andrequires additional filing to straighten the gradual curve. Multiple point filling is necessary.3. Apical third level: the canal, generally roundand gradually curved, is enlarged by filing to astraightened trajectory. Preparation is completed by shaping the cavity into a round,tapered preparation. Preparation terminates atthe cementodentinal junction, 0.5 to 1.0 mmfrom the radiographic apex.D. Large, triangular, funnel-shaped coronal preparation is necessary to adequately débride the chamberof all pulpal remnants. (The pulp is “ghosted” in thebackground.) Note the beveled extension toward theincisal, which will carry the preparation labially andthus nearer the central axis. Incisal extension allowsbetter access to the apical third of the canal.E. Lingual view of an adult incisor with extensive secondary dentin formation.A radiograph will reveal1. full pulp recession2. severe apical curve to the distal3. 16-degree mesial-axial inclination of the toothF. Distal view of the same tooth demonstratingdetails not apparent in the radiograph1. narrow labiolingual width of the pulp2. reduced size of the lingual shoulder3. apical-lingual curvature (4% of the time)4. 29-degree lingual-axial angulation of the toothThe operator must recognize thata. a small canal orifice is difficult to find.b. apical-lingual curvature, not usually seen radiographically, can be determined by exploration with a fine curved file and mesially oriented radiographs.c. axial inclination of the root calls for carefulorientation and alignment of the bur to prevent labial “gouging.” A “corkscrew” curve, tothe distal and lingual, complicates preparationof the apical third of the canal.G. Cross-sections at three levels: 1, cervical; 2, midroot; and 3, apical third:1. Cervical level: the canal is only slightly ovoidand becomes progressively rounder.2. Midroot level: the canal varies from slightlyovoid to round.3. Apical third level: the canal is generally roundin the older patient.A curved canal is enlarged by alternate reamingand filing. Ovoid preparation will require multiplepoint filling.H. Ovoid, funnel-shaped coronal preparation shouldbe only slightly skewed toward the mesial to present better access to the apical-distal. It is not necessary to extend preparation for coronal débridement, but an extensive bevel is necessary towardthe incisal to carry preparation nearer the centralaxis, allowing better access to the apical third.
PLATE 5Maxillary Lateral IncisorsLength of toothAverage LengthMaximum LengthMinimum LengthRangeCanal22.8 mm25.1 mm20.5 mm4.6 mmOne canal99.9%Lateral canalsApical ramifications10%12%Root curvatureStraight30%Distal Curve53%Mesial Curve3%*Labial Curve4%*Bayonet and6%Gradual Curve*Not apparent in radiograph
PLATE 6Maxillary CaninePulp Anatomy and Coronal PreparationA. Lingual view of a recently calcified canine with alarge pulp. A radiograph will reveal1. coronal extent of the pulp2. narrow mesiodistal width of the pulp3. apical-distal curvature (32% of the time)4. 6-degree distal-axial inclination of the toothThese factors, seen in the radiograph, are borne inmind when preparation is begun, particularly thesevere apical curve.B. Distal view of the same tooth demonstratingdetails not apparent in the radiograph:1. huge ovoid pulp, larger labiolingually than theradiograph would indicate2. presence of a labial “shoulder” just below thecervical3. narrow canal in the apical third of the root4. 21-degree lingual-axial angulation of the toothThese “unseen” factors will affect the size, shape,and inclination of the final preparation.C. Cross-section is at three levels: 1, cervical; 2, midroot; and 3, apical third:1. Cervical level: the pulp is enormous in a youngtooth, much wider in the labiolingual direction. Débridement in this area is accomplishedwith a long, tapered diamond point and extensive perimeter filing.2. Midroot level: the canal continues ovoid inshape and requires perimeter filing and multiple point filling.3. Apical third level: the straight canal (39% oftime), generally round in shape, is prepared byshaping the cavity into round tapered preparation. Preparation should terminate at the cementodentinal junction, 0.5 to 1.0 mm from theradiographic apex. If unusually large or curved,the apical canal requires perimeter filing andmultiple point or warm gutta-percha filling.D. Extensive, ovoid, funnel-shaped coronal preparation is necessary to adequately débride the chamber of all pulpal remnants. (The pulp is “ghosted”in the background.) Note the long, beveled extension toward the incisal, which will carry the preparation labially and thus nearer the central axis.Incisal extension allows better access for largeinstruments and filling materials used in the apicalthird of the canal.E. Lingual view of an adult canine with extensive secondary dentin formation. A radiograph will reveal1. full pulp recession2. straight canal (39% of the time)3. 6-degree distal-axial inclination of toothF. Distal view of the same tooth demonstratingdetails not apparent in the radiograph:1. narrow labiolingual width of the pulp2. apical labial curvature (13% of the time)3. 21-degree lingual-axial angulation of the toothThe operator should recognize thata. a small canal orifice is difficult to find.b. apical labial curvature, not seen radiographically, can be determined only by explorationwith a fine curved file and mesially orientedradiographs.c. distal-lingual axial inclination of the root callsfor careful orientation and alignment of thebur to prevent “gouging.”d. apical foramen toward the labial is a problem.G. Cross-sections at three levels: 1, cervical; 2, midroot; and 3, apical third:1. Cervical level: the canal is slightly ovoid.2. Midroot level: the canal is smaller but remainsovoid.3. Apical third level: the canal becomes progressively rounder.H. Extensive, ovoid, funnel-shaped preparation mustbe nearly as large as for a young tooth. A beveledincisal extension carries preparation nearer thecentral axis, allowing better access to the curvedapical third. Discovery by exploration of an apicallabial curve calls for even greater incisal extension.
PLATE 6Maxillary CaninesLength of toothAverage LengthMaximum LengthMinimum LengthRangeCanal26.0 mm28.9 mm23.1 mm5.8 mmOne canal100%Lateral canalsApical ramifications24%8%Root curvatureStraight39%Distal Curve32%Mesial Curve0%*Labial Curve13%*Lingual Curve7%Bayonet and7%Gradual Curve*Not apparent in radiograph
PLATE 7Maxillary Anterior TeethERRORS in Cavity PreparationA. PERFORATION at the labiocervical caused by failure to complete convenience extension toward theincisal, prior to the entrance of the shaft of the bur.E. DISCOLORATION of the crown caused by failureto remove pulp debris. The access cavity is too farto the gingival with no incisal extension.B. GOUGING of the labial wall caused by failure torecognize the 29-degree lingual-axial angulation ofthe tooth.F. LEDGE formation at the apical-distal curve causedby using an uncurved instrument too large for thecanal. The cavity is adequate.C. GOUGING of the distal wall caused by failure torecognize the 16-degree mesial-axial inclination ofthe tooth.G. PERFORATION at the apical-distal curve causedby using too large an instrument through an inadequate preparation placed too far gingivally.D. PEAR-SHAPED PREPARATION of the apical canalcaused by failure to complete convenience extensions. The shaft of the instrument rides on the cavity margin and lingual “shoulder.” Inadequatedébridement and obturation ensure failure.H. LEDGE formation at the apical-labial curve causedby failure to complete the convenience extension.The shaft of the instrument rides on the cavitymargin and “shoulder.”
PLATE 7
PLATE 8Endodontic Preparation of MandibularAnterior TeethA. Entrance is always gained through the lingual surface of all anterior teeth. Initial penetration is madein the exact center of the lingual surface at the position marked “X.” A common error is to begin toofar gingivally.B. The initial entrance cavity is prepared with a 701 Utapering fissure bur in an accelerated-speed contra-angle handpiece with air coolant, operated at aright angle to the long axis of the tooth. Onlyenamel is penetrated at this time. Do not force thebur; allow it to cut its own way.C. Convenience extension toward the incisal continuesinitial penetrating cavity. Maintain the point of thebur in the central cavity and rotate the handpiecetoward the incisal so that the bur parallels the longaxis of the tooth. Enamel and dentin are beveledtoward the incisal. Entrance into the pulp chambershould not be made with an accelerated-speedinstrument. Lack of tactile sensation with theseinstruments precludes their use inside the tooth.D. The preliminary cavity outline is funneled andfanned incisally with a fissure bur. The enamel hasa short bevel toward the incisal, and a “nest” is prepared in the dentin to receive the round bur to beused for penetration.E. A surgical-length No. 2 round bur in a slow-speedcontra-angle handpiece is used to penetrate into thepulp chamber. If the pulp has greatly receded, theNo. 2 round bur is used for initial penetration. Takeadvantage of convenience extension toward theincisal to allow for the shaft of the penetrating bur,operated nearly parallel to the long axis of the tooth.F. Working from inside the chamber to the outside, around bur is used to remove the lingual and labialwalls of the pulp chamber. The resulting cavity issmooth, continuous, and flowing from cavity margin to canal orifice.G. After the outline form is completed, a surgical-lengthbur is carefully passed down into the canal. Workingfrom inside to outside, the lingual “shoulder” isremoved with a long, fine, tapered diamond point togive a continuous, smooth-flowing preparation.H. Occasionally, a No. 1 round bur must be used laterally and incisally in the cavity to eliminate pulpalhorn debris and bacteria. This also prevents futurediscoloration.I.Final preparation related to the internal anatomyof the chamber and canal. In a “young” tooth witha large pulp, the outline form reflects triangularinternal anatomy—an extensive cavity that allowsthorough cleansing of the chamber as well as passage of large instruments and filling materialsneeded to prepare and fill the large canal. Noteextension toward the incisal to allow better accessto the central axis.J.Cavity preparations in an “adult” tooth with thechamber obliterated with secondary dentin areovoid. Preparation funnels down to the orifice ofthe canal. The further the pulp has receded, themore difficult it is to reach to this depth with around bur. Therefore, when a radiograph revealsadvanced pulpal recession, convenience extension must be advanced further incisally to allowthe bur shaft to operate in the central axis. Theincisal edge may even be invaded and laterrestored by composites.K. Final preparation showing the reamer in place.The instrument shaft clears the incisal cavitymargin and reduced lingual shoulder, allowing anunrestrained approach to the apical third of thecanal. The instruments remain under the complete control of the clinician. Great care must betaken to explore for additional canals, particularly to the lingual of the pulp chamber. An optimalround, tapered cavity may be prepared in the apical third, tailored to requirements of round,tapered filling materials to follow. The remainingovoid part of the canal is cleaned and shaped byextensive filing.
PLATE 8
PLATE 9Mandibular Central and Lateral IncisorsPulp Anatomy and Coronal PreparationA. Lingual view of a recently calcified incisor with alarge pulp. A radiograph will reveal1. extent of the pulp horns2. mesiodistal width of the pulp3. slight apical-distal curvature of the canal (23%of the time)4. mesial-axial inclination of the tooth (centralincisor 2 degrees, lateral incisor 17 degrees).These factors, seen in the radiograph, are borne inmind when preparation is begun.B. Distal view of the same tooth demonstratingdetails not apparent in the radiograph:1. presence of a lingual “shoulder” at the pointwhere the chamber and canal join2. broad labiolingual extent of the pulp3. 20-degree lingual-axial angulation of the toothThe operator must recognize thata. the lingual “shoulder” must be removed with afine, tapered diamond point to allow betteraccess to the canal.b. these “unseen” factors affect the size, shape,and inclination of the final preparation.C. Cross-sections at three levels: 1, cervical; 2, midroot; 3, apical third:1. Cervical level: the pulp is enormous in a youngtooth, wider in the labiolingual dimension.Débridement in this area is accomplished byextensive perimeter filing.2. Midroot level: the canal continues ovoid andrequires perimeter filing and multiple pointfilling.3. Apical third level: the canal, generally round inshape, is enlarged by shaping the cavity into around, tapered preparation. Preparation terminates at the cementodentinal junction, 0.5to 1.0 mm from the radiographic apex.D. Large, triangular, funnel-shaped coronal preparation is necessary to adequately débride the chamberof all pulp remnants. (The pulp is “ghosted” in thebackground.) Note the beveled extension toward theincisal, which will carry the preparation labially andthus nearer the central axis. Incisal extension allowsbetter access for instruments and filling materialsused in the apical third of the canal.E. Lingual view of an adult incisor with extensive secondary dentin formation.A radiograph will reveal:1. full pulp recession2. an apparently straight canal3. mesial-axial inclination of the tooth (centralincisor 2 degrees, lateral incisor 17 degrees).F. Distal view of the same tooth demonstratingdetails not apparent in the radiograph:1. labiolingual width of the pulp2. reduced size of the lingual shoulder3. unsuspected presence of bifurcation of pulpinto the labial and lingual canals nearly 30%of the time4. 20-degree lingual-axial angulation of the toothThe operator must recognize thata. smaller canal orifices are more difficult to find.b. labial and lingual canals are discovered byexploration with a fine curved file to both labial and lingual.c. axial inclination of the root calls for carefulorientation and alignment of the bur to prevent “gouging.”G. Cross-sections at three levels: 1, cervical; 2, midroot; and 3, apical third:1. Cervical level: the canal is only slightly ovoid.2. Midroot level: the two canals are essentiallyround.3. Apical third level: the canals are round andcurve toward the labial.It is important that all mandibular anterior teethbe explored to both labial and lingual for the possibility of two canals.H. Ovoid, funnel-shaped coronal preparation providesadequate access to the root canal. An “adult” cavity isnarrow in the mesiodistal width but is as extensive inthe incisogingival direction as preparation in ayoung tooth. This beveled incisal extension carriespreparation nearer to the central axis. The incisaledge may even be i
B. Coronal preparation of a maxillary first molar illustrating the major principle of endodontic cav-ity outline form: the internal anatomy of the tooth (pulp) dictates the external outline form.This is accomplished by extending preparation from inside of the tooth to the