Transcription
Preparing for CertificationUsing GNS3This is the chapter where you get to do the work. No matter what level ofcertification you are going for, these are the tips and exercises that will beuseful for you.The following topics will be covered in this chapter: Exercises to prepare you for CCENT/CCNA: Two-router tango Simple switching VLAN variety OSPF operation EIGRP excitementExercises to boost/assist/advance you to CCNP-level certifications: EIGRP Multi-area OSPF eBGPStriving for the "Holy Grail"—how to use GNS3 to prepare for the CCIER&S lab Sample CCIE practice lab design using simulated switches Sample CCIE practice lab design using your own switches
Preparing for Certification Using GNS3These exercises are aimed at specific objectives with the Cisco certification exams inmind, but could easily be adapted for Junos or Vyatta. Even if you are not studyingfor certifications, reading this chapter will give you tips on how to set up a labenvironment for any simulation.This chapter has been written to cater to a variety of router technology skill levels,but the more advanced exercises require more advanced GNS3 familiarity as well. Soeven if you are using GNS3 to study for advanced certifications, you may still find ituseful to at least set up some of the earlier topologies to gain familiarity.By the end of this chapter, you will have a complex simulation environment, ready totackle some extremely diverse simulations.Getting ready for CCENT/CCNAHere are some practical exercises to test your mettle and to see if you meet theexacting standards set for the Cisco ICND1 and ICND2 exams. The first exercise is toensure you are comfortable with the GNS3 environment and can do the most basic ofall exercises—get two routers routing!Two router tangoBuild a topology with two Cisco routers, each with an attached Virtual PC. Ideally,you should be able to design your own IP addressing scheme as well, but use thefollowing diagram if you can't manage your own design.Principle objectiveThe two virtual PCs should be able to ping each other.TopologyUse the partial IP addressing scheme shown as follows (you fill in the gaps), orbetter still, design your own IP addressing scheme. Some information, such as thedefault gateway IP of the Virtual PCs, has been deliberately omitted because that willdepend on how you choose to complete the design.[2]
Chapter 8ValidationFrom the VPCS, the following commands must produce exactly the same output(apart from response times, which are semi-random, and the IP addresses assignedto f0/1 of each router):VPCS[1] ping 192.168.0.1 -c 2192.168.0.1 icmp seq 1 ttl 255 time 30.992 ms192.168.0.1 icmp seq 2 ttl 255 time 15.475 msVPCS[1] ping 192.168.0.7 -c 2*192.168.1.1 icmp seq 1 ttl 255 time 47.242 ms(ICMP type:3, code:1, Destination host unreachable)*192.168.1.1 icmp seq 2 ttl 255 time 15.393 ms(ICMP type:3, code:1, Destination host unreachable)VPCS[1] ping 192.168.2.7 -c 2192.168.2.7 icmp seq 1 timeout192.168.2.7 icmp seq 2 timeoutVPCS[1] 2VPCS[2] trace 192.168.1.10trace to 192.168.1.10, 8 hops max, press Ctrl C to stop1192.168.2.114.774 ms15.654 ms30.584 ms2192.168.0.162.937 ms30.513 ms31.996 ms3*192.168.1.1077.572 ms(ICMP type:3, code:3, Destination port unreachable)[3]
Preparing for Certification Using GNS3HintsThe exercise does not specify any routing criteria. You will need to use eitherstatic routes or OSPF routing to make the exercise work. Make sure you can performboth methods.VariationsYou might like to try the following variations: You must work with the IP address allocation of 192.168.15.64/26and ensure that there are sufficient IP addresses to cater to 20 hosts onthe VPC1 subnet. Assign all IP addresses from the range fc00:0000:0000:abc0::/62.Use OSPFv3 to ensure connectivity.Simple switchingIt is possible to use the NM-16ESW module in several routers to provide somefundamental switching functions. GNS3 has the following two features that help youuse the NM-16ESW module to create a Cisco layer 2 switch: A device called the EtherSwitch router in the Switches devices toolbar A default baseconfig sw.txt obj type reqd, mate suitable for theEtherSwitch routerWhen you add the EtherSwitch router device to your topology, GNS3 looks tosee if you have a Cisco c3700 platform image configured in the IOS images andhypervisors option under the Edit menu. If so, it puts a 3700 router loaded with aNM-16ESW (a layer 2 switch module) right into your topology.GNS3 also looks to see if the file baseconfig sw.txt exists, and if so, uses it as thestartup configuration file rather than the file you may have assigned as the Baseconfig file for this image.For this exercise, you will need to have a 37xx image available. I used a c3725adventerprisek9-mz.124-15.T10.bin image.[4]
Chapter 8Principle objectivesTo attain familiarity with basic switching concepts and, specifically, the operationof the following Cisco switches (from the 100-101 ICND1 Exam Topics available d1b.html# Topics). Broadcast Domains CAM TableTopologyBuild the topology, shown as follows, using EtherSwitch routers and VPCs. The IPaddress will be assigned during the course of the exercise. Pay particular attention tothe interfaces that are used.ActivitiesTo achieve your objectives, you will need to be able to do the following:1. Configure the IP addresses for the switches (SW1 10.1.2.101/24 andSW2 10.1.2.102/24). Remember that, for switches, you assign the switch IPaddress to a VLAN interface (for this exercise, use VLAN 1).2. Make sure the switches can ping each other.3. Use the show mac-address-table dynamic command on each switch and verifythat each switch has at least one dynamic MAC address in its CAM (ContentAddressable Memory). If not, repeat the ping and try again.[5]
Preparing for Certification Using GNS34. Compare the output with the show arp command. You should see the sameMAC address in both tables (make sure you know why you should!).5. Issue the show mac-address-table dynamic command on each switch again soyou can easily compare the results with the expected results.6. Start the VPCS application by navigating to Tools VPCS.7. Assign VPC1 its IP address using the command ip 10.1.2.11; for example, asshown in the following command:VPCS[1] ip 10.1.2.11Checking for duplicate address.PC1 : 10.1.2.11 255.255.255.0While the VPC was "Checking for duplicate address." it was sendinggratuitous ARP requests to the MAC broadcast address, so both SW1 andSW2 should have seen a frame from VPC1 and learned the VPC1's MACaddress.8. Issue the show mac-address-table dynamic command on each switch again andcompare the results with the preceding results. You should see a new MACaddress (0050.7966.6800) in the MAC address table.By default, a MAC address should stay in the table for 300 seconds.On the NM-16ESW I was using, this seemed to be reduced to about20 seconds, so the expected MAC addresses may have timed out. Thiswas despite the fact that the command show mac-address-table aging timeshowed the time as 300 seconds.9. Note the interface numbers associated with the new MAC address. On SW1,the MAC address should appear on interface f1/0 and on SW2 on interfacef1/15.10. Continue assigning all IPs to the VPCS. Check the MAC address tables onyour switches after each assignment.You need to be familiar with the show mac-address-tablecommand. Be aware that on some platforms it has a slightly differentsyntax: show mac address-table. Explore the other options ofthis command.[6]
Chapter 811. From VPC3, start a continuous ping to VPC1 (ping 10.1.2.11 -t). Checkboth SW1 and SW2 (with the show mac-address-table command) to verifythat the MAC address for VPC3 appears on interface fa1/0 on SW2 and oninterface fa1/15 on SW1.12. Shut down interface fa1/0 (using the shutdown command) on SW2, whereVPC3 is connected, and check the MAC address tables again. You shouldobserve that the MAC address for VPC3 has been removed from SW2 CAMbut is still present for some time on interface fa1/15 on SW1.Make sure you bring interface fa1/0 on SW2 back into service withthe no shutdown command when you have finished.13. Explore the concept of a broadcast domain using the following pointers: Issue the clear mac-address-table command on SW1 and SW2. Start three Wireshark live captures; one each on [SW1 f1/0], [SW1f1/1], and [SW2 f1/1]. Open the Wireshark window for each of thethree captures and make each fit on one-fourth of your screen, onein three corners of your screen. Place the VPCS window in the fourthcorner of your screen. Apply a filter of arp or icmp in each of the Wireshark captures—it isjust the broadcasts and pings you want to see. From VPC3, ping VPC4 (ping 10.1.2.22). Observe that Wiresharkshows the ARP broadcast on all three screens, showing that switchespass broadcasts out all interfaces except the interface it arrived on,and that the ICMP packets are only seen on SW2 f1/1 (VPC4).14. Finally, observe if a destination MAC address is unknown by the switch,and the frame is flooded. You have approximately 120 seconds from thecompletion of the previous activity to complete this activity (before the ARPcache on VPCS times out). Issue the clear mac-address-table command on SW1 and SW2 again. Youwant to see now what happens when a frame arrives at a switch whenthe switch doesn't know what the destination MAC address is. From VPC3, ping VPC4 (ping 10.1.2.22). Observe that there are no ARPrequests shown in the Wireshark captures (if there is, the ARP cachehas timed out; start it again). However, you do see the first ICMPecho showing that switches pass frames with an unknown destinationaddress from all interfaces except the interface it arrived on.[7]
Preparing for Certification Using GNS3VLAN varietyVLANs are a way of restricting broadcast domains. One popular definition of aVLAN is as follows: A VLAN is a broadcast domain. In this exercise, you will explorehow VLANs limit broadcasts, and how to route packets between VLANs.Principle objectivesThe principle objectives are designed to give you familiarity with VLAN conceptsand specifically configuration on Cisco switches (from the 100-101 ICND1 ExamTopics available at b.html# Topics). Configure and verify VLANs Configure and verify trunking on Cisco switches Describe how VLANs create logically separate networks and the need forrouting between them. Configure SVI interfacesTopologyThe initial topology and IP addressing identical to the Simple switching exercise.ActivitiesThis set of activities will be split into the following two parts. Part 1 deals withVLAN creation and the broadcast domain concept; Part 2 extends the broadcastdomain concept to multiple switches using trunk ports.Note that the following activities were designed to be conducted usingrouters with a NM-16ESW module installed. Conducting these activitieson a modern Cisco switch will give different results because modernswitches use Cisco's Dynamic Trunking Protocol (DTP) to automaticallyform trunk ports when switches are connected together.Part 1This part deals with VLAN creation and the broadcast domain concept. Completethe following steps to create broadcast domains for VLAN 10 and VLAN 20 , keepingin mind that in the beginning all ports are in the broadcast domain called VLAN 1:[8]
Chapter 81. Configure the IP addresses for the switches and the VPCs as they were in theSimple switching exercise.2. Make sure the switches and VPCs can ping each other.3. Create two VLANs on your switches, VLAN10 and VLAN20. Use thefollowing commands as a guideThe baseconfig-sw.txt file loads macros that turn the normalvlan command into a macro that creates the vlan using the vlandatabase commands. That is why the following example uses anabbreviated vla command—to prevent the macro from taking over.However, if this doesn't work for your version of IOS, try creatingyour vlans using the vlan database method.SW1-SW#configure terminalSW1-SW(config)#vla 10 !Note the abbreviated vlan commandSW1-SW(config-vlan)#vlan 20SW1-SW(config-vlan)#exit4. Verify the creation of the VLANs with the show vlan-sw command in theprivileged mode.On normal Cisco switches, you would use the show vlan commandrather than the show vlan-sw command.5. Now use the switchport access vlan 10 command in the interface configurationmode on interface f1/0 on each switch. Effectively, you have put VPC1 andVPC3 on VLAN 10.SWx-SW(config)#interface f1/0SWx-SW(config-if)#switchport access vlan 106. Observe that this action has had no effect on VPC2 and VPC4. Both VPC2and VPC4 can still ping each other, and each can ping the switch IPaddresses. But also note that now that VPC1 and VPC3 are on VLAN 10,neither VPC2 nor VPC4 can ping VPC1 or VPC3.7. Use Wireshark captures to verify that VPC1 and VPC3 do not see ARPbroadcasts generated by VPC2 or VPC4.8. Also observe that VPC1 and VPC3 can't actually ping each other even thoughthey are both on VLAN 10. You need to understand why this is so, and if thereason is not clear, it might become apparent to you in the next step.[9]
Preparing for Certification Using GNS39. Use the switchport access vlan 20 command under the interface configurationmode on interface f1/1 on each switch, which will put VPC2 and VPC4 onVLAN 20.10. Another useful command to check your VLAN port configuration is showinterface status. Make it a practice to use it often. Use it now (from privilegedmode) to check if interfaces f1/0 and f1/1 are on the correct VLANs.11. Observe that now that VPC1 and VPC3 are on VLAN 20, they can no longerping each other and nor can either ping either of the switches; this is becauseyou assigned the IP address for the switch to VLAN 1.12. Note that the switches can still ping each other.13. Start a Wireshark capture on the link between the two switches and openthe Wireshark window for that capture. Observe that when you try and pingVPC3 from VPC1, or VPC4 from VPC2, you do not see the ARP broadcastappear on the link between the two switches. This is because the two interswitch link ports are still assigned to the default VLAN 1.Checkpoint: It is important that you realize that the reason the VPCs in thesame VLAN can't ping each other is because the link between the switches is stillassociated with VLAN 1.Part 2This part extends the broadcast domain concept to multiple switches using trunkports. At this stage, you should realize that you have three broadcast domains, VLAN1, VLAN 10, and VLAN 20, but only VLAN 1 has connectivity between the switches.Complete the following steps to give all broadcast domains connectivity between theswitches:1. To allow traffic from multiple VLANs to traverse the inter-switch link,interface f1/15 on each switch will have to be configured as what Ciscocalls a Trunk port.On more modern Cisco switches, trunk ports are often automaticallyconfigured. Make sure you know how the switchport modedynamic desirable and switchport mode dynamic autocommands affect the formation of trunk ports before you sit for theexam, and the role of the Dynamic Trunking Protocol (DTP) in thisprocess (an excellent summary can be found on Brad Hedlund'sblog at urations-explained/).[ 10 ]
Chapter 82. Configure trunk ports on the f1/15 interfaces of each switch using thefollowing commands as a guide. Note that many switches do not require theswitchport trunk encapsulation dot1q command because they onlysupport one kind of VLAN trunk encapsulation.SW1-SW#configure terminalSW1-SW(config)#interface f1/15SW1-SW(config-if)#switchport trunk encapsulation dot1qSW1-SW(config-if)#switchport mode trunk3. Observe that (after 45 seconds, when the spanning tree has stabilized) VPC1can now ping VPC3, VPC2 can ping VPC4, and SW1 can ping SW2.4. Next, restrict which VLANs can communicate using the switchport trunkallowed command. First, restrict the trunk to just VLAN 10 as in the followingcommands (do this on both switches):SW1-SW(config)#interface f1/15SW1-SW(config-if)#switchport trunk allowed vlan 1,10,1002-10055. Observe that the VPCs on VLAN 20 (VPC2 and VPC4) can no longer pingeach other because VLAN 20 was not included in the list of allowed VLANson the trunk.On modern switches, you will reduce the command to switchporttrunk allowed vlan 10. On these NM-16ESW switches, you are forced toinclude all default VLANs in the list.6. Use the show interface f1/15 switchport command to see which VLANs areallowed on the trunk.On modern switches, you can also use the showinterface trunk command to check this.7. Now add VLAN 20 to the trunks as in the following command. Noteparticularly the use of the term add.SW1-SW(config-if)#switchport trunk allowed vlan add 20[ 11 ]
Preparing for Certification Using GNS38. Observe that VPC2 and VPC4 on VLAN 20 can now ping each other (oncethe spanning tree has converged) and also verify that VPC1 and VPC3 canping each other. In this environment (using NM-16ESW), you are forced toinclude the default VLANs on the trunks, but a common mistake on modernswitches is to accidently issue the preceding command without the term add.This action results in removing all VLANs from the link except the VLANlisted in the command.9. The situation in this lab at the moment is that all VPCs and switchesare configured on the same IP subnet. Normally, each VLAN is ona different subnet, so reconfigure the IP addresses as shown in thefollowing commands—note that VPC1 and VPC3 on VLAN 10 are on the192.168.10.0/24 subnet and VPC2 and VPC4 on VLAN 20 are on the192.168.20.0/24 subnet.VPCS[1] ip 192.168.10.11/24 192.168.10.1VPCS[2] ip 192.168.20.12/24 192.168.20.1VPCS[3] ip 192.168.10.21/24 192.168.10.1VPCS[4] ip 192.168.20.22/24 192.168.20.110. Now configure SW1 as a Layer 3 switch, and make it the default gateway forthe VPCs. To do this on a switch that supports Layer 3 switching, use the iprouting command, shown as follows, in global configuration mode.SW1-SW(config)#ip routing11. Finally, assign IP addresses to the VLAN 10 and VLAN 20 interfaces, anddon't forget the no shutdown command. Use the following model:SW1-SW(config)#interface vlan 10SW1-SW(config-if)#ip address 192.168.10.1 255.255.255.0SW1-SW(config-if)#no shutdownValidationVerify that all VPCs can now ping each other. Also use the VPCS trace command tovalidate the path taken.OSPF operationFor ICND1 you are expected to be able to configure and verify both OSPFv2 andOSPFv3 in a single area. For ICND2, this requirement extends to a multi area andyou are also expected to demonstrate a degree of troubleshooting skills.[ 12 ]
Chapter 8Principle objectivesThe principle objectives are designed to give you familiarity with OSPF conceptsand specifically configuration on Cisco routers (from the 100-101 ICND1 ExamTopics and 200-101 ICND2 Exam Topics available at b.html# Topics and b.html# Topics). Configure and verify utilizing the CLI to set the basic Router configuration Cisco IOS commands to perform basic router setupConfigure and verify OSPF (single area) Configure OSPF v2 Configure OSPF v3TopologyThe IP addressing scheme and physical topology is shown in the following figure. It isrecommended that you use C7200 routers in this topology, running version 15.x IOS.[ 13 ]
Preparing for Certification Using GNS3ActivitiesTo achieve the objectives, you will need to be able to do the following:1. Configure IPv4/IPv6 addresses for the routers and VPCs as shown in thepreceding figure.2. Configure OSPFv2 as your routing protocol with all interfaces in area 0.Make sure your loopback interfaces are included.3. Configure OSPFv3 as your routing IPv6 protocol with all interfaces in area 0.ValidationVerify that all VPCs can now ping each other.A show ip route ospf command on R1 should produce the following command lines:R1#show ip route ospf include /172.16.0.0/16 is variably subnetted, 8 subnets, 3 masksO172.16.2.0/24 [110/65] via 10.0.12.2, 00:20:17, Serial1/0O172.16.3.0/24 [110/129] via 10.0.14.2, 00:20:17, Serial1/1[110/129] via 10.0.12.2, 00:20:17, Serial1/0O172.16.4.0/24 [110/65] via 10.0.14.2, 00:20:17, Serial1/1O172.16.22.1/32 [110/65] via 10.0.12.2, 00:20:17, Serial1/0O172.16.23.0/30 [110/128] via 10.0.12.2, 00:20:17, Serial1/0O172.16.33.1/32 [110/129] via 10.0.14.2, 00:20:17, Serial1/1[110/129] via 10.0.12.2, 00:20:17, Serial1/0O172.16.34.0/30 [110/128] via 10.0.14.2, 00:20:17, Serial1/1O172.16.44.1/32 [110/65] via 10.0.14.2, 00:20:17, Serial1/1A show ipv6 route ospf command on R1 should produce the following command lines:R1#show ipv6 route ospf include /OFC00:0:16:2::/64 [110/65]via FE80::C801:FFF:FED8:8, Serial1/0OFC00:0:16:3::/64 [110/129]via FE80::C801:FFF:FED8:8, Serial1/0via FE80::C803:1FF:FE08:8, Serial1/1OFC00:0:16:4::/64 [110/65]via FE80::C803:1FF:FE08:8, Serial1/1OFC00:0:16:22::/128 [110/64][ 14 ]
Chapter 8via FE80::C801:FFF:FED8:8, Serial1/0OFC00:0:16:23::/127 [110/128]via FE80::C801:FFF:FED8:8, Serial1/0OFC00:0:16:33::/128 [110/128]via FE80::C801:FFF:FED8:8, Serial1/0via FE80::C803:1FF:FE08:8, Serial1/1OFC00:0:16:34::/127 [110/128]OFC00:0:16:44::/128 [110/64]via FE80::C803:1FF:FE08:8, Serial1/1via FE80::C803:1FF:FE08:8, Serial1/1ICND2 extensionsTo achieve the ICND2 objectives, you will need to be able to do the following:1. Modify your configurations so that all interfaces with class B IPv4 addressesare placed in area 172.16.0.0.2. Summarize the 172.16.0.0/16 routes being advertised by the ABRs in themost precise (longest) summary possible.3. Summarize the FC00:0:16::/48 routes being advertised by the ABRs in themost precise (longest) summary possible.ValidationVerify that all VPCs can now ping each other.A show ip route ospf command on R1 should produce the following command lines(note the /18 mask):R1#show ip route ospf include /172.16.0.0/18 is subnetted, 1 subnetsO IA172.16.0.0 [110/65] via 10.0.14.2, 00:03:10, Serial1/1[110/65] via 10.0.12.2, 00:03:32, Serial1/0Make sure you understand that by summarizing in this way, packetsfrom R1 to, say, 172.16.44.1 will not always take the same path!A show ipv6 route ospf command on R1 should produce the following command lines(note the /57 mask). On the IOS 15.1(4)M4 I was using, the cost parameter had to beused on the area range command to get two summary routes.[ 15 ]
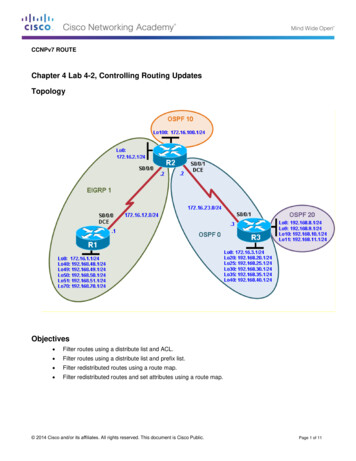
Preparing for Certification Using GNS3R1#show ipv6 route ospf include /OIFC00:0:16::/57 [110/193]via FE80::C801:FFF:FE14:8, Serial1/0via FE80::C802:FFF:FEB0:8, Serial1/1EIGRP excitementEIGRP is not a requirement for ICND1, but make sure you fulfill the followingobjectives for ICND2.This lab starts by configuring OSPF so you can observe the effect of running tworouting protocols with different administrative distances.Principle objectivesThe principle objectives are designed to give you familiarity with EIGRP conceptsand specifically configuration on Cisco routers (from the 200-101 ICND2 ExamTopics available at b.html# Topics). Configure and verify EIGRP (single AS) Feasible Distance / Feasible Successors /Administrative distance Feasibility condition Metric composition Router ID Auto summary Path selection Load balancing Equal Unequal Passive interfaceTopologyThe IP addressing scheme and physical topology is shown in the following figure. It isrecommended that you use C7200 routers in this topology, running version 15.x IOS.[ 16 ]
Chapter 8ActivitiesTo achieve the objectives, you will need to be able to do the following:1. Configure the IPv4/IPv6 addresses for the routers and VPCs as shown in thepreceding figure.2. Make sure you include the bandwidth statements on the serial interfaces, andnote that the link between R1 & R4 is 1 Mb/s and between R1 & R2 it is 1.2Mb/s.3. Configure OSPFv2 as your routing protocol with all interfaces in area 0.Make sure your loopback interfaces are included. Later, you will configureEIGRP and observe that the EIGRP routes replace the OSPF routes.[ 17 ]
Preparing for Certification Using GNS34. Configure OSPFv3 as your routing IPv6 protocol with all interfaces in area 0.5. Verify that routing has converged and that all VPCs can ping each other(IPv4 & IPv6) as well as ping all loopback addresses.6. Capture a copy of the routing tables (IPv4 and IPv6) and save it in a texteditor. Note particularly the administrative distance of the OSPF routes,and make sure you know how to identify the administrative distance inthe output of the show ip route, show ipv6 route, and show ip protocolscommands.7. Verify (using the VPCS trace command) that the path taken between VPC1and VPC3 is via R2 (because the bandwidth is greater).8. Begin a continuous (IPv4) ping between VPC1 and VPC3 and then shutdown one of the serial interfaces on R2 to force OSPF to reconverge. Notehow long the convergence takes. Repeat for an IPv6 ping.9. Don't forget to bring the interface back into service (using the no shutdowncommand).10. Configure EIGRP as your routing protocol for AS 65500. Make sure yourloopback interfaces are included.11. Verify that the routing has converged using the show ip route and show ipv6route commands.12. Compare the routing tables now with the output you saved in a text editor(back in step 6). You should observe that the routing tables are exactly thesame, but now the EIGRP routes have replaced the OSPF routes. Note theadministrative distance of the new EIGRP routes is lesser than the old OSPFroutes.13. If all of the OSPF routes have disappeared, remove OSPF routing. If not,troubleshoot (you did remember to use the no auto-summary command,didn't you?).14. Verify (using the VPCS trace command) that the path taken between VPC1and VPC3 is via R2 (because the bandwidth is greater).15. Verify (using the show ip eigrp topology and show ipv6 eigrp topologycommands) that R1 holds a feasible successor route to R3. Make sure youunderstand how to extract this information from the output.16. Begin a continuous (IPv4) ping between VPC1 and VPC3 and then shutdown one of the serial interfaces on R2 to force the EIGRP to reconverge.Note how long the convergence takes. Repeat for an IPv6 ping.17. Don't forget to bring the interface back into service (using the no shutdowncommand).[ 18 ]
Chapter 818. Repeat the failover test with debugging turned on (using the debug eigrpfsm command).19. Change the variance so that traffic between R1 and R3 is distributed betweenR2 and R4.20. Observe the effect that this has on your routing table.21. Begin a Wireshark capture on interface f0/0 on R1. Observe that the EIGRPhello packets are sent every five seconds for both IPv4 and IPv6.22. Now modify your EIGRP (IPv4) configuration to make interface f0/0 on R1 apassive interface and observe the result in Wireshark. Repeat for IPv6.23. Add the auto-summary command to your IPv4 EIGRP configuration. Notethe effect this has on your configuration and make sure you understand whyVPC1 can no longer (IPv4) ping VPC3 and why the routing table does notshow any /24 masks for the 10.0.0.0 network.Before IOS 15.x, auto-summary was enabled by default.24. Summarize the 10.0.0.0/8 routes being advertised to R1 by R2 and R4 inthe most efficient (longest) single summary route possible.25. Summarize the 2001:DB8::/48 routes being advertised to R1 by R2 and R4in the most efficient (longest) single summary route possible.ValidationAfter the completion of this exercise, R1's EIGRP routing tables should look like thefollowing command lines:R1#show ip route eigrp include /10.0.0.0/8 is variably subnetted, 10 subnets, 3 masksD10.0.32.0/22 [90/2647808] via 192.168.12.2, 00:31:35, Serial1/0192.168.23.0/30 is subnetted, 1 subnetsD192.168.23.0 [90/3157248] via 192.168.12.2, 04:25:55, Serial1/0D192.168.34.0 [90/3584000] via 192.168.14.2, 04:25:53, Serial1/1192.168.34.0/30 is subnetted, 1 subnetsR1#show ipv6 route eigrp include /D2001:DB8::/53 [90/2647808]via FE80::C83D:19FF:FEB4:8, Serial1/1via FE80::C83C:1DFF:FEEC:8, Serial1/0[ 19 ]
Preparing for Certification Using GNS3Extending to CCNP certificationCCNP certification requires a much deeper understanding of the actual protocolsthan CCNA does. These labs are therefore not so prescriptive but more orientedtoward guiding you to create your own labs. You will find that using GNS3 toimplement your own designs will give you a far more real-life experience than tryingto work with someone else's ideas.EIGRPA solid understanding of EIGRP is essential for CCNP.Principle objectivesThe principle objectives are designed to give you a thorough understanding ofEIGRP concepts and specifically configuration on Cisco routers (from the 200-101642-902 ROUTE Exam Topics available at .html# Topics). Determine network resources needed for implementing EIGRP in a network Create an EIGRP implementation plan Create an EIGRP verification plan Configure EIGRP routing Verify if an EIGRP solution was implemented properly using the show anddebug commands Document the verification results for an EIGRP implementation Create an IPv6 implementation plan Create an IPv6 verification plan Configure IPv6 routingTopologyYour network consists of a central office with two core routers, R1 and R2. Three newbranch offices are being added, with dual connections back to the central office—onelink each to R1 and R2. The branch offices each have two subnets that are requiredto support 60 users each. A third subnet for BYOD wireless access is being plannedfor each branch office that will need to support up to 100 devices. You must makeprovision for this subnet in your plan.[ 20 ]
Chapter 8In accordance with the rest of the company's addressing scheme, you have beenallocated the IP address spaces of 172.30.40.0/22 and 2001:db8:a:1d28::/60 tonumber your network, and you are expected to
Preparing for Certification Using GNS3 This is the chapter where you get to do the work. No matter what level of certification you are


