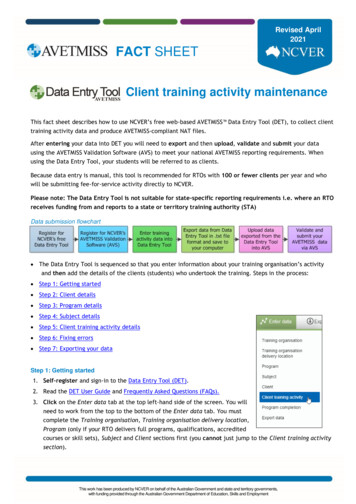
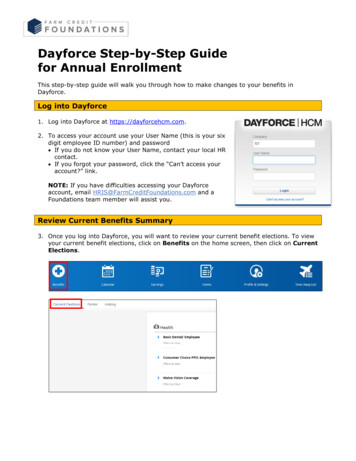
Transcription
Step by step guide to using AudacityContents1 - Introduction . 12 - Getting Started . 22.1 - Starting Audacity . 23 – Recording, Saving and Editing Your Audio. 33.1 – Recording your audio. 33.2 - Listening to your recording . 43.3 – Adjusting the Recording Level for optimum quality . 53.4 - Saving your work . 63.5 – Editing your audio . 63.5.1 - Deleting audio . 63.5.2 – Inserting audio into your recording. . 73.6 - Adding other audio . 93.7 - Adjusting the volume of different audio tracks . 113.8 - Fading in and out. 114 - Archiving your work and exporting your podcast. 124.1 - Archiving your work as an uncompressed WAV file . 124.2 - Exporting your audio as an MP3 file . 134.2.1 - A note on file size and compression. 134.2.2 - Setting the bit-rate in Audacity . 134.2.3 - Creating your final MP3 file . 144.2.4 - Distributing your podcast. 15Appendix A - Downloading and Installing Audacity and the LAME MP3 Encoder. 16Downloading and installing Audacity: . 16Installing the MP3 Encoder . 161 - IntroductionAudacity is an easy to use but powerful audio recording and editing package. Itis also free to download and use (see Appendix A – Downloading andInstalling Audacity and the LAME MP3 encoder at the end of this documentfor information on how to do this). Audacity enables you to record your voice,edit your recording to correct any mistakes you might make, and to combinesound recordings from various sources such as interviews, music, or othersound recordings you may have. Audacity also enables you to export yourrecording as an MP3 file, and because of this it is ideal for producing podcasts.This guide will serve as an introduction to the key features of Audacity 1.2.6 forWindows. A full reference guide for the software can be found .htmlLearning and Teaching ServciesThe University of Sheffield, 5 Favell Road, Sheffield, S3 7QX, http://www.shef.ac.uk/letsVersion 3: April 081
Step by step guide to using audacity2 - Getting Started2.1 - Starting AudacityTo Start Audacity:1. Click on the Start button in Windows.2. Choose Audacity from the Programs menu.When Audacity starts, you will see the following screen as shown in Figure 1.Don’t worry about it looking complex; you will only require a few of the basicfeatures which are labelled below.ZoomControl ToolbarIn/OutMixer ToolbarButtonsProjectSample RateWork AreaFigure 1 – the main Audacity program screenLearning and Teaching ServciesThe University of Sheffield, 5 Favell Road, Sheffield, S3 7QX, http://www.shef.ac.uk/letsVersion 3: April 082
Step by step guide to using audacity3 – Recording, Saving and Editing Your Audio3.1 – Recording your audioBefore starting to record your audio, you will need to do the following:1. Make sure your microphone and speakers (or headset if using one) arecorrectly connected to your computer - check your microphone orcomputer instruction manual if you are unsure how to do this.2. Prepare something to say.3. Check that the Project Sample Rate is set at 44100, as shown in Figure1.4. If you are using loudspeakers, you may need to turn these down toprevent feedback.Tip: Before investing too much time in your recording, please consultSection 3.3 – Adjusting the Recording Level for Optimum Qualitybelow. It is well worth doing a test recording to make sure that therecording levels have been set correctly.SelectionToolPlayButtonTime ShiftToolRecordButtonPauseButtonStopButtonFigure 2 – The Control ToolbarTo start recording:1. Click on the Record Button in the Control Toolbar, as shown in Figure 2.2. Start saying what you wish to say.3. Press the Pause Button in the Control Toolbar if you wish to pause yourrecording at any point – press it again to resume recording.4. Press the Stop Button in the Control Toolbar when you have finishedyour recording.When you have finished your recording, you should see your voice representedas a “waveform”, as shown in Figure 3 below.Learning and Teaching ServciesThe University of Sheffield, 5 Favell Road, Sheffield, S3 7QX, http://www.shef.ac.uk/letsVersion 3: April 083
Step by step guide to using audacityYour waveform will be visible as an “audio track”. Audacity allows you to havemultiple recordings in multiple audio tracks, and these can be editedindependently of each other.AudioWaveformAudioTrackFigure 3 – Recorded audio shown as an Audio Waveform in an Audio Track3.2 - Listening to your recordingYou will almost certainly want to listen back to your recording to check that youare happy with the quality of the recording, and with your performance. Youmay wish to re-record it.To listen to your recording:1. Click on the Play Button in the Control Toolbar as shown in Figure 2.2. Click on the Stop Button or Pause Button in the Control Toolbar to stopor pause the playback.3. You can adjust the volume at which you listen to your recording using thePlayback Volume slider in the Mixer Toolbar, as shown in Figure 4below.Playback VolumeInput LevelFigure 4 – The Mixer ToolbarLearning and Teaching ServciesThe University of Sheffield, 5 Favell Road, Sheffield, S3 7QX, http://www.shef.ac.uk/letsVersion 3: April 084
Step by step guide to using audacityImportant: If your recording seems very quiet, with lots ofbackground noise OR your recording seems very loud anddistorted, please consult Section 4 – Adjusting the Recording Levelfor Optimum Quality below.3.3 – Adjusting the Recording Level for optimum qualityIt is very important to make sure that you record your audio at the correctrecording level to get the best quality – too high a recording level causesdistortion, whilst too low a recording level introduces too much backgroundnoise and hiss. Neither are desirable and make your recording difficult to listento.Examining the waveform will give you a good idea about your recording level.Please consult Figure 5 below Track 1 in Figure 5 depicts a waveform that has been recorded at thecorrect level.Track 2 depicts a waveform that has been recorded at too low a level.Track 3 depicts a waveform that has been recorded at too high a level.1 - correctrecordinglevel2 - recordinglevel too low3 - recordinglevel too highFigure 5 – Waveforms showing recording levels that are correct, too low and toohigh.Learning and Teaching ServciesThe University of Sheffield, 5 Favell Road, Sheffield, S3 7QX, http://www.shef.ac.uk/letsVersion 3: April 085
Step by step guide to using audacityIf your recording level is too low:1. Increase the recording level by adjusting the Input Level slider in theMixer Toolbar, as shown in Figure 4 above, and/or2. Sit closer to your microphone.If your recording level is too high:1. Decrease the recording level by adjusting the Input Level slider in theMixer Toolbar, as shown in Figure 4 above, and/or2. Sit further away from your microphone.3.4 - Saving your workAt this point, you need to save the project for the first time. It is important thatyou save your work regularly to avoid losing any work in case a problem arises.1. Choose File, Save Project from the main menu.2. Save your Audacity Project in an appropriate location.Important: Please note that when you choose Save Project, this savesall the information from your current Audacity Project. This includesall your raw audio data, along with any other information such as therelative volumes of different audio tracks etc. This is NOT the same asexporting your audio in a format suitable for podcasting – this iscovered in Section 4 below.3.5 – Editing your audioYou will almost invariably wish to edit your audio in some way after you haverecorded it. This may be to remove unwanted sections, record additionalmaterial, or incorporate audio from other sources, such as background music,interviews etc. Audacity provides a comprehensive range of editing facilities,which are briefly introduced here.3.5.1 - Deleting audioTo remove an unwanted section of your recording:1. Click on the Selection Tool in the Control Toolbar as shown in Figure 2.2. Click and drag the part of the audio waveform you want to delete in theaudio track.3. The selection should appear as shown in Figure 6 below.Learning and Teaching ServciesThe University of Sheffield, 5 Favell Road, Sheffield, S3 7QX, http://www.shef.ac.uk/letsVersion 3: April 086
Step by step guide to using audacitySelectedregion ofwaveformFigure 6 – Selecting part of the waveform for deleting and/or editing4. Press the Delete key on the keyboard, or choose Edit, Delete from themain menu.5. The unwanted audio is removed, and the audio either side of theselected region is joined together leaving no gap.Tip: Click on the Zoom In button as shown in Figure 1 to make it easierto select the portion of the waveform you want to delete. Rememberyou can always correct any mistakes by choosing Edit, Undo from themain menu, or by pressing Ctrl Z on the keyboard.3.5.2 – Inserting audio into your recording.You may want to add extra audio in the middle of your original recording – thishas to be done in several steps:1. Using the Selection Tool (or “cursor”), click in the waveform at the pointfrom where you want to add the new audio.2. Click on the Record Button in the Control Toolbar to start your newrecording.3. Audacity automatically creates a new track and starts to record from theposition you clicked the cursor.4. Press the Stop Button when you have finished recording your new pieceof audio.5. You should see your new recording in a new audio track, as shown inFigure 7 below.Learning and Teaching ServciesThe University of Sheffield, 5 Favell Road, Sheffield, S3 7QX, http://www.shef.ac.uk/letsVersion 3: April 087
Step by step guide to using audacityOriginalaudio trackNew audiotrackFigure 7 – Overlapping original and newly recorded audio tracks6. At the moment the two tracks overlap and if you press play, your tworecordings mix together in the middle. To complete the insertion of thenew audio, you need to move the second half of your original recording.7. Go to your original track, and highlight the waveform from the point thesecond track starts to the end as shown in Figure 8.8. Choose Edit, Split from the main menu. This will remove the highlightedsection from the original track and add it to a new track at the bottom ofthe work area, as shown in Figure 9.HighlightedareaNew trackFigure 8Figure 99. Now select the Time Shift Tool from the Control Toolbar and click anddrag the waveform on the new track at the bottom so it lines up with theend of the waveform on the track above, as shown in Figure 10 below.Learning and Teaching ServciesThe University of Sheffield, 5 Favell Road, Sheffield, S3 7QX, http://www.shef.ac.uk/letsVersion 3: April 088
Step by step guide to using audacityTime Shift toolFigure 10 – Audio tracks re-aligned with Time Shift tool10. If you now play this back, the recording will play as one continuous piecewithout overlapping any audio.3.6 - Adding other audioIf you want to add audio that you have not recorded directly with themicrophone, such as music, or material that you have recorded elsewhere suchas an interview, you will need to import an audio file.Important: Be very clear that you are not breaking copyright law. Ifyou wish to use audio that you did not produce yourself, or getfrom a copyright free site, then you should not use it unless younegotiate permission from the copyright owner, for example bybuying a licence.Learning and Teaching ServciesThe University of Sheffield, 5 Favell Road, Sheffield, S3 7QX, http://www.shef.ac.uk/letsVersion 3: April 089
Step by step guide to using audacityA few of points to note on importing audio: Audacity allows you to import audio in WAV and MP3 formats.Please Note that the WMA format is not supported.If you are ripping (copying) music from a CD using Windows MediaPlayer or other ripping software, make sure you use the WAV or MP3format only.You can convert files that are not in the correct file format using cheetahaudio-converter, which can be downloaded 4/cheetah-audioconverterUsing this software is not covered in this guide.To add an audio file to your Audacity project:1. Choose Project, Import Audio from the main menu.2. Select the file you wish to import and Audacity will add it as a new trackat the bottom of the work area.3. If the track you have imported is in stereo, as will often be the case withmusic, it will look different from the track you have recorded with themicrophone, having two waveforms - one for stereo left and one forstereo right, as shown in Figure 11 below.Stereo trackshowingwaveforms forleft and rightTrackVolumeFigure 11 – A stereo wave form imported into AudacityLearning and Teaching ServciesThe University of Sheffield, 5 Favell Road, Sheffield, S3 7QX, http://www.shef.ac.uk/letsVersion 3: April 0810
Step by step guide to using audacityWhen you have imported some audio from another source, you may find youwill need to adjust its volume to match your own recording. To do this, seeSection 3.7 - Adjusting the volume of different audio tracks below.3.7 - Adjusting the volume of different audio tracksIf you have combined audio from a number of different sources, you may findthat you need to adjust their relative volumes to be able to hear them allproperly.To adjust the volume of an audio track:1. Click and drag the Track Volume slider for the track you want to adjust,as shown in Figure 11 above.3.8 - Fading in and outYou may want to shorten this new audio because it is longer than you require.Rather than simply chopping of the end which doesn’t sound very good, youcan easily make this track fade away to nothing, which is called a “fade out”.To create a fade out:1. Highlight a section of waveform at the end of the track where you wishthe audio to fade out.2. Choose Effect, Fade Out from the main menu.3. You will see the waveform gradually get smaller at the end, and if youlisten to it, you will hear it fade away to nothing.4. You can create the opposite effect by choosing Effect, Fade In from themain menu, to create a gradual “fade in” at the beginning of an audiotrack if you wish.Tip: See the online Audacity documentation for more in depthinformation about editing and mixing, ial ed beginner1.htmlWhen you have mixed the audio to your liking, it is time to create your finalaudio file for your podcast, and archive your work. This is covered in Section 4– Archiving your work and exporting your podcast, below.Learning and Teaching ServciesThe University of Sheffield, 5 Favell Road, Sheffield, S3 7QX, http://www.shef.ac.uk/letsVersion 3: April 0811
Step by step guide to using audacity4 - Archiving your work and exporting your podcastDuring your work, you should have been regularly saving the project using SaveProject from the File menu. This is essential to keep all your work intact, butthis cannot be played by any other software than Audacity, and the project filescan be very large. It is very useful to keep these project files if you want torevisit or re-edit your podcast. As with any other important work you do on acomputer, it is highly advisable that you create a backup of this work in thenormal way (by writing to a CD, or copying to a shared network drive forexample).4.1 - Archiving your work as an uncompressed WAV fileWe also strongly suggest that you create an ‘archive version’ of yourrecording by exporting it as a WAV file. This is uncompressed, high qualityaudio, that can be opened, played and edited by a very wide range of audioprograms.To create an uncompressed archive version of your recording:1. Choose File, Export As WAV from the main menu.2. If you have created several audio tracks in the course of your recording,you will see the following message, as shown in Figure 12 below.Figure 12 – Warning message indicating that all separate tracks will becombined on export3. Click on OK if you see the above warning message.4. Save your WAV file to an appropriate location using the file savedialogue box.Learning and Teaching ServciesThe University of Sheffield, 5 Favell Road, Sheffield, S3 7QX, http://www.shef.ac.uk/letsVersion 3: April 0812
Step by step guide to using audacity4.2 - Exporting your audio as an MP3 fileTo create a podcast that anyone can listen to, you have to export your audio asan MP3 file.In order for Audacity to export your recording as an MP3 file, you will need tohave installed the LAME MP3 encoder, as described in Appendix A below. Ifyou have not yet done this, follow the steps outlined in Appendix A now.4.2.1 - A note on file size and compressionMP3 files use what is known as “compression” in order to keep their file sizessmall, and this is why they have become so popular for use as podcasts. Bycomparison, MP3 files can be as much as 20 times smaller than an equivalentCD audio track of the same length.Although this ability to compress the size of MP3 files is very useful for Internetdistribution, it does also come at a cost, which is sound quality. There areseveral factors that effect how much compression that we can use in creatingan MP3 file, and hence the final file size and audio quality. The most importantvariable we can control when using Audacity is to alter what is known as the bitrate.Before you export your audio as an MP3 file in Audacity, you therefore need tomake sure you have chosen an appropriate bit-rate for your final recording. Ifyour final podcast will only contain speech, you can afford to set a lower bit-ratefor your output than you would if your recording was mainly comprised of music(the latter of which needs higher sound quality to be perceived as acceptable)The following bit-rates are strongly recommended as a matter of policy:Type ofPodcastSpeechMusicBit-rateFile size per minute64kbps128kbps500K1Mb4.2.2 - Setting the bit-rate in AudacityTo set the bit-rate in Audacity before exporting your MP3 file:1. Choose Edit, Preferences from the main menu.2. You should see the following screen as shown in Figure 13 below.Learning and Teaching ServciesThe University of Sheffield, 5 Favell Road, Sheffield, S3 7QX, http://www.shef.ac.uk/letsVersion 3: April 0813
Step by step guide to using audacity3. Click on the File Formats tab.4. Choose the appropriate bit-rate from the drop down list box5. Remember – 64 kbps for speech, 128 kbps for music.File Formats tabBit-rate dropdown list boxFigure 13 – The Audacity Preferences screen4.2.3 - Creating your final MP3 fileAfter you have set the appropriate Bit-rate, as described above, you are nowready to create your final MP3 file. This will be the file that you will upload tothe Internet for distribution.To create your MP3 file:1. Choose File, Export As MP3 from the main menu.2. You may see the warning message shown in Figure 12 above – click onOk if so.3. Choose a filename and location to save your file – you arerecommended to only use lowercase letters and no spaces in yourfilename.4. Enter some summary information into the ID3 Tags using the dialoguebox shown in Figure 14 below.5. This information will appear when people listen to your podcast usingiTunes, Windows Media Player, or their MP3 players.Learning and Teaching ServciesThe University of Sheffield, 5 Favell Road, Sheffield, S3 7QX, http://www.shef.ac.uk/letsVersion 3: April 0814
Step by step guide to using audacityAlthough the information to be entered into the ID3 Tags is optional, you arestrongly recommended to add the following as good practice:TagTitleDescriptionA sensible title for your podcast – NOT the sameas the File name for your MP3 fileArtistYour nameYearYear you created the podcastGenreNormally applies to music so is optionalComments These could be used as a short précis of yourpodcastFigure 14 – ID3 Tag editing dialogue box.4.2.4 - Distributing your podcastNow you have recorded and exported your podcast, you need to distribute it viathe Internet. It is current University policy to use the University of LondonComputing Centre (ULCC) podcasting service for this. To do this, pleaseconsult the “Using the University of London Computing Centre PodcastingService” document that accompanies this guide.Important: Please do NOT use MOLE, cPanel or the University’sCMS web server for distributing podcasts.Learning and Teaching ServciesThe University of Sheffield, 5 Favell Road, Sheffield, S3 7QX, http://www.shef.ac.uk/letsVersion 3: April 0815
Step by step guide to using audacityAppendix A - Downloading and Installing Audacity andthe LAME MP3 EncoderDownloading and installing Audacity:1. Using your web browser, go to http://audacity.sourceforge.net/.2. Choose “Download Audacity 1.2.6 for Windows”, if you wish to downloadthe Windows version. This will take you to the Windows download page(which you can also go directly to ).3. From the Windows download page, click on the link to the “Audacity1.2.6 installer” – the link to this is in the Recommended Downloadsection at the beginning of the page.4. After a few moments, the download should start.5. Save the installer file, audacity-win-1.2.6.exe, to a folder on yourcomputer.6. When the file has downloaded, double click the installer program youhave just saved, and follow the on-screen instructions to complete theinstallation.Installing the MP3 EncoderDue to licensing reasons, Audacity cannot export MP3 files by default, butrequires an extra piece of software, the LAME MP3 Encoder, to be installed.Like Audacity, this is also free to download and install.1. Using your web browser, go to the LAME download page athttp://lame.buanzo.com.ar/.2. Under "For Audacity on Windows", left-click on the link "libmp3lamewin-3.97.zip" and save the zip folder to a folder on your computer.3. When it has downloaded, unzip the file.4. When the file has unzipped, copy the file lame enc.dll, and paste it intoyour Audacity folder (NB on most Windows XP machines, this should belocated in Program Files/Audacity folder).5. When you are ready to create your first MP3 file using Audacity, Audacitywill ask you to specify where you have saved the lame enc.dll file,showing the following warning.Learning and Teaching ServciesThe University of Sheffield, 5 Favell Road, Sheffield, S3 7QX, http://www.shef.ac.uk/letsVersion 3: April 0816
Step by step guide to using audacity6. Click on the Yes button.7. Navigate to where you have saved the lame enc.dll file as described instep 4 above, and click on the Open button, as shown below.8. You will now be able to export your audio recordings in MP3 formatsuitable for podcasting.Learning and Teaching ServciesThe University of Sheffield, 5 Favell Road, Sheffield, S3 7QX, http://www.shef.ac.uk/letsVersion 3: April 0817
3. Check that the Project Sample Rate is set at 44100, as shown in Figure 1. 4. If you are using loudspeakers, you may need to turn these down to prevent feedback. Tip: Before investing too much time in your recording, please consult Section 3.3 –