Transcription
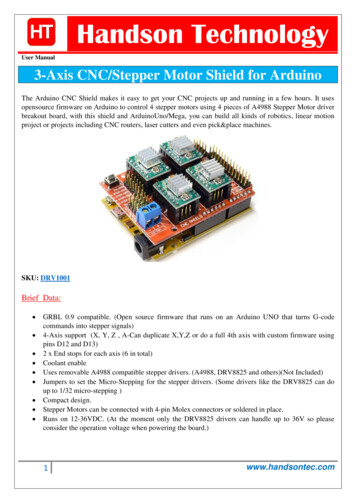
Handson TechnologyUser Manual3-Axis CNC/Stepper Motor Shield for ArduinoThe Arduino CNC Shield makes it easy to get your CNC projects up and running in a few hours. It usesopensource firmware on Arduino to control 4 stepper motors using 4 pieces of A4988 Stepper Motor driverbreakout board, with this shield and ArduinoUno/Mega, you can build all kinds of robotics, linear motionproject or projects including CNC routers, laser cutters and even pick&place machines.SKU: DRV1001Brief Data: GRBL 0.9 compatible. (Open source firmware that runs on an Arduino UNO that turns G-codecommands into stepper signals)4-Axis support (X, Y, Z , A-Can duplicate X,Y,Z or do a full 4th axis with custom firmware usingpins D12 and D13)2 x End stops for each axis (6 in total)Coolant enableUses removable A4988 compatible stepper drivers. (A4988, DRV8825 and others)(Not Included)Jumpers to set the Micro-Stepping for the stepper drivers. (Some drivers like the DRV8825 can doup to 1/32 micro-stepping )Compact design.Stepper Motors can be connected with 4-pin Molex connectors or soldered in place.Runs on 12-36VDC. (At the moment only the DRV8825 drivers can handle up to 36V so pleaseconsider the operation voltage when powering the board.)1www.handsontec.com
Table of Contents1. Configuring Micro Stepping for Each Axis . 32. GRBL Control Software/Firmware for Arduino . 43. Hooking Up the Stepper Motor to CNC Shield . 74. G-Code Sender . 85. Recommended Driver Board & Accessory . 102www.handsontec.com
1. Configuring Micro Stepping for Each AxisEach axis has 3 jumpers that can be set to configure the micro stepping for the A4988 plug-in driver board.Micro-stepping jumper location, before inserting A4988.In the tables below „High‟ indicates that a jumper is insert and „Low‟ indicates that no jumper is ghMS2LowLowLowLowHighMicrostep ResolutionFull Step½ Step¼ Step1/8 Step1/16 Stepwww.handsontec.com
After setting the microstep jumper, you can plug-in A4988 driver boards as shown in the photo below. Thephoto also shown this CNC sit nicely on top of Arduino Uno board, without any external jumper wires.!!! Beware of the orientation of the A4988 driver boards! You will destroy the A4988driver board if plug-in with wrong orientation.2. GRBL Control Software/Firmware for ArduinoBefore you can use this CNC shield with Arduino, a control firmware need to be downloaded into Arduinoboard. We are going to use „GRBL‟ to accomplish our job. GRBL is open-source software that runs on anArduino Uno that takes G-Code commands via Serial and turns the commands into motor signals. Grbl is ano-compromise, high performance, low cost alternative to parallel-port-based motion control for CNCmachine. It accepts standards-compliant g-code and has been tested with the output of several CAM toolswith no problems. Arcs, circles and helical motion are fully supported, as well as, all other primary g-codecommands. Macro functions, variables, and most canned cycles are not supported, but we think GUIs can doa much better job at translating them into straight g-code anyhow.A copy of this open-source firmware can be downloaded from the below link:Following the below steps to prepare this CNC Shield board to function properly:1. Download a copy of GRBL from: https://github.com/grbl/grbl4www.handsontec.com
Unzip this file into your local hardisk location, you may want to create a special new folder for this purposefor easy locating of all files needed in your project. Locate an Arduino sketch „grblUpload.ino‟ in this folderwhere you have unzip the files.Below is the files structures located in my local hardisk:Open up this sketch „grblUpload.ino‟ and you should see the screen as below:5www.handsontec.com
Click the upload icon as usual to „compile/upload‟ as you normally upload Arduino sketch. When you see„done uploading‟, click the „Serial Monitor‟ on Arduino IDE as shown below:6www.handsontec.com
If you can receive response message “ Grbl 0.9j [' ' for help] ” from your Serial Monitor, congratulation!You have successful uploaded the „GRBL‟ firmware into your Arduino board.3. Hooking Up the Stepper Motor to CNC ShieldConnect steppers motor to CNC Shield board as the below block diagram. of the CNC Shield connected to 3-steppermotor:Your CNC Shield board is now ready to go for a test run, let’s try to turn the motor as to our instruction !!7www.handsontec.com
4. G-Code SenderTo send commands to your CNC/3-axis stepper motor driver board you need a g-code sender to send command andinstruction.Download the Universal-G-Code-Sender.Universal GcodeSender is a Java based GRBL compatible cross platform G-Code sender. Use this programto run a GRBL controlled CNC machine. Once downloaded, connect the UNO board USB to your computerand take note of the COM port it is connected to.Run the start-windows.bat or the JAR file directly.You will be presented with the following screen:Click the “Machine Control” tab. Select the “Port” number which your Arduino board is attached to. Select 115200 asthe Baud rate as this is the speed configured in “GRBL” firmware. Click “Open” button to start the communicationfor controlling this shield board.8www.handsontec.com
Gray out area in “Machine Control”tab become active once successfullyconnected to the shield boardNow, you are ready to control the XYZ stepper motor connected to shield board. Click X or X- for example, thestepper motor attached to X terminal will turn in forward or reverse direction.This will complete our initial setup for driving 3-axis stepper motor connected to this shield board with “GRBL”loaded to Arduino controller board using “Universal G-Code Sender” user interface.9www.handsontec.com
5. Recommended Driver Board & Accessory CNC/3-Axis Stepper Motor Driver Shield for Arduino BoardA4988 Stepper Motor Driver ModuleGT2 Pulley 5mm Bore5mm to 8mm Motor Shaft Coupler10www.handsontec.com
Handsontec.comHandsOn Technology provides a multimedia and interactive platform foreveryone interested in electronics. From beginner to diehard, from studentto lecturer. Information, education, inspiration and entertainment. Analogand digital, practical and theoretical; software and hardware.HandsOn Technology support Open Source Hardware (OSHW)Development Platform.Learn : Design : Sharewww.handsontec.com11www.handsontec.com
The Face behind our product quality In a world of constant change and continuous technological development, a new or replacementproduct is never far away – and they all need to be tested.Many vendors simply import and sell wihtout checks and this cannot be the ultimate interests ofanyone, particularly the customer. Every part sell on Handsotec is fully tested. So when buying fromHandsontec products range, you can be confident you’re getting outstanding quality and value.We keep adding the new parts so that you can get rolling on your next project.Breakout Boards & ModulesConnectorsElectro-Mechanical PartsEngineering MaterialMechanical HardwareElectronics ComponentsPower SupplyArduino Board & ShieldTools & Accessory12Pwww.handsontec.com
User Manual 3-Axis CNC/Stepper Motor Shield for Arduino The Arduino CNC Shield makes it easy to get your CNC projects up and running in a few hours. It uses opensource firmware on Arduino to control 4 st