Transcription
GENIUS1DANGERUser Guide & WarrantyREAD AND UNDERSTAND ALL SAFETY INFORMATION BEFORE USING THIS PRODUCT. Failure tofollow these safety instructions may result in ELECTRICAL SHOCK, EXPLOSION, FIRE, which mayresult in a SERIOUS INJURY, DEATH, or PROPERTY DAMAGE.Electrical Shock. Product is an electrical device that can shock and cause serious injury. Do not cut powercords. Do not submerge in water or get wet.Explosion. Unmonitored, incompatible, or damaged batteries can explode if used with product. Do notleave product unattended while in use. Do not attempt to jump start a damaged or frozen battery. Useproduct only with batteries of recommended voltage. Operate product in well ventilated areas.Fire. Product is an electrical device that emits heat and is capable of causing burns. Do not cover product.Do not smoke or use any source of electrical spark or fire when operating product. Keep product away fromcombustible materials.Eye Injury. Wear eye protection when operating product. Batteries can explode and cause flying debris.Battery acid can cause eye and skin irritation. In the case of contamination of eyes or skin, flush affectedarea with running clean water and contact poison control immediately.Explosive Gases. Working in the vicinity of a lead-acid is dangerous. Batteries generate explosive gasesduring normal battery operation. To reduce risk of battery explosion, follow all safety information instructionsand those published by the battery manufacturer and manufacturer of any equipment intended to be usedin the vicinity of battery. Review cautionary markings on these products and on engine.For more informationand support visit:www.no.co/support
Important Safety WarningsAbout GENIUS1. The NOCO GENIUS1 represents some of the most innovative and advanced technology on the market, making each charge simple and easy. It isquite possibly the safest and most efficient charger you will ever use. The GENIUS1 is designed for charging all types of 6V & 12V lead-acid batteries, including Lithium(LiFePO4), Wet (Flooded), Gel, MF (Maintenance-Free), CA (Calcium), EFB (Enhanced Flooded Battery), and AGM (Absorption Glass Mat) batteries. It is suitable forcharging battery capacities up to 30 Amp-Hours and maintaining all battery sizes. Getting Started. Before using the charger, carefully read the battery manufacturer’sspecific precautions and recommended rates of charge for the battery. Make sure to determine the voltage and chemistry of the battery by referring to your batteryowner’s manual prior to charging. Mounting. The GENIUS1 is a direct wall plug-in charger, and it is important to keep in mind the distance to the battery. The DC cablelength from the charger, with either the battery clamp or eyelet terminal connectors, is approximately 107.2 inches (2722.9mm). Allow for 12-inches (304mm) of slackbetween connections. Proposition 65. Battery posts, terminals, and related accessories contain chemicals, including lead. These materials are known to the State ofCalifornia to cause cancer and birth defects and other reproductive harm. Personal Precaution. Only use product as intended. Someone should be within range of yourvoice or close enough to come to your aid in case of emergency. Have a supply of clean water and soap nearby in the case of battery acid contamination. Wear completeeye protection and protective clothing while working near a battery. Always wash hands after handling batteries and related materials. Do not handle or wear any metalobjects when working with batteries including; tools, watches or jewelry. If metal is dropped onto battery, it may spark or create a short circuit resulting in electricalshock, fire, explosion which may result in injury, death or property damage. Minors. If the product is intended by “Purchaser” to be used by a minor, purchasing adultagrees to provide detailed instructions and warnings to any minor prior to use. Failure to do so is the sole responsibility of the “Purchaser,” who agrees to indemnifyNOCO for any unintended use or misuse by a minor. Choking Hazard. Accessories may present a choking hazard to children. Do not leave children unattended withproduct or any accessory. The product is not a toy. Handling. Handle product with care. The product can become damaged if impacted. Do not use a damaged product,including, but not limited to, cracks to the casing or damaged cables. Do not use product with a damaged power cord. Humidity and liquids may damage product. Do nothandle product or any electrical components near any liquid. Store and operate product in dry locations. Do not operate product if it becomes wet. If product is alreadyoperating and becomes wet, disconnect it from the battery and discontinue use immediately. Do not disconnect the product by pulling on the cables. Modifications.Do not attempt to alter, modify or repair any part of the product. Disassembling product may cause injury, death or damage to property. If product becomes damaged,malfunctions or comes in contact with any liquid, discontinue use, and contact NOCO. Any modifications to the product will void your warranty. Accessories. Thisproduct is only approved for use with NOCO accessories. NOCO is not responsible for user safety or damage when using accessories not approved by NOCO. Location.Prevent battery acid from coming in contact with the product. Do not operate the product in a closed-in area or an area with restricted ventilation. Do not set a batteryon top of product. Position cable leads to avoid accidental damage by moving vehicle parts (including hoods and doors), moving engine parts (including fan blades,belts, and pulleys), or what could become a hazard that may cause injury or death. Operating Temperature. This product is designed to work in ambient temperaturesbetween -4 F and 104 F (-20 C and 40 C). Do not operate outside of temperature ranges. Do not charge a frozen battery. Discontinue use of product immediatelyif the battery becomes excessively warm. Storage. Do not use or store your product in areas with high concentrations of dust or airborne materials. Store your producton flat; secure surfaces so it’s not prone to falling. Store your product in a dry location. The storage temperature is -20ºC - 25ºC (average temperature). Never exceed80ºC under any condition. Compatibility. The product is only compatible with 6V & 12-volt Lead-Acid, AGM, and Lithium batteries. Do not attempt to use product
ENwith any other type of battery. Charging other battery chemistries may result in injury, death or property damage. Contact the battery manufacturer prior to attemptingto charge the battery. Do not charge a battery if you are unsure of the battery’s specific chemistry or voltage. Medical Devices. Product may emit electromagneticfields. Product contains magnetic components which may interfere with pacemakers, defibrillators, or other medical devises. These electromagnetic fields may interferewith pacemakers or other medical devices. Consult with your physician prior to use if you have any medical device including pacemakers. If you suspect the product isinterfering with a medical device, stop using the product immediately and consult your physician. Cleaning. Power off the product before attempting any maintenanceor cleaning. Clean and dry product immediately if it comes in contact with liquid or any type of contaminant. Use a soft, lint-free (micro fiber) cloth. Avoid getting moisturein openings. Explosive Atmospheres. Obey all signs and instructions. Do not operate product in any area with a potentially explosive atmosphere, including fuelingareas or areas which contain chemicals or particles such as grain, dust or metal powders. High-Consequence Activities. This product is not intended for use wherethe failure of the product could lead to injury, death or severe environmental damage. Radio Frequency Interference. Product is designed, tested, and manufacturedto comply with regulations governing radio frequency emissions. Such emissions from the product can negatively affect the operation of other electronic equipment,causing them to malfunction. Model Number: GENIUS1 This device complies with Part 15 of the FCC Rules. Operation is subject to the following two conditions: (1) thisdevice may not cause harmful interference, and (2) this device must accept any interference received, including interference that may cause undesired operation. NOTE:This equipment has been tested and found to comply with the limits for a Class A digital device, pursuant to Part 15 of the FCC Rules. These limits are designed to providereasonable protection against harmful interference when the equipment is operated in a commercial environment. This equipment generates, uses, and can radiateradio frequency energy and, if not installed and used in accordance with the instruction manual, may cause harmful interference to radio communications. Operationof this equipment in a residential area is likely to cause harmful interference in which case the user will be required to correct the interference at his own expense.
How To UseCharging Modes.The GENIUS1 has six (6) modes: Standby, 12V, 12V AGM, 12V LITHIUM, 6V and Force. Some charge modes must be pressed and held for three (3) to five (5) secondsto enter the mode. These “Press and Hold” modes are advanced charging modes that require your full attention before selecting. It is important to understand thedifferences and purpose of each charge mode. Always check with battery manufacturer to confirm the right charge mode for your specific battery. Do not operate thecharger until you confirm the appropriate charge mode for your battery. Below is a brief description:ModeExplanationStandbyIn Standby mode, the charger is not charging or providing any power to the battery. Energy Save is activated during this mode, drawingmicroscopic power from the electrical outlet. Canbus is enabled in Standby mode. When in Standby, the orange Standby LED will illuminate.12V12VAGM12VLITHIUM6VPress & Hold(3 Seconds)Force ModePress & Hold(5 Seconds)(Peak Voltage Measured At 25 C, Amperage Rating Is Bulk Amperage When Above 0 C)No PowerFor charging 12-volt Wet Cell, Gel Cell, Enhanced Flooded, Maintenance-Free and Calcium batteries. When selected, the 12V white LED willilluminate.14.5V 1A Up To 30Ah BatteriesFor charging 12-volt AGM batteries. When selected, the 12V AGM white LED will illuminate.14.8V 1A Up To 30Ah BatteriesFor charging 12-volt lithium-ion batteries, including lithium iron phosphate. When selected, the 12V Lithium blue LED will illuminate. For use onbatteries with Battery Management Systems (BMS) only.14.6V 1A Up To 30Ah BatteriesFor charging 6-volt Wet Cell, Gel Cell, Enhanced Flooded, Maintenance-Free and Calcium batteries. When selected, the 6V white LED willilluminate.7.25V 1A Up To 30Ah BatteriesFor charging batteries with a voltage lower than 1V. Press and Hold for five (5) seconds to enter Force Mode. The selected charge mode willthen operate under Force Mode for five (5) minutes before returning to standard charging in the selected mode.1A Up To 30Ah Batteries
Using 6V. [Press & Hold for 3 seconds]Using 12V Lithium.12V Lithium charge mode is designed for 12-volt lithium-ion batteries only, including lithium iron phosphate.CAUTION. USE THIS MODE WITH EXTREME CARE. THIS MODE SHOULD ONLY BE USED WITH 12-VOLT LITHIUM BATTERIES THAT HAVE A BUILT-IN BATTERYMANAGEMENT SYSTEM (BMS). LITHIUM-ION BATTERIES ARE MADE AND CONSTRUCTED IN DIFFERENT WAYS AND SOME MAY OR MAY NOT CONTAIN A BATTERYMANAGEMENT SYSTEM (BMS). CONSULT THE LITHIUM BATTERY MANUFACTURER BEFORE CHARGING AND ASK FOR RECOMMENDED CHARGING RATES ANDVOLTAGES. SOME LITHIUM-ION BATTERIES MAY BE UNSTABLE AND UNSUITABLE FOR CHARGING.Force Mode. [Press & Hold for 5 seconds]Force mode allow the charger to manually begin charging when the connected battery’s voltage is too low to be detected. If battery voltage is too low for the chargerto detect, press and hold the mode button for 5 seconds to activate Force Mode, then select the appropriate mode. All available modes will flash. Once a chargemode is selected, the Charge Mode LED and Charge LED will alternate between each other, indicating Force Mode is active. After five (5) minutes the charger willreturn to the normal charge operation and low voltage detection will be reactivated.CAUTION. USE THIS MODE WITH EXTREME CARE. FORCE MODE DISABLES SAFETY FEATURES AND LIVE POWER IS PRESENT AT THE CONNECTORS. ENSURE ALLCONNECTIONS ARE MADE PRIOR TO ENTERING FORCE MODE, AND DO NOT TOUCH CONNECTIONS TOGETHER. RISK OF SPARKS, FIRE, EXPLOSION, PROPERTYDAMAGE, INJURY, AND DEATH.Connecting to the Battery.Do not connect the AC power plug until all other connections are made. Identify the correct polarity of the battery terminals on the battery. The positive batteryterminal is typically marked by these letters or symbol (POS,P, ). The negative battery terminal is typically marked by these letters or symbol (NEG,N,-). Do not makeany connections to the carburetor, fuel lines, or thin, sheet metal parts. The below instructions are for a negative ground system (most common). If your vehicle is apositive ground system (very uncommon), follow the below instructions in reverse order.1.) Connect the positive (red) battery clamp or eyelet terminal connector to the positive (POS,P, ) battery terminal.2.) Connect the negative (black) battery clamp or eyelet terminal connector to the negative (NEG,N,-) battery terminal or vehicle chassis.3.) Connect the battery charger into a suitable electrical outlet. Do not face the battery when making this connection.4.) When disconnecting the battery charger, disconnect in the reverse sequence, removing the negative first (or positive first for positive ground systems).EN6V charge mode is designed for 6-volt lead-acid batteries only, like Wet Cell, Gel Cell, Enhanced Flooded, Maintenance-Free and Calcium batteries. Press and hold forthree (3) seconds to enter 6V Charge Mode. Consult the battery manufacturer before using this mode.
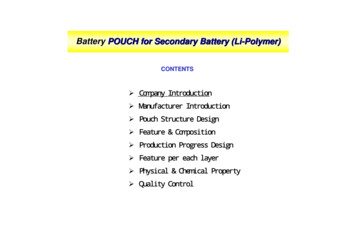
Begin Charging.1.) Verify the voltage and chemistry of the battery.2.) Confirm that you have connected the battery clamps or eyelet terminal connectors properly and the AC power plug is plugged into an electrical outlet.3.) [First time use] The charger will begin in Standby mode, indicated by an orange LED. In Standby, the charger is not providing any power.4.) Press the mode button to toggle to the appropriate charge mode (press and hold for three seconds to enter an advanced charge mode) for the voltage andchemistry of your battery.5.) The mode LED will illuminate the selected charge mode and the Charge LEDs will illuminate (depending on the health of the battery) indicating the chargingprocess has started.6.) The charger can now be left connected to the battery at all times to provide maintenance charging.Auto-Memory: The charger has built in auto-memory and will return to the last charge mode when connected. To change modes after the first use, press themode button.Charging TimesCharging Times.The estimated time to charge a battery is shown below. The size of thebattery (Ah) and its depth of discharge (DOD) greatly affect its chargingtime. The charge time is based on an average depth of discharge toa fully charged battery and is for reference purposes only. Actual datamay differ due to battery conditions. The time to charge a normallydischarged battery is based on a 50% DOD. Temperature will alsoimpact charging times. The GENIUS1 features thermal compensationthat automatically adjusts charging profiles to maximize chargingperformance.Battery SizeApprox. Time to Charge In 2.522.5
Understanding Charge LEDs.LEDExplanationPulsing Red LEDThe Charge LED will slowly pulse “on” and “off” when the battery is less than 75% fully charged.Pulsing Green LEDBulk charge complete, optimizing battery for extended life.Solid Green LEDWhen the battery is 100% charged, the Charge LED will be solid green.MaintenanceGreen LEDAfter the battery is fully charged, the charger will continue monitoring the battery, and provide ongoing maintenance andoptimization. The 100% Charge LED will pulse “on” and “off” slowly during these cycles. The charger can be left connectedto the battery indefinitely.Understanding Error LEDs.Error Conditions will be indicated by the following LEDs.LEDReason/SolutionSolidCharger is in Standby mode or Battery voltage is too low for charger to detect.SolidBattery voltage is too high for the selected charge mode / Check the battery and charge mode.SolidPossible battery short / Battery will not hold a charge. Have battery checked by a professional.SolidReverse polarity / Reverse the battery connections.FlashingCharger internal temperature too high / Charger will resume function once the Charger internal temperature drops.Charger ambient temperature too cold / Charger will resume function once the Charger ambient temperature rises.ENThe charger has one (1) Charge LED. This Charge LED indicates the connected battery(s) state-of-charge (SOC). See the explanation below:
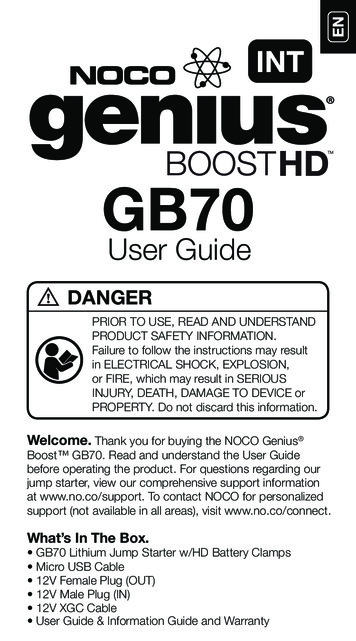
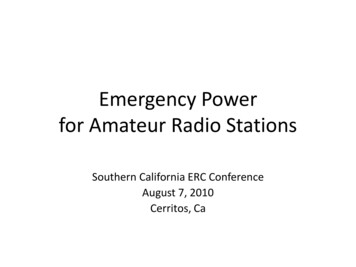
1.) Charge LED indicates the connected battery(s) state-of-charge.2.) Mode LED Indicates the Charge Mode the charger is currently in. Push theMODE button to cycle through charge Modes.13.) [Press and Hold] Mode LED Mode button must be pressed and held for 3seconds to enter the mode.4.) Standby LED Illuminates when the charger is in Standby Mode, the charger isnot charging or providing any power to the battery.235.) Overvoltage Error LED Illuminates solid Red; Battery Voltage is aboveProtect voltage.6.) Bad Battery Error LED Illuminates solid Red when connected battery will nothold a charge.46252787.) Reverse Polarity Error LED Illuminates solid Red when reverse polarity isdetected.8.) Mode Button Push to cycle through charging Modes.
Input Voltage AC:Working Voltage AC:Output Power:Charging Voltage:Charging Current:Low-Voltage Detection:Back Current Drain:Ambient Temperature:Type of Batteries:Battery Chemistries:Battery Capacity:Housing Protection:Cooling:Dimensions (L x W x H):Weight:120-240 VAC, 50-60Hz120-240 VAC, 50-60Hz15W MaxVarious1A (12V), 1A (6V)1V (12V), 1V (6V) 5mA-20 C to 40 C6V & 12VWet, Gel, MF, CA, EFB, AGM, Lithium.Up to 30Ah, Maintains All Battery SizesIP60Natural Convection3.5 x 2.3 x 1.3 Inches0.77 Pounds3 Year Hassle-Free WarrantyNOCO warrants that this product (the “Product”) will be free from defects in material and workmanship for a period of Three (3) years from the date of purchase (the “WarrantyPeriod”). For defects reported during the Warranty Period, NOCO will, at its discretion, and subject to NOCO’s technical support analysis, either repair or replace defectiveproducts. Replacement parts and products will be new or serviceably used, comparable in function and performance to the original part and warranted for the remainder of theoriginal Warranty Period.NOCO’S LIABILITY HEREUNDER IS EXPRESSLY LIMITED TO REPLACEMENT OR REPAIR. TO THE MAXIMUM EXTENT PERMITTED BY LAW, NOCO SHALL NOT BE LIABLE TOANY PURCHASER OF THE PRODUCT OR ANY THIRD PARTY FOR ANY SPECIAL, INDIRECT, CONSEQUENTIAL OR EXEMPLARY DAMAGES, INCLUDING, BUT NOT LIMITEDENTechnical Specifications
TO, LOST PROFITS, PROPERTY DAMAGE OR PERSONAL INJURY, RELATED IN ANY WAY TO THE PRODUCT, HOWSOEVER CAUSED, EVEN IF NOCO HAD KNOWLEDGE OFTHE POSSIBILITY OF SUCH DAMAGES. THE WARRANTIES SET FORTH HEREIN ARE IN LIEU OF ALL OTHER WARRANTIES, EXPRESS, IMPLIED, STATUTORY OR OTHERWISE,INCLUDING, WITHOUT LIMITATION, THE IMPLIED WARRANTIES OF MERCHANTABILITY AND FITNESS FOR A PARTICULAR PURPOSE, AND THOSE ARISING FROM COURSE OFDEALING, USAGE OR TRADE PRACTICE. IN THE EVENT THAT ANY APPLICABLE LAWS IMPOSE WARRANTIES, CONDITIONS OR OBLIGATIONS THAT CANNOT BE EXCLUDED ORMODIFIED, THIS PARAGRAPH SHALL APPLY TO THE GREATEST EXTENT ALLOWED BY SUCH LAWS.This Warranty is made solely for the benefit of the original purchaser of the Product from NOCO or from a NOCO approved reseller or distributor and is not assignable ortransferable. To assert a warranty claim, the purchaser must: (1) request and obtain a return merchandise authorization (“RMA”) number and return location information (the“Return Location”) from NOCO Support by emailing support@no.co or by calling 1.800.456.6626; and (2) send the Product, including RMA number, and receipt to the ReturnLocation. DO NOT SEND IN PRODUCT WITHOUT FIRST OBTAINING AN RMA FROM NOCO SUPPORT.The original purchaser is responsible (and must prepay) all packaging and transportation costs to ship products for warranty service.NOTWITHSTANDING THE ABOVE, THIS HASSLE-FREE WARRANTY IS VOID AND DOES NOT APPLY TO PRODUCTS THAT: (a) are misused, mishandled, subjected to abuse orcareless handling, accident, improperly stored, or operated under conditions of extreme voltage, temperature, shock, or vibration beyond NOCO’s recommendations for safeand effective use; (b) improperly installed, operated or maintained; (c) are/were modified without the express written consent of NOCO; (d) have been disassembled, altered orrepaired by anyone other than NOCO; (e) the defects of which were reported after the Warranty Period.THIS HASSLE-FREE WARRANTY DOES NOT COVER: (1) normal wear and tear; (2) cosmetic damage that does not affect functionality; or (3) Products where the NOCO serialnumber is missing, altered, or defaced.HASSLE-FREE WARRANTY CONDITIONSThese conditions apply only to Product during the Warranty Period. The Hassle-Free Warranty is void either by elapsed time from date of purchase (elapsed time from serialnumber date, if no proof of purchase) or from the conditions listed earlier in this document. Return Product with the appropriate documentation.With Receipt:0-3 Years: NO Charge. With proof of purchase, The warranty period begins on date of purchase.With NO Receipt:0-3 Years: NO Charge. With NO proof of purchase, The warranty period begins on the serial number date.We recommend registering your NOCO product in order to upload proof of purchase and extend your effective warranty dates. You may register your NOCO product onlineat: no.co/register. If you have any questions regarding your warranty or product, contact NOCO Support (email and phone number above) or write to: The NOCO Company, at30339 Diamond Parkway, #102, Glenwillow, OH 44139 USA.
GENIUS1DANGERGuide d’utilisation et garantieLISEZ ATTENTIVEMENT TOUTES LES CONSIGNES DE SÉCURITÉ AVANT D’UTILISER CE PRODUIT. La nonapplication des consignes de sécurité peut résulter en UN CHOC ÉLECTRIQUE, UNE EXPLOSION, DU FEU, ce quipeut conduire à de GRAVES BLESSURES, LA MORT ou des DÉGÂTS MATÉRIELS.Choc électrique. Le produit est un appareil électrique qui peut causer des chocs et des blessures graves. Necoupez pas les cordons d’alimentation. Ne pas immerger ni mouiller.FrançaisExplosion. Des batteries non-surveillées, incompatibles ou endommagées peuvent exploser si elles sontutilisées avec ce produit. N’utilisez pas ce produit sans le surveiller. Ne tentez pas de démarrer une batterieendommagée ou gelée. N’utilisez ce produit qu’avec les batteries recommandées. Utilisez ce produit dansdes lieux bien aérés.Feu. Le produit est un appareil électrique émettant de la chaleur et capable de causer des brûlures. Necouvrez pas le produit. Ne fumez pas et n’utilisez aucune source d’étincelles ou de feu quand vous utilisez ceproduit. Tenez le produit à l’écart de matériaux combustibles.Blessures aux yeux. Utilisez des lunettes de protection lors de l’utilisation du produit. Les batteries peuventexploser et projeter des débris. L’acide des batteries peut causer des irritations de la peau et des yeux. Dansla cas de contact avec les yeux ou la peau, rincez abondamment le point de contact avec de l’eau courantepropre et contactez immédiatement le centre anti-poison.Gaz explosifs.Travailler à proximité de l’acide de plomb est dangereux. Les batteries produisent un gazexplosif durant leur utilisation normale. Pour réduire le risque d’explosion de batteries, conformez-vous àtoutes les consignes de sécurité indiquées ici et celles indiquées par le fabricant de la batterie, ainsi que decelles de tout équipement utilisé dans les environs de la batterie. Prenez connaissance des indications desécurité sur ces produits et sur le moteur.Pour plus d’informations,rendez-vous sur le site:
Indications de sécurité importantesÀ propos de GENIUS1. Le NOCO GENIUS1 représente l’une des technologies les plus innovatrices et avancées sur le marché, rendant chaque recharge simple et facile.Il s’agit peut-être du chargeur le plus sécuritaire et efficace que vous utiliserez jamais. Le GENIUS1 est conçu pour recharger tous les types de piles 6 V et 12 V plombacide, incluant celles au lithium (LiFePO4), les piles liquides (innondées), au gel, MF (sans entretien), CA (calcium), EFB (pile innondées améliorées) et AGM (fondabsorbant en verre). Il convient pour recharger des piles à une capacité allant jusqu’à 30 A-heure et peut contenir des piles de toutes tailles. Premiers pas. Avantd’utiliser le chargeur, veuillez lire attentivement les indications du fabricant et les taux de chargement recommandés pour la batterie. Soyez certains de déterminez levoltage et la composition chimique de la batterie en consultant le guide d’utilisation avant tout chargement. Installation. GENIUS1 est un chargeur qui s’installedirectement au mur et il est important de respecter une distance avec la batterie. La longueur du câble CC à partir du chargeur, à la pince de la batterie ou à l’œillet dela borne est d’environ 107.2 po (2722,9 mm). Laissez un jeu de 12 po (304 mm) entre les connexions. Proposition 65. Les batteries, les terminaux et les accessoirescorrespondants contiennent des produits chimiques, y compris du plomb. Ces matériaux sont déclarés cancérigènes et causant des défauts de naissance et d’autrecomplications par l’État de Californie. Précaution personnelle. N’utilisez le produit que pour les applications recommandées. Veillez à ce qu’il y ait toujours unepersonne à portée de voix pour pouvant vous venir en aide en cas d’urgence. Gardez suffisamment d’eau propre avec du savon près de vous en cas de contact avecl’acide de la batterie. Portez une protection des yeux et des vêtements de protection quand vous travaillez près d’une batterie. Lavez-vous toujours les mains après avoirmanipulé des batteries et des matériaux correspondants. Ne manipulez pas ou ne portez pas d’objets en métal quand vous utilisez des batteries y compris des outils,des montres ou de bijoux. Si du métal tombe sur une batterie, cela peut causer une étincelle ou un court circuit résultant en un choc électrique, du feu, une explosionpouvant résulter en des blessures, la mort ou des dommages matériels. Mineurs. Si le produit doit être utilisé par un mineur, l’adulte achetant le produit s’engage àexpliquer au mineur les instructions de sécurité détaillées et toutes les mises en garde nécessaires avant la première utilisation. Ne pas suivre cette recommandationrelève entièrement de la responsabilité de l’acheteur qui accepte d’indemniser NOCO pour toute utilisation non-intentionnelle, bonne ou mauvaise, par un mineur.Risque d’étouffement. Les produits risquent d’étouffer les enfants si ils sont avalés ou mis dans leur bouche. Ne laissez pas des enfants avec le produit sanssurveillance. Le produit n’est pas un jouet. Manipulation. Manipulez le produit avec soin. Le produit peut être endommagé s’il subit un choc. N’utilisez pas un produitendommagé, même s’il ne présente que des traces de dommages que vous jugez minimes, comme des fêlures sur le boîtier ou des câbles endommagés, ou d’autressignes. N’utilisez pas le produit avec un cordon d’alimentation abîmé. L’humidité et les liquides peuvent endommager le produit. Ne manipulez pas le produit oun’importe quel composant électrique près d’une source eau. Entreposez et utilisez le produit dans des endroits secs. N’utilisez pas le produit s’il est mouillé. Si le produitest en fonctionnement et est mouillé, déconnectez-le de la batterie et cessez l’utilisation immédiatement. Ne déconnectez pas le produit en tirant sur les cordonsd’alimentation. Modifications. Ne tentez pas de modifier, de changer ou de réparer le produit. Démonter le produit peut causer des blessures, la mort ou desdommages matériels. Si le produit est endommagé, fonctionne mal ou entre en contact avec du liquide, cessez son utilisation et contactez NOCO. Toute modification auproduit annule votre garantie. Accessoires. Ce produit est utilisable avec accessoires NOCO seulement. NOCO n’est pas responsable pour tout dommage ou incidenten cas d’utilisation avec des accessoires qui ne sont pas recommandés par NOCO. Lieu d’utilisation. Empêchez l’acide de la batterie d’entrer en contact avec leproduit. N’utilisez pas le produit dans un lieu fermé ou mal ventilé. Ne placez pas de batteries sur le produit. Placez les câbles pour éviter des dommages accidentelsprovoqués par des parties mobiles d’un véhicule (y compris les portières et les capots), des parties mobiles du moteur (y compris des lames de ventilateur, des courroies
FRet des arbres de transmission). Tout risque non pris en compte peut causer des blessures ou la mort. Température de fonctionnement. Ce produit est conçu pourfonctionner à des températures ambiantes entre -4 F et 104 F (-20 C et 40 C). Ne faites pas fonctionner hors de cette plage de température. Cessez immédiatementl’utilisation du produit si la batterie devient excessivement chaude. Entreposage. N’utilisez ni ne rangez le produit dans des endroits où il y a de grandes concentrationsde poussières ou de matériaux dans l’air. Rangez votre produit sur une surface plane et solide pour qu’elle ne soit pas sujette à tomber. Rangez votre produit dans unendroit sec. La température de rangement est de -20 à 25 C (température moyenne sous le capot). Ne jamais dépasser 80ºC dans toutes les
Charging Modes. The GENIUS1 has six (6) modes: Standby, 12V, 12V AGM, 12V LITHIUM, 6V and Force. Some charge modes m