Transcription
Raspberry Pi Compute Module 4Colophon 2021 Raspberry Pi (Trading) Ltd.The documentation around the Raspberry Pi Compute Module 4 is licensed under a Creative Commons AttributionNoDerivatives 4.0 International (CC BY-ND).build-date: 2021-10-12build-version: githash: 44673b6-cleanLegal Disclaimer NoticeTECHNICAL AND RELIABILITY DATA FOR RASPBERRY PI PRODUCTS (INCLUDING DATASHEETS) AS MODIFIED FROMTIME TO TIME (“RESOURCES”) ARE PROVIDED BY RASPBERRY PI (TRADING) LTD (“RPTL) "AS IS" AND ANY EXPRESS ORIMPLIED WARRANTIES, INCLUDING, BUT NOT LIMITED TO, THE IMPLIED WARRANTIES OF MERCHANTABILITY ANDFITNESS FOR A PARTICULAR PURPOSE ARE DISCLAIMED. TO THE MAXIMUM EXTENT PERMITTED BY APPLICABLELAW IN NO EVENT SHALL RPTL BE LIABLE FOR ANY DIRECT, INDIRECT, INCIDENTAL, SPECIAL, EXEMPLARY, ORCONSEQUENTIAL DAMAGES (INCLUDING, BUT NOT LIMITED TO, PROCUREMENT OF SUBSTITUTE GOODS ORSERVICES; LOSS OF USE, DATA, OR PROFITS; OR BUSINESS INTERRUPTION) HOWEVER CAUSED AND ON ANY THEORYOF LIABILITY, WHETHER IN CONTRACT, STRICT LIABILITY, OR TORT (INCLUDING NEGLIGENCE OR OTHERWISE)ARISING IN ANY WAY OUT OF THE USE OF THE RESOURCES, EVEN IF ADVISED OF THE POSSIBILITY OF SUCHDAMAGE.RPTL reserves the right to make any enhancements, improvements, corrections or any other modifications to theRESOURCES or any products described in them at any time and without further notice.The RESOURCES are intended for skilled users with suitable levels of design knowledge. Users are solely responsible fortheir selection and use of the RESOURCES and any application of the products described in them. User agrees toindemnify and hold RPTL harmless against all liabilities, costs, damages or other losses arising out of their use of theRESOURCES.RPTL grants users permission to use the RESOURCES solely in conjunction with the Raspberry Pi products. All other useof the RESOURCES is prohibited. No licence is granted to any other RPTL or other third party intellectual property right.HIGH RISK ACTIVITIES. Raspberry Pi products are not designed, manufactured or intended for use in hazardousenvironments requiring fail safe performance, such as in the operation of nuclear facilities, aircraft navigation orcommunication systems, air traffic control, weapons systems or safety-critical applications (including life supportsystems and other medical devices), in which the failure of the products could lead directly to death, personal injury orsevere physical or environmental damage (“High Risk Activities”). RPTL specifically disclaims any express or impliedwarranty of fitness for High Risk Activities and accepts no liability for use or inclusions of Raspberry Pi products in HighRisk Activities.Raspberry Pi products are provided subject to RPTL’s Standard Terms. RPTL’s provision of the RESOURCES does notexpand or otherwise modify RPTL’s Standard Terms including but not limited to the disclaimers and warranties expressedin them.Legal Disclaimer Notice1
Raspberry Pi Compute Module 4Table of ContentsColophon . . . . . . . . . . . . . . . . . . . . . . . . . . . . . . . . . . . . . . . . . . . . . . . . . . . . . . . . . . . . . . . . . . . . . . . . . . . . . . . . . . . . . . . . . . . . . . . . . . . .Legal Disclaimer Notice . . . . . . . . . . . . . . . . . . . . . . . . . . . . . . . . . . . . . . . . . . . . . . . . . . . . . . . . . . . . . . . . . . . . . . . . . . . . . . . . . . . .1. Introduction . . . . . . . . . . . . . . . . . . . . . . . . . . . . . . . . . . . . . . . . . . . . . . . . . . . . . . . . . . . . . . . . . . . . . . . . . . . . . . . . . . . . . . . . . . . . . . .1.1. Introduction. . . . . . . . . . . . . . . . . . . . . . . . . . . . . . . . . . . . . . . . . . . . . . . . . . . . . . . . . . . . . . . . . . . . . . . . . . . . . . . . . . . . . . . . . . .1.2. Features. . . . . . . . . . . . . . . . . . . . . . . . . . . . . . . . . . . . . . . . . . . . . . . . . . . . . . . . . . . . . . . . . . . . . . . . . . . . . . . . . . . . . . . . . . . . . .2. Interfaces . . . . . . . . . . . . . . . . . . . . . . . . . . . . . . . . . . . . . . . . . . . . . . . . . . . . . . . . . . . . . . . . . . . . . . . . . . . . . . . . . . . . . . . . . . . . . . . . .2.1. Wireless . . . . . . . . . . . . . . . . . . . . . . . . . . . . . . . . . . . . . . . . . . . . . . . . . . . . . . . . . . . . . . . . . . . . . . . . . . . . . . . . . . . . . . . . . . . . . .2.1.1. WL nDisable . . . . . . . . . . . . . . . . . . . . . . . . . . . . . . . . . . . . . . . . . . . . . . . . . . . . . . . . . . . . . . . . . . . . . . . . . . . . . . . . . . . . .113335552.1.2. BT nDisable . . . . . . . . . . . . . . . . . . . . . . . . . . . . . . . . . . . . . . . . . . . . . . . . . . . . . . . . . . . . . . . . . . . . . . . . . . . . . . . . . . . . . 52.2. Ethernet . . . . . . . . . . . . . . . . . . . . . . . . . . . . . . . . . . . . . . . . . . . . . . . . . . . . . . . . . . . . . . . . . . . . . . . . . . . . . . . . . . . . . . . . . . . . . . 62.3. PCIe (Gen2 x1) . . . . . . . . . . . . . . . . . . . . . . . . . . . . . . . . . . . . . . . . . . . . . . . . . . . . . . . . . . . . . . . . . . . . . . . . . . . . . . . . . . . . . . . . 62.4. USB 2.0 (Highspeed) . . . . . . . . . . . . . . . . . . . . . . . . . . . . . . . . . . . . . . . . . . . . . . . . . . . . . . . . . . . . . . . . . . . . . . . . . . . . . . . . . . . 72.5. GPIO . . . . . . . . . . . . . . . . . . . . . . . . . . . . . . . . . . . . . . . . . . . . . . . . . . . . . . . . . . . . . . . . . . . . . . . . . . . . . . . . . . . . . . . . . . . . . . . . . 72.5.1. Alternative Function Assignments . . . . . . . . . . . . . . . . . . . . . . . . . . . . . . . . . . . . . . . . . . . . . . . . . . . . . . . . . . . . . . . . . . 82.6. Dual HDMI 2.0 . . . . . . . . . . . . . . . . . . . . . . . . . . . . . . . . . . . . . . . . . . . . . . . . . . . . . . . . . . . . . . . . . . . . . . . . . . . . . . . . . . . . . . . 102.7. CSI-2 (MIPI Serial Camera) . . . . . . . . . . . . . . . . . . . . . . . . . . . . . . . . . . . . . . . . . . . . . . . . . . . . . . . . . . . . . . . . . . . . . . . . . . . . 102.8. DSI (MIPI Serial Display). . . . . . . . . . . . . . . . . . . . . . . . . . . . . . . . . . . . . . . . . . . . . . . . . . . . . . . . . . . . . . . . . . . . . . . . . . . . . . . 112.9. I2C (SDA0 SCL0) . . . . . . . . . . . . . . . . . . . . . . . . . . . . . . . . . . . . . . . . . . . . . . . . . . . . . . . . . . . . . . . . . . . . . . . . . . . . . . . . . . . . . 112.10. I2C (ID SD ID SC) . . . . . . . . . . . . . . . . . . . . . . . . . . . . . . . . . . . . . . . . . . . . . . . . . . . . . . . . . . . . . . . . . . . . . . . . . . . . . . . . . . . 112.11. SDIO/eMMC (CM4Lite only) . . . . . . . . . . . . . . . . . . . . . . . . . . . . . . . . . . . . . . . . . . . . . . . . . . . . . . . . . . . . . . . . . . . . . . . . . . 112.12. Analog IP0/IP1. . . . . . . . . . . . . . . . . . . . . . . . . . . . . . . . . . . . . . . . . . . . . . . . . . . . . . . . . . . . . . . . . . . . . . . . . . . . . . . . . . . . . . 122.13. Global EN . . . . . . . . . . . . . . . . . . . . . . . . . . . . . . . . . . . . . . . . . . . . . . . . . . . . . . . . . . . . . . . . . . . . . . . . . . . . . . . . . . . . . . . . . . 122.14. RUN PG . . . . . . . . . . . . . . . . . . . . . . . . . . . . . . . . . . . . . . . . . . . . . . . . . . . . . . . . . . . . . . . . . . . . . . . . . . . . . . . . . . . . . . . . . . . . . 122.15. nRPI BOOT . . . . . . . . . . . . . . . . . . . . . . . . . . . . . . . . . . . . . . . . . . . . . . . . . . . . . . . . . . . . . . . . . . . . . . . . . . . . . . . . . . . . . . . . . . 122.16. LED nACT . . . . . . . . . . . . . . . . . . . . . . . . . . . . . . . . . . . . . . . . . . . . . . . . . . . . . . . . . . . . . . . . . . . . . . . . . . . . . . . . . . . . . . . . . . . 122.17. LED nPWR . . . . . . . . . . . . . . . . . . . . . . . . . . . . . . . . . . . . . . . . . . . . . . . . . . . . . . . . . . . . . . . . . . . . . . . . . . . . . . . . . . . . . . . . . . . 132.18. EEPROM nWP . . . . . . . . . . . . . . . . . . . . . . . . . . . . . . . . . . . . . . . . . . . . . . . . . . . . . . . . . . . . . . . . . . . . . . . . . . . . . . . . . . . . . . . . .3. Electrical and Mechanical . . . . . . . . . . . . . . . . . . . . . . . . . . . . . . . . . . . . . . . . . . . . . . . . . . . . . . . . . . . . . . . . . . . . . . . . . . . . . . . . . .3.1. Mechanical . . . . . . . . . . . . . . . . . . . . . . . . . . . . . . . . . . . . . . . . . . . . . . . . . . . . . . . . . . . . . . . . . . . . . . . . . . . . . . . . . . . . . . . . . .3.2. Thermal . . . . . . . . . . . . . . . . . . . . . . . . . . . . . . . . . . . . . . . . . . . . . . . . . . . . . . . . . . . . . . . . . . . . . . . . . . . . . . . . . . . . . . . . . . . . .3.3. Electrical Specification . . . . . . . . . . . . . . . . . . . . . . . . . . . . . . . . . . . . . . . . . . . . . . . . . . . . . . . . . . . . . . . . . . . . . . . . . . . . . . . .4. Pin Out. . . . . . . . . . . . . . . . . . . . . . . . . . . . . . . . . . . . . . . . . . . . . . . . . . . . . . . . . . . . . . . . . . . . . . . . . . . . . . . . . . . . . . . . . . . . . . . . . . .4.1. Differential Pairs . . . . . . . . . . . . . . . . . . . . . . . . . . . . . . . . . . . . . . . . . . . . . . . . . . . . . . . . . . . . . . . . . . . . . . . . . . . . . . . . . . . . .4.1.1. 100Ω Differential pairs signal lengths . . . . . . . . . . . . . . . . . . . . . . . . . . . . . . . . . . . . . . . . . . . . . . . . . . . . . . . . . . . . . .4.1.2. 90Ω Differential pair signal lengths. . . . . . . . . . . . . . . . . . . . . . . . . . . . . . . . . . . . . . . . . . . . . . . . . . . . . . . . . . . . . . . . .5. Power . . . . . . . . . . . . . . . . . . . . . . . . . . . . . . . . . . . . . . . . . . . . . . . . . . . . . . . . . . . . . . . . . . . . . . . . . . . . . . . . . . . . . . . . . . . . . . . . . . .5.1. Power up sequencing . . . . . . . . . . . . . . . . . . . . . . . . . . . . . . . . . . . . . . . . . . . . . . . . . . . . . . . . . . . . . . . . . . . . . . . . . . . . . . . . .5.2. Power down sequencing . . . . . . . . . . . . . . . . . . . . . . . . . . . . . . . . . . . . . . . . . . . . . . . . . . . . . . . . . . . . . . . . . . . . . . . . . . . . . .5.3. Power Consumption . . . . . . . . . . . . . . . . . . . . . . . . . . . . . . . . . . . . . . . . . . . . . . . . . . . . . . . . . . . . . . . . . . . . . . . . . . . . . . . . . .5.4. Regulator Outputs . . . . . . . . . . . . . . . . . . . . . . . . . . . . . . . . . . . . . . . . . . . . . . . . . . . . . . . . . . . . . . . . . . . . . . . . . . . . . . . . . . . .Appendix A: Troubleshooting . . . . . . . . . . . . . . . . . . . . . . . . . . . . . . . . . . . . . . . . . . . . . . . . . . . . . . . . . . . . . . . . . . . . . . . . . . . . . . . . .Hardware Checklist. . . . . . . . . . . . . . . . . . . . . . . . . . . . . . . . . . . . . . . . . . . . . . . . . . . . . . . . . . . . . . . . . . . . . . . . . . . . . . . . . . . . . . .Bootloader . . . . . . . . . . . . . . . . . . . . . . . . . . . . . . . . . . . . . . . . . . . . . . . . . . . . . . . . . . . . . . . . . . . . . . . . . . . . . . . . . . . . . . . . . . . . . .rpi-eeprom-update . . . . . . . . . . . . . . . . . . . . . . . . . . . . . . . . . . . . . . . . . . . . . . . . . . . . . . . . . . . . . . . . . . . . . . . . . . . . . . . . . . . . . . .EEPROM Write protect . . . . . . . . . . . . . . . . . . . . . . . . . . . . . . . . . . . . . . . . . . . . . . . . . . . . . . . . . . . . . . . . . . . . . . . . . . . . . . . . . . . .Firmware. . . . . . . . . . . . . . . . . . . . . . . . . . . . . . . . . . . . . . . . . . . . . . . . . . . . . . . . . . . . . . . . . . . . . . . . . . . . . . . . . . . . . . . . . . . . . . . .Kernel . . . . . . . . . . . . . . . . . . . . . . . . . . . . . . . . . . . . . . . . . . . . . . . . . . . . . . . . . . . . . . . . . . . . . . . . . . . . . . . . . . . . . . . . . . . . . . . . . .Appendix B: Availability. . . . . . . . . . . . . . . . . . . . . . . . . . . . . . . . . . . . . . . . . . . . . . . . . . . . . . . . . . . . . . . . . . . . . . . . . . . . . . . . . . . . . . .Support . . . . . . . . . . . . . . . . . . . . . . . . . . . . . . . . . . . . . . . . . . . . . . . . . . . . . . . . . . . . . . . . . . . . . . . . . . . . . . . . . . . . . . . . . . . . . . . . .Ordering codes . . . . . . . . . . . . . . . . . . . . . . . . . . . . . . . . . . . . . . . . . . . . . . . . . . . . . . . . . . . . . . . . . . . . . . . . . . . . . . . . . . . . . . . . . .Packaging . . . . . . . . . . . . . . . . . . . . . . . . . . . . . . . . . . . . . . . . . . . . . . . . . . . . . . . . . . . . . . . . . . . . . . . . . . . . . . . . . . . . . . . . . . . . . . .Table of 303030312
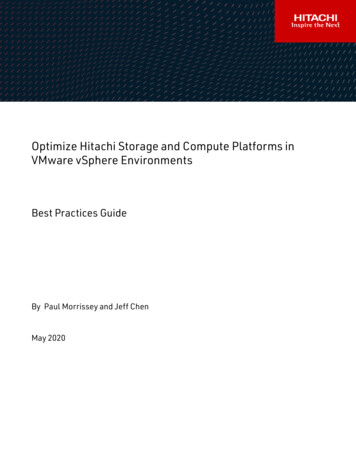
Raspberry Pi Compute Module 4Chapter 1. Introduction1.1. IntroductionFigure 1. TheRaspberry Pi ComputeModule 4 (CM4).The Raspberry Pi Compute Module 4 (CM4) is a System on Module (SoM) containing processor, memory, eMMC Flashand supporting power circuitry. These modules allow a designer to leverage the Raspberry Pi hardware and softwarestack in their own custom systems and form factors. In addition these modules have extra IO interfaces over and abovewhat is available on the Raspberry Pi boards, opening up more options for the designer.The design of the CM4 is loosely based on the Raspberry Pi 4, Model B, and for cost sensitive applications it can besupplied without the eMMC fitted; this version is called the Raspberry Pi Compute Module 4 Lite (CM4Lite).While previous generations of the Compute Module have all shared the same DDR2-SODIMM-mechanically-compatibleform factor, the new CM4 and CM4Lite are different. The electrical interface of the CM4 is via two 100-pin high densityconnectors, and the new physical form factor has a smaller footprint overall when the connectors are taken into account.This change is due to the addition of new interfaces; an additional second HDMI, PCIe, and Ethernet. The addition of thesenew interfaces, especially PCIe, would not have been possible while preserving the previous form factor. NOTEUnless otherwise stated, for this document CM4 also refers to CM4Lite.1.2. FeaturesKey features of the CM4 are as follows: Broadcom BCM2711, Quad core Cortex-A72 (ARM v8) 64-bit SoC @ 1.5GHz Small Footprint 55mm 40mm 4.7mm module 4 M2.5 mounting holes H.265 (HEVC) (upto 4Kp60 decode), H.264 (upto 1080p60 decode, 1080p30 encode)1.1. Introduction3
Raspberry Pi Compute Module 4 OpenGL ES 3.0 graphics Options for 1GB, 2GB, 4GB or 8GB LPDDR4-3200 SDRAM with ECC (see Appendix B) Options for 0GB (CM4Lite), 8GB, 16GB, or 32GB eMMC Flash memory (see Appendix B) Peak eMMC bandwidth 100MBytes/s (four times faster than previous Compute modules) Option (see Appendix B) for certified radio module with: 2.4 GHz, 5.0 GHz IEEE 802.11 b/g/n/ac wireless Bluetooth 5.0, BLE On board electronic switch to select between PCB trace or external antenna Gigabit Ethernet PHY supporting IEEE 1588 1 PCIe 1-lane Host, Gen 2 ( 5Gbps ) 1 USB 2.0 port ( highspeed ) 28 GPIO supporting either 1.8v or 3.3v signalling and peripheral options: Up to 5 UART Up to 5 I2C Up to 5 SPI 1 SDIO interface 1 DPI (Parallel RGB Display) 1 PCM Up to 2 PWM channels Up to 3 GPCLK outputs 2 HDMI 2.0 ports (up to 4Kp60 supported) MIPI DSI: 1 2-lane MIPI DSI display port 1 4-lane MIPI DSI display port MIPI CSI-2: 1 2-lane MIPI CSI camera port 1 4-lane MIPI CSI camera port 1 SDIO 2.0 (CM4Lite) Single 5v PSU input.1.2. Features4
Raspberry Pi Compute Module 4Chapter 2. Interfaces2.1. WirelessThe CM4 can be supplied with an onboard wireless module based on the Cypress CYW43455 supporting both, 2.4 GHz, 5.0 GHz IEEE 802.11 b/g/n/ac wireless Bluetooth 5.0, BLE.These wireless interfaces can be individually enabled or disabled as required. For instance, in the case of a kioskapplication, a service engineer could enable wireless operation and then disable it once finished.The CM4 has an onboard antenna. If used it should be positioned in the product such that it is not surrounded by metal,including any ground plane (see Chapter 3 for further details). Alternatively there is a standard U.FL connector on themodule, see Figure 1, so that an external antenna can be used.Raspberry Pi has an antenna kit which is certified to be used with the CM4. If a different antenna is used then separatecertification will be required. WARNINGRaspberry Pi Trading will not be able to assist with certification for third-party antennas.The selection of internal or external antenna is done at boot time using the config.txt file, and can not be changed duringoperation. The config.txt options are dtparam ant1 to select the internal antenna, or dtparam ant2 for the externalantenna.2.1.1. WL nDisableThis pin serves a number of functions;1. It can be used to monitor the enable/disable state of wireless networking. A logic high means the wirelessnetworking module is powered up.2. When driven or tied low it prevents the wireless network module from powering up. This is useful to reduce powerconsumption or in applications where it is required to physically ensure the wireless networking is disabled. If theinterface is enabled after being disabled, the wireless interface driver needs reinitialised. NOTEOn CM4 modules without wireless, this pin is reserved.2.1.2. BT nDisableThis pin serves a number of functions;1. It can be used to monitor the enable/disable state of Bluetooth. A logic high means the Bluetooth module is poweredup.2. When driven, or tied low, it prevents the Bluetooth module from powering up. This is useful to reduce powerconsumption, or in applications where it is required to physically ensure the Bluetooth is disabled. If the interface isenabled after being disabled, the Bluetooth interface driver needs reinitialised.2.1. Wireless5
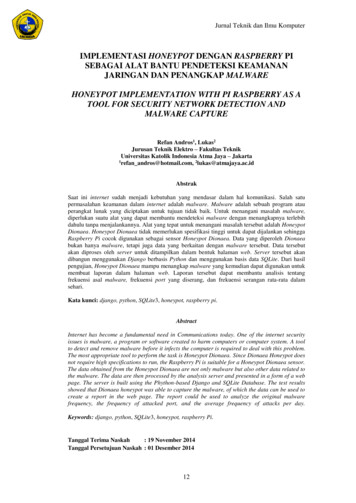
Raspberry Pi Compute Module 4 NOTEOn CM4 modules without wireless, this pin is reserved.2.2. EthernetThe CM4 has an onboard Gigabit Ethernet PHY — the Broadcom BCM54210PE — some of the major features of this PHYinclude; IEEE 1588-2008 compliant MDI crossover, pair skew and pair polarity correctionA standard 1:1 RJ45 MagJack is all that is necessary to provide an Ethernet connection to the CM4. Typical wiring of aMagJack supporting POE, and with added ESD protection, can be seen in Figure 2.Figure 2. Ethernetschematic interfacefor the Raspberry PiCompute Module 4supporting POE, andwith added ESDprotection.The differential Ethernet signals should be routed as 100Ω differential pairs, with suitable clearances. Length matchingbetween pairs should be better than 50mm, so in the typical case no length matching is required. However the signalswithin a pair need to be length matched, ideally to better than 0.15mm.The PHY also supports up to 3 LEDs to give user status feedback, these are low active. These LEDs can have a range offunctions, and you should consult your OS driver to see which functions are supported by your driver.The PHY also provides SYNC IN and SYNC OUT at 1.8v signalling to support IEEE 1588-2008.2.3. PCIe (Gen2 x1)The CM4 has an internal PCIe 2.0 x1 host controller. While on the Raspberry Pi 4, Model B this has been connected to aUSB 3 host controller (using the Via Labs VLI805), on the CM4 the product designer is free to choose how the interface isused.2.2. Ethernet6
Raspberry Pi Compute Module 4 WARNINGYou should ensure that there is a suitable OS driver for any host controller that is chosen before proceeding to aprototype. NOTEThe onboard PCIe Host controller doesn’t support 64bit accesses from the ARM, they must be split up into two 32 bitaccesses.Connecting a PCIe device follows the standard PCIe convention. The CM4 has onboard AC coupling capacitors for CLKand PCIe TX signals. However the PCIe RX signals need external coupling capacitors close to the driving source (thedevice TX), if you are using an external PCIe/NVMe cards these capacitors will be onboard. The PCIe conversion is that ifyou are wiring directly to an IC then the TX and RX pairs need to be swapped ( ie. TX- RX , RX- TX ). If you are wiring to aconnector then this is typically labelled from the host post of view and so TX RX swaps aren’t required. Additionally thePCIe CLK nREQ must be connected to ensure the CM4 produces a clock signal, and the PCIe nRST should also beconnected to ensure the device is correctly reset when required.The differential PCIe signals should be routed as 90Ω differential pairs, with suitable clearances. There is no need tomatch the lengths between pairs, only the signals within a Pair need to be length matched ideally to better than 0.1mm. TIP5.10 kernels and newer have had support for MSI-X added. There is a limit of upto 32 IRQs available. If the device hasproblems with interrupts then adding pci nomsi to cmdline.txt (and rebooting) often fixes the issue.2.4. USB 2.0 (Highspeed)The USB 2.0 interface supports up to 480MBps signalling. The differential pair should be routed as a 90Ω differential pair.The P N signals should ideally be matched to 0.15mm TIPThe USB interface is disabled to save power by default on the CM4 . To enable it you need to adddtoverlay dwc2,dr mode host to the config.txt file NOTEThe port is capable of being used as a true USB On-The-Go (OTG) port. While there is no official documentation, someusers have had success making this work. The USB OTG pin is used to select between USB host and device that istypically wired to the ID pin of a Micro usb connector. To use this functionality it must be enabled in the OS that isused. If using either as a fixed slave or fixed master, please tie the USB OTGID pin to ground2.5. GPIOThere are 28 pins available for general purpose I/O (GPIO), which correspond to the GPIO pins on the Raspberry Pi 4,Model B 40-pin header. These pins have access to internal peripherals; I2C, PWM, SPI, and UART. The BCM2711 ARMPeripherals book describes these features in detail, and the multiplexing options available. The drive strength and slewrate should ideally be set as low as possible to reduce any EMC issues. GPIO2 and GPIO3 have 1.8K pull up resistors.The BCM2711 GPIO bank is powered by GPIO VREF, this can either be connected to the 1.8v from the CM4 for 1.8vsignalling GPIO, or 3.3v from the CM4 for 3.3v signalling. You should keep the load on the 28 GPIO pins to below 50mA2.4. USB 2.0 (Highspeed)7
Raspberry Pi Compute Module 4in total. GPIO VREF must be powered for the CM4 to startup correctly2.5.1. Alternative Function AssignmentsUp to 6 alternate functions are available. The BCM2711 ARM Peripherals book describes these features in detail. Thetable below gives a quick overview.Table 1. GPIO PinsAlternative GPIO0HighSDA0SA5PCLKSPI3 CE0 NTXD2SDA6GPIO1HighSCL0SA4DESPI3 MISORXD2SCL6GPIO2HighSDA1SA3LCD VSYNCSPI3 MOSICTS2SDA3GPIO3HighSCL1SA2LCD HSYNCSPI3 SCLKRTS2SCL3GPIO4HighGPCLK0SA1DPI D0SPI4 CE0 NTXD3SDA3GPIO5HighGPCLK1SA0DPI D1SPI4 MISORXD3SCL3GPIO6HighGPCLK2SOE N / SEDPI D2SPI4 MOSICTS3SDA4GPIO7HighSPI0 CE1 NSWE N /DPI D3SPI4 SCLKRTS3SCL4SRW NGPIO8HighSPI0 CE0 NSD0DPI D4BSCSL / CE NTXD4SDA4GPIO9LowSPI0 MISOSD1DPI D5BSCSL / MISORXD4SCL4GPIO10LowSPI0 MOSISD2DPI D6BSCSL SDA /CTS4SDA5RTS4SCL5MOSIGPIO11LowSPI0 SCLKSD3DPI D7BSCSL SCL /SCLKGPIO12LowPWM0 0SD4DPI D8SPI5 CE0 NTXD5SDA5GPIO13LowPWM0 1SD5DPI D9SPI5 MISORXD5SCL5GPIO14LowTXD0SD6DPI D10SPI5 MOSICTS5TXD1GPIO15LowRXD0SD7DPI D11SPI5 SCLKRTS5RXD1GPIO16Low reserved SD8DPI D12CTS0SPI1 CE2 NCTS1GPIO17Low reserved SD9DPI D13RTS0SPI1 CE1 NRTS1GPIO18LowPCM CLKSD10DPI D14SPI6 CE0 NSPI1 CE0 NPWM0 0GPIO19LowPCM FSSD11DPI D15SPI6 MISOSPI1 MISOPWM0 1GPIO20LowPCM DINSD12DPI D16SPI6 MOSISPI1 MOSIGPCLK0GPIO21LowPCM DOUTSD13DPI D17SPI6 SCLKSPI1 SCLKGPCLK1GPIO22LowSD0 CLKSD14DPI D18SD1 CLKARM TRSTSDA6GPIO23LowSD0 CMDSD15DPI D19SD1 CMDARM RTCKSCL6GPIO24LowSD0 DAT0SD16DPI D20SD1 DAT0ARM TDOSPI3 CE1 NGPIO25LowSD0 DAT1SD17DPI D21SD1 DAT1ARM TCKSPI4 CE1 NGPIO26LowSD0 DAT2 reserved DPI D22SD1 DAT2ARM TDISPI5 CE1 NGPIO27LowSD0 DAT3 reserved DPI D23SD1 DAT3ARM TMSSPI6 CE1 NGPIO44-GPCLK1SDA0SDA1 reserved SPI0 CE1 NSD CARD VOLT2.5. GPIO8
Raspberry Pi Compute Module 4GPIOPullALT0ALT1ALT2ALT3ALT4ALT5GPIO45-PWM0 1SCL0SCL1 reserved SPI0 CE2 NSD CARD PWR0Special function legend:Table 2. GPIO PinsAlternative FunctionLegend2.5. GPIONameFunctionSDA0BSC master 0 data lineaSCL0BSC master 0 clock lineSDAxBSC master 1,3,4,5,6 data linebSCLxBSC master 1,3,4,5,6 clock lineGPCLKxGeneral purpose Clock 0,1,2SPIx CE2 NSPI 0,3,4,5,6 Chip select 2SPIx CE1 NSPI 0,3,4,5,6 Chip select 1SPIx CE0 NSPI 0,3,4,5,6 Chip select 0SPIx MISOSPI 0,3,4,5,6 MISOSPIx MOSISPI 0,3,4,5,6 MOSISPIx SCLKSPI 0,3,4,5,6 Serial clockPWMx 0PWM 0,1 channel 0PWMx 1PWM 0,1 channel 1TXDxUART 0,2,3,4,5 Transmit DataRXDxUART 0,2,3,4,5 Receive DataCTSxUART 0,2,3,4,5 Clear To SendRTSxUART 0,2,3,4,5 Request To SendPCM CLKPCM clockPCM FSPCM Frame SyncPCM DINPCM Data inPCM DOUTPCM data outSAxSecondary mem Address busSOE N / SESecondary mem. ControlsSWE N / SRW NSecondary mem. ControlsSDxSecondary mem. data busBSCSL SDA / MOSIBSC slave Data, SPI slave MOSIBSCSL SCL / SCLKBSC slave Clock, SPI slave clockBSCSL - / MISOBSC not used , SPI MISOBSCSL - / CE NBSC not used , SPI CSnSPI1 CE2 NSPI 1 Chip select 2 cSPI1 CE1 NSPI 1 Chip select 1SPI1 CE0 NSPI 1 Chip select 09
Raspberry Pi Compute Module 4aNameFunctionSPI1 MISOSPI 1 MISOSPI1 MOSISPI 1 MOSISPI1 SCLKSPI 1 Serial clockTXD1UART 1 Transmit DataRXD1UART 1 Receive DataCTS1UART 1 Clear To SendRTS1UART 1 Request To SendARM TRSTARM JTAG resetARM RTCKARM JTAG return clockARM TDOARM JTAG Data outARM TCKARM JTAG ClockARM TDIARM JTAG Data inARM TMSARM JTAG Mode selectPCLKDisplay Parallel InterfaceDEDisplay Parallel InterfaceLCD VSYNCDisplay Parallel InterfaceLCD HSYNCDisplay Parallel InterfaceDPI DxDisplay Parallel InterfaceThe Broadcom Serial Control bus is a proprietary bus compliant with the Philips I2C bus/interface.bBSC master 2 & 7 are not user-accessible.cSPI 2 is not user-accessible.2.6. Dual HDMI 2.0The CM4 supports two HDMI 2.0 interfaces each one capable of driving 4K images. If both HDMI outputs are used theneach can be driven upto 4Kp30, however if only HDMI0 interface is being used then images up to 4Kp60 are possible.HDMI signals should be routed as 100Ω differential pairs, each signal within a pair should ideally be matched to betterthan 0.15mm. Pairs don’t typically need any extra matching as they only have to be matched to 25mm.CEC is also supported, an internal 27K pullup resistor is included in the CM4.Basic onboard ESD protection is provided for the I2C EDID signals and the CEC signals, internal pullup and down resistorsare also provided. On the {rpi4} the HDMI signals don’t have any extra ESD protection , depending on the application extraESD protection maybe required.2.7. CSI-2 (MIPI Serial Camera)The CM4 supports two camera ports; CAM0 (2 lanes) and CAM1 (4 lanes). CSI signals should be routed as 100Ω differentialpairs, each signal within a pair should ideally be matched to better than 0.15mm.The documentation around the CSI interface can be found on the Raspberry Pi website while Linux kernel drivers can befound on Github.2.6. Dual HDMI 2.010
Raspberry Pi Compute Module 4 NOTECamera sensors supported by the official Raspberry Pi firmware are; the OmniVision OV5647, Sony IMX219 and SonyIMX477, no security device is required on Compute Module devices to use these camera sensors.2.8. DSI (MIPI Serial Display)The CM4 supports two display ports; DISP0 (2 lanes) and DISP1 (4 lanes). Each lane supports a maximum of data rate perlane of 1Gbit/s.Although Linux kernel drivers are available, the DSI interface is not currently documented. Only DSI displays supported bythe official Raspberry Pi firmware are supported, DSI signals should be routed as 100Ω differential pairs, each signalwithin a pair should ideally be matched to better than 0.15mm. NOTEWhile only official DSI displays are supported, other displays can be added using the parallel DPI interface which isavailable as a GPIO alternate function. The CM4 supports up to 3 displays of any type (HDMI, DSI, DPI) at any one time.2.9. I2C (SDA0 SCL0)This internal I2C bus is normally allocated to the CSI1 and DSI1 as these devices are controlled by the firmware. It can beused as a general I2C bus if the CSI1 ad DSI1 interfaces aren’t being used or are being controlled by the firmware. Forexample libcamera runs on the ARM and doesn’t use the firmware so in this case you may use CSI1 and this I2C bus.SDA0 is connected to GPIO44 on the BCM2711 and SCL0 is connected to GPIO452.10. I2C (ID SD ID SC)This I2C bus is normally used for identifying HATs and controlling CSI0 and DSI0 devices. If the firmware isn’t using theI2C bus e.g. CSI0 and DSI0 aren’t being used then these pins may be used as GPIO 0 and GPIO 1 if required.Note: If these pins are used as GPIO pins then to prevent the firmware from checking to see if there is a HAT EEPROMavailable add force eeprom read 0 to the config.txt file.2.11. SDIO/eMMC (CM4Lite only)If the CM4Lite is used, which does not have on-board eMMC, then the eMMC signals are available on the connector sothat an external eMMC or SDCARD can be used.The SD PWR ON signal is used to enable an external power switch to turn on power to the SDCARD, for eMMC it typicallyisn’t used. If booting from SDCARD is required then a pullup resistor must also be fitted to default the power to be on.When SD VDD override is high, this signal is used to force 1.8v signalling on the SDIO interface. Typically this is used witheMMC memory.2.8. DSI (MIPI Serial Display)11
Raspberry Pi Compute Module 4Figure 3. CM4LiteSDCARD interface.2.12. A
FITNESS FOR A PARTICULAR PURPOSE ARE DISCLAIMED. TO THE MAXIMUM EXTENT PERMITTED BY APPLICABLE . When driven or tied low it prevents the wireless network module from powering up. This is useful to reduce power . USB 3 host controller (using the Via Labs VLI805), on the CM4 the product designer is